 |
VOOZH | about |
|
VOOZH | about |
Almost everything in Flutter is a widget, and when you compose widgets, you can build a layout. For example, you can add several widgets in a column widget to create a vertical layout. As you continue to add more widgets, the more complex your Flutter app layout will become.
👁 ImageIn this article, I’ll cover some best practices to implement when laying out your Flutter app.
The Replay is a weekly newsletter for dev and engineering leaders.
Delivered once a week, it's your curated guide to the most important conversations around frontend dev, emerging AI tools, and the state of modern software.
SizedBox instead of Container in FlutterThere are many use cases where you’ll need to use a placeholder. Let’s look at the example below:
return _isLoaded ? Container() : YourAwesomeWidget();
The Container is a great widget that you will use extensively in Flutter. Container() expands to fit the constraints provided by the parent and is not a const constructor.
On the other hand, the SizedBox is a const constructor and creates a fixed-size box. The width and height parameters can be null to indicate that the size of the box should not be constrained in the corresponding dimension.
Hence, when we are implementing a placeholder, SizedBox should be used instead of Container.
return _isLoaded ? SizedBox() : YourAwesomeWidget();
if condition instead of ternary operator syntaxWhen laying out a Flutter app, it’s often the case that you want to render different widgets conditionally. You might need to generate a widget based on the platform, for example:
Row(
 children: [
 Text("Majid"),
 Platform.isAndroid ? Text("Android") : SizeBox(),
 Platform.isIOS ? Text("iOS") : SizeBox(),
 ]
);
In this situation, you can drop the ternary operator and leverage Dart’s built-in syntax for adding an if statement in an array.
Row(
 children: [
 Text("Majid"),
 if (Platform.isAndroid) Text("Android"),
 if (Platform.isIOS) Text("iOS"),
 ]
);
You can also expand on this feature with a spread operator and load several widgets as needed.
Row(
 children: [
 Text("Majid"),
 if (Platform.isAndroid) Text("Android"),
 if (Platform.isIOS) ...[
 Text("iOS_1")
 Text("iOS_2")
 ],
 ]
);
build() method in FlutterThe build method in Flutter widgets may be invoked frequently when ancestor widgets are rebuilding the widget. It’s important to avoid repetitive and costly work in build() methods.
An example of this is when you use a method instead of creating widgets in your app. Let me elaborate:
class MyAwesomeWidget extends StatelessWidget {
 @override
 Widget build(BuildContext context) {
 return Scaffold(
 body: Column(
 mainAxisSize: MainAxisSize.min,
 children: [
 _buildHeaderWidget(),
 _buildBodyWidget(context),
 _buildFooterWidget(),
 ],
 ),
 );
 }

 Widget _buildHeaderWidget() {
 return Padding(
 padding: const EdgeInsets.all(10.0),
 child: FlutterLogo(
 size: 50.0,
 ),
 );
 }

 Widget _buildBodyWidget(BuildContext context) {
 return Expanded(
 child: Container(
 child: Center(
 child: Text(
 'Majid Hajian, Flutter GDE',
 ),
 ),
 ),
 );
 }

 Widget _buildFooterWidget() {
 return Padding(
 padding: const EdgeInsets.all(10.0),
 child: Text('Footer'),
 );
 }
}
The downside of this approach is that when MyAwesomeWidget needs to rebuild again — which might happen frequently — all of the widgets created within the methods will also be rebuilt, leading to wasted CPU cycles and possibly memory.
Hence, it’s better to convert those methods to StatelessWidgets in the following way:
class MyAwesomeWidget extends StatelessWidget {
 @override
 Widget build(BuildContext context) {
 return Scaffold(
 body: Column(
 mainAxisSize: MainAxisSize.min,
 children: [
 HeaderWidget(),
 BodyWidget(),
 FooterWidget(),
 ],
 ),
 );
 }
}

class HeaderWidget extends StatelessWidget {
 @override
 Widget build(BuildContext context) {
 return Padding(
 padding: const EdgeInsets.all(10.0),
 child: FlutterLogo(
 size: 50.0,
 ),
 );
 }
}

class BodyWidget extends StatelessWidget {
 @override
 Widget build(BuildContext context) {
 return Expanded(
 child: Container(
 child: Center(
 child: Text(
 'Majid Hajian, Flutter GDE',
 ),
 ),
 ),
 );
 }
}

class FooterWidget extends StatelessWidget {
 @override
 Widget build(BuildContext context) {
 return Padding(
 padding: const EdgeInsets.all(10.0),
 child: Text('Footer'),
 );
 }
}
All StatefulWidgets or StatelessWidgets, based on the key, widget type, and attributes, have a special cache mechanism that only rebuilds when necessary. We may even optimize these widgets by adding const, which leads us to the next section of this article.
const widgets where possibleIn Dart, it’s good practice to use a const constructor where possible, and remember that the compiler will optimize your code. Now, let’s review our example above. With one straightforward step, we can make the build method work even more efficiently:
class MyAwesomeWidget extends StatelessWidget {
 @override
 Widget build(BuildContext context) {
 return Scaffold(
 body: Column(
 mainAxisSize: MainAxisSize.min,
 children: [
 const HeaderWidget(),
 const BodyWidget(),
 const FooterWidget(),
 ],
 ),
 );
 }
}

class HeaderWidget extends StatelessWidget {
 const HeaderWidget();
 @override
 Widget build(BuildContext context) {
 return Padding(
 padding: const EdgeInsets.all(10.0),
 child: FlutterLogo(
 size: 50.0,
 ),
 );
 }
}

class BodyWidget extends StatelessWidget {
 const BodyWidget();
 @override
 Widget build(BuildContext context) {
 return Expanded(
 child: Container(
 child: Center(
 child: Text(
 'Majid Hajian, Flutter GDE',
 ),
 ),
 ),
 );
 }
}

class FooterWidget extends StatelessWidget {
 const FooterWidget();
 @override
 Widget build(BuildContext context) {
 return Padding(
 padding: const EdgeInsets.all(10.0),
 child: Text('Footer'),
 );
 }
}
This change might look simple, but it helps us avoid rebuilding the const widget.
itemExtent in ListView for long listsIn order to understand how to best use itemExtent, let’s say we have a list with several thousand elements, and we need to jump to the last element when an action is triggered, e.g., when a button is clicked. Here is when itemExtent can drastically improve the performance of laying out of the ListView.
Specifying an itemExtent is more efficient than letting the children determine their extent because scrolling machinery can use the foreknowledge of the children’s extent to save work, like so:
class LongListView extends StatelessWidget {
 final _scrollController = ScrollController();
 @override
 Widget build(BuildContext context) {
 return Scaffold(
 floatingActionButton: FloatingActionButton(onPressed:() {
 _scrollController.jumpTo(
 _scrollController.position.maxScrollExtent,
 );
 }),
 body: ListView(
 controller: _scrollController,
 children: List.generate(10000, (index) => Text('Index: $index')),
 itemExtent: 400,
 ),
 );
 }
}
There is no hard rule for when to split your widget into smaller widgets. However, it’s best practice to avoid large trees because of the following benefits:
So, you should split your code into different widgets where you can.
The golden rule of a Flutter layout that every Flutter developer must know is: constraints go down, sizes go up, and the parent sets the position.
Let’s break this down.
A widget gets its own constraints from its parent. A constraint is just a set of four doubles: a minimum and maximum width, and a minimum and maximum height.
Then, the widget goes through its own list of children. One by one, the widget tells its children what their constraints are (which can be different for each child), and then asks each child what size it wants to be.
Next, the widget positions its children (horizontally in the x axis, and vertically in the y axis) one by one. Finally, the widget tells its parent about its own size (within the original constraints, of course).
In Flutter, all widgets render themselves based on parent or their box constraints. This comes with some limitations. For example, imagine you have a child widget inside a parent widget and you’d want to decide on its size. The widget cannot have any size! The size must be within the constraints set by its parent.
Similar to the first example, a widget cannot know its own position in the screen because that’s the parent widget’s decision.
With that said, if a child widget decides on a different size from its parent and the parent doesn’t have enough information to align it, then the child’s size might be ignored.
Ok, let’s see this in action.
void main() {
 runApp(MyApp());
}

class MyApp extends StatelessWidget {
 @override
 Widget build(BuildContext context) {
 return MyWidget();
 }
}

class MyWidget extends StatelessWidget {
 @override
 Widget build(BuildContext context) {
 return ConstrainedBox(
 constraints: const BoxConstraints(
 maxHeight: 400,
 minHeight: 100,
 minWidth: 100,
 maxWidth: 400,
 ),
 child: Container(
 color: Colors.green,
 ),
 );
 }
}
You can ignore ConstrainedBox and add the height and widget to Container if you wish.
class MyWidget extends StatelessWidget {
 @override
 Widget build(BuildContext context) {
 return Container(
 height: 400,
 width: 400,
 color: Colors.green,
 );
 }
}
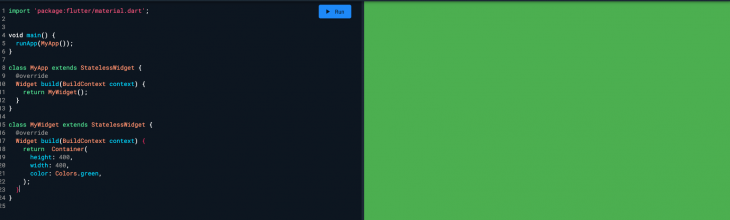
You would expect the code above to render a green Container with a maximum height and width of 400. However, when you run this code, you’ll be surprised.
👁 understanding parent and child constraints and containers in flutter
The entire screen will be solid green! I won’t dive into the specifics here, but you might see several issues similar to this one while building your Flutter layout.
Let’s see what is going on here. In the example above, the tree looks like this:
 - `MyApp`
 - `MyWidget`
 - `ConstrainedBox`
 - `Container`
The constraint rule will be passed from the parent widget to the child, so the child widget can decide its size within the given constraint by its parent. So, the constraints apply.
Therefore, Flutter is passing a tight constraint to MyApp(), then MyApp() is passing down its tight constraint to ConstrainedBox. Then, ConstrainedBox is forced to ignore its own constraint and will be using its parent, which, in this case, is full-screen size, and that’s why you’ll see a full-screen green box.
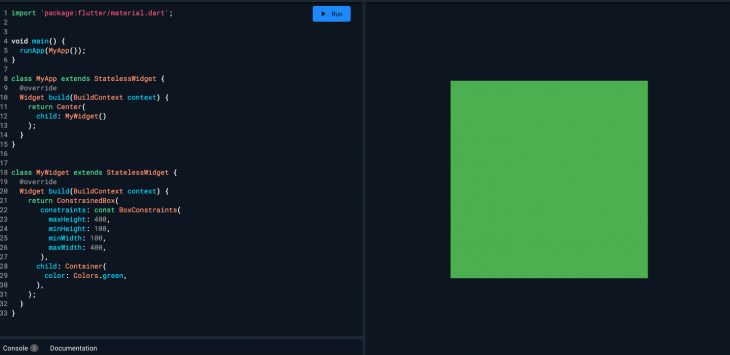
Typically, you’ll find that adding a Center widget might fix this issue. Let’s give it a try:
class MyApp extends StatelessWidget {
 @override
 Widget build(BuildContext context) {
 return Center(
 child: MyWidget()
 );
 }
}
Voila! It’s fixed!
👁 best practice flutter app fixed green box constraints
The Center widget takes a tight constraint from MyApp() and converts it to a loose constraint for its child, which is ConstrainedBox. Hence, Container follows constraints given by ConstraiedBox so that Container will have the minimum and max size applied.
Before we finish this section, let me quickly explain what tight and loose constraints are in-depth.
A tight constraint offers a single possibility — an exact size, meaning its maximum width is equal to its minimum width, and its maximum height equals its minimum height.
If you go to Flutter’s box.dart file and search for the BoxConstraints constructors, you’ll find the following:
BoxConstraints.tight(Size size)
 : minWidth = size.width,
 maxWidth = size.width,
 minHeight = size.height,
 maxHeight = size.height;
A loose constraint, on the other hand, sets the maximum width and height but allows the widget to be as small as it wants. It has a minimum width and height both equal to 0:
BoxConstraints.loose(Size size)
 : minWidth = 0.0,
 maxWidth = size.width,
 minHeight = 0.0,
 maxHeight = size.height;
If you revisit the example above, it tells us that the Center allows the green Container to be smaller, but not larger, than the screen. The Center does that, of course, by passing loose constraints to the Container.
In this article, I mentioned some of the many best practices you should put into place when you start building a Flutter application. However, there are many more — and more advanced — practices to consider, and I recommend you check out Flutter’s thorough documentation. Happy coding.
Install LogRocket via npm or script tag. LogRocket.init() must be called client-side, not
server-side
$ npm i --save logrocket

// Code:

import LogRocket from 'logrocket';
LogRocket.init('app/id');
// Add to your HTML:

<script src="https://cdn.lr-ingest.com/LogRocket.min.js"></script>
<script>window.LogRocket && window.LogRocket.init('app/id');</script>
Learn how next-browser gives AI agents runtime context for debugging Next.js apps, including React props, hydration, PPR, forms, and performance.
Build dynamic LLM routing in Next.js with OpenRouter, TanStack AI, task classification, model fallbacks, and cost-aware routing.
TSRX adds first-class control flow, conditional hooks, and scoped styles to React via a TypeScript compiler extension — no new framework required.
Learn how to build a full React Native auth system using Better Auth and Expo — with email/password login, Google OAuth, session persistence, and protected routes.
Hey there, want to help make our blog better?
Join LogRocket’s Content Advisory Board. You’ll help inform the type of content we create and get access to exclusive meetups, social accreditation, and swag.
Sign up now