 |
VOOZH | about |
|
VOOZH | about |
It’s easy to test your apps using commands that bootstrap Next.js applications with the test framework of your choice, and make testing more accessible and efficient.
👁 Comparing Next.js testing strategies and toolsIn this article, we’ll explore various testing strategies and tools available for Next.js applications, comparing their features, benefits, and use cases to help developers make informed choices about how to test their Next.js applications.
Below are a few prerequisites that you’ll need before moving forward with this article:
The Replay is a weekly newsletter for dev and engineering leaders.
Delivered once a week, it's your curated guide to the most important conversations around frontend dev, emerging AI tools, and the state of modern software.
Let’s start with a quick look at the tools we’ll talk about:
Jest and Vitest are used for component, integration, and unit tests, while Cypress and Playwright are used for end-to-end tests. Each tool is different and useful for certain parts of testing in Next.js.
Jest is an open-source test runner that finds tests, runs the tests, and determines whether the tests passed or failed. The React Testing Library is a lightweight solution that provides utility functions to test React components on top of react-dom and react-dom/test-utils, in a way that makes your tests resemble the way your software is used by its users.
While Jest offers functions for test suites, test cases, and assertions, React Testing Library provides virtual DOMs for testing React components as well as utilities to facilitate querying the DOM in the same way the user would.
Jest and React Testing Library together enable you to write component, integration, and unit tests.
.resolves /.rejects, and async/awaitJest and React testing library is a popular choice for unit and integration testing due to its fast, interactive watch mode features. Setting up Jest and React Testing Library in a Next.js project involves:
Next.js allows you to bypass the above setup process with the following command:
npx create-next-app@latest --example with-jest with-jest-app
OR
yarn create next-app@latest --example with-jest with-jest-app
This code handles the first two bullet points listed above. You can also explore the Next.js Rust compiler as another alternative.
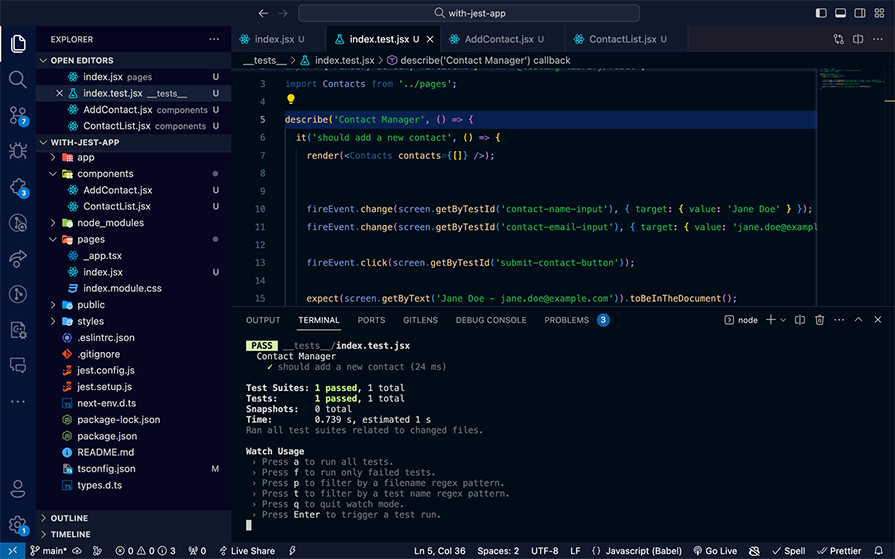
Here is a brief example of how to write integration tests using Jest and React Testing Library in Next.js:
// contacts.test.js
import React from 'react';
import { render, screen, fireEvent } from '@testing-library/react';
import Contacts from '../Contacts';
describe('Contact Manager', () => {
 it('should render the list of contacts', () => {
 const contacts = [
 { id: 1, name: 'John Paul', email: '[email protected]', phone: '1234567890' },
 ];
 render(<Contacts contacts={contacts} />);
 const contactItems = screen.getAllByTestId('contact-item');
 expect(contactItems).toHaveLength(contacts.length);
 expect(screen.getByText('John Paul')).toBeInTheDocument();
 });
 it('should add a new contact', () => {
 render(<Contacts contacts={[]} />);
 fireEvent.click(screen.getByTestId('add-contact-button'));
 fireEvent.change(screen.getByTestId('contact-name-input'), { target: { value: 'Jane Doe' } });
 fireEvent.change(screen.getByTestId('contact-email-input'), { target: { value: '[email protected]' } });
 fireEvent.change(screen.getByTestId('contact-phone-input'), { target: { value: '9876543210' } });
 fireEvent.click(screen.getByTestId('submit-contact-button'));
 expect(screen.getByText('Jane Doe')).toBeInTheDocument();
 });
});
In this example, we have two test cases for adding a new contact and another for viewing the contacts.
Testing a component with the app router in Next.js v 13 poses a significant challenge at the time of writing this article. The difficulty arises because you’d need to mock the next/navigation module, and it is important to note that server actions are still experimental.
Both Jest and React Testing Library have developer-friendly documentation and extensive community support, making it easier for developers to get started and solve any issues they encounter.
Vitest is a free, lightweight, and open source next-generation testing framework powered by Vite. It ships support for ESM, TypeScript, and JSX out of the box, powered by esbuild.
Vitest enables you to write component tests, integration tests, and unit tests. It also includes the most commonly required features when setting up your tests, such as mocking, snapshots, and coverage, making it straightforward to migrate from Jest.
Vitest focuses heavily on test performance and only reruns related changes, just like HMR for tests. It also uses worker threads to run tests in parallel.
--no-threads in the CLI--no-isolate to the CLI (which can trade correctness for run performance)Other features include out-of-the-box TypeScript and JSX support, Jest-compatible snapshot support, code coverage and type testing via expect-type.
You can set up a Next.js project with Vitest using the following commands:
npx create-next-app --example with-vitest with-vitest-app
//OR
yarn create next-app --example with-vitest with-vitest-app
Combining React Testing Library with Vitest, instead of Jest, has recently become the preferred choice for unit and integration testing with Next.js due to its lightweight, blazing-fast, performant, and dev-first experience.
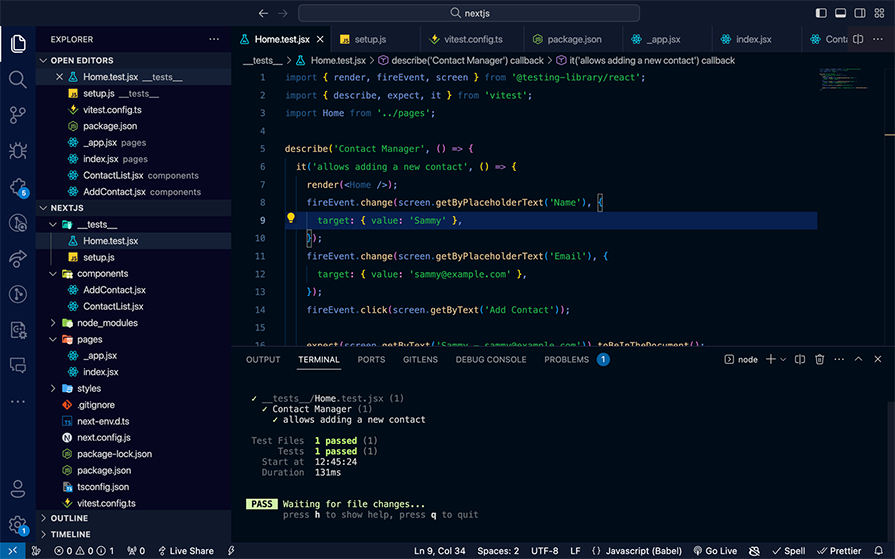
Here’s a brief example of how to write integration tests using Vitest and React Testing Library:
import { render, fireEvent, screen } from '@testing-library/react';
import { describe, expect, it } from 'vitest';
import Home from '../pages';
describe('Contact Manager', () => {
 it('allows adding a new contact', () => {
 render(<Home />);
 fireEvent.change(screen.getByPlaceholderText('Name'), {
 target: { value: 'Sammy' },
 });
 fireEvent.change(screen.getByPlaceholderText('Email'), {
 target: { value: '[email protected]' },
 });
 fireEvent.click(screen.getByText('Add Contact'));
 expect(screen.getByText('Sammy - [email protected]')).toBeInTheDocument();
 });
});
You’ll need to update the Vitest config file with the setupFiles, as follows:
/// <reference types="vitest" />
import { defineConfig } from "vitest/config";
import react from "@vitejs/plugin-react";
// <https://vitejs.dev/config/>
export default defineConfig({
 plugins: [react()],
 test: {
 environment: "jsdom",
 globals: true,
 setupFiles: "__tests__/setup.js",
 },
});
Create your setup.js file and import the @testing-library/jest-dom package like this:
import '@testing-library/jest-dom';
Vitest has one of the best documentation and it is developer-friendly. Although it is relatively new, it has extensive community support but few guides available.
Until now, we looked at the features of these libraries and how to implement them in our projects. Now, let’s examine some benchmarks and compare the results among these libraries.
Although both testing tools are very similar in their approach to testing, When it comes to speed, Vitest is preferable due to its HMR method that stays fast, regardless of app size.
Jest took 739ms to run the test for our Next.js contact manager app:
By contrast, Vitest took 131ms to execute the same test:
Check out the code repository here.
Vitest is designed to be compatible with modern JavaScript modules and its support for HMR again makes module management easier irrespective of the app size.
Working with modern JavaScript modules in Jest is difficult and requires you to modify the config returned by next/jest with CommonJS. Testing with Jest is simpler, however, because Jest integrates nicely with CommonJS modules.
Jest has 196 dependencies, taking up to 32MB of disk space. Vitest, on the other hand, has just 61 dependencies and uses 26MB of disk space.
Apart from creating test files for each of our component tests, Vitest allows us to write inline tests inside the component:
//Home.js Component
....
//Test
if (import.meta.vitest) {
 import { render, fireEvent, screen } from '@testing-library/react';
 const { describe, expect, it } = import.meta.vitest
 describe('Contact Manager', () => {
 it('allows adding a new contact', () => {
 render(<Home />);
 fireEvent.change(screen.getByPlaceholderText('Name'), {
 target: { value: 'Sammy' },
 });
 fireEvent.change(screen.getByPlaceholderText('Email'), {
 target: { value: '[email protected]' },
 });
 fireEvent.click(screen.getByText('Add Contact'));
 expect(screen.getByText('Sammy - [email protected]')).toBeInTheDocument();
 });
 });
}
import.meta.vitest allows the test methods to be imported only in test mode. Jest, on the other hand, does not support inline tests.
Cypress is an open source testing tool built for the modern web. With Cypress, you can test any application that runs in a browser and watch your end-to-end and component tests run in real time as you develop your applications. Cypress deterministically interacts with your application the same way as your users, so you can discover bugs before your users do.
Because Cypress runs directly in the browser, you can debug failed tests using the in-browser developer tools you already know and love.
You can set up a Next.js project with Cypress preconfigured with the following commands:
npx create-next-app --example with-cypress with-cypress-app
OR
yarn create next-app --example with-cypress with-cypress-app
For Next.js, Cypress is a popular choice for E2E testing due to its simplicity and powerful features. In this example below, we have two test cases for adding a new contact and another for viewing the list of contacts:
// cypress/integration/contacts.spec.js
describe('Contact Manager', () => {
 beforeEach(() => {
 cy.visit('<http://localhost:3000>');
 });
 it('should add a new contact', () => {
 // Click on the button to add a new contact
 cy.get('[data-test=add-contact]').click();
 cy.get('[data-test=contact-name]').type('John Doe');
 cy.get('[data-test=contact-email]').type('[email protected]');
 cy.get('[data-test=contact-phone]').type('1234567890');
 cy.get('[data-test=submit-contact]').click();
 cy.contains('John Doe');
 });
 it('should view the list of contacts', () => {
 cy.get('[data-test=contact-item]').should('exist');
 });
});
Cypress end-to-end tests require the Next.js server to be running before starting Cypress. Cypress’s official docs recommend running your tests against your production code to more closely resemble how your application will behave.
Run the following commands:
npm run build
npm run start
Then, in another terminal window, run:
npm run cypress -- --e2e
This will start Cypress and run your end-to-end testing suite.
Running Cypress with the Cypress open command opens an interactive browser which is not ideal for CI environments. You can also run Cypress headlessly using the cypress run command for CI environments.
You can check the documentation to get started with component tests, integration tests, and unit tests with Cypress.
The Cypress documentation is approachable and developer-friendly. It’s more than sufficient to get developers up to speed with testing their frontend applications.
Cypress has extensive community support and the documentation includes real-world code examples that cover a lot of well-known challenges, like testing Auth0 and Okta authentication.
Playwright enables reliable end-to-end testing for modern web apps. Playwright offers exceptional cross-browser compatibility, which ensures that web applications can be thoroughly tested across the most widely used browsers.
You can set up a Next.js project with Playwright preconfigured with the following commands:
npx create-next-app --example with-playwright with-playwright-app
OR
yarn create next-app --example with-playwright with-playwright-app
The following code example specifically tests a contacts manager web application with two test cases, one to add a new contact, and another to view the list of contacts:
const { chromium } = require('playwright');
describe('Contact Manager App', () => {
 let browser;
 let page;
 beforeAll(async () => {
 browser = await chromium.launch();
 });
 afterAll(async () => {
 await browser.close();
 });
 beforeEach(async () => {
 page = await browser.newPage();
 await page.goto('<http://localhost:3000>');
 });
 afterEach(async () => {
 await page.close();
 });
 it('should add a new contact', async () => {
 await page.click('[data-test=add-contact]');
 await page.type('[data-test=contact-name]', 'John Doe');
 await page.type('[data-test=contact-email]', '[email protected]');
 await page.type('[data-test=contact-phone]', '1234567890');
 await page.click('[data-test=submit-contact]');
 await page.waitForSelector('li:has-text("John Doe")');
 });
 it('should view the list of contacts', async () => {
 await page.waitForSelector('[data-test=contact-item]');
 });
});
Playwright’s official docs highly recommend running your tests with UI mode for a better developer experience. In UI mode, you can easily walk through each step of the test and visually see what was happening before, during, and after each step. To initiate UI mode:
npx playwright test --ui
Playwright’s documentation offers valuable guidance on troubleshooting common issues and debugging techniques. Though the docs help identify and resolve challenges quickly, the examples are more generic than the Cypress ones. Playwright also has extensive community support and learning resources.
Both Cypress and Playwright are powerful test automation tools that simplify the process of writing, running, and debugging tests for web applications. However, both have certain features that make them suitable in specific contexts.
Cypress is a bit less intuitive when it comes to working with iframes. It does not provide an out-of-the-box command for switching between iframes, which forces us to write longer specs for pages that contain iframes. A typical approach for iframes in Cypress would be:
cy.get("#iframe")
.its("0.contentDocument")
.its("body")
.then(cy.wrap)
.find("#input")
.should("be.visible");
The above code snippet asserts that a DOM element with ID=input is visible inside an iframe with ID=iframe.
Playwright makes working with iframes straightforward. It provides a frameLocator() command that changes the context of the test to a specific iframe:
// Switch to the iframe
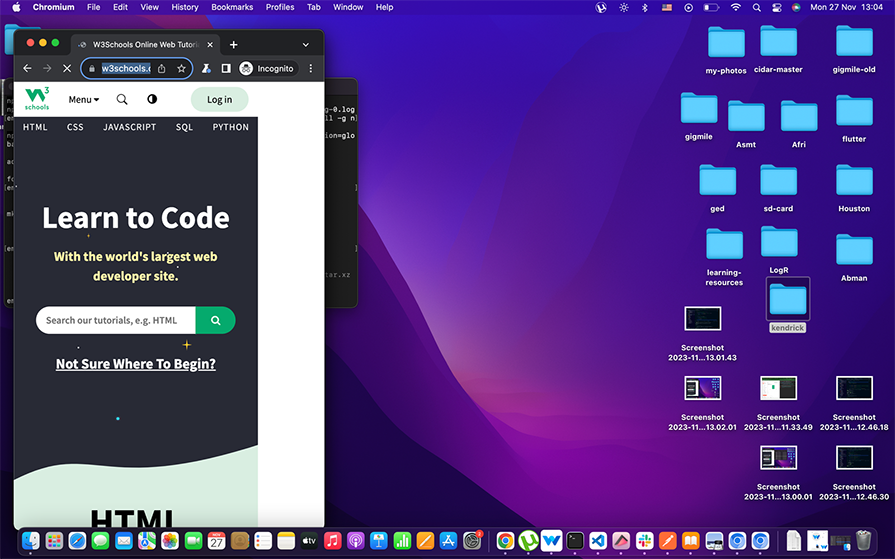
test('w3 schools has HTML tutorials', async ({ page }) => {
await page.goto('<https://www.w3schools.com/tags/tryit.asp?filename=tryhtml_iframe>');
await page.frameLocator('iframe[name="iframeResult"]')
.frameLocator('iframe[title="W3Schools Free Online Web Tutorials"]').getByPlaceholder('Search our tutorials, e.g. HTML').fill('HTML')
});
The above code snippet navigates to the W3Schools iframe test website by calling the goto() method on the page class and using the frameLocator and getByPlaceholder to locate the search field and fill in the value “HTML” to search for all HTML content.
Cypress has a third-party tool called Cypress Studio for recording the test flow and auto-generating the test code for the flow. Playwright has built-in support for this feature.
Cypress supports custom test commands. Unlike Cypress, custom test commands are not supported in Playwright.
Playwright’s multi-tab support could be used for test parallelization in a single testing environment. Playwright runs tests in parallel for three major browser environments: Chrome, WebKit, and Firefox. It offers the flexibility to run tests sequentially and in specific browser environments.
Unlike Playwright, Cypress does not have multi-tab browsing support.
Both Cypress and Playwright allow you to specify up to three test execution retries in the event of failure. This is very useful for testing flaky app behaviors: if you have 3/3 tests failing consistently in a row, you can be certain that it’s a complete failure.
You can specify your retries in the configuration file or within the command line.
When there is no straightforward way to find an element (by ID, class, or data attribute), we can use XPath. XPath is a special language that uses a path-like syntax to specify the location of nodes in the HTML tree.
<svg aria-label="Messenger" class="_8-yf5 " color="#262626" fill="#262626" height="24" role="img" viewBox="0 0 24 24" width="24">
This is another aspect where Playwright shines over Cypress. Cypress has a built-in command for finding elements by using XPath and auto-detects them if you omit the xpath= prefix:
await page.locator('xpath=//svg').hover();
OR
await page.locator('//svg').hover();
At the time of writing, Cypress does not have a built-in command for finding elements by using XPath. Instead, the xpath() command can be added by installing a third-party library called cypress-xpath.
Playwright’s mobile-specific capabilities extend beyond visual emulation to encompass geolocation, time zones, and locales. Developers can specify these parameters to simulate the real-world environments in which web applications are expected to be used.
In the code snippet below, you can see how to navigate to the W3Schools website on a Google Pixel 7 smartphone while setting a Spanish locale (es-ES):
import { test, expect, chromium, devices } from '@playwright/test'
test('should navigate to w3schools home page', async () => {
 const phone = devices['Pixel 5'];
 const browser = await chromium.launch({ headless: false, slowMo: 300 });
 const context = await browser.newContext({
 ...phone,
 locale: 'es-ES'
 });
 const page = await context.newPage();
 await page.goto('<https://www.w3schools.com/>');
 await page.screenshot({ path: 'DE-Google.png' })
 await browser.close();
})
When running the above command, it will open in a Google Pixel 7 viewport size:
👁 The Google Pixel mobile emulator
At this stage, Cypress framework is not mobile-friendly.
Playwright ships with every tool or strategy needed to test applications effectively without relying on third-party tools providing almost zero dependencies, which makes it lightweight compared to Cypress.
In this article, we compared lists of testing libraries best suited for Next.js applications and each testing library, and framework brings its advantages and downsides, depending on the use case.
For end-to-end testing, Cypress is a popular choice, although Playwright has several advantages over Cypress. For unit and integration testing, Vitest has recently become a preferred choice compared to Jest due to its lightweight, blazing-fast, performant, and dev-first experience.
When choosing a test tool, the most important thing is that the tool fits your needs and helps you write better, more reliable code.
Debugging Next applications can be difficult, especially when users experience issues that are difficult to reproduce. If you’re interested in monitoring and tracking state, automatically surfacing JavaScript errors, and tracking slow network requests and component load time, try LogRocket.
LogRocket captures console logs, errors, network requests, and pixel-perfect DOM recordings from user sessions and lets you replay them as users saw it, eliminating guesswork around why bugs happen — compatible with all frameworks.
LogRocket's Galileo AI watches sessions for you, instantly identifying and explaining user struggles with automated monitoring of your entire product experience.
The LogRocket Redux middleware package adds an extra layer of visibility into your user sessions. LogRocket logs all actions and state from your Redux stores.
👁 ImageModernize how you debug your Next.js apps — start monitoring for free.
Build dynamic LLM routing in Next.js with OpenRouter, TanStack AI, task classification, model fallbacks, and cost-aware routing.
TSRX adds first-class control flow, conditional hooks, and scoped styles to React via a TypeScript compiler extension — no new framework required.
Learn how to build a full React Native auth system using Better Auth and Expo — with email/password login, Google OAuth, session persistence, and protected routes.
Compare the top AI development tools and models of June 2026. View updated rankings, feature breakdowns, and find the best fit for you.
Would you be interested in joining LogRocket's developer community?
Join LogRocket’s Content Advisory Board. You’ll help inform the type of content we create and get access to exclusive meetups, social accreditation, and swag.
Sign up now