 |
VOOZH | about |
|
VOOZH | about |
Cypress is one of the foremost tools for testing web applications today. It focuses heavily on providing a smooth developer experience and enabling you to write reliable, flake-resistant tests.
👁 Cypress Adoption Guide: Overview, Examples, AlternativesIn this overview, we’ll go over what makes Cypress unique, the advantages it offers, and how it compares with its peers. By the end of this guide, you’ll have a clear sense of when and why you should adopt Cypress in your projects.
The Replay is a weekly newsletter for dev and engineering leaders.
Delivered once a week, it's your curated guide to the most important conversations around frontend dev, emerging AI tools, and the state of modern software.
Cypress was created in 2014 as an answer to tools like Selenium, which were unsuited to testing web applications.
Historically, the asynchronous nature of testing, the need to have a live backend, and the challenges posed by debugging UI tests have all been thorny problems to deal with. Cypress lets you side-step all of that. It has evolved and improved over the years to make the testing process more reliable and its user interface more intuitive.
Unlike tools like Selenium, Cypress runs all your tests against real browsers instead of running outside the browser. Likewise, it executes in the same run loop as your app rather than performing remote commands over the network.
According to the docs on Cypress’ architecture:
Behind Cypress is a Node server process. Cypress and the Node process constantly communicate, synchronize, and perform tasks on behalf of each other. Having access to both parts (front and back) gives us the ability to respond to your application’s events in real time, while at the same time work outside of the browser for tasks that require a higher privilege.
Cypress is split into the Cypress application and the Cypress Cloud service. The Cypress app is the software where test development and fine-tuning happen, running on your local machine. Cypress Cloud is an optional cloud service that allows you to record, analyze, and orchestrate test runs.
The app is what most people mean when they refer to Cypress. In the rest of the article, we’ll follow this convention as well.
While Cypress is a very versatile tool that can be used to write different types of tests, it shines the most when used for end-to-end (E2E) testing or component testing, which is a type of unit test that allows you to test components written in major JavaScript frameworks thoroughly in isolation.
Before we go on, let’s get some terminology down.
First, what exactly do we mean when we refer to a test? A test is a sequence of commands wrapped in an it block. Commands are JavaScript methods on the cy object provided by Cypress.
Commands are the building blocks of all your tests. They’re how you tell Cypress to perform actions on your application, as well as how you tell Cypress what state you expect your application to be in. Here’s an example of a test:
it('Hello Cypress', () => {
 cy.visit('/')

 cy.get("input.text-field")
 .type("Hello, Cypress!");

 cy.contains("Submit")
 .click();

 cy.get("h1")
 .should("contain", "Hello, Cypress");
});
The name of the test is Hello Cypress. The commands here instruct Cypress to use your browser to:
input with a class of text-fieldHello Cypress into itSubmith1 on the pageHello CypressDid you notice how close the commands are to English and how intuitive it is to chain commands? You’re looking at one of Cypress’ greatest strengths — it goes to great lengths to make sure your tests are easy to write, read, and debug.
In Cypress, related tests are grouped together in describe blocks like this:
describe('User Authentication Tests', () => {
 it('should let a user log in', () => {
 // Test logic for user login
 });

 it('should let new users sign up', () => {
 // Test logic for new signups
 });

 it('should let users reset their passwords', () => {
 // Test logic for password reset functionality
 });
});
Related describe blocks gathered together are collectively called a test suite. A test suite lives inside a spec file.
That should be enough to get you comfortable with the terminology, but there’s much more to learn about writing tests in Cypress.
Let’s highlight some of the features that make Cypress such a compelling option, from its great ease of use and shallow learning curve to its extensive documentation and myriad integrations:
As you can see, Cypress is a user-friendly, easy-to-learn tool with an active community, detailed docs, and plenty of support for various frameworks, browsers, and integrations.
While Cypress’ unique architecture makes it capable of many things, it also comes with certain tradeoffs. Let’s discuss them.
Because all Cypress tests are evaluated inside the browser, they can only ever be written in the language of the browser — JavaScript.
This does mean that some extra effort is required for tasks that involve things outside the browser. However, when you’re working on tasks inside the browser, the experience is unmatched.
Unlike some other testing software, Cypress does not double as a general-purpose automation tool. Cypress isn’t designed for — and therefore doesn’t do well with — tasks like web scraping or scripting repetitive actions on sites you don’t control.
This isn’t much of a limitation, since Cypress is focused on testing and does it very well. However, it’s something to keep in mind if you’re coming to Cypress from something like Selenium.
Cypress is built to test your application from the perspective of one person using it in one tab and browser per time. As a result, it will never support having multiple browsers or multiple browser tabs open while running tests.
While this does require you to think about the tests you write in a slightly different way, the tests you write as a result are faster and more flake-resistant.
Cypress does also have some features that you would expect to be implemented but are not — at least, not as of Cypress v13.5.1:
The docs state that these limitations are temporary and will be addressed eventually, but as most of them have been open issues since 2016, it’s probably better not to count on them being fixed anytime soon.
That said, don’t let this put you off Cypress. The lack of these features only becomes an issue in niche situations, and even if you need them, several people have documented workarounds that worked for them in the Issues section of Cypress’ GitHub repository.
So far, we’ve gone over some of Cypress’ strengths and weaknesses. Now, let’s take some time to go into the specifics of what Cypress can do.
You can use Cypress to write a write variety of tests, like E2E, integration, and unit tests. Because Cypress commands can even make HTTP requests, you can even use it for testing APIs, although Cypress’ advantages lie mostly in testing the frontends of web applications.
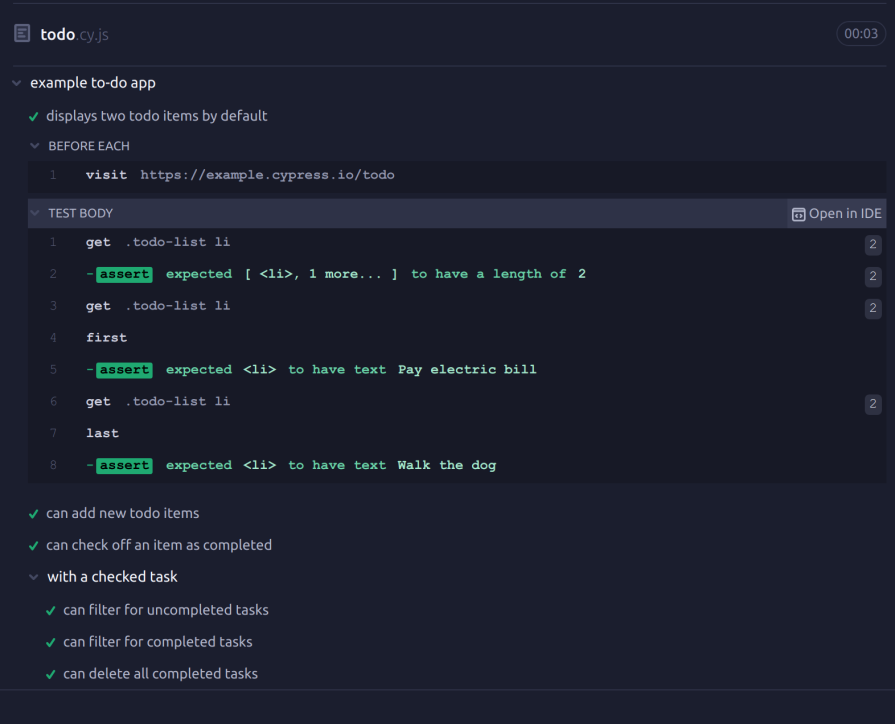
Time travel is a Cypress feature that allows you to inspect the state of your application at any step of a test. Cypress has a Command Log that lists every command Cypress executes as part of your test. Here’s what the Command Log looks like:
The time travel feature allows you to select a command from the log and see your app frozen in the state it was just after you executed that command. Note that the values of select inputs may not be preserved while time traveling.
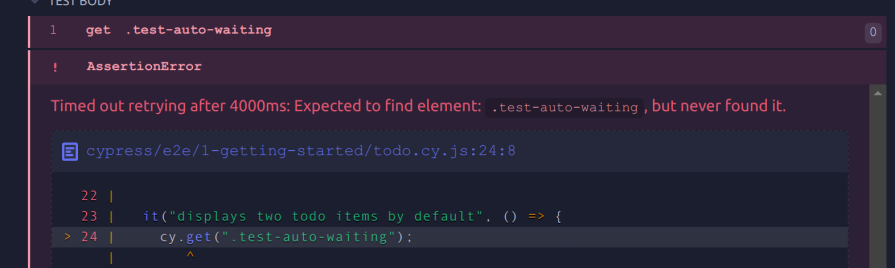
In contrast to tools like Selenium, when writing tests with Cypress, you don’t have to manually write wait functions.
Cypress will automatically wait a configurable amount of time for UI elements to settle — in other words, finish animating or become visible or enabled — before attempting to interact with them or execute commands affecting them.
It’s only after waiting, retrying to find the element, and still failing that Cypress will fail the test:
If executing a command will cause a new page to load, Cypress will pause command execution until the new page is fully loaded.
Cypress allows you to take screenshots of your application — and optionally, the Command Log — during your test runs with the cy.screenshot() command. When running Cypress in headless mode, which runs your tests without booting up a GUI, it takes a screenshot of the application every time a test fails.
Cypress doesn’t record videos by default, and video recording is only available in Chromium-based browsers. When video recording is enabled, Cypress will record a video of the application for every spec file run in headless mode.
Spies, stubs, and clocks are Cypress features that provide fine-grained control over your application and tests.
Spies let you record function calls. When you create a spy that wraps a function, you can use the spy to check how many times the function was called, and with which arguments, among other things.
Stubs let you substitute one function call for another. When you stub a function, every place in your application where the original function was called will call the stub instead.
Stubs are most useful when your tests involve functions with side effects you want to control or functions that rely on external resources your application doesn’t control, like an API call.
Clocks allow you to modify your application’s time. This feature means that, without needing to wait the amount of time you would normally need to, you can exert control over timing-related JavaScript — like setTimeout or setInterval — along with test behavior that depends on those functions.
Cypress goes above and beyond to make it easy to debug failing tests.
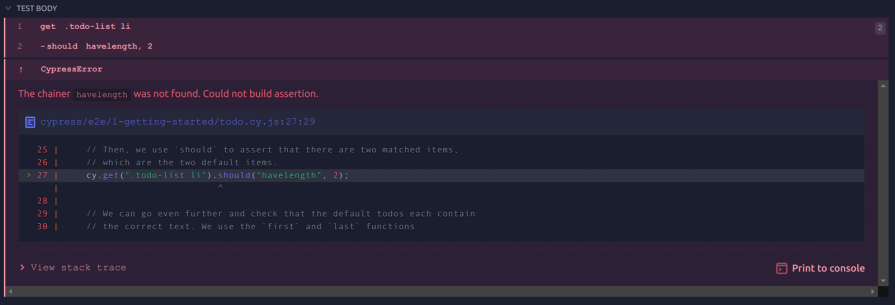
When you time travel, you can inspect every element on the page using the browser’s developer tools to get a complete picture of the test’s conditions. Furthermore, when a command throws an error, Cypress displays extremely detailed error messages like this one:
These detailed messages are meant to give you as much clarity as possible so you can solve your error quickly and efficiently.
A typical Cypress workflow has three steps:
What feature to test will usually be obvious to you. It will either be something you just built, or something important you built a long time ago and should have written tests for immediately.
Deciding what type of test to write depends on why you’re writing the test in the first place:
Figuring out the test is usually done according to the Arrange, Act, Assert (AAA) pattern. In this pattern, you start by getting the application into the desired initial state. Then, you perform some sequence of actions. Finally, you assert that your application’s final state matches what you expect it to be.
Let’s walk through an example to demonstrate this workflow. Say you’ve just created a settings modal triggered by a button — that’s what you want to test. Since you want to make sure just one small feature is working, you’re going to write a unit test.
Now you can write the test using the AAA pattern:
cy.visit() commandcy.get() and cy.click() commands and click on the buttoncy.get() and cy.should()to check for the modal’s presence on the page and make sure it has the attributes you want
Here’s what that might look like when you put it all together:
describe('Settings Modal', () => {
 beforeEach(() => {
 // Assuming your app is hosted at http://localhost:3000
 cy.visit('http://localhost:3000');
 });

 it('should open the settings modal when the settings button is clicked', () => {
 // Click the settings button to trigger the modal
 cy.get('#settings-button').click();

 // Ensure the modal is visible
 cy.get('#settings-modal').should('be.visible');

 // Check that the modal contains what it's supposed to
 cy.get('#settings-modal').contains('Dark Mode');
 cy.get('#settings-modal').contains('Save Changes');
 });
});
That’s what a Cypress workflow looks like.
As great as Cypress is, no single tool can satisfy everyone’s needs. Some developers might prefer to write their tests in languages other than JavaScript, want to combine their testing and some automation, or need to test their applications in browsers Cypress doesn’t support.
Below is a table comparing Cypress to its biggest competitors to help you make the right choice regarding which testing tool to use:
| Tool | Supported Languages | Ease of use | Community & Resources | Browser Support |
|---|---|---|---|---|
| Cypress | JavaScript | Very easy to use | Extensive documentation and a large community | Chrome, Edge, Firefox |
| Selenium | Java, C#, Python, Ruby, JavaScript, and Kotlin | Complex to set up and use | Extensive documentation, very large community |
Supports Chrome, Firefox, Safari, Internet Explorer, Edge |
| Playwright | JavaScript, Python, C#, and Java | Easy to use | Good documentation, large community | Chrome and Chromium, WebKit, Firefox |
| Puppeteer | JavaScript | Somewhat easy to use | Good documentation, large community | Firefox, Chrome and Chromium |
Cypress offers a robust testing framework with its ease of use, exhaustive documentation, and commitment to flake-resistant tests, enhancing developer efficiency. However, its unique architecture creates some limitations that may require some effort to work around.
Nonetheless, Cypress offers many extremely useful features that make it one of the best testing software for web applications out there.
Install LogRocket via npm or script tag. LogRocket.init() must be called client-side, not
server-side
$ npm i --save logrocket

// Code:

import LogRocket from 'logrocket';
LogRocket.init('app/id');
// Add to your HTML:

<script src="https://cdn.lr-ingest.com/LogRocket.min.js"></script>
<script>window.LogRocket && window.LogRocket.init('app/id');</script>
Learn how next-browser gives AI agents runtime context for debugging Next.js apps, including React props, hydration, PPR, forms, and performance.
Build dynamic LLM routing in Next.js with OpenRouter, TanStack AI, task classification, model fallbacks, and cost-aware routing.
TSRX adds first-class control flow, conditional hooks, and scoped styles to React via a TypeScript compiler extension — no new framework required.
Learn how to build a full React Native auth system using Better Auth and Expo — with email/password login, Google OAuth, session persistence, and protected routes.
Hey there, want to help make our blog better?
Join LogRocket’s Content Advisory Board. You’ll help inform the type of content we create and get access to exclusive meetups, social accreditation, and swag.
Sign up now