 |
VOOZH | about |
|
VOOZH | about |
Whether you’re using SQLite because it is the most popular database engine in the world, or you’re working with Rust because it is the most loved language, you can never go wrong with these two technologies. SQLite and Rust will provide you with speed and efficiency.
👁 Create API Rust SQLite RocketThis tutorial will demonstrate how to use SQLite as the database context system for Rust APIs. We’ll create a SQLite database, set up and install the Rocket framework for writing the server logic, and then use the Diesel framework to handle connections to the SQLite database.
Let’s get started!
Jump ahead:
The Replay is a weekly newsletter for dev and engineering leaders.
Delivered once a week, it's your curated guide to the most important conversations around frontend dev, emerging AI tools, and the state of modern software.
To follow along with this tutorial, you’ll need the following:
SQLite is a relational database management system with a lightweight feel in terms of setup complexity and resource usage. It is serverless and requires zero configurations. Because SQLite is literally a database residing in a single cross-platform file, it requires no administration.
SQLite transactions are ACID-compliant (atomic, consistent, isolated, and durable), providing safe access to multi-threading operations. As lightweight and “pruned” as it sounds, it has most of the important query language features in the SQL2 standards.
Cargo makes it easier to start a Rust project of any kind. For our SQLite API project, we’ll use the following command for initialization:
cargo new rust-rocket-sqlite-api --bin
This creates the Cargo.toml file.
SQLite is the default database store in this tutorial, so as a next step, install the SQLite drivers for your machine.
SQLite is pre-installed on new Mac computers, but (if needed) the Mac command is as follows:
brew install sqlite
Here’s the installation command for Linux users:
sudo apt install sqlite3
Now, confirm installation, like so:
sqlite3 --version
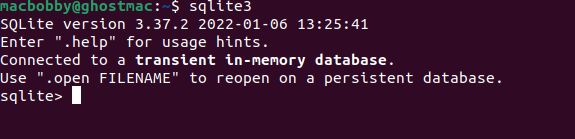
Next, run an instance:
sqlite3
You should see the below output:
👁 Terminal Output Confirming SQLite Installation
If you’re not familiar with how to use the SQLite3 database, you can learn more about it here.
Now, let’s connect to the SQLite database.
To start, run an instance of SQLite in the terminal with the following command:
sqlite3
Next, we need a file for the data. Create a folder called data using the below command and navigate into it:
sqlite filename.db
We’ll create a file named data.db. Next, we’ll create a table containing usernames and passwords:
create table users(username text PRIMARY KEY, password text);
If we run the .tables command, we’ll see that users is now a table in the database engine:
👁 Creating SQLite Table Usernames Passwords
Next, let’s populate the user table with values:
 insert into users(username, password) values ("Jon Doe", "j0hnd03");
sqlite> select * from users;
In the Cargo.toml file, add the SQLite crate in the dependencies section:
[dependencies]
sqlite = "0.30.1"
Now, build the project to be certain there are no errors:
cargo build
This command will download and build the dependency crates and compile the project.
Rocket is a popular framework for Rust backend web development like the Actix Web framework. It’s newer than Actix Web and offers some advantages. For one, it’s easier to write an application in Rocket, since most of the boilerplate code is included under the hood.
Another advantage is that Rocket’s middleware components and handlers are easier to implement, as they do not require any deep understanding of the process.
To install Rocket, simply specify the framework and its version under the dependencies in the Cargo.toml file. Since we’re using Rocket as the web framework, we do not need to specify SQLite and its version in the dependencies file:
[dependencies]
rocket = "0.5.0-rc.2"
Diesel is an ORM framework that can be used to create and handle connections to the SQLite database. Diesel has dependency on libpq, libmysqlclient, and libsqlite3. To install Diesel, we only need to specify it in the dependencies file. We can add Diesel to our Rusty Rocket, like so:
[dependencies]
rocket = "0.5.0-rc.2"
diesel = { version = "2.0.2", features = ["sqlite"] }
dotenvy = "0.15"
Here, we also add the dotenvy library to manage environment variables. This library looks for a file that ends with .env to find all the environment variables to load. We’ll create a file named .env now, and input the following variable:
DATABASE_URL=data.db
We’ll use diesel cli locally to manage the project. To install it, simply run the following:
cargo install diesel_cli
While this is the general command, we can strip diesel_cli of any unneeded libraries and specify the one we want. In this case, we need SQLite so we’ll run the following:
cargo install diesel_cli --no-default-features --features sqlite
This command prevents installing the defaults, except for SQLite. Next, we’ll use Diesel to set migrations:
diesel setup
To demonstrate the usage of the packages we’ve installed, we’ll build a to-do API.
Let’s start by creating a new project:
cargo new rusty-rocket --bin
Next, we’ll use Diesel to create a directory to handle migrations. Diesel does this automatically after you run this command:
diesel migration generate create_tasks
The resulting directory is named create_tasks, and it contains two files:
up.sql: Statements for applying migrationsdown.sql: Statements for reverting migrationsYou can write migrations in these files. For example, our CREATE statement will be in the up.sql file:
-- Your SQL goes here
CREATE TABLE IF NOT EXISTS tasks
(
 id INTEGER PRIMARY KEY NOT NULL,
 name TEXT NOT NULL,
 description TEXT NOT NULL
);
And the corresponding statement will be in the down.sql file:
DROP TABLE tasks;
After you add these statements to the respective files, apply the migrations with the following command:
diesel migration run
To confirm that this works, check the parent directory for a new file named db.sqlite3. You can add this to your .gitignore file if you use one, along with the target/ and .env files.
Also, try running diesel migration redo to confirm that the down.sql file correctly undoes the up.sql file.
So far, we’ve created the database using Diesel. Now, we need to write a module to connect to the database, and also write the to-do API logic.
But first, let’s make the following changes to our Cargo.toml file:
[package]
name = "rusty-rocket"
version = "0.1.0"
edition = "2021"

# See more keys and their definitions at https://doc.rust-lang.org/cargo/reference/manifest.html

[dependencies]
rocket = { version = "0.5.0-rc.2", features = ["json"] }
sqlx = { version = "0.6", features = ["runtime-tokio-native-tls", "sqlite"] }
tokio = { version = "1", features = ["full"] }
All our previous dependencies and more are contained in these parent packages.
Next, we’ll add a module by creating a folder with the module’s name along with a Rust source file with the same name. We’ll create a database.rs file and a directory named database. Inside of this directory, we’ll add two files, one for requests and one for responses:
requests.rs file for requests:use rocket::serde::Deserialize;
#[derive(Deserialize, Debug)]
#[serde(crate = "rocket::serde")]
pub struct TaskRequest {
pub name: String,
pub description: String,
}
2) responses.rs file for responses:
use rocket::serde::Serialize;
use sqlx::FromRow;

#[derive(Serialize, FromRow, Debug)]
#[serde(crate = "rocket::serde")]
pub struct Task {
 pub id: i64,
 pub name: String,
 pub description: String,
}
Now. we’ll make the module public by calling it in the database.rs file. We’ll also make connections to the database, as well as write the create and get functions for making and polling tasks.
The logic looks like this:
use sqlx::{Pool, Sqlite};

pub mod requests;
pub mod responses;

use responses::Task;

pub type DBResult<T, E = rocket::response::Debug<sqlx::Error>> = std::result::Result<T, E>;

pub async fn create_task(
 pool: &Pool<Sqlite>,
 name: &String,
 description: &String,
) -> DBResult<i64> {
 let mut connection = pool
 .acquire()
 .await?;
 let id = sqlx::query_as!(
 Task,
 r#"
 INSERT INTO tasks (name, description) VALUES (?, ?);
 "#,
 name,
 description
 )
 .execute(&mut connection)
 .await?
 .last_insert_rowid();
 Ok(id)
}

pub async fn get_task(pool: &Pool<Sqlite> id: i64) -> DBResult<Task> {
 let mut connection = pool.acquire()
 .await?;
 let task = sqlx::query_as!(
 Task,
 r#"
 SELECT id, name, description from tasks
 WHERE id = ?;
 "#,
 id
 )
 .fetch_one(&mut connection)
 .await?;
 Ok(task)
}

pub async fn get_tasks(pool: &Pool<Sqlite>) -> DBResult<Vec<Task>> {
 let mut connection = pool.acquire()
 .await
 .unwrap();
 let tasks = sqlx::query_as::<_, Task>(
 r#"
 select id, name, description from tasks;
 "#
 )
 .fetch_all(&mut connection)
 .await?;
 Ok(tasks)
}
It’s time to write the routing logic in the main.rs file with the help of the Rocket framework:
#[macro_use]
extern crate rocket;
mod database;

use database::requests::TaskRequest;
use database::responses::Task;
use database::{create_task, get_task, get_tasks, DBResult};
use rocket::serde::json::Json;
use rocket::State;
use sqlx::{Pool, Sqlite, SqlitePool};

#[post("/tasks", format = "json", data = "<task>")]
async fn create(task: Json<TaskRequest>, pool: &State<Pool<Sqlite>>) -> DBResult<Json<Task>> {
 let id = create_task(pool, &task.name, &task.description).await?;
 let task = get_task(pool, id).await?;
 Ok(Json(task))
}

#[get("/tasks")]
async fn index(pool: &State<Pool<Sqlite>>) -> DBResult<Json<Vec<Task>>> {
 let tasks = get_tasks(pool).await?;
 Ok(Json(tasks))
}

#[get("/tasks/<id>")]
async fn detail(id: i64, pool: &State<Pool<Sqlite>>) -> DBResult<Json<Task>> {
 let task = get_task(pool, id).await?;
 Ok(Json(task))
}

#[rocket::main]
async fn main() -> Result<(), rocket::Error> {
 let pool = SqlitePool::connect("sqlite://db.sqlite3")
 .await
 .expect("Couldn't connect to sqlite database");

 sqlx::migrate!()
 .run(&pool)
 .await
 .expect("Couldn't migrate the database tables");

 let _rocket = rocket::build()
 .mount("/", routes![index, create, detail])
 .manage(pool)
 .launch()
 .await?;
 Ok(())
}
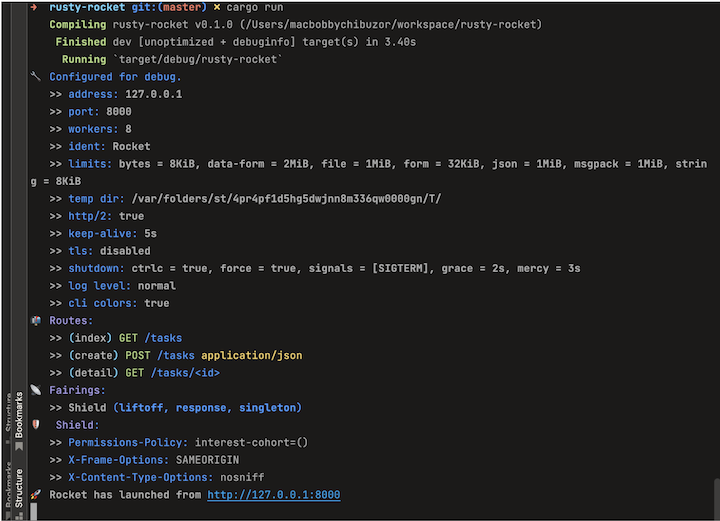
Now, we can proceed to run the project, using the following command in the parent directory:
cargo run
Here’s the output showing Rocket running in the console after the build:
👁 Rocket Running Background After API Build
In this tutorial, we demonstrated how to build a simple to-do API using Rocket and Diesel. We saw how Rust handles connections to the SQLite database using Rocket.
This sample project can be structured in any way you like. For example, using the concepts described here, you could create modules for the schema and model instead of writing them in the database.rs file.
Debugging Rust applications can be difficult, especially when users experience issues that are hard to reproduce. If you’re interested in monitoring and tracking the performance of your Rust apps, automatically surfacing errors, and tracking slow network requests and load time, try LogRocket.
LogRocket lets you replay user sessions, eliminating guesswork around why bugs happen by showing exactly what users experienced. It captures console logs, errors, network requests, and pixel-perfect DOM recordings — compatible with all frameworks.
LogRocket's Galileo AI watches sessions for you, instantly identifying and explaining user struggles with automated monitoring of your entire product experience.
👁 LogRocket Dashboard Free Trial BannerModernize how you debug your Rust apps — start monitoring for free.
Learn how next-browser gives AI agents runtime context for debugging Next.js apps, including React props, hydration, PPR, forms, and performance.
Build dynamic LLM routing in Next.js with OpenRouter, TanStack AI, task classification, model fallbacks, and cost-aware routing.
TSRX adds first-class control flow, conditional hooks, and scoped styles to React via a TypeScript compiler extension — no new framework required.
Learn how to build a full React Native auth system using Better Auth and Expo — with email/password login, Google OAuth, session persistence, and protected routes.
Would you be interested in joining LogRocket's developer community?
Join LogRocket’s Content Advisory Board. You’ll help inform the type of content we create and get access to exclusive meetups, social accreditation, and swag.
Sign up now