 |
VOOZH | about |
|
VOOZH | about |
Over the years, navigation bars, or navbars, have become a staple feature in building websites. They really come in handy for navigating across a website.
👁 Creating a navbar in ReactIn this tutorial, we’ll go over the basics of building navbars in React. We’ll build a navbar that’s fixed to the top of the page, and the user will be able to switch between webpages like you can on a dashboard, for instance. We’ll then put all our newfound skills into practice by building a live sample app.
Our sample app is an animal gallery that we’ll use to view some pictures of different types of animals after we click the animal’s name on the navigation bar.
The Replay is a weekly newsletter for dev and engineering leaders.
Delivered once a week, it's your curated guide to the most important conversations around frontend dev, emerging AI tools, and the state of modern software.
Let’s get right into the code. To create a React app, make sure you have Node.js installed on your computer. If you haven’t built a React app before, you can check to see if you have Node.js installed by typing the following into your terminal:
node -v
If not, just go to the Node.js website to download the latest version.
Once that’s done, we can get started with our React app by running this command:
npx create-react-app nav-bar
Then, we navigate into our project folder on the terminal:
cd nav-bar
Using the React Router library in our application allows us to navigate between different pages or components in React, and actually makes these changes to the URL of each page or component. In fact, it can also handle more complex functionalities, like passing data between pages through queries and nested routes — but that’s beyond the scope of this article.
For this example, we’ll only need to install the React Router library to help us switch views of the animals in our app when we click on the animal names on the links.
npm install react-router-dom
First, we’ll build the navbar itself. To do that, we’ll create a file named navbar.js in src/components/navbar:
import React from 'react';
import { Link } from "react-router-dom";
const navbar= () =>{
 return (
 <div>
 <li>
 <Link to="/">Dogs</Link>
 </li>
 <li>
 <Link to="/cats">Cats</Link>
 </li>
 <li>
 <Link to="/sheeps">Sheeps</Link>
 </li>
 <li>
 <Link to="/goats">Goats</Link>
 </li>
 </div>
 );
}
export default navbar;
We have to import Link from the react-router-dom library we’ve already installed. <Link> comes out of the box from the React Router library to allow us to navigate to the exact route name in the to attribute. What it does is convert whatever’s inside the attribute (text, images, etc.) into a link. When you click it, you are taken to the route that’s already indicated in the to attribute.
to attribute linksBack to our example — we have the name of our animals listed in the to attribute, and each name will link to the corresponding animal page. Now, let’s create the component for the animals we’ve listed in our navbar.
We’ll place them in src/pages/navbar, like so:
import React from 'react';
const Dogs = () =>{
 return (
 <div>
 <h3>Dogs</h3>
 <div>
 <img src="./dog.png"/>
 <img src="./dog.png"/>
 </div>
 </div>
 );
}
export default Dogs;

Dogs.js
import React from 'react';
const Cats = () =>{
 return (
 <div>
 <h3>Cats</h3>
 <div>
 <img src="./cat.png"/>
 <img src="./cat.png"/>
 </div>
 </div>
 );
}
export default Cats;

Cats.js
import React from 'react';
const Sheeps = () =>{
 return (
 <div>
 <h3>Sheeps</h3>
 <div>
 <img src="./sheeps.png"/>
 <img src="./sheeps.jpg"/>
 </div>
 </div>
 );
}
export default Sheeps;

Sheep.js
import React from 'react';
const Goats = () =>{
 return (
 <div>
 <h3>Goat</h3>
 <div>
 <img src="./goats.png"/>
 <img src="./mountaingoat.jpg"/>
 </div>
 </div>
 );
}
export default Goats;

Goat.js
You’ll notice that the code is the same for each animal page.
Now, go into your App.js, and import react-router-dom into your project:
import './App.css';
import { BrowserRouter as Router, Switch, Route } from "react-router-dom";
import navbar from "./components/navbar"
import Dogs from "./pages/Dogs"
import Cats from "./pages/Cats"
import Sheeps from "./pages/Sheeps"
import Goats from "./pages/Goats"
function App() {
 return (
 <Router>
 <navbar />
 <Switch>
 <Route path='/' exact component={Dogs} />
 <Route path='/cats' component={Cats} />
 <Route path='/sheeps' component={Sheeps} />
 <Route path='/goats' component={Goats} />
 </Switch>
 </Router>
 );
}

export default App;
When importing react-router-dom, you can choose to import the specific things we need. Here, we’ll import BrowserRouter (which we renamed Router for clarity), Switch to help us move between one page at a time, and Route to define each path and its related component or page. By default, once the the page loads, the user is taken to the component with the empty path *path*='/'. In our case, the user is initially sent to Dogs.js.
navbar is outside our Switch because we want it to be at the top of our page permanently, so it’s unaffected when we switch between different animal components.
Let’s start the server to view our final product. Just run the command below:
npm start
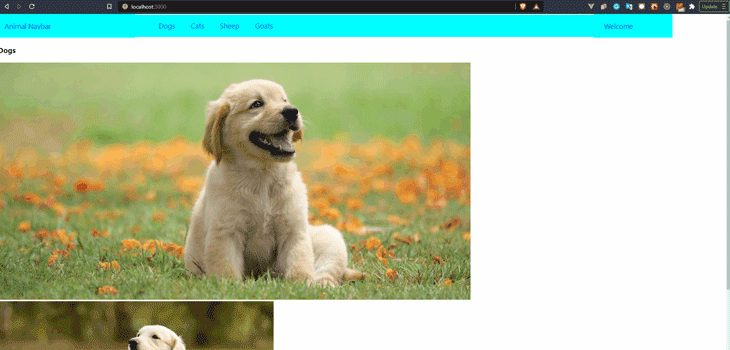
👁 Final demo of our example animal app
Let’s quickly recap on what we’ve done. First, we used Create React App to get started with the project, then we installed the react-router-dom library. Once that was done to our project, we built the navbar itself, and the component for each animal was also added.
Finally, we go into our App.js and connect the names on the navbar to the corresponding component using our react router.
Congrats, you’ve successfully built your first navbar in React. You can find the sample project on my GitHub. Although more complex routing is possible with our navbar, this should be sufficient to handle simple routing between different components through a navbar.
Install LogRocket via npm or script tag. LogRocket.init() must be called client-side, not
server-side
$ npm i --save logrocket

// Code:

import LogRocket from 'logrocket';
LogRocket.init('app/id');
// Add to your HTML:

<script src="https://cdn.lr-ingest.com/LogRocket.min.js"></script>
<script>window.LogRocket && window.LogRocket.init('app/id');</script>
Learn how next-browser gives AI agents runtime context for debugging Next.js apps, including React props, hydration, PPR, forms, and performance.
Build dynamic LLM routing in Next.js with OpenRouter, TanStack AI, task classification, model fallbacks, and cost-aware routing.
TSRX adds first-class control flow, conditional hooks, and scoped styles to React via a TypeScript compiler extension — no new framework required.
Learn how to build a full React Native auth system using Better Auth and Expo — with email/password login, Google OAuth, session persistence, and protected routes.
Would you be interested in joining LogRocket's developer community?
Join LogRocket’s Content Advisory Board. You’ll help inform the type of content we create and get access to exclusive meetups, social accreditation, and swag.
Sign up now