 |
VOOZH | about |
|
VOOZH | about |
In this article, we’re going to have a look at the topic of first-party event tracking. Google announced earlier this year that third-party cookies will no longer be supported in Chrome, and as a result, this topic has become more relevant.
👁 ImageIn this context, we’re going to examine what first-party tracking actually is and how to implement privacy-friendly tracking with a library called walker.js. For that purpose, we will create an example app with Next.js and walker.js from scratch. This tutorial will not cover topics like managing consent and user identification.
Jump ahead:
The Replay is a weekly newsletter for dev and engineering leaders.
Delivered once a week, it's your curated guide to the most important conversations around frontend dev, emerging AI tools, and the state of modern software.
Before we dive into the actual code and the walker.js library, let’s understand what first-party data is. This will be crucial in order to understand the benefits and value of tools like walker.js.
In the end, it is quite simple: first-party data is information collected and owned by a company or website itself. The data is gathered using the company’s or website’s own tools; in contrast, third-party data comes from a company from the outside whose business model is to collect data and sell it.
walker.js is an open source library and first-party tracking solution, which means the data you capture using the library is completely owned by you.
walker.js also addresses privacy in a few other ways. With walker.js, you’re free to send data directly to your own endpoint, just as you can with Google Tag Manager or Google Analytics, which makes it possible to own the entire collection process, from capturing data in the browser to ingesting and ultimately analyzing it. No third-party vendor required!
GDPR forces you to be aware of which tools receive what type of data from your users and document it. This is much easier if you own the data collection process before the data arrives at any third-party tools.
Above that, walker.js makes the communication easier among your website, consent management platform (aka, your CMP or cookie notification banner), and third-party tools because of its consent feature. With a simple function, walker.js handles initialization and any further communication — including the appropriate race conditions for your functional, statistics, and marketing tools that you need the user’s consent for. This way, no tool will be loaded without the corresponding consent from your users due to technical issues or bad implementation.
It is also possible to use walker.js if you want to implement cookie-less tracking by capturing anonymized session IDs or doing campaign-based attribution without collecting any personal identifiable information (PII). Cookie-less tracking allows you to measure basic campaign performance without being able to tie this data to a single user.
If you’re using a first-party data collector and an explicit tracking approach with walker.js, it is also less likely that sensitive data will be captured by accident, reducing your risk of losing important information and increasing focus on the user events you really need to pay attention to.
Another really cool thing about walker.js is that you don’t necessarily need JavaScript to track events. Rather, HTML attributes are used in order to track user events and enrich them with necessary information. This makes your code and tracking system more readable and maintainable.
Below, you can find an example of tagging a page with walker.js from their documentation:
<!-- Generic usage -->
<div
 data-elb="ENTITY"
 data-elb-ENTITY="KEY:VALUE"
 data-elbaction="TRIGGER:ACTION"
 data-elbcontext="KEY:VALUE"
 data-elbglobals="KEY:VALUE"
/>

<!-- Example usage -->
<div data-elbglobals="language:en">
 <div data-elbcontext="test:engagement">
 <div data-elb="promotion" data-elbaction="visible:view">
 <h1 data-elb-promotion="name:Setting up tracking easily">
 Setting up tracking easily
 </h1>
 <p data-elb-promotion="category:analytics">Analytics</p>
 </div>
 </div>
</div>
As you can see, walker.js is based on an entity-action model. In order to understand the context in which a certain event took place, we can define an entity scope with the data-elb attribute. You can even extend the context to include more general info with the data-elbglobals and data-elbcontext attributes.
By setting the data-elbaction attribute, you can define the trigger that fires an action and finally use data-elb-ENTITY in order to set the entities properties.
The example from above will lead to the following data structure, which will be stored in your browser’s data layer once the div container is visible in the viewport:
{
 event: 'promotion view', // combination of entity and action
 data: {
 // arbitrary set properties with the data-elb-promotion attribute
 name: 'Setting up tracking easily',
 category: 'analytics',
 },
 context: {
 // Related properties defined with the data-elbcontext attribute
 test: 'engagement'
 },
 globals: {
 // General Properties defined with the data-elbglobals attribute
 language: 'en'
 },
 user: {
 // stored user ids (manually added once)
 id: 'userid',
 device: 'cookieid',
 hash: 'sessionid',
 },
 nested: [], // all nested entities within the promotion
 id: '1647968113641-01b5e2-5', // timestamp, group & count of the event
 trigger: 'visible', // name of the trigger that fired
 entity: 'promotion', // entity name
 action: 'view', // entity action
 timestamp: 1647968113641, // time when the event fired
 timing: 3.14, // how long it took from the page load to trigger the event
 group: '01b5e2', // random group id for all events on a page
 count: 2, // incremental counter of the events on a page
 version: {
 // Helpful when working with raw data
 walker: 1.5, // used walker.js version
 config: 42, // a custom configuration version number
 },
 walker: true, // flag to filter events
}
If you’re interested in other tagging examples apart from Next.js, you can check out the examples directory in the elbwalker package. In this case, I build a simple ecommerce demo website with home, product details, and login pages.
I’m not going to explain how to setup a Next.js project in this blog post; if you need help with that visit their docs. In order to integrate walker.js in your existing Next.js project, run the following command:
npm i --save @elbwalker/walker.js
The next thing we need to get things running is to initialize the walker:
// ./data/index.ts
import Elbwalker, { elb, WebDestination } from "@elbwalker/walker.js";

export default function setupAnalytics() {
 window.elbLayer = [];
 window.elbwalker = Elbwalker();
 window.elb = elb;

 elb("walker destination", {
 push: console.log,
 } as WebDestination.Function);

 elb("walker run");
}
As a first step, we take in the setupAnalytics() function, then create the elblayer array, where we will store all of our information. With the creation of the Elbwalker() function, we can also pass other options to the elbLayer.
We also imported the elb helper function that pushes events to the elbLayer. At this point, it will help us define a destination and call elb("walker run") to actually start the walker.
For the sake of simplicity, we will only define the console as our destination in this tutorial. walker.js supports the following destinations by default (there are more to come):
Generally, you can add any destination to the walker. Check out the docs regarding destinations to find out how to add your custom destination.
We will use the setupAnalytics() function inside the pages/_app.tsx component to actually setup the walker:
// pages/_app.tsx
...
import "../styles/globals.css";
import type { AppProps } from "next/app";
import { useEffect } from "react";

export default function App({ Component, pageProps }: AppProps) {
 useEffect(() => {
 const initTracking = async () => {
 const setupAnalytics = (await import("../data/index")).default;
 setupAnalytics();
 };
 initTracking();
 }, []);

 return (
 <>
 ...
 </>
 );
}
You will notice that I outsourced the import and the call of the setupAnalytics() function inside a useEffect Hook. Since Next.js creates this page on the server side, we need to wait with the setup until the page loads in the browser. The reason for that is because walker.js needs access to the document interface, which is only available on the client side. If we called the setupAnalytics() function outside the useEffect Hook, we would get a ReferenceError saying that the document is not defined.
Now that we have successfully set up the walker, we can move on to tagging pages. In the first step, we’ll use some of the pre-defined triggers that come with walker.js. Below is a table listing all available triggers:
| Event | Definition |
load |
after loading a page when the DOM is ready |
click |
when the element or a child is clicked |
visible |
after the element has been in the viewport for at least 50 percent for one second |
hover |
each time the mouse enters the corresponding element |
submit |
on a valid form submission |
wait(ms) |
waits ms seconds (15 seconds by default) until triggering |
pulse(ms) |
recurring triggers every ms seconds (15 seconds by default) if page is not hidden |
custom |
calling elbLayer.push(), see using JavaScript |
scroll(y) |
fires when min. y percent of the element’s height is above the bottom of the window, e.g., scroll(80) for an 80 percent threshold |
In the following sections, we will add page view, hover, and click events.
In the pages/index.tsx file, which represents our homepage, we will firstly add load and wait triggers. Thanks to how we set up our walker, we don’t have to explicitly add a load trigger in order to for our example to generate a page view event; this will be thrown automatically with each walker run.
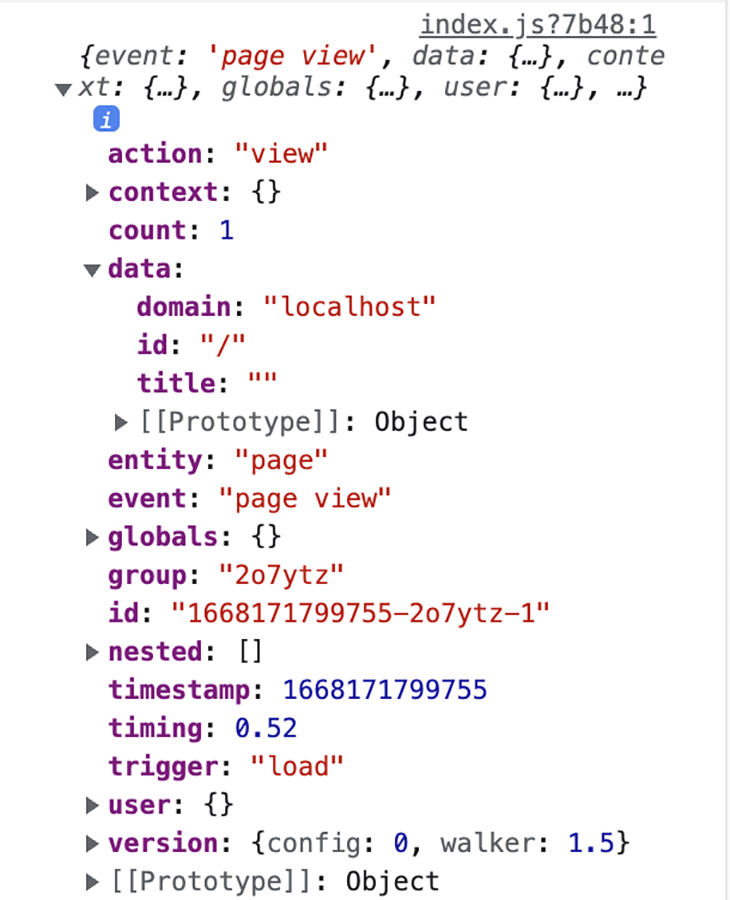
If we visit the homepage of the demo webpage, following output will be generated in the console:
👁 The output of our homepage in the console
The login route will generate this event:
👁 The login route output in the console
However, we must explicitly add the rest of the triggers.
wait trigger to our homepageNext, we want to add the wait trigger to our homepage. This trigger can be used to determine whether or not a user is generally interested in our site (i.e., to measure bounce rates). The walker will wait a specified amount of milliseconds until triggering.
// pages/index.tsx
export default function Home() {
 ...

 return (
 <div
 className="relative bg-gray-800 overflow-hidden"
 data-elbcontext="test:home_engagement"
 >
 <div className="relative pt-6 pb-16 sm:pb-24">
 <main className="mt-16 sm:mt-24">
 <div className="mx-auto max-w-7xl" data-elb="home">
 <div
 className="lg:grid lg:grid-cols-12 lg:gap-8"
 data-elbaction="wait(10000):interested"
 >
 ...
 );
}
In this case, we wait 10 seconds until the trigger is fired. With data-elbcontext="test:home_engagement", we say that we’re generally testing user engagement on the homepage; with data-elb="home", we set the entity and scope, and finally, data-elbaction="wait(10000):interested" sets the trigger and the corresponding action.
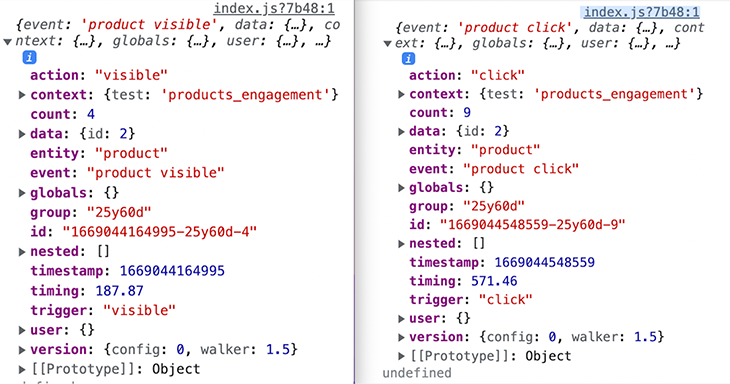
click and hover eventsNext, let’s implement click and hover events for the products overview:
👁 Console output for our click and hover events on the products overview page
👁 Demo of our click and hover events on the products overview page
The corresponding code looks like this, and can be found in components/organisms/products.tsx:
import { products } from "../../utils/mockProducts";

export default function Products() {
 return (
 <div className="bg-white" data-elbcontext="test:products_engagement">
 <div className="mx-auto max-w-2xl py-16 px-4 sm:py-24 sm:px-6 lg:max-w-7xl lg:px-8">
 <h2 className="text-3xl font-extrabold tracking-tight text-gray-900 sm:text-4xl mb-10">
 Trending products
 </h2>

 <div className="grid grid-cols-1 gap-y-10 gap-x-6 sm:grid-cols-2 lg:grid-cols-3 xl:grid-cols-4 xl:gap-x-8">
 {products.map((product) => (
 <a
 key={product.id}
 href={product.href}
 className="group"
 target="_blank"
 data-elb="product"
 data-elbaction="click"
 data-elb-product={`id: ${product.id}`}
 >
 <div data-elbaction="visible" className="aspect-w-1 aspect-h-1 w-full overflow-hidden rounded-lg bg-gray-200 xl:aspect-w-7 xl:aspect-h-8">
 …
 </div>

 );
}
The most important information in this snippet can be found in the map-method, where we iterate over all items in the products array. With data-elb="product", we set our entity to be a product. We can use data-elbaction="click; hover" in order to track the users clicking and hovering over the products.
If you take a closer look at the screenshots showing the console logs from the hover and click events, you’ll notice that the data property holds the product ID for the hovered/clicked product. We can dynamically add the product ID to the event by adding data-elb-product={`id: ${product.id}`} to our code. You can add any property to your entity, but in this case, we can also add the name, price, etc.
So far, we’ve looked at how to easily tag pages with the pre-built triggers. But Walker.js also allows us to implement custom triggers that we can push to the elbLayer by ourselves using JavaScript.
For this purpose, we’re going to implement a trigger to detect whether a user has typed an invalid password (password length shorter than 8 characters) and another trigger that will track whether a user focused on a specific input field.
You can find further information on how to use JavaScript to track events in the walker.js documentation. Generally, the workflow looks like this:
import { elb } from '@elbwalker/walker.js';

elb('entity action', data, trigger, nested, context);
First, let’s implement the password validation event. Similar to the code snippet above, we can define a new event called checkPassword:
// utils/customEvents.ts
export const checkPassword = async (entity: string) => {
 const { elb } = await import('@elbwalker/walker.js');
 elb(`${entity} shortPassword`, { domain: 'localhost' }, 'validation', {
 test: 'password validation',
 });
};
As a second step, we need to import the checkPassword function in the location we want to validate the password input. The handleSubmit function, below, will be called each time the Create your account button is clicked.
// components/organisms/account.tsx
const handleSubmit = (e: MouseEvent<HTMLButtonElement>) => {
 if (password.length < 8) {
 e.preventDefault();
 checkPassword('account');
 }
 };
For the second custom event, we again need a function that pushes the event to the elbLayer:
// utils/customEvents.ts
export const trackInput = async (
 e: React.ChangeEvent<HTMLInputElement>,
 entityAction: string
) => {
 const { elb } = await import("@elbwalker/walker.js");

 elb(entityAction, { domain: "localhost", inputField: e.target.id }, "focus", {
 test: "input field engagement",
 });
};
We’re passing inputField: e.target.id to our data object so that we can distinguish our focus between several input fields. This event can now be added to any input field in your app. In our case, we will add it to the signup component on our homepage.
// components/organisms/account.tsx/AccountSignUp
<div>
 <label htmlFor="name" className="sr-only">
 Full name
 </label>
 <input
 onFocus={(e) => {
 trackInput(e, "account focus");
 }}
 type="text"
 name="name"
 id="name"
 autoComplete="name"
 placeholder="Full name"
 />
…
</div>
As you can see, we simply added the trackInput function to the onFocus property of the input element. Below you can find the result of this implementation:
👁 Applying the trackInput function on the onFocus property
In this blog post, we covered the topic of privacy-friendly data tracking and had a detailed look at the walker.js library, which allows you to implement first party data tracking in your application easily.
If you’re interested in using the walker.js library, feel free to check out the GitHub repo!
Install LogRocket via npm or script tag. LogRocket.init() must be called client-side, not
server-side
$ npm i --save logrocket

// Code:

import LogRocket from 'logrocket';
LogRocket.init('app/id');
// Add to your HTML:

<script src="https://cdn.lr-ingest.com/LogRocket.min.js"></script>
<script>window.LogRocket && window.LogRocket.init('app/id');</script>
Learn how next-browser gives AI agents runtime context for debugging Next.js apps, including React props, hydration, PPR, forms, and performance.
Build dynamic LLM routing in Next.js with OpenRouter, TanStack AI, task classification, model fallbacks, and cost-aware routing.
TSRX adds first-class control flow, conditional hooks, and scoped styles to React via a TypeScript compiler extension — no new framework required.
Learn how to build a full React Native auth system using Better Auth and Expo — with email/password login, Google OAuth, session persistence, and protected routes.
Hey there, want to help make our blog better?
Join LogRocket’s Content Advisory Board. You’ll help inform the type of content we create and get access to exclusive meetups, social accreditation, and swag.
Sign up now