 |
VOOZH | about |
|
VOOZH | about |
Svelte Commerce is a new Svelte template by Vercel that allows you to launch a fully functional ecommerce store with Shopify, shockingly fast. Even though it can be considered a starter kit, it is fully functional and has all the features needed in an ecommerce store with high performance. In addition, it was built with the fast and efficient Svelte Web framework.
👁 Deploy Your Ecommerce Store With the New Svelte CommerceIn this piece, I’ll show you step-by-step how to set up an ecommerce store with Svelte Commerce and deploy it to Vercel and Netlify.
Jump ahead:
The first step in setting up your store with Svelte Commerce is to ensure you have Node.js installed on your computer. If you don’t have Node.js installed, check the official documentation to download and install it.
Svelte Commerce is an open source template created and hosted by Vercel in their GitHub repository.
Installing it just means cloning it from the GitHub repository. You can clone it by running git clone https://github.com/vercel/sveltekit-commerce. Then, navigate into the cloned project and install the dependencies using cd sveltekit-commerce && npm install.
Remember that the default package manager used in Svelte Commerce is pnpm. If you have pnpm installed, then go ahead and type pnpm install. Otherwise, you can use yarn or npm install — in that case; you’ll need to delete the pnpm-lock.yml file from the project root.
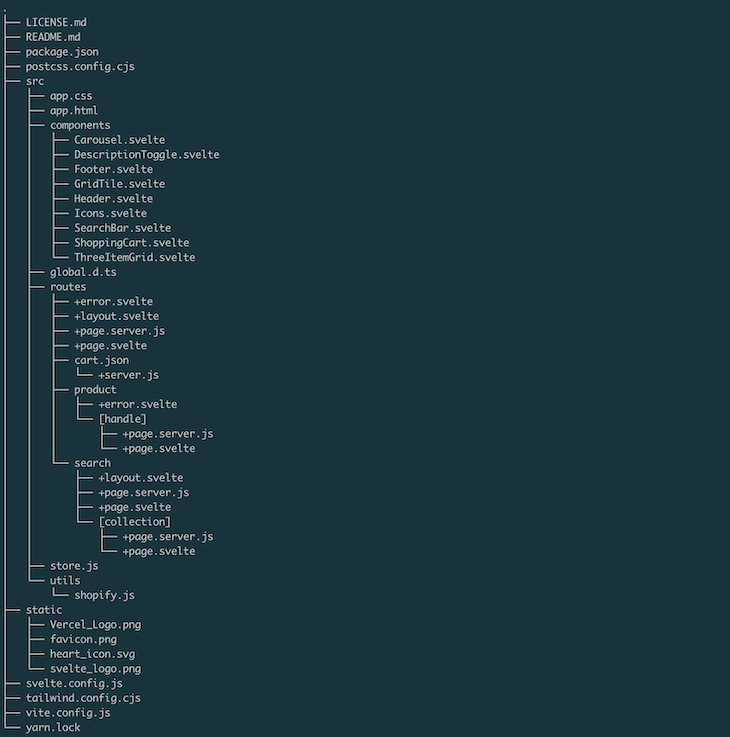
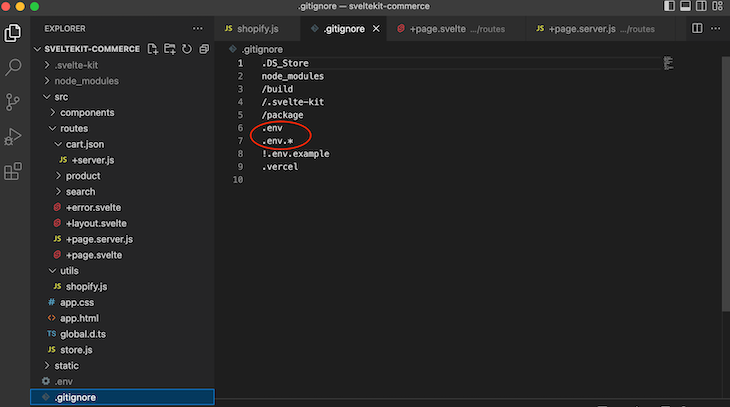
Your file structure should look like so:
👁 Svelte Commerce File Structure
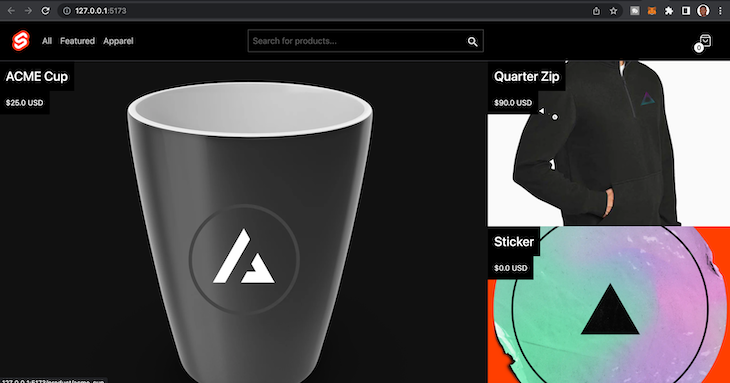
To verify that you have everything in order, run npm run dev on your Terminal and visit the URL that will display on your screen. You should see something like the page below:
This confirms that we’ve successfully cloned the default version of Svelte Commerce, and we are ready to make it our own.
So, Svelte Commerce helps you with the presentation layer of your ecommerce store. It, however, depends on the datastore that you’ll provide. By default, Svelte Commerce uses data from your Shopify store via the Shopify storefront API.
When you clone the project, you’ll see that it has some default Shopify credentials in the shopify.js file. This credential is a sample credential added by the Vercel team to enable the example template to work:
├── src
│ ├── store.js
│ └── utils
│ └── shopify.js
Let’s edit it to add our own custom Shopify store credentials. The shopify.js file will contain the code below:
// src/utils/shopify.js
export async function shopifyFetch({ query, variables }) {
 const endpoint =
 import.meta.env.VITE_SHOPIFY_API_ENDPOINT ||
 'https://next-js-store.myshopify.com/api/2021-10/graphql.json';
 const key =
 'ef7d41c7bf7e1c214074d0d3047bcd7b';

 try {
 const result = await fetch(endpoint, {
 method: 'POST',
 headers: {
 'Content-Type': 'application/json',
 'X-Shopify-Storefront-Access-Token': key
 },
 body: { query, variables } && JSON.stringify({ query, variables }),
 duplex: 'half'
 });


 return {
 status: result.status,
 body: await result.json()
 };
 } catch (error) {
 console.error('Error:', error);
 return {
 status: 500,
 error: 'Error receiving data'
 };
 }
}
Notice that the credentials are shown in plaintext. We’ll need to add it to the .env file and delete the default credentials. So, our updated code will look like the one below:
// src/utils/shopify.js
...
const endpoint = import.meta.env.VITE_SHOPIFY_API_ENDPOINT;
const key = import.meta.env.VITE_SHOPIFY_API_ACCESS_TOKEN;
...
Now, create a .env file in the root directory of your project and add the following variables:
//.env
VITE_SHOPIFY_API_ENDPOINT=
VITE_SHOPIFY_API_ACCESS_TOKEN=
To get these credentials, we need a Shopify account and a storefront. If you don’t have an account yet, create an account and then create a store.
When you have a store all setup, your SHOPIFY_API_ENDPOINT will be in this pattern https://{shopname}.myshopify.com/admin/api/2022-10/graphql.json. So, replace the shop name with your shop name. Then, you can update your .env variable to have that now:
//.env
VITE_SHOPIFY_API_ENDPOINT=https://{shopname}.myshopify.com/admin/api/2022-10/graphql.json
VITE_SHOPIFY_API_ACCESS_TOKEN=
Next, let’s get the Shopify access token from your dashboard.
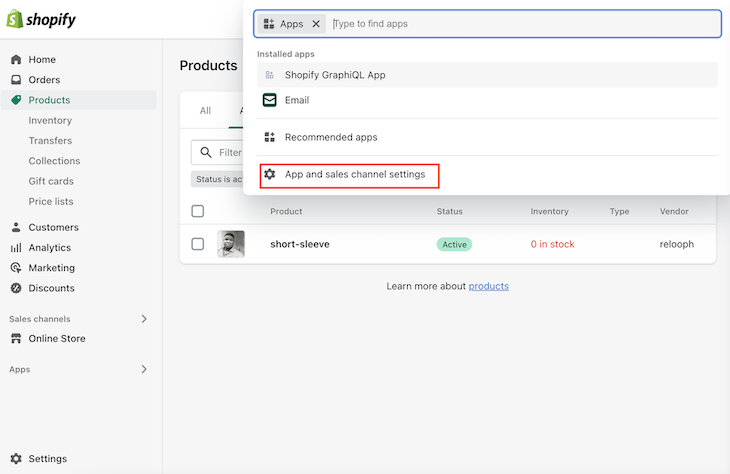
Your Shopify backend is where everything happens, from generating your access tokens and creating the products that will be displayed on your ecommerce store, to viewing your inventory and analytics, and more.
Let’s complete the basic setup in the backend that will allow us to generate the storefront access token for Svelte Commerce. From your Shopify admin dashboard, click the Apps link on the sidebar. This will return a pop-up. Then, click the App and sales channel settings in the pop-up:
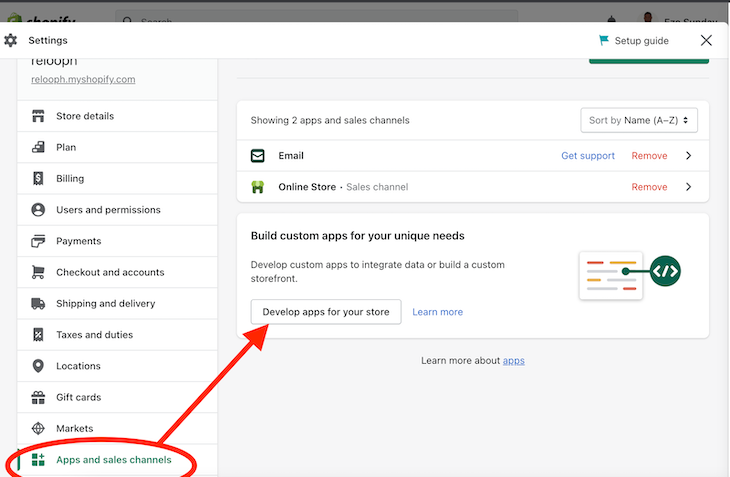
You’ll be taken to a screen where you will see Develop apps for your store button, as shown below. Click it:
👁 Svelte Commerce Develop Apps
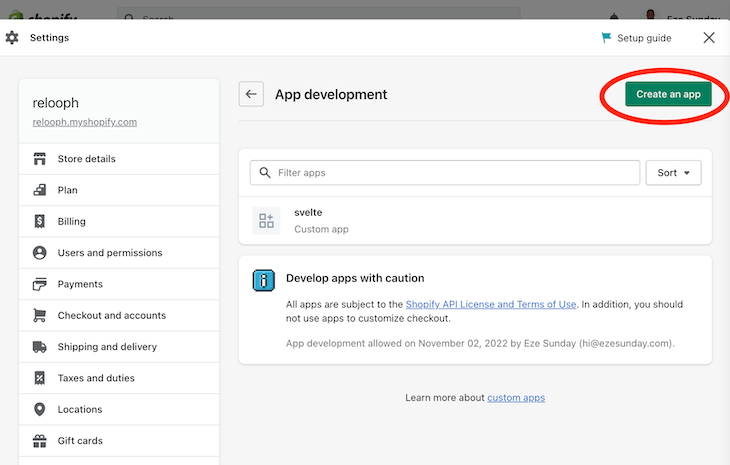
Then, you’ll be taken to another screen that allows you to search for your apps or create a new one. Select the Create an app button as shown below:
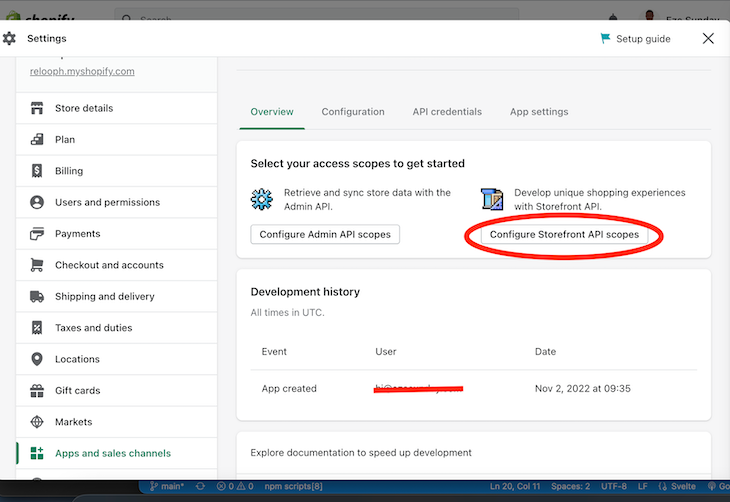
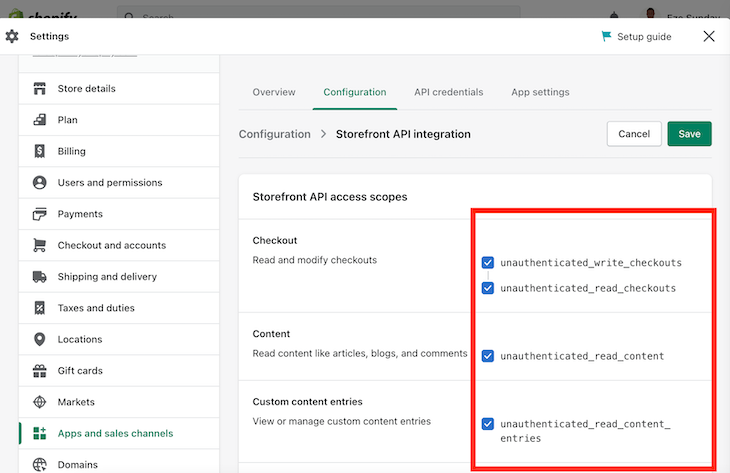
When the app is created, you will need to configure the Storefront API scopes as shown below on the next page:
👁 Svelte Commerce Storefront API
From there, select all the Storefront API access scopes and select Save:
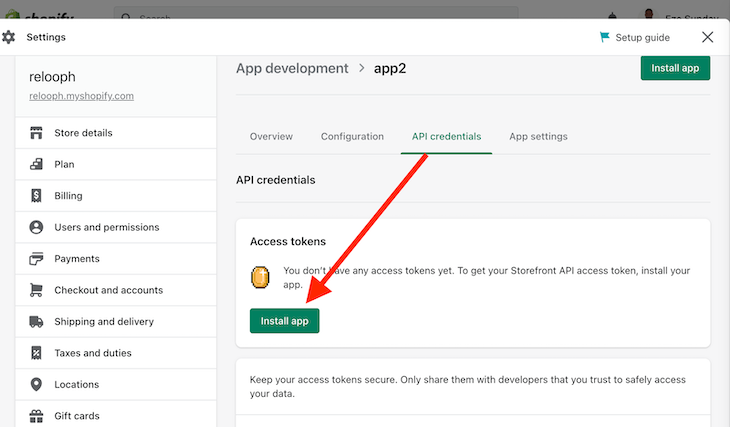
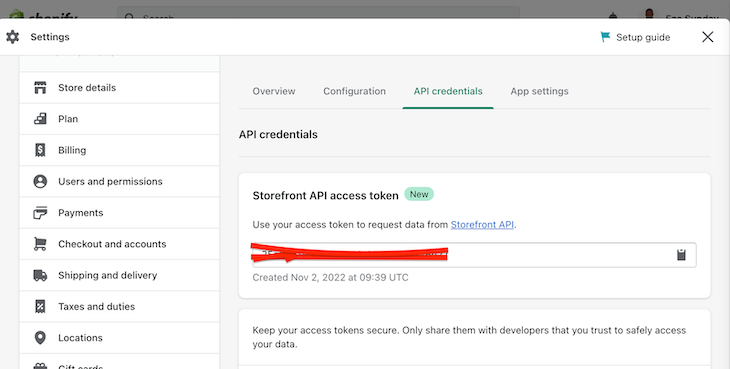
Finally, navigate to the Credentials section and click the Install App button:
When the installation process is complete, you will be shown your Storefront API access token as shown below:
Copy the token, head over to your .env file, and add the access token there:
//.env
VITE_SHOPIFY_API_ENDPOINT=https://{shopname}.myshopify.com/admin/api/2022-10/graphql.json
VITE_SHOPIFY_API_ACCESS_TOKEN=kjbabfjkhfkjhjbkvhjvfiofguhfy
Congrats! Your Svelte Commerce-powered ecommerce store is ready. You can tweak the design as you desire or any additional functionalities. All the products you create on your Shopify Store will appear in your custom shop. The best part is that you don’t have to pay a Shopify monthly fee because the API is free to use.
Now that we have our ecommerce store ready, let’s deploy it for the world to see.
One of the reasons developers love to use Vercel is that it’s incredibly easy for anyone to deploy supported applications to their server within minutes. You don’t have to worry about any complicated setup. All you really need to do is push your code to GitHub and connect it to Vercel once, and each time you push a new update to GitHub, it will be automatically deployed.
So, let’s start with creating an account on the Vercel website and logging in.
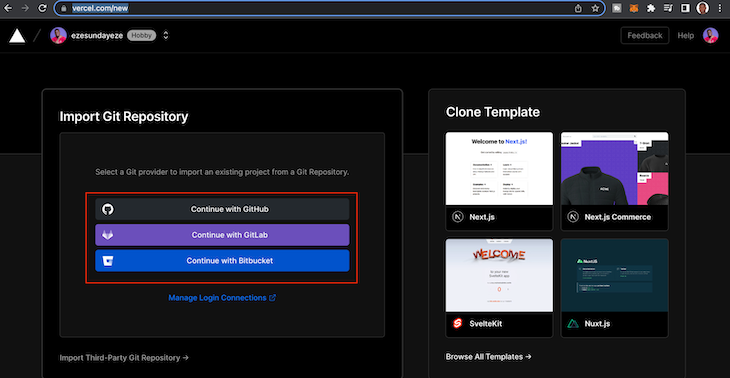
Next, push your Store code to GitHub, GitLab, or BitBucket because Vercel will trigger automated deployment via this medium each time you push an update to the repository. Make sure to double-check that you have added the .env file to your .gitignore, file so you don’t accidentally push your secrets to GitHub:
For this step, stay logged into your Vercel account while you visit this https://vercel.com/new. Then, you should see a page requesting to connect your Git Provider. Go ahead and connect and import your project:
👁 Connect Git Provider to Svelte Commerce
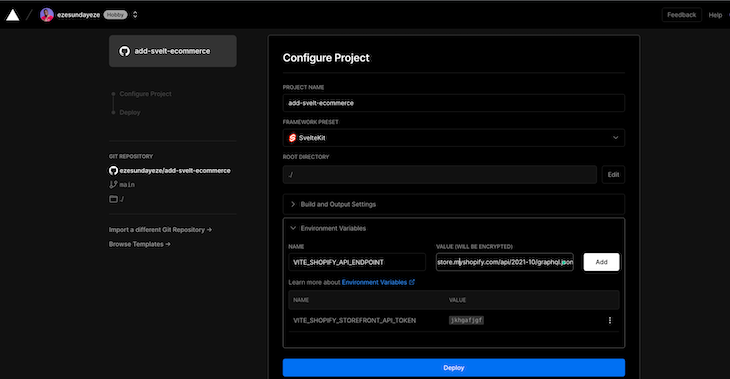
Finally, configure it to use your Environment Variables and click the Deploy button as shown below:
👁 Deploy Svelte Commerce with Vercel
That’s all there is to it. Just wait for the deployment to complete, and you should have your ecommerce store ready to show the world. That was simple, right?
Let’s deploy to Netlify as well.
Netlify users enjoy similar benefits as Vercel users — straightforward deployment, developer-friendliness, and it shines for frontend applications and lambda functions.
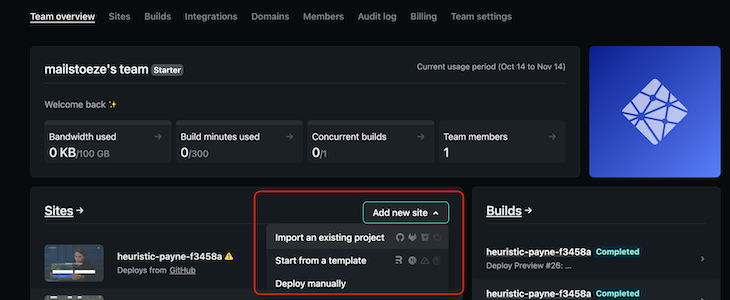
Like we did for Vercel, there is not much difference with Netlify in terms of deployment. First, sign up and log in to your Netlify backend.
From there, click the Add new site button and choose to import it from your GitHub profile. Then, you’ll be guided to connect your GitHub repository:
👁 Svelte Commerce Deploy with Netlify
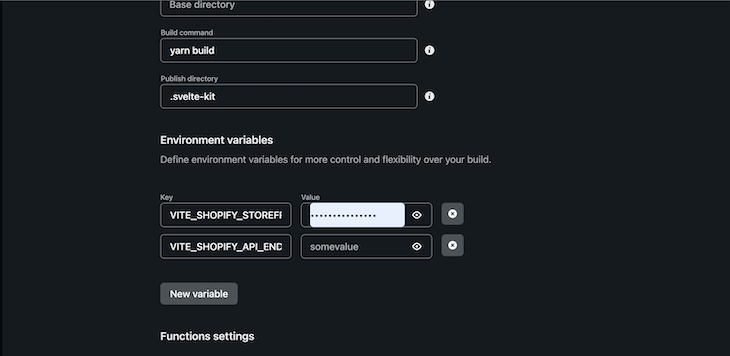
When you select your repository and import it, click the advanced option and add your environment variables:
👁 Svelte Commerce Advanced Option
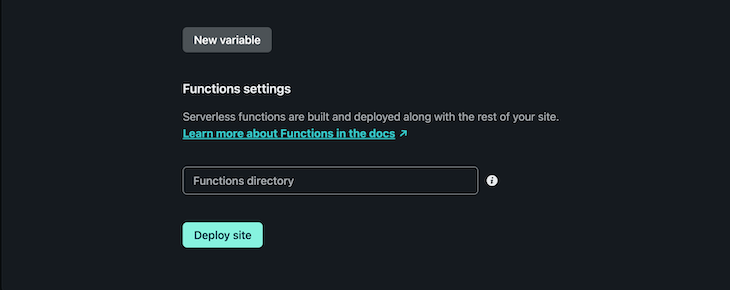
Next, click the Deploy site button:
👁 Svelte Commerce Deployed with Netlify
Voila! Your ecommerce store is ready.
You can always work to improve your ecommerce store by leveraging all of Svelte’s features and taking advantage of the free features that the Shopify API provides.
Building a full-scale ecommerce store takes time and comes with some financial and mental burdens. If you are trying to build a custom ecommerce store for your business or a client, and you want to do it fast without compromising security or quality, then Svelte Commerce is probably your best bet.
LogRocket lets you replay user sessions, eliminating guesswork around why users don't convert by showing exactly what users experienced. It captures console logs, errors, network requests, and pixel-perfect DOM recordings — compatible with all frameworks.
LogRocket's Galileo AI watches sessions for you, instantly identifying and explaining user struggles with automated monitoring of your entire product experience.
Start proactively monitoring your ecommerce apps — try LogRocket for free.
We built the same app in TanStack Start RSC and Next.js RSC. TanStack shipped 40% less JS and built 4x faster — but Next.js is still the safer production bet.
From RSC vulnerabilities and the Vercel breach to TypeScript 7.0 Beta and AI agents — the nine frontend storylines that defined H1 2026, ranked.
AI tools generate working React code fast, but miss race conditions, empty states, debouncing, and accessibility. Here’s how to catch bugs before production.
Learn how to use Gemini CLI subagents to delegate frontend, backend, testing, and docs tasks to specialized agents with guardrails and clear ownership.
Would you be interested in joining LogRocket's developer community?
Join LogRocket’s Content Advisory Board. You’ll help inform the type of content we create and get access to exclusive meetups, social accreditation, and swag.
Sign up now