 |
VOOZH | about |
|
VOOZH | about |
Google Stitch is an AI-powered UI design and development tool that allows users to generate professional-quality UI designs along with the corresponding web and mobile source code from text prompts.
👁 vibe based ui building with google stitchVibe coding involves using AI to build applications via prompts. This practice is often very effective for design, as we will discover in this article.
We‘ll use Stitch to generate the app design and implement it in React code using Google Gemini.
Follow along to build a responsive, multi-page e-commerce site containing a Homepage, Product listing, and Detail pages — with the UI generated from text prompts using Stitch. Our page will also contain the Add to Cart and Checkout pages.
We’ll also discuss the benefits and drawbacks of using Stitch, and how tools like these will affect the future of UI and frontend design.
There are a couple of assumptions in this article:
The Replay is a weekly newsletter for dev and engineering leaders.
Delivered once a week, it's your curated guide to the most important conversations around frontend dev, emerging AI tools, and the state of modern software.
Currently, Stitch can be accessed through stitch.withgoogle.com
Stitch has a bold and straight-to-the-point interface.
It comes with a big input for prompting the AI on the kind of features of the design you want. Stitch is currently in beta and offers both standard and experimental modes. The standard mode is powered by Google Gemini 2.5 Flash, which allows quick editing of themes and export to Figma.
The experimental mode has Gemini 2.5 Pro under the hood, offering the capability to upload a design image as a sketch, mockup, or visual inspiration to Stitch for inspiration.
Stitch can be accessed at no cost, but it comes with specific usage limitations.
Every user is granted a monthly quota of 350 UI generations in standard mode and 50 generations in experimental mode. When you are finally done with your design, Stitch outputs the design through a design file, code, and Figma file. The code is just a plain HTML file with styling done using Tailwind CSS. It utilizes a CDN to support Tailwind CSS.
In this article, we will not be using Tailwind CDN, but instead will set up React and Tailwind locally on our machine and copy the HTML we need to get our vibe coding going. Let’s get into it.
It is worth noting that exporting to a Figma file is only available in Standard mode.
These are a few things you have to keep at the back of your mind to get optimum results with Stitch:
With that out of the way, it is time to put the above-stated points into practice.
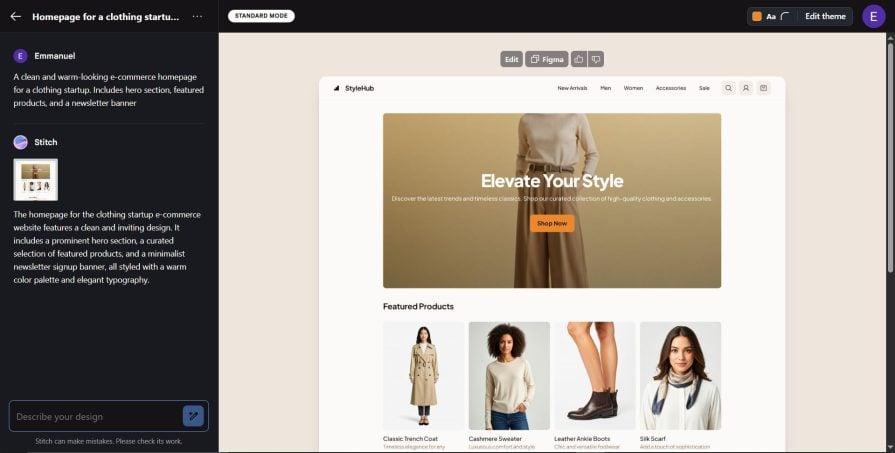
We are creating an e-commerce homepage for a fictional clothing brand. We need it to come with a hero section, featured products, and a newsletter banner.
Let’s distill the above into a clear and concise prompt:
A clean and warm-looking e-commerce homepage for a clothing startup. Includes hero section, featured products, and a newsletter banner:👁 first draft of ecommerce site with stitch
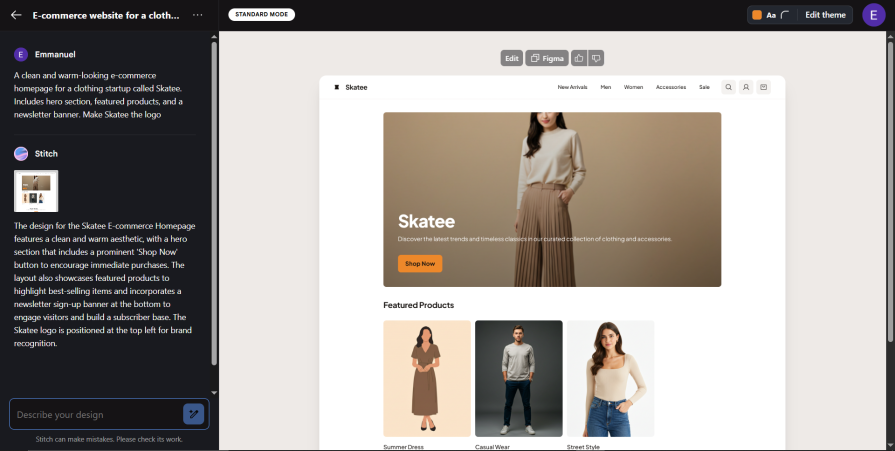
Let’s further fine-tune our prompt:
A clean and warm-looking e-commerce homepage for a clothing startup called Skatee. Includes hero section, featured products, and a newsletter banner. Make Skatee the logo:👁 adding skatee logo to google stitch design
Did you notice the change? Our app logo was changed to Skatee, the name of the fictional clothing company we created.
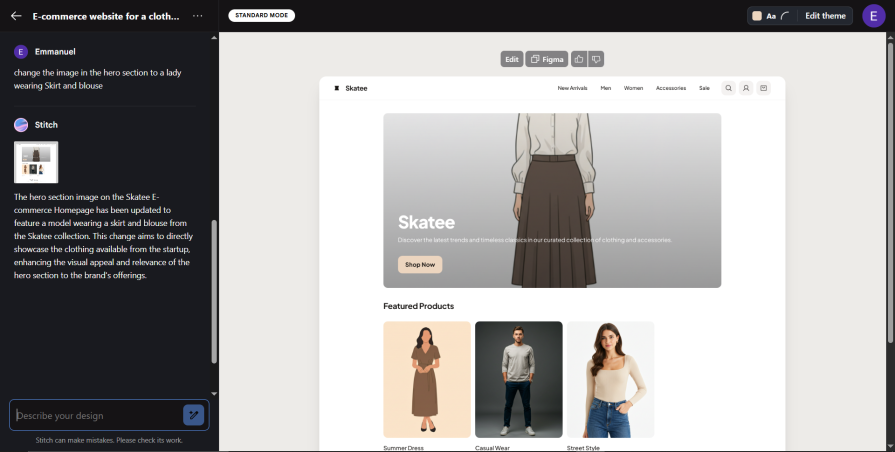
We can even go a bit further by telling Stitch to change a particular image. Let’s refine our prompt.
Click on the Describe your design input and paste in the following prompt:
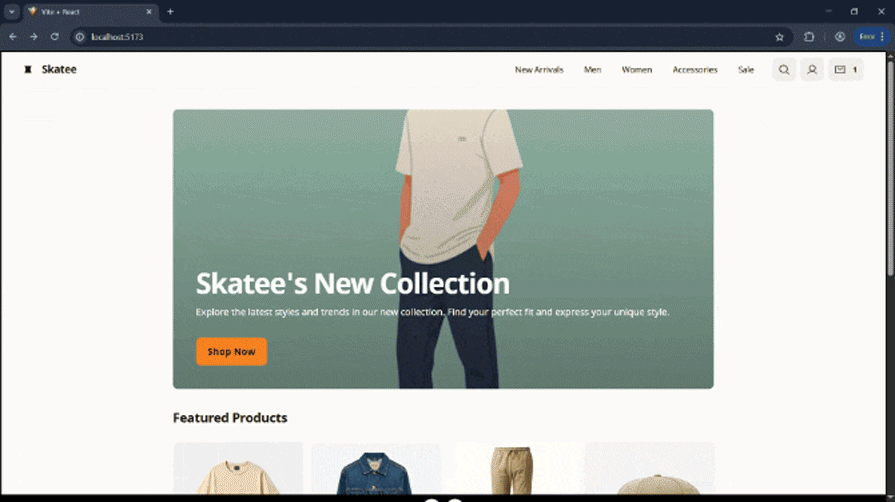
Change the image in the hero section to a lady wearing a Skirt and blouse:👁 changing image in hero section
Luckily for us, in the experimental version of Stitch, prompt output can be enhanced using images.
All we need to do is give Stitch a prompt and back it up with a product mockup, logo, or vibe board.
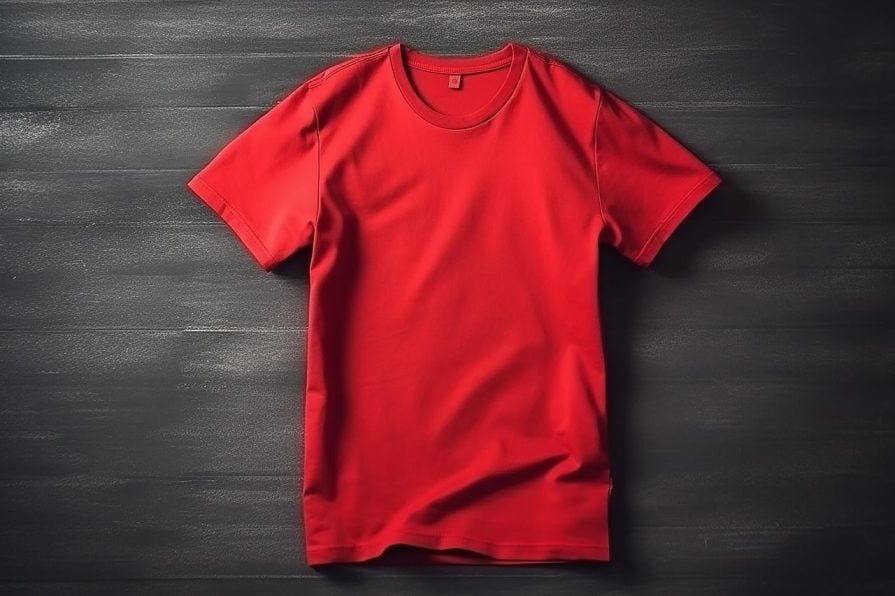
I downloaded a t-shirt image from Pixabay. Let’s use it to experiment with Stitch:👁 t shirt from pixabay
Open Stitch and switch to Experimental Mode. Then click the image icon to upload the image:
👁 experimental mode with google stitch
Select the t-shirt photo you downloaded.
Then paste in the prompt below:
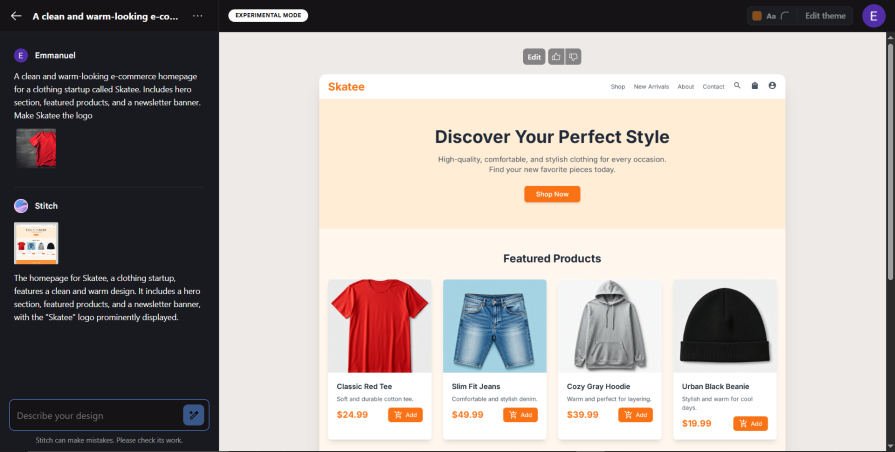
A clean and warm-looking e-commerce homepage for a clothing startup called Skatee. Includes hero section, featured products, and a newsletter banner. Make Skatee the logo:👁 adding the t shirt pic to skatee website
As seen from the generated design, Stitch included a similar-looking t-shirt to the one we uploaded.
Did you also notice the subtle orange colour theme it added to our design? This can also be done with a design mockup.
With all of that out of the way, we can now create our designs.
Our app consists of 5 pages:
Open Stitch and paste in the prompt below:
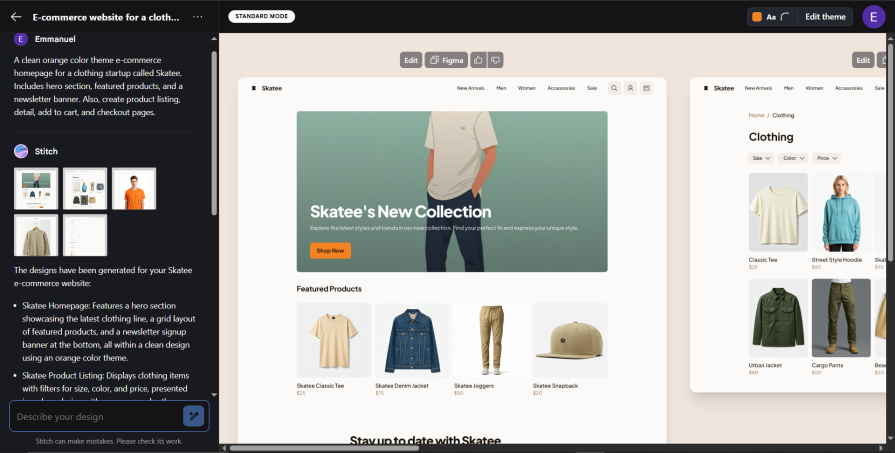
A clean orange color-themed e-commerce homepage for a clothing startup called Skatee. Includes hero section, featured products, and a newsletter banner. Also, create product listing, detail, add to cart, and checkout pages: 👁 adding the theme to the ecommerce page
In the next section, we will experiment with creating a mobile version of our app using the same prompt.
Stitch has a separate tab for generating mobile versions of designs. Let’s try using the same prompt we used in generating the web version.
Click the mobile tab and add the following prompt:
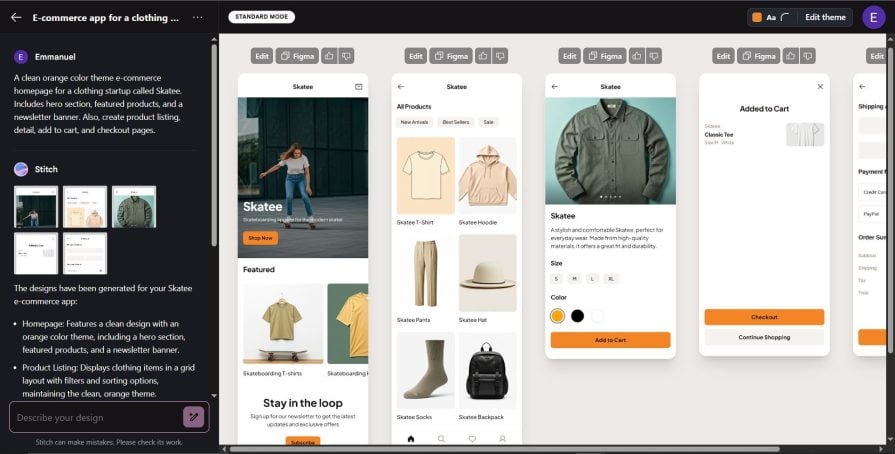
A clean orange color theme e-commerce homepage for a clothing startup called Skatee. Includes hero section, featured products, and a newsletter banner. Also, create product listing, detail, add to cart, and checkout pages:👁 generating mobile version with google stitch
Like the web version we designed earlier, we can also customize it to our taste through prompts.
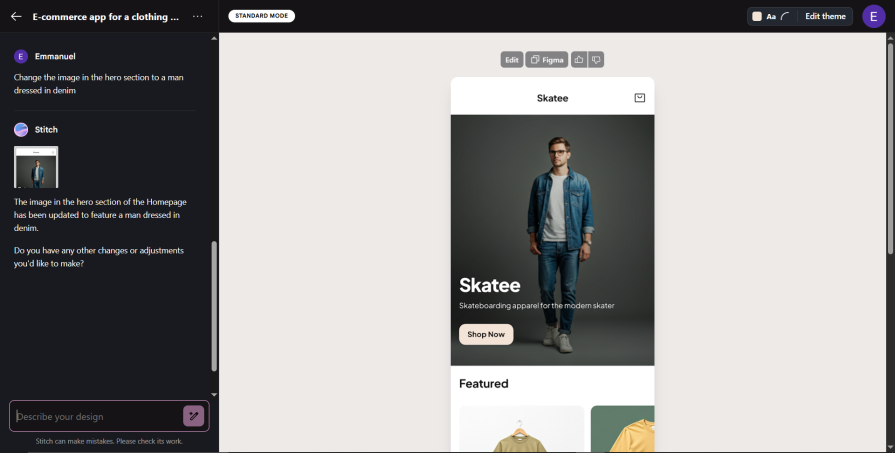
Let’s play around with it a bit and ask it to change the image in the hero section. Click on the Describe your design input and paste in the following prompt:
Change the image in the hero section to a man dressed in denim:👁 change the image in the hero section to a man dressed in denim
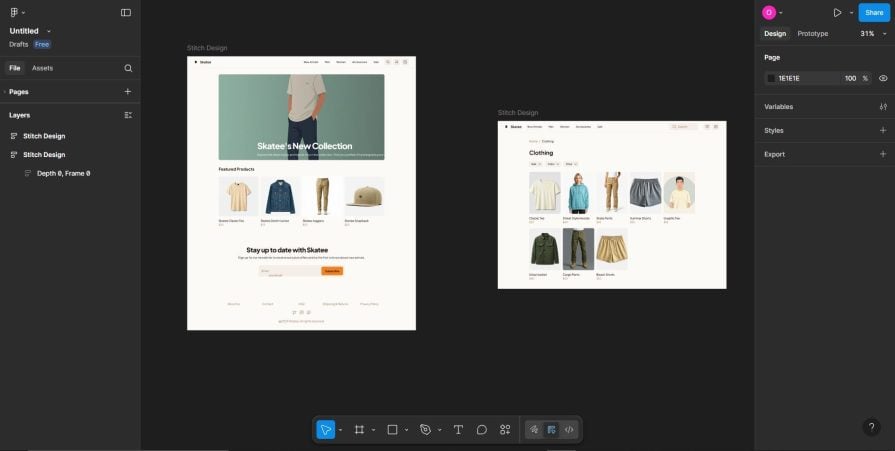
In this section, we will be looking at exporting generated designs into Figma and static HTML/CSS.
Click the Figma button at the top of the design, and paste it into Figma like so: 👁 exporting google stitch design to figma
Here you can edit and customize the design like a normal Figma file, and collaborate with other designers.
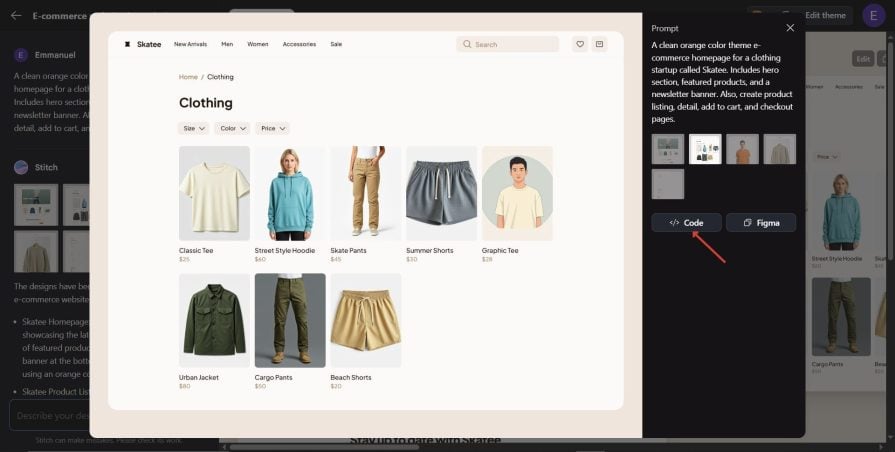
Apart from the design file, Stitch also generates frontend code consisting of HTML and Tailwind CSS that you can copy and use in your project.
To copy the code, click on the design, and it will pop out like so:👁 copying the code
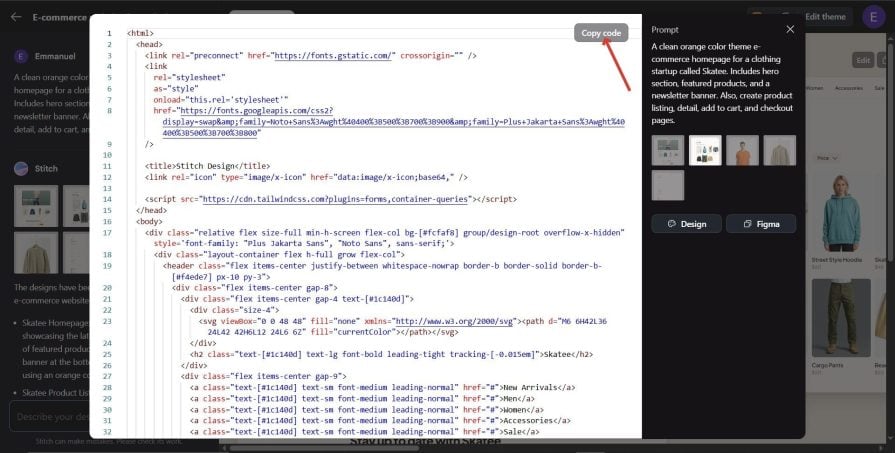
Then click on code, and it will pop out a read-only code editor where you can copy the code for editing or use in your project:👁 google stitch read only copy editor
The code editor in Stitch is read-only, so you may want to copy and paste it into your code editor for further tweaking.
Let’s get all the different pages of our e-commerce app working by using another AI tool, Google Gemini. We will prompt Gemini to create the React code for us.
We’ll give it the HTML we copied to create our e-commerce app.
Open up Gemini and give it the following prompt:
I have a React boilerplate already set up on my machine, together with Tailwind CSS. I will give you plain HTML files of 5 pages of an e-commerce site that you will make work with React.
The pages are the homepage, product Listing, detail, add to cart, and checkout. Make it into a working e-commerce site. Handle page routing with React Router DOM, and I want the pages to be interactive
After that, Gemini will ask for the following:
It will then spit out complete and working React code that we will copy and paste into an App.jsx file (if you used Vite to initialize your React app) or App.js file (if you used create-react-app).
You can even prompt Gemini to rewrite the HTML to any framework of your choice. Let’s see our code in action.
Here is the generated code for the React components:
Copy and paste the generated code into the App.jsx file and run the project. Since I used Vite to initialize my React boilerplate, I’ll run npm run dev.
Here is what the final app build looks like:👁 gif of final app build using google stitch
For now, the best use cases for Stitch are MVPs, startups, and side projects, as it can help in a faster launch.
You just need to type what you need, and Stitch will turn it into clean UI, plus the HTML and CSS to match. With this, you can start building right away and not be bothered by design bottlenecks.
I’d only recommend Stitch for prototypes for now, as it has not matured enough for building enterprise software.
It’s not all rosy with Stitch, as it tends to produce similar-looking designs. If you need custom designs, then Stitch is not the tool for you.
Stitch doesn’t seem to understand design positioning, and especially center positioning. It sometimes produces misaligned design elements.
When you prompt it to correct the misalignment, it returns the same result, claiming that the issue has been fixed. Getting the best outcome from Stitch requires some level of experience with design tools like Figma, as well as a good knowledge and experience with CSS.
Since Stitch is in beta, we can hope that the tool will get better with time. For now, it is not replacing Figma, but it can be helpful for design inspiration.
There is so much to be said about how AI has changed the way we complete tasks. A tool like Stitch helps cut the product ideation and implementation stage to a minimum.
But there is still room for improvement. Stitch can be improved to produce responsive HTML code for all screen sizes.
In this article, we designed the pages of our fictional startup called Skatee. We also generated mobile versions of our Skatee e-commerce app.
We finally ended by giving the HTML/CSS code we generated from Stitch to Gemini to generate the program logic for us.
Learn how next-browser gives AI agents runtime context for debugging Next.js apps, including React props, hydration, PPR, forms, and performance.
Build dynamic LLM routing in Next.js with OpenRouter, TanStack AI, task classification, model fallbacks, and cost-aware routing.
TSRX adds first-class control flow, conditional hooks, and scoped styles to React via a TypeScript compiler extension — no new framework required.
Learn how to build a full React Native auth system using Better Auth and Expo — with email/password login, Google OAuth, session persistence, and protected routes.
Would you be interested in joining LogRocket's developer community?
Join LogRocket’s Content Advisory Board. You’ll help inform the type of content we create and get access to exclusive meetups, social accreditation, and swag.
Sign up now