 |
VOOZH | about |
|
VOOZH | about |
Editor’s note: This article was last updated by Oyinkansola Awosan on 10 September 2024 to cover how to integrate Bootstrap into a Next.js project using the App Router, and to offer insight into using Bootstrap’s SCSS variables for further customization.
👁 Handling Bootstrap Integration With Next.jsThere are several reasons you would want to incorporate Bootstrap into your Next.js application, one of which being that Bootstrap comes prebuilt with a ton of utility classes and components.
However, when integrating Bootstrap into a Next.js application (as opposed to a standard React app), certain errors occur, particularly when using Bootstrap JavaScript features such as toggle navbars and modals. These issues are frequently caused by Next.js’s SSR functionality.
The Replay is a weekly newsletter for dev and engineering leaders.
Delivered once a week, it's your curated guide to the most important conversations around frontend dev, emerging AI tools, and the state of modern software.
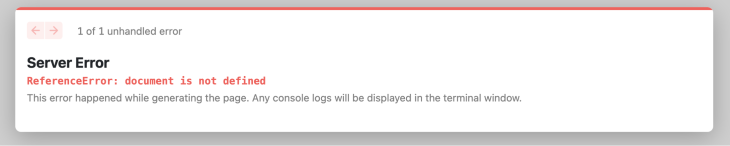
Server-side rendering (SSR) is a functionality of Next.js and other JavaScript libraries/frameworks that allow web applications to convert HTML files on the server into fully rendered HTML pages for the client. This means that all activities are performed on the server, and markup files generated as a result of these processes are rendered to the client.
The included JavaScript in Bootstrap, on the other hand, requires the browser’s document object to function. And, because Next.js is SSR by default, this implies that the document object is not ready until the page is fully loaded, which is why you would get the following error when attempting to use Bootstrap’s JavaScript capabilities in a Next.js application:
This article will explain how to fix this error as well as how to effectively use the full capabilities of Bootstrap in a Next.js application.
There are several approaches to incorporating Bootstrap into a Next.js application. However, the most common is to install the Bootstrap package. Before we get started, let’s create a new Next.js app:
npx create-next-app my-app
Once the project has been created, we can easily add the most recent stable version of Bootstrap to it by running the following command:
npm install bootstrap
Following the installation of Bootstrap, we can import the minified Bootstrap CSS file into the Next.js entry pages/_app.js file, as shown below:
import "bootstrap/dist/css/bootstrap.min.css"; // Import bootstrap CSS
import "../styles/globals.css";

function MyApp({ Component, pageProps }) {
 return <Component {...pageProps} />;
}

export default MyApp;
Like in the code above, you want to make sure that you’ve imported Bootstrap before your custom CSS file so that it would be easier to override Bootstrap’s default styling with this file (if the need arises, of course).
Modals in Next.js present content that requires the user’s focus. Typically, they function as overlays that appear above the primary webpage, often containing notifications, requests for signup or login, and similar elements. Their use is particularly relevant in situations where user action is necessary prior to resuming interaction with the standard webpage.
These modals can be developed as modal components, which are self-sufficient and reusable code segments designed to manage the functionality and user interface for opening, displaying, and closing the modal. This approach enhances the reusability of modals throughout various sections of the application.
As previously explained, if we directly import the Bootstrap-bundled JavaScript file, we will get a 'document is not defined' error. We may, however, leverage React’s useEffect() Hook to accomplish the import:
// src/_app.js

import { useEffect } from "react";

useEffect(() => {
 require("bootstrap/dist/js/bootstrap.bundle.min.js");
}, []);
The useEffect() Hook in React is used to instruct our React components that they need to do something after rendering, and in this scenario, we’d use it to import the bundled Bootstrap JavaScript file.
With this addition, the complete code for our _app.js file would look like this:
import "bootstrap/dist/css/bootstrap.min.css";
import "../styles/globals.css";
import { useEffect } from "react";

function MyApp({ Component, pageProps }) {
 useEffect(() => {
 require("bootstrap/dist/js/bootstrap.bundle.min.js");
 }, []);

 return <Component {...pageProps} />;
}

export default MyApp;
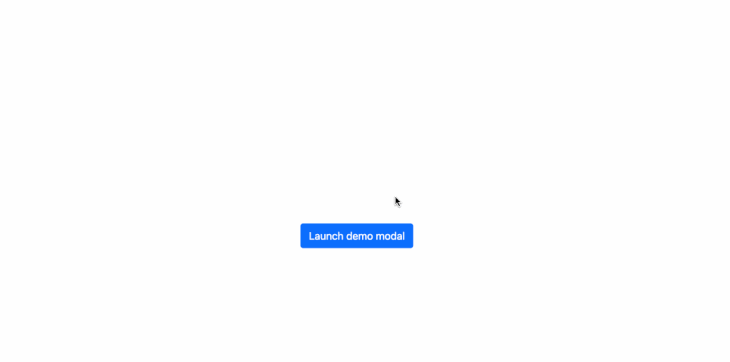
Let’s create a simple modal to try things out. Open the default pages/index.js file and replace its contents with the following code:
export default function Home() {
 return (
 <div className="d-flex
justify-content-center align-items-center">
 <button
 type="button"
 className="btn btn-primary"
 data-bs-toggle="modal"
 data-bs-target="#exampleModal"
 >
 Launch demo modal
 </button>

 <div
 className="modal fade"
 id="exampleModal"
 tabIndex="-1"
 aria-labelledby="exampleModalLabel"
 aria-hidden="true"
 >
 <div className="modal-dialog">
 <div className="modal-content">
 <div className="modal-header">
 <h5 className="modal-title" id="exampleModalLabel">
 Modal title
 </h5>
 <button
 type="button"
 className="btn-close"
 data-bs-dismiss="modal"
 aria-label="Close"
 ></button>
 </div>
 <div className="modal-body">...</div>
 </div>
 </div>
 </div>
 </div>
 );
}
If we run our app with npm run dev and preview its output in the browser, we should observe that everything works as intended:
There are scenarios where you’d want to trigger Bootstrap components programmatically rather than by adding the data property to a button as we did in our previous example.
For modals, for example, the Bootstrap package exports a module that allows us to perform this operation:
import bootstrap from "bootstrap";

 const showModal = () => {
 const myModals = new bootstrap.Modal("#exampleModal");
 myModal.show();
 };
If we run this code, however, we’ll still get the 'document is not defined' error because we’d clearly also imported Bootstrap into this current page.
One approach to fixing this is to simply use the JavaScript destructuring syntax to import the aforementioned module in our custom function, as shown in the code below:
 const showModal = () => {
 const { Modal } = require("bootstrap");
 const myModal = new Modal("#exampleModal");
 myModal.show();
 };
We can then call the showModal() function to easily display our modal:
<button type="button" className="btn btn-primary" onClick={showModal}>
 Launch demo modal
</button>
Applying this to a sample page, our full code would look like this:
// pages/index.js

export default function Home() {
 const showModal = () => {
 const { Modal } = require("bootstrap");
 const myModal = new Modal("#exampleModal");

 myModal.show();
 };
 return (
 <div className="d-flex">
 <button type="button" className="btn" onClick={showModal}>
 Launch demo modal
 </button>

 <div
 className="modal fade"
 id="exampleModal"
 tabIndex="-1"
 aria-labelledby="exampleModalLabel"
 aria-hidden="true"
 >
 <div className="modal-dialog">
 <div className="modal-content">
 <div className="modal-header">
 <h5 className="modal-title" id="exampleModalLabel">
 Modal title
 </h5>
 <button
 type="button"
 className="btn-close"
 data-bs-dismiss="modal"
 aria-label="Close"
 ></button>
 </div>
 <div className="modal-body">
 . . .
 </div>
 </div>
 </div>
 </div>
 </div>
 );
}
This solution works nicely with all Bootstrap components that support toggle via JavaScript. Below is an example of how it might be used in a carousel:
// pages/index.js

export default function Home() {
 const toggleCarousel = (action) => {
 const { Carousel } = require("bootstrap");
 const carousel = new Carousel("#myCarousel");
 if (action === "next") {
 carousel.next();
 } else {
 carousel.prev();
 }
 };
 return (
 <>
 {" "}
 <div>
 <button
 className="btn btn-primary"
 onClick={() => toggleCarousel("prev")}
 >
 Prev
 </button>
 <button
 className="btn btn-primary ms-3"
 onClick={() => toggleCarousel("next")}
 >
 Next
 </button>
 </div>
 <div>
 <div
 id="myCarousel"
 className="carousel slide"
 data-bs-touch="false"
 data-bs-interval="false"
 style={{ maxWidth: "50%", height: "80vh", overflow: "hidden" }}
 >
 <div className="carousel-inner">
 <div className="carousel-item active">
 <img src="https://picsum.photos/id/237/700/700" />
 </div>
 <div className="carousel-item">
 <img src="https://picsum.photos/id/123/700/700" />
 </div>
 <div className="carousel-item">
 <img src="https://picsum.photos/id/234/700/700" />
 </div>
 </div>
 </div>
 </div>
 </>
 );
}
Running the code above, we get the following output in our browser:
You can alternatively create these Bootstrap components as custom React components and then import them into your pages using Next.js’s dynamic import feature while disabling SSR.
With the Next.js dynamic import feature, we are able to import components dynamically and work with them. While the dynamic import allows server-side rendering, we can disable it if desired.
Below is how to import a sample component in this manner:
import dynamic from 'next/dynamic'

const DynamicComponentNoSSR = dynamic(
 () => import('../components/SampleComponent'),
 { ssr: false }
)
And in our component file located at ../components/SampleComponent, we are able to run any client-side JavaScript-related code before the component is rendered.
To try things out, let’s create a new file, Toast.js, in the root source of our Next.js project, and paste the following contents into it:
const bootstrap = require("bootstrap");

const Toast = () => {
 const showToast = () => {
 const toast = new bootstrap.Toast("#liveToast");
 toast.show();
 };

 return (
 <div>
 <button type="button" onClick={showToast} className="btn">
 Show Toast
 </button>

 <div className="toast-container position-fixed p-3 top-0">
 <div
 id="liveToast"
 className="toast"
 role="alert"
 aria-live="assertive"
 aria-atomic="true"
 >
 <div className="toast-header">
 <img src="..." className="rounded" alt="..." />
 <strong className="me-auto">Bootstrap</strong>
 <small>2 secs ago</small>
 <button
 type="button"
 className="btn-close"
 data-bs-dismiss="toast"
 aria-label="Close"
 ></button>
 </div>
 <div className="toast-body">
 Hello, world! This is a toast message.
 </div>
 </div>
 </div>
 </div>
 );
};

export default Toast;
The code above is simply a template for a Bootstrap Toast component that we are triggering programmatically with a custom function, and as you can see, we have also imported the Bootstrap module at the top level of this component.
Now, let’s go to our public/index.js file and dynamically import this component while disabling SSR:
import dynamic from "next/dynamic";

const Toast = dynamic(() => import("../Toast"), {
 ssr: false,
});

export default function Home() {
 return (
 <>
 <Toast />
 </>
 );
}
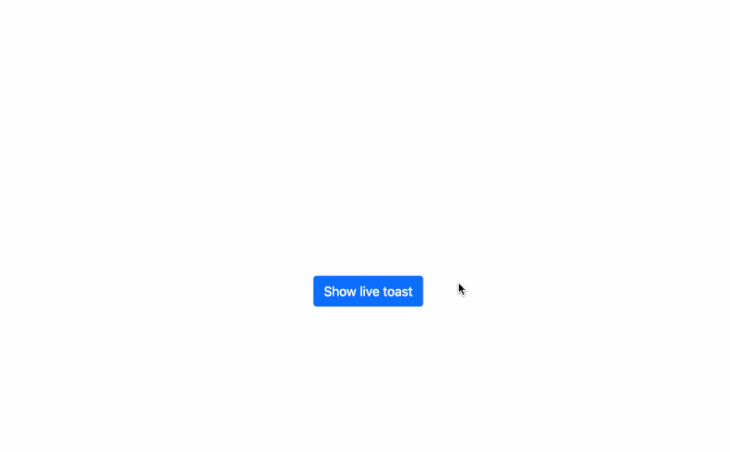
If we run our code and click the button, we should see that everything works perfectly without throwing any errors:
With the App Router, which was introduced in Next.js 13, the project structure differs slightly from the Pages Router. In the App Router, each route is defined in the app directory, and you can still easily integrate Bootstrap into this setup. Here’s how to incorporate Bootstrap while using the App Router.
First, install Bootstrap:
npm install bootstrap
Next, we’ll configure the layout component. Each layout component defines the structure and global settings for its nested routes. You can import Bootstrap in the layout.js file above import './globals.css':
// app/layout.js
import "bootstrap/dist/css/bootstrap.css"; // Import the bootstrap styles
import './globals.css' // Import the global styles
Bootstrap’s JavaScript components, like modals and tooltips, rely on the DOM. To use these, you need to ensure that Bootstrap’s JavaScript is only loaded on the client side. To do this, you will need to modify layout.js or any page that requires Bootstrap JavaScript components. However, a better way is to create a component and import it whenever needed.
Navigate to src/components and create the BootstrapClient.js file with the following contents:
"use client"

import { useEffect } from 'react';

function BootstrapClient() {
 useEffect(() => {
 // Dynamically import Bootstrap JS only in the client-side
 require('bootstrap/dist/js/bootstrap.bundle.min.js');
 }, []);

 return null;
}

export default BootstrapClient;
Now in layout.js, import the new component by running:
import BootstrapClient from '@/components/BootstrapClient.js';
Make sure to return the new component. The final layout.js should look like the following:
// app/layout.js
import 'bootstrap/dist/css/bootstrap.css'; // Import the bootstrap styles
import './globals.css' // Import the global styles
import BootstrapClient from '@/components/BootstrapClient.js'; // Import bootstrap js component

export default function RootLayout({ children }) {
 return (
 <html lang="en">
 <body>
 {children}
 <BootstrapClient />
 </body>
 </html>
 )
}
This will ensure that Bootstrap’s JavaScript is initialized once the page is rendered on the client, preventing SSR errors.
To customize with SCSS variables, navigate to the /styles directory of the Next.js project and create a new custom SCSS file. In that file, you will define the customizations you would like to make.
To do that, you first need to import the Bootstrap SCSS variable and import your custom SCSS file into Next.js.
To import the Bootstrap SCSS, run:
@import "~bootstrap/scss/bootstrap";
To import a custom SCSS file into your _app.js file in the Next app, run:
import '../styles/custom.scss';
This is necessary to make sure that customized changes are implemented across the entire application.
Next, you need to carry out actual customizations like the ones below:
$btn-primary-bg: #26a591;
$btn-primary-border: #28a681;
$spacer: 1.5rem;
$navbar-bg: #26a823;
$body-bg: #f8f9fa;
$body-color: #343a40;
In the code above, we changed the following things:
- Button background primary color
- Button border primary color
- Spacer
- Navbar background color
- Body background color
- Body color
Throughout this article, we discussed how to use Bootstrap’s full capabilities in a Next.js application. We also analyzed the most common issue that occurs while attempting to use Bootstrap JavaScript features, as well as the many methods for resolving this error.
I hope this guide answers your questions about integrating Bootstrap with Next.js!
Debugging Next applications can be difficult, especially when users experience issues that are difficult to reproduce. If you’re interested in monitoring and tracking state, automatically surfacing JavaScript errors, and tracking slow network requests and component load time, try LogRocket.
LogRocket captures console logs, errors, network requests, and pixel-perfect DOM recordings from user sessions and lets you replay them as users saw it, eliminating guesswork around why bugs happen — compatible with all frameworks.
LogRocket's Galileo AI watches sessions for you, instantly identifying and explaining user struggles with automated monitoring of your entire product experience.
The LogRocket Redux middleware package adds an extra layer of visibility into your user sessions. LogRocket logs all actions and state from your Redux stores.
👁 ImageModernize how you debug your Next.js apps — start monitoring for free.
Learn how next-browser gives AI agents runtime context for debugging Next.js apps, including React props, hydration, PPR, forms, and performance.
Build dynamic LLM routing in Next.js with OpenRouter, TanStack AI, task classification, model fallbacks, and cost-aware routing.
TSRX adds first-class control flow, conditional hooks, and scoped styles to React via a TypeScript compiler extension — no new framework required.
Learn how to build a full React Native auth system using Better Auth and Expo — with email/password login, Google OAuth, session persistence, and protected routes.
Would you be interested in joining LogRocket's developer community?
Join LogRocket’s Content Advisory Board. You’ll help inform the type of content we create and get access to exclusive meetups, social accreditation, and swag.
Sign up now