 |
VOOZH | about |
|
VOOZH | about |
The Cardano blockchain is one of the fastest-rising and most widely used blockchains in 2022. The Cardano blockchain is a third-generation, proof-of-stake blockchain platform and home to the ADA cryptocurrency.
👁 How To Build DApps On The Cardano BlockchainIn this tutorial, we’ll show you how to build a DApp on the Cardano blockchain. We’ll cover the following:
sayInputLet’s begin 🎉
The Cardano blockchain is a new blockchain based on the Shelley consensus algorithm. It’s designed to be a secure, scalable, and easy-to-use platform for building and running decentralized applications.
Shelley is a software stack that provides a layer of abstraction over the underlying blockchains.
A blockchain is a distributed database of records linked together by a series of cryptographic proofs. The records are called blocks; the blockchain is a collection of blocks.
Ethereum is a blockchain that is based on the Ethereum Virtual Machine. To make transactions on the Ethereum blockchain, we’ll spend some Ethers. This is the cryptocurrency that is used to pay for the gas in the Ethereum blockchain.
Likewise, in the Cardano blockchain, we’ll spend ADA to pay the gas fees.
A decentralized, distributed app is an application that is not controlled by a single entity. Otherwise, a DApp is just like any conventional app. A DApp can be a web app, command-line app, desktop app, or mobile.
The difference between a DApp and a conventional app is that the conventional app is controlled by a single entity. A DApp has a blockchain as its backend.
For example, a React to-do app might have its data (the to-dos) stored in an Ethereum blockchain. Or, you could build a voting system in Angular and have its data stored in the Cardano blockchain.
As mentioned above, ADA is the native cryptocurrency of the Cardano blockchain. You can use and transfer ADA on the Cardano blockchain just as you would ETH on the Ethereum blockchain.
ADA can be used as both a cryptocurrency and a token. ADA being used as Cardano’s native currency means that it is:
Just like ETH is divided into denominations (e.g., Wei), ADA has denominations as well. Lovelace is the smallest unit of ADA; 1 ADA is equal to 10^(-18) Lovelace, which can be divided into a total of 1,000,000 Lovelaces.
The Cardano blockchain makes it possible to build native tokens. These tokens can be used to represent a value and to trade on the Cardano blockchain.
Tokens can be fungible or non-fungible. Fungible tokens represent a value, whereas non-fungible tokens represent real world items (e.g., a car or a piece of artwork).
In the following sections, we’ll walk through how to write and create smart contracts on the Cardano blockchain using the Plutus programming language.
Plutus is a programming language used for writing smart contracts on the Cardano blockchain. Other programming languages you can use for the Cardano blockchain include Glow lang, Marlowe, etc., but Plutus is the fastest among them.
Plutus is based on Haskell, so using it requires prior knowledge of Haskell programming.
Let’s walk through how to write smart contracts using the Plutus programming language. These apps can run off-chain and manage active contract instances.
According to Cardano Testnets, Plutus contracts consist of parts that run on the blockchain (on-chain code) and parts that run on a user’s machine (off-chain or client code). We’ll write our smart contracts in a Plutus online editor and simulator.
A Plutus smart contract is a Haskell code that runs in a user’s wallet and sends code to the blockchain to be run by the nodes in the blockchain. The smart contracts are run on the blockchain, not on the user’s machine.
Plutus smart contracts have definitions that are used to define the smart contract and its state. Inside these definitions are endpoints, which define the smart contract’s behavior. These endpoints are functions that are executed by the wallet. They are known as off-chain functions and are used to build transactions and send them to the blockchain.
Let’s write a simple DApp in the Cardano blockchain using the Plutus programming language.
We will write a smart contract that will print “Hello, World!” to the console.
Open the Plutus online editor and simulator.
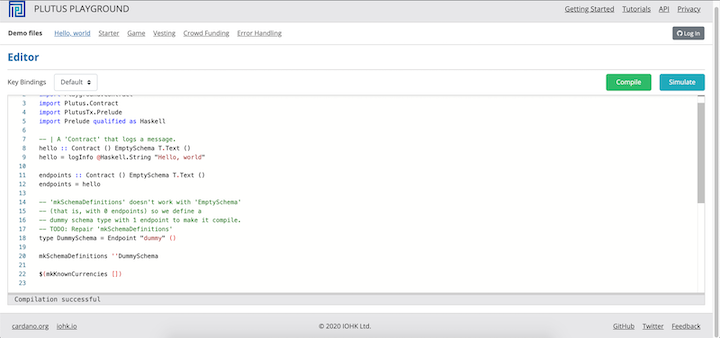
import Data.Text qualified as T
import Playground.Contract
import Plutus.Contract
import PlutusTx.Prelude
import Prelude qualified as Haskell

-- | A 'Contract' that logs a message.
hello :: Contract () EmptySchema T.Text ()
hello = logInfo @Haskell.String "Hello, world"

endpoints :: Contract () EmptySchema T.Text ()
endpoints = hello

type DummySchema = Endpoint "dummy" ()

mkSchemaDefinitions ''DummySchema

$(mkKnownCurrencies [])
The above will already be populated for us. Let’s go through the code:
import Data.Text qualified as T
import Playground.Contract
import Plutus.Contract
import PlutusTx.Prelude
import Prelude qualified as Haskell
Here, we imported the libraries and built-in functions we will need:
Data.Text library is used to convert strings to textPlayground.Contract imports the smart contract interfaces defined in the playgroundPlutus.Contract library is used to define the smart contract from the Plutus core libraryPlutusTx.Prelude library replaces the normal Haskell Prelude library and includes functions that are refined and easier for the PlutusTx compiler to compilehello :: Contract () EmptySchema T.Text () hello = logInfo @Haskell.String "Hello, world"
The above defines a hello function. The Contract () EmptySchema T.Text () tells the compiler the function will return nothing. The logInfo function is a built-in function that logs a message to the console. So, in summary. the hello function will log Hello, world to the console.
endpoints :: Contract () EmptySchema T.Text ()
endpoints = hello
This creates an endpoints function, which will be used to run the hello function. This exposes the hello function to the blockchain.
type DummySchema = Endpoint "dummy" ()

mkSchemaDefinitions ''DummySchema

$(mkKnownCurrencies [])
The above creates the DummySchema type, which is used to define the smart contract’s state. Finally, it exposes the endpoints to the blockchain.
In our Plutus playground, we can click on the green Compile button to compile our contracts. The blue Simulate button will open up a page where we can run the smart contracts on the blockchain.
👁 Compiling Smart Contracts In Plutus Playground
Click on the green Compile button. After a successful compilation, the blue Simulate button will open a page where we can run the smart contracts on the blockchain:
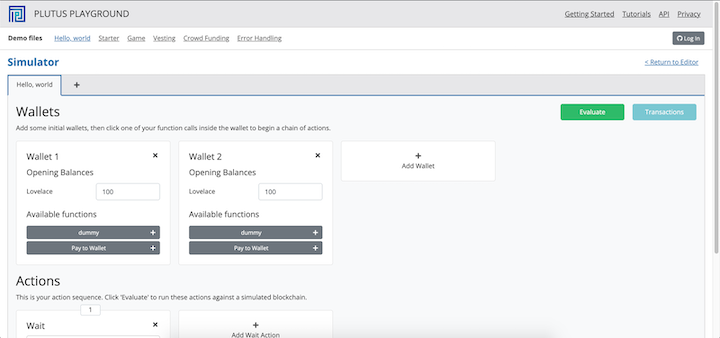
👁 Running Smart Contracts On The Blockchain In Plutus Playground
👁 Running Smart Contracts On The Blockchain In Plutus Playground
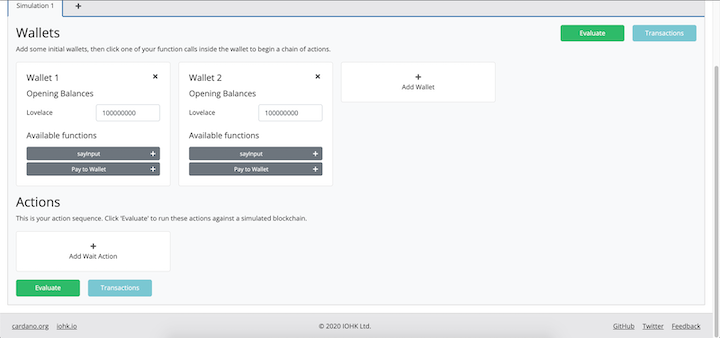
You’ll notice that we have two wallets, each with an open balance of 100 Lovelaces. The Available functions in each wallet will show the functions that are available to be used.
In our case, we see our hello function and another Pay to Wallet function. The Pay to Wallet function is used to send funds to another wallet, and it’s defined by the Plutus contract. We don’t get to see the code because it’s added there when we import the below modules:
import Playground.Contract
import Plutus.Contract
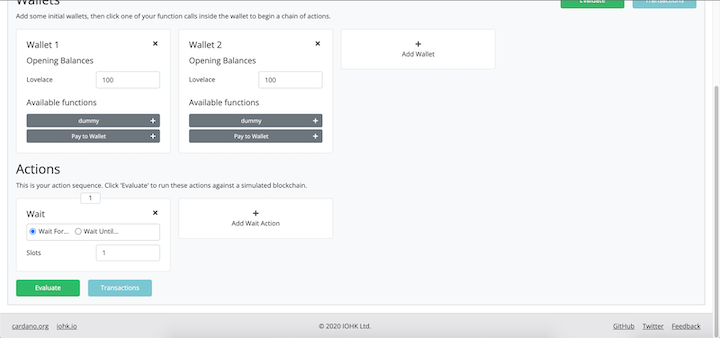
If we look in the below part of the page, we’ll see an Actions section. This section is where the functions we want to run are added when the wallet addresses card above is clicked on.
We have a card in the Actions already, the card simulates delay on the blockchain. We can remove this card by clicking on the “X” icon.
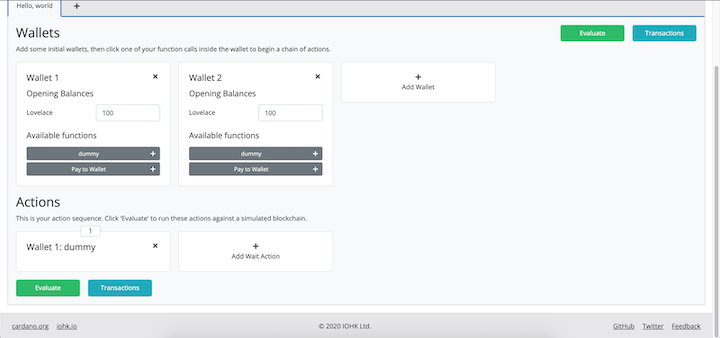
Now, click on the dummy button and you’ll see a card appear on the Actions section:
👁 Plutus Playgroud: Dummy Button
Click on the green Evaluate button and you will see the hello function run on the blockchain. After some time, a Transactions page will appear:
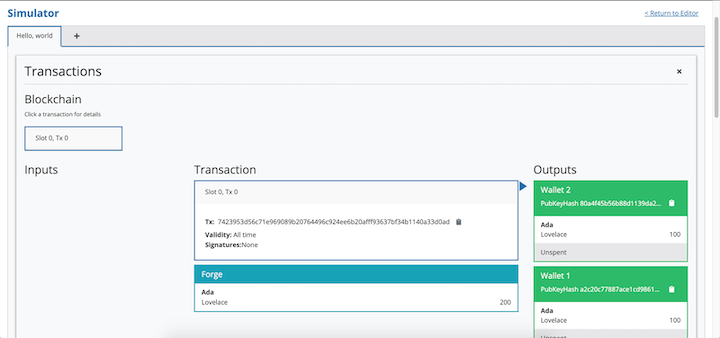
👁 Plutus Playground: Transactions
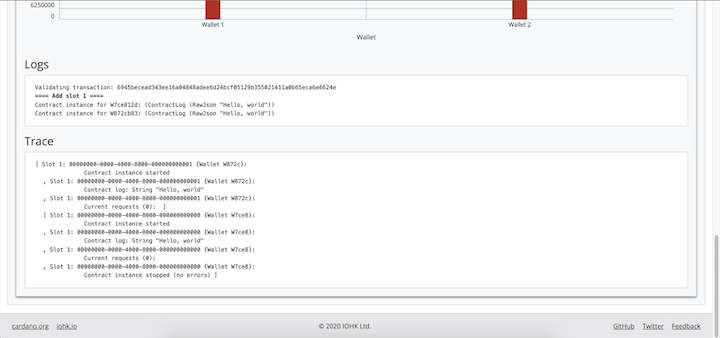
Scroll down to the Logs section and you will see the hello function log Hello, world to the console:
👁 Plutus Playground: Logs Section
sayInput functionLet’s write another program that will take a string and print it to the console.
Add the below code to your Plutus online editor:
import Data.Text qualified as T
import Playground.Contract
import Plutus.Contract
import PlutusTx.Prelude
import Prelude qualified as Haskell

type Schema =
 Endpoint "sayInput" Haskell.String

contract :: AsContractError e => Contract () Schema e ()
contract = selectList [sayInput]

-- | The "sayInput" contract endpoint.
sayInput :: AsContractError e => Promise () Schema e ()
sayInput = endpoint @"sayInput" $ \inputValue -> do
 logInfo @Haskell.String $ inputValue

endpoints :: AsContractError e => Contract () Schema e ()
endpoints = contract

mkSchemaDefinitions ''Schema

$(mkKnownCurrencies [])
We’ve already seen the first part of the code; here, we imported the libraries we need to run the app.
Next, we defined a Schema type. This type is used to define the smart contract’s state. After that, we set up a contract endpoint list and added the sayInput endpoint.
We also defined the sayInput endpoint, which takes a string as input and logs it to the console.
Finally, we made the endpoint available to the blockchain.
Click on the green Compile button. After a successful compilation, you should see this:
👁 Plutus Playgroud: Using The sayIput Function
Click on the blue Simulate button. This will open up a page where we can run the smart contracts on the blockchain.
👁 Plutus Playgroud: Using The sayIput Function
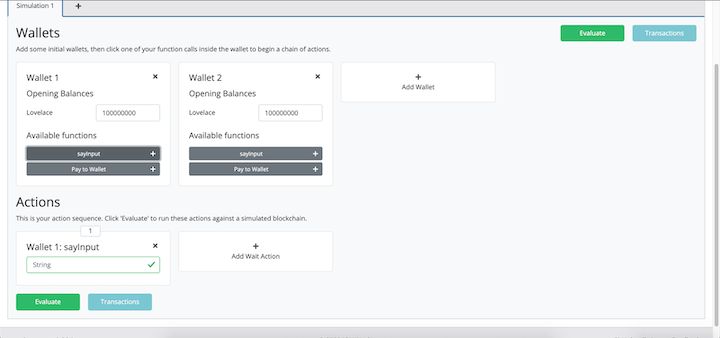
Notice that we have the sayInput function on the wallet addresses. Click on it.
The sayInput function will appear on the Actions section:
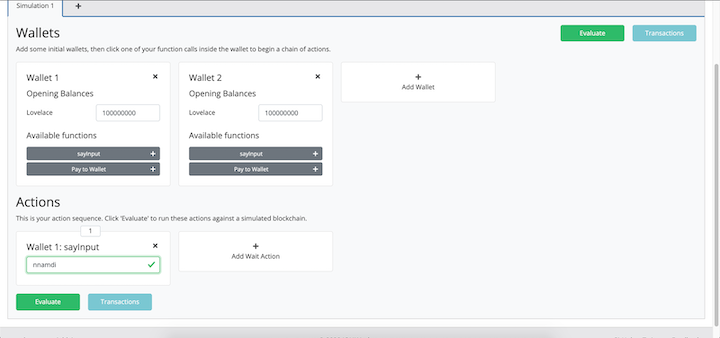
👁 Plutus Playgroud: Using The sayIput Function
Now, type any string into the input field and click on the Evaluate button:
👁 Plutus Playgroud: Using The sayIput Function
You’ll see the string you typed in the Transactions page.
In this tutorial, we demonstrated how to write a DApp on the Cardano blockchain using the Plutus programming language.
We started by introducing the Cardano blockchain and the Plutus programming language. Next, we explained Cardano by comparing it to the Ethereum blockchain. We then introduced the Plutus programming language and described how we can use it to compile and run smart contracts on the Cardano blockchain.
Finally, we walked through some examples of smart contracts written in the Plutus programming language and run on a simulated Cardano blockchain.
Client-side issues that impact users’ ability to activate and transact in your apps can drastically affect your bottom line. If you’re interested in monitoring UX issues, automatically surfacing JavaScript errors, and tracking slow network requests and component load time, try LogRocket.
👁 LogRocket Dashboard Free Trial BannerLogRocket lets you replay user sessions, eliminating guesswork around why bugs happen by showing exactly what users experienced. It captures console logs, errors, network requests, and pixel-perfect DOM recordings — compatible with all frameworks.
LogRocket's Galileo AI watches sessions for you, instantly identifying and explaining user struggles with automated monitoring of your entire product experience.
Modernize how you debug web and mobile apps — start monitoring for free.
Enabled React Compiler v1.0 on a production Next.js app. Here’s every warning, breakage, and silent opt-out I documented — and what actually worked.
We built the same app in TanStack Start RSC and Next.js RSC. TanStack shipped 40% less JS and built 4x faster — but Next.js is still the safer production bet.
From RSC vulnerabilities and the Vercel breach to TypeScript 7.0 Beta and AI agents — the nine frontend storylines that defined H1 2026, ranked.
AI tools generate working React code fast, but miss race conditions, empty states, debouncing, and accessibility. Here’s how to catch bugs before production.
Would you be interested in joining LogRocket's developer community?
Join LogRocket’s Content Advisory Board. You’ll help inform the type of content we create and get access to exclusive meetups, social accreditation, and swag.
Sign up now