 |
VOOZH | about |
|
VOOZH | about |
Are you looking for a way to gather valuable feedback from your customers? If so, building a customer feedback app could be the perfect solution. In this article, we’ll walk you through building an app using React Native and Firebase.
👁 How to Build a React Native Customer Feedback AppCreating a customer review app benefits both consumers and businesses by empowering consumers, building trust, influencing purchase decisions, providing valuable feedback, fostering a sense of community, and helping businesses make better apps through user insights.
Moreover, with the help of React Native, you can easily create a cross-platform app that works on both iOS and Android devices. On the other hand, Firebase makes it easy to store and manage user feedback in real time. So, let’s dive into the details of building a customer feedback app for food using React Native and Firebase.
Jump ahead:
Expo has matured to the point that it’s now my default choice to start new projects. With Expo EAS, React Native development has been put on steroids. So, for this project, we’ll use Expo to create our project, build our app, and run it on a simulator or a physical device.
To create a new project using Expo, open up your terminal, move to your projects directory (where you’ll initialize your project), and enter the following command:
$ npx create-expo-app@latest customer-feedback-app
To set up TypeScript, add tsconfig.json to the root of your new project and run this:
$ npx expo start
This will prompt you to install the required dependencies for TypeScript configuration. Click y, and in a few seconds, TypeScript will be added to the project. For app routing, we will use v1 of the Expo Router. (You can learn more about routing with Expo, check out our guide to native routing in Expo for React Native.)
To build and locally run your app on the simulator, we will first build the iOS and Android directories using Expo CLI:
npx expo prebuild
After the prebuild finishes, we can run the app by entering the following command:
npx expo run:ios
We’re going to use Firebase to build the backend. For React Native, we will use @react-native-firebase/app and its sub tools: /firestore as a database and /or storage for storing images.
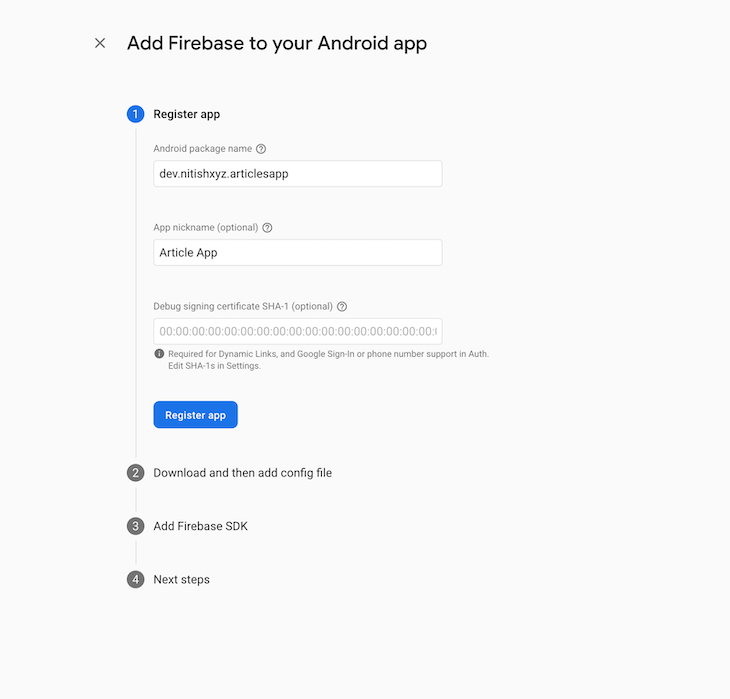
After the basic setup is complete, you will see a Firebase dashboard and the option to add the app. Go ahead and select that. Then, add the package name of your app in app.json in your app root, as shown below:
"android": {
 "package": "dev.nitishxyz.articlesapp"
},
👁 Adding Firebase to React Native
After selecting Register app, a button to download the config profile will appear. Use it to download the file. Then, create a new directory named credentials at the root of your project and add the downloaded config file to this directory.
From there, update the app.json to add googleServicesFile to Android. It should look something like this:
"ios": {
 "bundleIdentifier": "dev.nitishxyz.articlesapp",
 "googleServicesFile": "./credentials/GoogleService-Info.plist"
}
You will repeat the same process for iOS. So, add the app, enter the bundle identifier, download the credentials, move it to the credentials directory, and update your app.json as shown below:
"android": {
 "package": "dev.nitishxyz.articlesapp",
 "googleServicesFile": "./credentials/google-services.json"
},
"ios": {
 "bundleIdentifier": "dev.nitishxyz.articlesapp",
 "googleServicesFile": "./credentials/GoogleService-Info.plist"
},
Then, install react-native-firebase with the following command:
$ npx expo install @react-native-firebase/app @react-native-firebase/firestore @react-native-firebase/storage
Because these packages require changes in native code, they are not accessible on Expo Go. Therefore, we need to install expo-dev-client with the following command:
$ npx expo install expo-dev-client
We also need to add expo-plugins to successfully install the Firebase tools. Update app.json and add plugins under expo, as shown below:
 "plugins": [
 "@react-native-firebase/app",
 [
 "expo-build-properties",
 {
 "ios": {
 "useFrameworks": "static"
 }
 }
 ]
 ]
After this is complete, be sure to run expo prebuild and expo run:ios to build and run the new packages on your device.
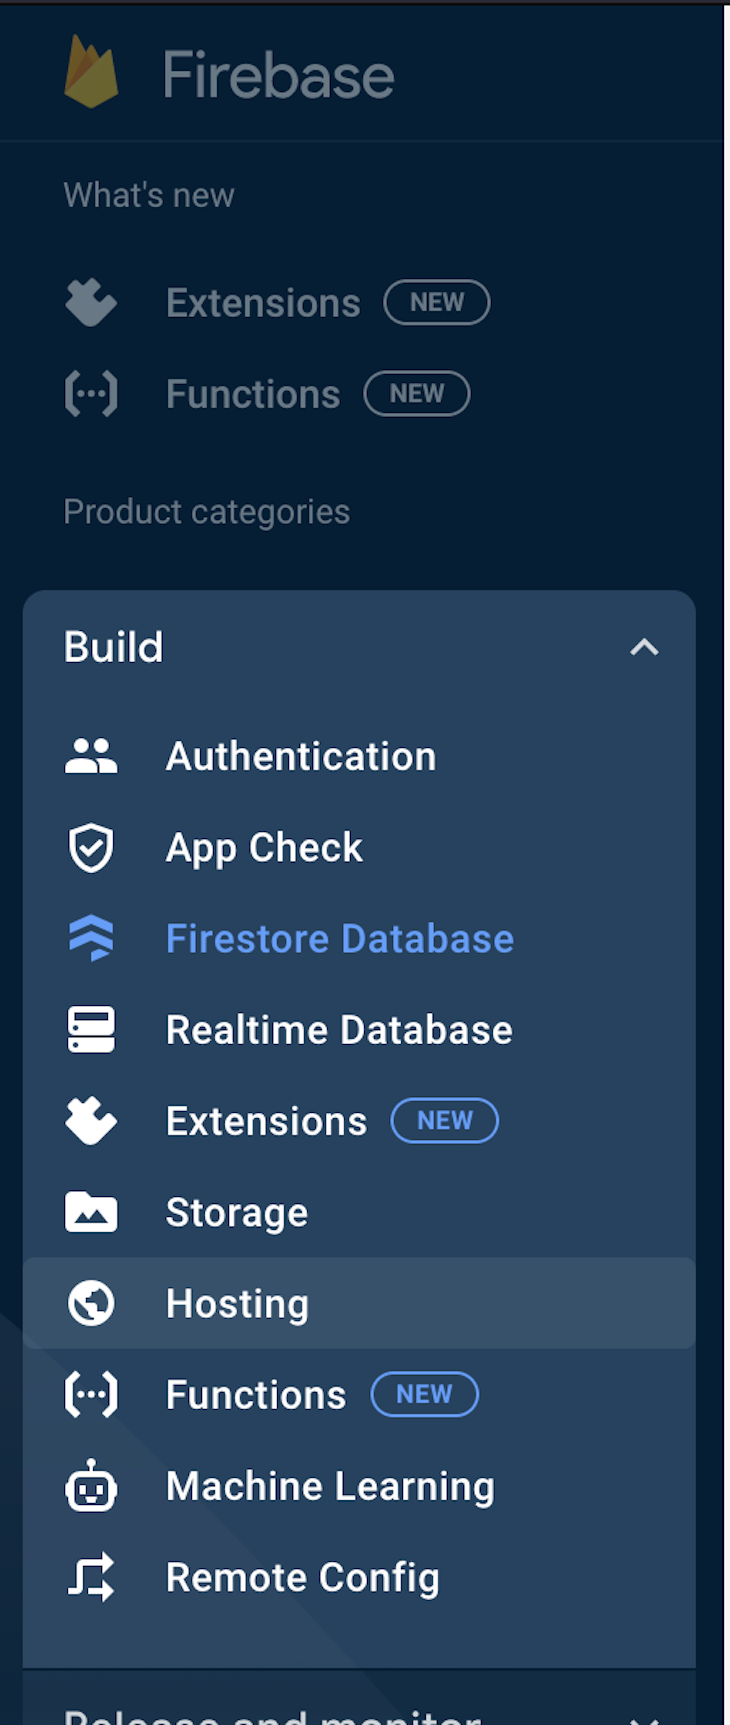
Now, we need to initialize the Firestore database and storage to use them in the app. Otherwise, they will not be accessible. Head to the Firebase dashboard and click Build, and then Firestore. Here’s what that should look like:
👁 Initializing the Firebase Database in React Native
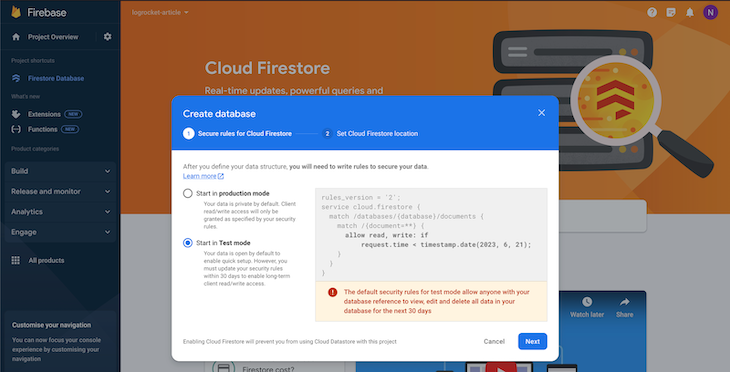
The following screen will appear, prompting you to Create a database:
👁 Creating the Firebase Database
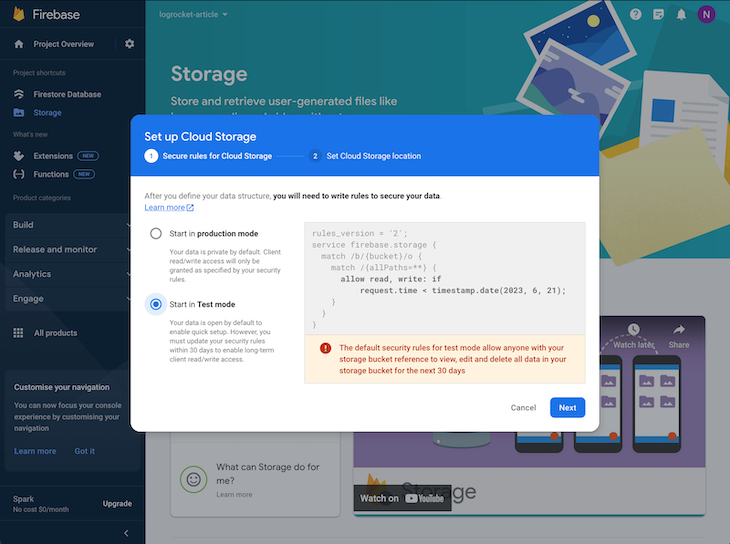
Select Start in Test mode as shown below:
👁 Starting the Firebase Database
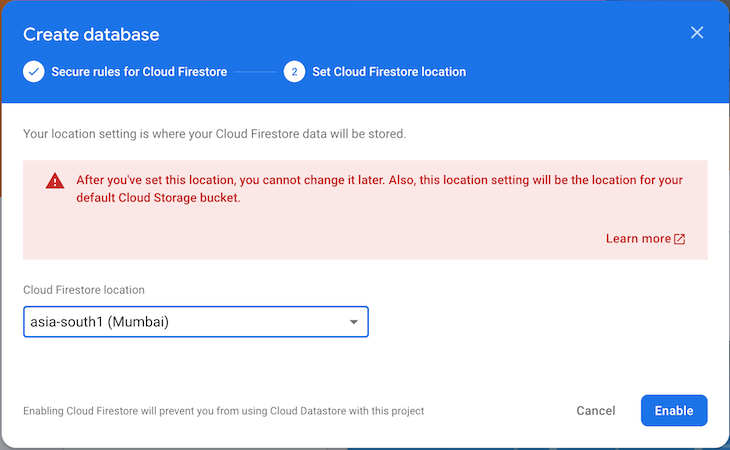
Then, select the location of the database:
👁 Getting the Database Location
We have a document-based database initialized for our app. Then, head to Storage and repeat the process:
👁 Managing the Database Storage
To add content to your React Native app, click Cloud Storage and upload the images of the food items you want to show on the app. Then, go to Firestore to start a food-items collection to store data on food items. For this tutorial, I’m using basic data in the following format:
{
"name": "name of the food item",
"description": "description of the food item.",
"image": "link of the image from Firebase Storage.",
"numberOfReview": "Number of reviews for the food item.",
"5": "Number of 5 star ratings",
"4": "Number of 4 star ratings",
"3": "Number of 3 star ratings",
"2": "Number of 2 star ratings",
"1": "Number of 1 star ratings",
"rating": "average rating of the foodItem"
}
Note: We’re using the basic way to store and show ratings for the food items for the purposes of this app.
Now, as we’ve configured our backend and integrated it into our app, we can build the frontend.
Let’s create an app directory to store our path files. Expo-router uses an app directory to serve routes for the app. Create the directory below:
$ mkdir app
Now we will create the first route inside the app directory by creating a file named index.tsx. We will also create a _layout.tsx file to configure the router as Stack, using the following code:
import React from "react";
import { Stack } from "expo-router";
const RootLayout = () => {
 return <Stack />;
};
export default RootLayout;
We have index.ts as the initial page, and we will build one more route to get feedback from the customers. Next, create a new directory in app/ directory named review/ and add a file named [id].tsx. You can add some basic code to render the page; this file will act as a dynamic route. Here’s what that will look like:
import { Stack } from "expo-router";
import { StatusBar } from "expo-status-bar";
import { StyleSheet, Text, View } from "react-native";
export default function Review() {
 return (
 <>
 <Stack.Screen
 options={{
 title: "Add Review",
 }}
 />
 <View style={styles.container}>
 <Text>This is where you can review the food item.</Text>
 <StatusBar style="auto" />
 </View>
 </>
 );
}
const styles = StyleSheet.create({
 container: {
 flex: 1,
 backgroundColor: "#fff",
 alignItems: "center",
 justifyContent: "center",
 },
});
Because we’ve already added the routes, we will create a new directory in the root of our app where the UI of the app will live. Create the directory screens. Then, add a file named Home.tsx; this component will list all the food items stored on our Firestore database.
From there, add another file named Review.tsx. This component will allow the users to add their feedback for the food item, upload images, and store reviews in the database. We’ll use Firestore to fetch the data and display the food items using Flatlist. Now, add the following content to Home.tsx:
import React, { useEffect } from "react";
import { Alert, FlatList, StyleSheet, View } from "react-native";
import firestore from "@react-native-firebase/firestore";
import FoodListItem from "./components/FoodListItem";
const Home = () => {
 const [foods, setFoods] = React.useState([]);
 const [loading, setLoading] = React.useState(true);
 useEffect(() => {
 loadFoods();
 }, []);
 const loadFoods = async () => {
 setLoading(true);
 firestore()
 .collection("food-items")
 .get({
 source: "server",
 })
 .then((querySnapshot) => {
 console.log("Total food items: ", querySnapshot.size);
 const items = [];
 querySnapshot.forEach((documentSnapshot) => {
 items.push({
 ...documentSnapshot.data(),
 id: documentSnapshot.id,
 });
 });
 setFoods(items);
 setLoading(false);
 })
 .catch((error) => {
 console.log(error);
 setLoading(false);
 Alert.alert("Something went wrong");
 });
 };
 const renderItem = ({ item }) => <FoodListItem data={item} />;
 return (
 <View style={styles.container}>
 <FlatList
 data={foods}
 renderItem={renderItem}
 keyExtractor={(item) => item.id}
 onRefresh={loadFoods}
 refreshing={loading}
 />
 </View>
 );
};
const styles = StyleSheet.create({
 container: {
 flex: 1,
 backgroundColor: "#fff",
 paddingTop: 20,
 },
});
export default Home;
This component fetches the food items and also allows us to refresh the list when we want to. We will also need smaller components, so we will create another directory components to hold them. Now, create a file named FoodListItem.tsx inside of the components. Then, add the following code:
import { Image } from "expo-image";
import React from "react";
import { Pressable, StyleSheet, Text, View } from "react-native";
import { Rating } from "react-native-ratings";
import { useRouter } from "expo-router";
const FoodListItem = ({ data }) => {
 const router = useRouter();
 return (
 <View style={styles.itemContainer}>
 <Image
 source={{ uri: data.image }}
 style={styles.image}
 contentFit="cover"
 />
 <View style={styles.content}>
 <Text style={styles.title}>{data.name}</Text>
 <Text style={styles.description}>{data.description}</Text>
 <View style={styles.reviewContainer} pointerEvents="none">
 <Rating imageSize={10} startingValue={data.rating} />
 <Text style={styles.countText}> ({data.numberOfReviews})</Text>
 </View>
 <Pressable
 style={styles.reviewButton}
 onPress={() => {
 router.push(`/review/${data.id}`);
 }}
 >
 <Text style={styles.buttonText}>Review your order</Text>
 </Pressable>
 </View>
 </View>
 );
};
const styles = StyleSheet.create({
 itemContainer: {
 marginBottom: 10,
 width: "90%",
 alignSelf: "center",
 borderWidth: 1,
 borderColor: "grey",
 borderRadius: 10,
 },
 image: {
 width: "100%",
 height: 150,
 borderTopLeftRadius: 10,
 borderTopRightRadius: 10,
 },
 content: {
 padding: 10,
 },
 title: {
 fontSize: 15,
 fontWeight: "600",
 },
 description: {
 fontSize: 13,
 fontWeight: "400",
 marginTop: 5,
 marginBottom: 10,
 },
 reviewButton: {
 width: "100%",
 padding: 15,
 alignItems: "center",
 justifyContent: "center",
 borderWidth: 1,
 borderColor: "grey",
 },
 buttonText: {
 fontSize: 15,
 fontWeight: "600",
 },
 countText: {
 fontSize: 13,
 fontWeight: "400",
 marginBottom: 10,
 },
 reviewContainer: {
 flexDirection: "row",
 },
});
export default FoodListItem;
This component is the UI for the card in the FlatList that shows us the food item and the number of reviews it has received. The Pressable opens the feedback screen, using the unique ID of the food-item.
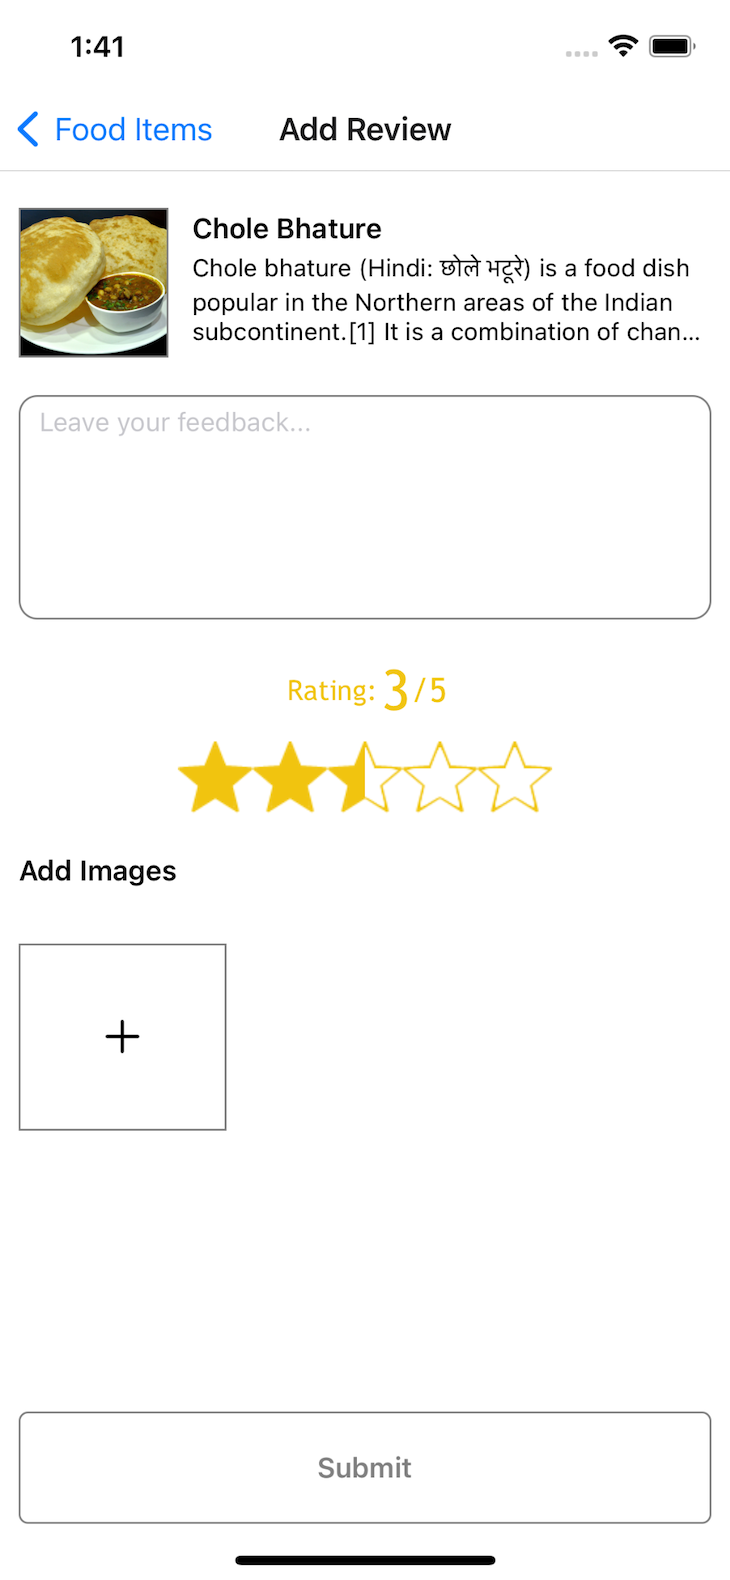
This is the most important screen in the entire app because it allows a user to publish their review of the selected food item. Here’s what our feedback screen will look like:
👁 Adding the Feedback Screen to the React Native App
On this screen, we have the name, image, and description of the food item. Now, for the feedback part, we have a text input to receive a textual review of the item. Then, we have the rating stars that a user can provide according to their satisfaction.
From there, we have the add image section where a user can post up to three images. For this, we’ll use expo-image-picker. We will create a state to store an array of images picked by the user, as shown below:
const [images, setImages] = React.useState([]);
The following code block renders a container for displaying a list of images. It uses the map function to iterate over an array of images and render image boxes for each image. Each image box contains an <Image> component that displays an image. The source URI for the image is determined by checking the image.remote property, and if it doesn’t exist, it falls back to image.local.
The image boxes also handle the uploading state by conditionally rendering a loading container with an activity indicator when image.uploading is true. Additionally, if the number of images is less than three, an "Add" button is rendered, which allows users to select and add more images.
The code uses styles defined in a styles object to control the appearance of the containers and buttons. Here’s what that looks like:
<View style={styles.imagesContainer}>
 {images.map((image) => (
 <View style={styles.imageBox} key={image.local}>
 <Image
 source={{ uri: image.remote || image.local }}
 style={styles.flex}
 contentFit="cover"
 />
 {image.uploading ? (
 <View style={styles.imageLoadingContainer}>
 <ActivityIndicator color={"blue"} />
 </View>
 ) : null}
 </View>
 ))}
 {images?.length < 3 ? (
 <View style={styles.imageBox}>
 <TouchableOpacity
 style={styles.addImageButton}
 onPress={pickImage}
 >
 <AntDesign name="plus" size={24} color="black" />
 </TouchableOpacity>
 </View>
 ) : null}
</View>
Then, we use an asynchronous function called pickImage. This function is responsible for launching the device’s image library and allowing the user to select an image. It uses the expo-image-picker library to accomplish this.
The function awaits the completion of the image selection process and stores the result. If the selection was not canceled, it calls the uploadImage function with the URI of the selected image. Overall, this code block enables selecting and handling images from the device’s library in a React Native application. Check it out below:
const pickImage = async () => {
 // No permissions request is necessary for launching the image library
 let result = await ImagePicker.launchImageLibraryAsync({
 mediaTypes: ImagePicker.MediaTypeOptions.All,
 allowsEditing: true,
 aspect: [4, 3],
 quality: 1,
 });
 if (!result.canceled) {
 uploadImage(result.assets[0].uri);
 }
};
Moving on to uploading the images, the following code block defines an asynchronous function called uploadImage, which is responsible for uploading an image to a storage location. It updates the state to indicate that the image is being uploaded, generates a unique identifier for the image file, creates a reference to the storage location, and initiates the upload process.
It handles progress and error events, retrieves the download URL upon successful upload, and updates the state again to reflect the final state of the uploaded image. Overall, this code block encapsulates the logic for uploading an image and managing the associated state in a React Native application:
const uploadImage = async (uri) => {
 setImages([...images, { local: uri, remote: null, uploading: true }]);
 const UUID = Crypto.randomUUID();
 const mime = uri.split(".").pop();
 const imgRef = storage().ref(`images/${UUID}.${mime}`);
 imgRef.putFile(uri).on(
 "state_changed",
 (snapshot) => {},
 (error) => {
 console.log("upload file error: ", error);
 // remove the image from the list
 setImages(images.filter((img) => img.local !== uri));
 },
 async () => {
 const url = await imgRef.getDownloadURL();
 setImages([...images, { local: uri, remote: url, uploading: false }]);
 }
 );
};
The following is the complete code for the ReviewFood.tsx file:
import { StatusBar } from "expo-status-bar";
import React, { useMemo } from "react";
import {
 ActivityIndicator,
 Alert,
 StyleSheet,
 TextInput,
 TouchableOpacity,
} from "react-native";
import { Text, View } from "react-native";
import { Image } from "expo-image";
import { Rating } from "react-native-ratings";
import { AntDesign } from "@expo/vector-icons";
import * as ImagePicker from "expo-image-picker";
import * as Crypto from "expo-crypto";
import storage from "@react-native-firebase/storage";
import firestore from "@react-native-firebase/firestore";
import { useRouter } from "expo-router";
const ReviewFood = ({ data }) => {
 const router = useRouter();
 const [feedback, setFeedback] = React.useState("");
 const [images, setImages] = React.useState([]);
 const [rating, setRating] = React.useState(0);
 const [loading, setLoading] = React.useState(false);
 const canSubmit = useMemo(() => {
 const hasFeedback = feedback.length > 0;
 const hasRating = rating > 0;
 const hasImages = images.length > 0;
 const allUploaded = images.every((img) => !img.uploading);
 return hasFeedback && hasImages && allUploaded && hasRating;
 }, [feedback, images]);
 const submitReview = () => {
 console.log("submitting review", data.id);
 setLoading(true);
 firestore()
 .runTransaction(async (transaction) => {
 const foodRef = firestore().collection("food-items").doc(data.id);
 const reviewRef = firestore().collection("reviews").doc();
 const review = {
 feedback,
 rating,
 images: images.map((img) => img.remote),
 food: foodRef,
 id: reviewRef.id,
 };
 transaction.set(reviewRef, review);
 const foodDoc = await transaction.get(foodRef);
 const food = foodDoc.data();
 const five_star = food["5"] || 0;
 const four_star = food["4"] || 0;
 const three_star = food["3"] || 0;
 const two_star = food["2"] || 0;
 const one_star = food["1"] || 0;
 const total_stars =
 five_star + four_star + three_star + two_star + one_star;
 const new_rating =
 (5 * five_star +
 4 * four_star +
 3 * three_star +
 2 * two_star +
 1 * one_star +
 rating) /
 (total_stars + 1);
 console.log("new_rating: ", new_rating);
 transaction.update(foodRef, {
 reviews: firestore.FieldValue.arrayUnion(reviewRef),
 [rating]: firestore.FieldValue.increment(1),
 numberOfReviews: firestore.FieldValue.increment(1),
 rating: new_rating,
 });
 })
 .then(() => {
 console.log("Review Submitted");
 Alert.alert("Review Submitted");
 router.back();
 setLoading(false);
 })
 .catch((error) => {
 console.log("Review submit error: ", error);
 setLoading(false);
 });
 };
 const pickImage = async () => {
 // No permissions request is necessary for launching the image library
 let result = await ImagePicker.launchImageLibraryAsync({
 mediaTypes: ImagePicker.MediaTypeOptions.All,
 allowsEditing: true,
 aspect: [4, 3],
 quality: 1,
 });
 if (!result.canceled) {
 uploadImage(result.assets[0].uri);
 }
 };
 const uploadImage = async (uri) => {
 setImages([...images, { local: uri, remote: null, uploading: true }]);
 const UUID = Crypto.randomUUID();
 const mime = uri.split(".").pop();
 const imgRef = storage().ref(`images/${UUID}.${mime}`);
 imgRef.putFile(uri).on(
 "state_changed",
 (snapshot) => {},
 (error) => {
 console.log("upload file error: ", error);
 // remove the image from the list
 setImages(images.filter((img) => img.local !== uri));
 },
 async () => {
 const url = await imgRef.getDownloadURL();
 setImages([...images, { local: uri, remote: url, uploading: false }]);
 }
 );
 };
 return (
 <View style={styles.container}>
 <View style={styles.flex}>
 <View style={styles.foodContainer}>
 <Image
 source={{ uri: data.image }}
 style={styles.image}
 contentFit="cover"
 />
 <View style={styles.foodRight}>
 <Text style={styles.foodTitle}>{data.name}</Text>
 <Text style={styles.foodDescription} numberOfLines={3}>
 {data.description}
 </Text>
 </View>
 </View>
 <TextInput
 value={feedback}
 multiline
 placeholder="Leave your feedback..."
 style={styles.input}
 onChangeText={(text) => setFeedback(text)}
 maxLength={250}
 />
 <Rating showRating onFinishRating={setRating} />
 <Text style={styles.addImageText}>Add Images</Text>
 <View style={styles.imagesContainer}>
 {images.map((image) => (
 <View style={styles.imageBox} key={image.local}>
 <Image
 source={{ uri: image.remote || image.local }}
 style={styles.flex}
 contentFit="cover"
 />
 {image.uploading ? (
 <View style={styles.imageLoadingContainer}>
 <ActivityIndicator color={"blue"} />
 </View>
 ) : null}
 </View>
 ))}
 {images?.length < 3 ? (
 <View style={styles.imageBox}>
 <TouchableOpacity
 style={styles.addImageButton}
 onPress={pickImage}
 >
 <AntDesign name="plus" size={24} color="black" />
 </TouchableOpacity>
 </View>
 ) : null}
 </View>
 </View>
 <TouchableOpacity
 style={[
 styles.submitButton,
 {
 backgroundColor: canSubmit ? "#000" : "transparent",
 },
 ]}
 disabled={!canSubmit}
 onPress={submitReview}
 >
 {loading ? (
 <ActivityIndicator color={"white"} />
 ) : (
 <Text
 style={[
 styles.submitText,
 {
 color: canSubmit ? "#fff" : "grey",
 },
 ]}
 >
 Submit
 </Text>
 )}
 </TouchableOpacity>
 </View>
 );
};
const styles = StyleSheet.create({
 container: {
 flex: 1,
 backgroundColor: "#fff",
 padding: 10,
 paddingTop: 20,
 },
 foodContainer: {
 flexDirection: "row",
 justifyContent: "space-between",
 },
 image: {
 width: 80,
 height: 80,
 borderWidth: 1,
 borderColor: "grey",
 },
 foodRight: {
 width: "75%",
 },
 foodTitle: {
 fontSize: 15,
 fontWeight: "600",
 marginTop: 2,
 marginBottom: 3,
 },
 foodDescription: {
 fontSize: 13,
 fontWeight: "400",
 },
 input: {
 borderWidth: 1,
 borderColor: "grey",
 borderRadius: 10,
 padding: 10,
 height: 120,
 marginTop: 20,
 marginBottom: 20,
 },
 imagesContainer: {
 flexDirection: "row",
 marginTop: 30,
 // justifyContent: "center",
 },
 imageBox: {
 width: "30%",
 height: 100,
 borderWidth: 1,
 borderColor: "grey",
 marginRight: 10,
 },
 flex: { flex: 1 },
 submitButton: {
 width: "100%",
 paddingVertical: 20,
 borderWidth: 1,
 borderColor: "grey",
 alignItems: "center",
 justifyContent: "center",
 borderRadius: 5,
 marginBottom: 20,
 },
 submitText: {
 fontSize: 15,
 fontWeight: "600",
 },
 addImageButton: {
 width: "100%",
 height: "100%",
 alignItems: "center",
 justifyContent: "center",
 },
 imageLoadingContainer: {
 position: "absolute",
 ...StyleSheet.absoluteFillObject,
 alignItems: "center",
 justifyContent: "center",
 },
 addImageText: {
 fontSize: 15,
 fontWeight: "600",
 marginTop: 20,
 },
});
export default ReviewFood;
This file has all the logic for the review and ratings for a food item. When an image is selected, it automatically starts to upload, and a loading indicator is shown until it is uploaded completely. When the user fills in all the required information, the Submit button becomes active (which is by default disabled), and on hitting the Submit button, the submitReview function is called.
We’re using Firestore transaction to make batch get and set calls. First, we get the reference to the food-item that the review is being published for. Then, we create a new review doc reference. We create an object for the review, add all the data and images, and also a reference for the food.
We create a review and update the ratings in the food-item, according to all the previous ratings and the new rating given to the item. You can visit this GitHub repo to access the complete code for the app.
In conclusion, the powerful combination of React Native Expo and React Native Firebase, with Firestore and Firebase Storage, provides a seamless and quick way to build apps with a scalable backend that can store images, data, and servers seamlessly to a larger audience.
With React Native Expo, the app is compatible across different devices, making it accessible to a wider audience. The integration of Firestore ensures real-time updates, keeping the app responsive and user-friendly.
Firebase Storage simplifies image hosting, allowing users to visually showcase their dining experiences. In summary, combining these technologies offers a streamlined and effective approach to app development, providing a seamless UX.
LogRocket's Galileo AI watches sessions for you and and surfaces the technical and usability issues holding back your React Native apps.
LogRocket also helps you increase conversion rates and product usage by showing you exactly how users are interacting with your app. LogRocket's product analytics features surface the reasons why users don't complete a particular flow or don't adopt a new feature.
Start proactively monitoring your React Native apps — try LogRocket for free.
We built the same app in TanStack Start RSC and Next.js RSC. TanStack shipped 40% less JS and built 4x faster — but Next.js is still the safer production bet.
From RSC vulnerabilities and the Vercel breach to TypeScript 7.0 Beta and AI agents — the nine frontend storylines that defined H1 2026, ranked.
AI tools generate working React code fast, but miss race conditions, empty states, debouncing, and accessibility. Here’s how to catch bugs before production.
Learn how to use Gemini CLI subagents to delegate frontend, backend, testing, and docs tasks to specialized agents with guardrails and clear ownership.
Hey there, want to help make our blog better?
Join LogRocket’s Content Advisory Board. You’ll help inform the type of content we create and get access to exclusive meetups, social accreditation, and swag.
Sign up now