 |
VOOZH | about |
|
VOOZH | about |
Health is really important. There is a popular saying that health is wealth — this is true even in software engineering. Like living things, an application can be broken, too, if we do not take care of it.
👁 How To Implement A Healthcheck In Node.jsHealth checks in software help us identify inefficiencies in our applications to better maintain them. Much like how we see a doctor to know if anything is wrong with us, the same principle applies to software as we pay attention to the server or response time, for example.
In this article, we will examine how to do a health check in a Node.js application.
The Replay is a weekly newsletter for dev and engineering leaders.
Delivered once a week, it's your curated guide to the most important conversations around frontend dev, emerging AI tools, and the state of modern software.
We will implement a basic Node.js health check. Here’s what’s necessary to follow along:
As we have already mentioned in the introduction; health is wealth. Before we jump into how to implement health check in Node.js, let’s talk about its importance and why you should get into the habit of performing these checks.
We first need to acknowledge that the availability of software or functionality is extremely important. Routine health checking of the availability of APIs, for instance, helps you learn of crucial issues and remediate them as quickly as possible.
If downtime occurs, the application owner can be informed immediately so that there is a speedy resolution to it.
Health checks become even more important as the infrastructure of our software grows, and the need to make sure that all microservices and endpoints are working flawlessly becomes more vital for the apps we manage.
Some of the things we check when considering the health of software in any programming language or stack are the response time of a server when a request is made and how the server connects to the database (if there is one).
Another reason why a health check is necessary is to maintain the availability of your services. Your application or product should not be seen as the one that has the most downtime among its competitors — it is bad for business, and a good name is better than fortune, as they say.
We will now look at how to implement a basic health check in Node.js.
I will be using an application I’ve built. Here is a link to the tutorial for it. The Github code can be found here.
You can clone or download it from here.
Use git clone to clone the repository into your own machine:
git clone https://github.com/bigpreshy/mvc
Then move into the folder by doing this:
cd mvc
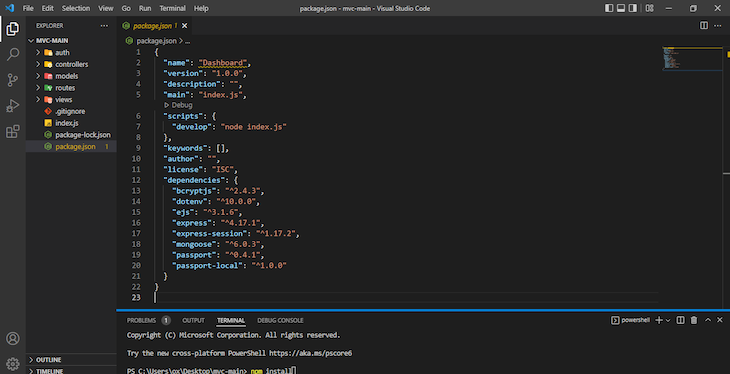
The package.json file should look like this:
After that, run this command to install all the dependencies (packages) used in the application:
npm install
After this has been completed, run:
npm run develop
On your browser, go to http://localhost:4111/login (there are other routes like /register/dashboard).
Now everything is running. You can follow the MVC tutorial to connect to MongoDB Atlas
To add a basic health check that performs checks (server health and run time, etc.), add healthchecker.js in our route folder and add the following code:
//js
const express = require("express");
const router = express.Router({});
router.get('/', async (_req, res, _next) => {

 const healthcheck = {
 uptime: process.uptime(),
 message: 'OK',
 timestamp: Date.now()
 };
 try {
 res.send(healthcheck);
 } catch (error) {
 healthcheck.message = error;
 res.status(503).send();
 }
});
// export router with all routes included
module.exports = router;
What we’ve done here is added another route, and this route has a healthcheck object that has three properties (uptime, message, and timestamp) which have respective values process.uptime(), OK, and Date.now().
We also have a try catch, which executes the code in the try block. If an exception exists, it responds with an error (the message value in the healthcheck object becomes the error) and sends a status of 503.
Finally, we have to export the module (router), hence the module.exports = router; at the end of the file.
After we have created the route, go ahead edit the index.js file. Just add this line of code:
app.use('/healthcheck', require('./routes/healthchecker'));
After that, your full index.js file will look like this:
const express = require("express");
const app = express();
const mongoose = require("mongoose");
const dotenv = require("dotenv");
const session = require('express-session');
dotenv.config();
const passport = require("passport");
const { loginCheck } = require("./auth/passport");
loginCheck(passport);
// Mongo DB conncetion
const database = process.env.MONGOLAB_URI;
mongoose
 .connect(database, { useUnifiedTopology: true, useNewUrlParser: true })
 .then(() => console.log("e don connect"))
 .catch((err) => console.log(err));
app.set("view engine", "ejs");
//BodyParsing
app.use(express.urlencoded({ extended: false }));
app.use(session({
 secret:'oneboy',
 saveUninitialized: true,
 resave: true
 }));

app.use(passport.initialize());
app.use(passport.session());
//Routes
app.use("/", require("./routes/login"));
app.use('/healthcheck', require('./routes/healthchecker'));

const PORT = process.env.PORT || 4111;
app.listen(PORT, console.log("Server has started at port " + PORT));
Take note of how our routes are registered. It is added right after our passport.session() and passport.initialize() methods.
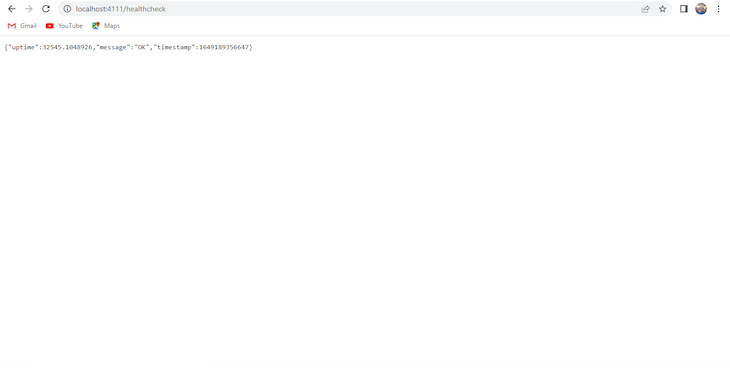
After that, stop the server and rerun npm run develop, then go to http://localhost:4111/healthcheck, it will show this:
This has our uptime (how long our server has been up and running since it started), an “OK” message that indicates that everything is good, and a timestamp is included, too.
Another thing to check is response time — how long it takes your server to respond to requests.
To do this, we are going to be adding the following process.hrtime() method as a value to the processtime property in the healthcheck object that is our healthchecker.js file in our route folder.
Your healthchecker.js should look like this:
👁 Healthcheckerjs Screenshot Example
Refreshing your server and revisiting http://localhost:4111/healthcheck will give you this. It will now have the responsetime property with the value recorded in nanoseconds:
👁 Local Host Response Time Uptime
It is also worth noting that there are services that have been built over the years that routinely check the health of our applications (not just Node.js, but applications in other stacks too). I usually use https://uptimerobot.com/ .
There are others. Logrocket does this for frontend monitoring, and there are also Freshping, Uptime, Logicmonitor,, all of which should tell you that the health of applications is really important!
In this article, we have discussed what health checks entail and why we need to consider them in your applications for easy and quick issue resolution.
Furthermore, we looked at how health checks can be implemented in Node.js with a sample project. This project is simply a Model-view-controller Node.js based project that handles user registration and login using Mongo DB as a database.
Here are some of the things we checked for: the response time of the server, the uptime of the server, the status code of the server (as long as it is 200, we are going to get an “OK” message), and the timestamp of the server.
You need to think about health of your application when you are developing. This helps you to monitor closely what is happening and if eventually, something unforeseen happens, you would know where to look.
Deploying a Node-based web app or website is the easy part. Making sure your Node instance continues to serve resources to your app is where things get tougher. If you’re interested in ensuring requests to the backend or third-party services are successful, try LogRocket.
👁 LogRocket Network Request MonitoringLogRocket lets you replay user sessions, eliminating guesswork around why bugs happen by showing exactly what users experienced. It captures console logs, errors, network requests, and pixel-perfect DOM recordings — compatible with all frameworks.
LogRocket's Galileo AI watches sessions for you, instantly identifying and explaining user struggles with automated monitoring of your entire product experience.
LogRocket instruments your app to record baseline performance timings such as page load time, time to first byte, slow network requests, and also logs Redux, NgRx, and Vuex actions/state. Start monitoring for free.
Learn how next-browser gives AI agents runtime context for debugging Next.js apps, including React props, hydration, PPR, forms, and performance.
Build dynamic LLM routing in Next.js with OpenRouter, TanStack AI, task classification, model fallbacks, and cost-aware routing.
TSRX adds first-class control flow, conditional hooks, and scoped styles to React via a TypeScript compiler extension — no new framework required.
Learn how to build a full React Native auth system using Better Auth and Expo — with email/password login, Google OAuth, session persistence, and protected routes.
Hey there, want to help make our blog better?
Join LogRocket’s Content Advisory Board. You’ll help inform the type of content we create and get access to exclusive meetups, social accreditation, and swag.
Sign up now