 |
VOOZH | about |
|
VOOZH | about |
JavaScript is single-threaded, so any JavaScript that runs also stops webpages from being responsive. This isn’t a problem in many cases because the code runs quickly enough that any UI stutter is effectively imperceptible by the user.
👁 How to Improve Interface Responsiveness with Web WorkersHowever, it can become a significant problem if the code is computationally expensive or if the user’s hardware is underpowered.
The Replay is a weekly newsletter for dev and engineering leaders.
Delivered once a week, it's your curated guide to the most important conversations around frontend dev, emerging AI tools, and the state of modern software.
One way to mitigate the problem is to avoid putting so much work on the main thread by offloading work onto background threads. Other platforms, like Android and iOS, stress the importance of making the main thread deal with as little non-UI work as possible.
The Web Workers API is the web equivalent of Android and iOS background threads. Over 97 percent of browsers support workers.
Let’s create a demo to demonstrate the problem and solution. You can also view the final result here and the source code on GitHub. We’ll start with a bare bones index.html.
<!DOCTYPE html>
<html lang="en">
 <head>
 <meta charset="utf-8" />
 <meta name="viewport" content="width=device-width, initial-scale=1.0" />
 <title>Web Worker Demo</title>
 <script src="./index.js" async></script>
 </head>
 <body>
 <p>The current time is: <span id="time"></span></p>
 </body>
</html>
Next, we’ll add index.js to continuously update the time and display it like this: 21:45:08.345.
// So that the hour, minute, and second are always two digits each
function padTime(number) {
 return number < 10 ? "0" + number : number;
}

function getTime() {
 const now = new Date();
 return (
 padTime(now.getHours()) +
 ":" +
 padTime(now.getMinutes()) +
 ":" +
 padTime(now.getSeconds()) +
 "." +
 now.getMilliseconds()
 );
}

setInterval(function () {
 document.getElementById("time").innerText = getTime();
}, 50);
By setting the interval to the value of 50 milliseconds, we’ll see the time update very quickly.
👁 A gif showing a clock set to count down.
Next, we’ll start a Node.js project with either npm init or yarn init and install Parcel. The first reason we want to use Parcel is that in Chrome, workers need to be served rather than loaded from a local file.
So when we add a worker later, we wouldn’t be able to just open index.html if we’re using Chrome. The second reason is that Parcel has built-in support for the Web Workers API that requires no configuration for our demo. Other bundlers like webpack would require more setup.
I suggest adding a start command to package.json:
{
 "scripts": {
 "start": "parcel serve index.html --open"
 }
}
This will let you run npm start or yarn start to build the files, start a server, open the page in your browser, and automatically update the page when you change the source files.
Now let’s add something that’s computationally expensive.
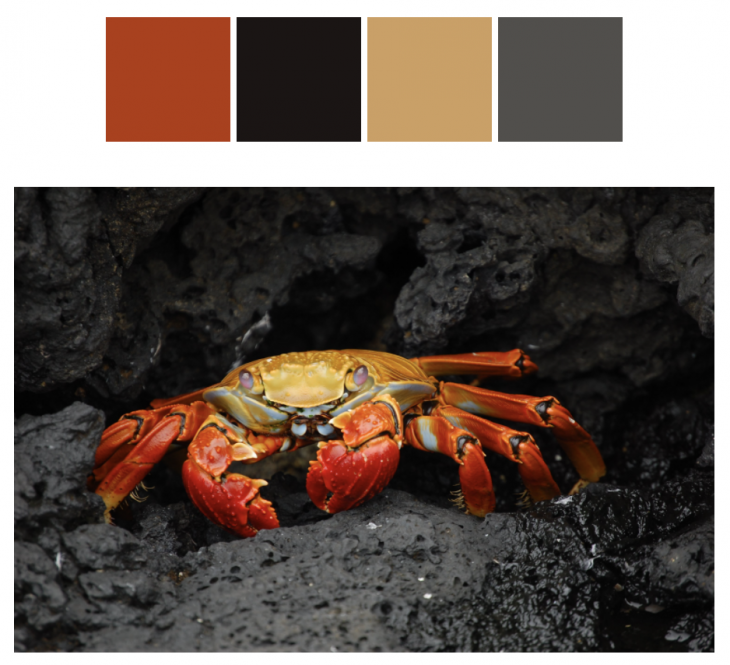
We’ll install image-q, an image quantization library that we’ll use to calculate the main colors of a given image, creating a color palette from the image.
Here’s an example:
Let’s update the body:
<body>
 <div class="center">
 <p>The current time is: <span id="time"></span></p>

 <form id="image-url-form">
 <label for="image-url">Direct image URL</label>
 <input
 type="url"
 name="url"
 value="https://upload.wikimedia.org/wikipedia/commons/1/1f/Grapsus_grapsus_Galapagos_Islands.jpg"
 />
 <input type="submit" value="Generate Color Palette" />
 <p id="error-message"></p>
 </form>
 </div>

 <div id="loader-wrapper" class="center">
 <div id="loader"></div>
 </div>

 <div id="colors-wrapper" class="center">
 <div id="color-0" class="color"></div>
 <div id="color-1" class="color"></div>
 <div id="color-2" class="color"></div>
 <div id="color-3" class="color"></div>
 </div>

 <a class="center" id="image-link" target="_blank">
 <img id="image" crossorigin="anonymous" />
 </a>
</body>
So, we’re adding a form that takes a direct link to an image. Then, we have a loader to display a spinning animation during processing. We’ll adapt this CodePen to implement it. We also have four divs that we’ll use to display the color palette. Finally, we’ll display the image itself.
Add some inline styles to the head. This includes a CSS animation for the spinning loader.
<style type="text/css">
 .center {
 display: block;
 margin: 0 auto;
 max-width: max-content;
 }

 form {
 margin-top: 25px;
 margin-bottom: 25px;
 }

 input[type="url"] {
 display: block;
 padding: 5px;
 width: 320px;
 }

 form * {
 margin-top: 5px;
 }

 #error-message {
 display: none;
 background-color: #f5e4e4;
 color: #b22222;
 border-radius: 5px;
 margin-top: 10px;
 padding: 10px;
 }

 .color {
 width: 80px;
 height: 80px;
 display: inline-block;
 }

 img {
 max-width: 90vw;
 max-height: 500px;
 margin-top: 25px;
 }

 #image-link {
 display: none;
 }

 #loader-wrapper {
 display: none;
 }

 #loader {
 width: 50px;
 height: 50px;
 border: 3px solid #d3d3d3;
 border-radius: 50%;
 border-top-color: green;
 animation: spin 1s ease-in-out infinite;
 -webkit-animation: spin 1s ease-in-out infinite;
 }

 @keyframes spin {
 to {
 -webkit-transform: rotate(360deg);
 }
 }
 @-webkit-keyframes spin {
 to {
 -webkit-transform: rotate(360deg);
 }
 }

 #error-message {
 display: none;
 background-color: #f5e4e4;
 color: #b22222;
 border-radius: 5px;
 margin-top: 10px;
 padding: 10px;
 }
</style>
Update index.js:
import * as iq from "image-q";

// Previous code for updating the time

function setPalette(points) {
 points.forEach(function (point, index) {
 document.getElementById("color-" + index).style.backgroundColor =
 "rgb(" + point.r + "," + point.g + "," + point.b + ")";
 });

 document.getElementById("loader-wrapper").style.display = "none";
 document.getElementById("colors-wrapper").style.display = "block";
 document.getElementById("image-link").style.display = "block";
}

function handleError(message) {
 const errorMessage = document.getElementById("error-message");
 errorMessage.innerText = message;
 errorMessage.style.display = "block";
 document.getElementById("loader-wrapper").style.display = "none";
 document.getElementById("image-link").style.display = "none";
}

document
 .getElementById("image-url-form")
 .addEventListener("submit", function (event) {
 event.preventDefault();

 const url = event.target.elements.url.value;
 const image = document.getElementById("image");

 image.onload = function () {
 document.getElementById("image-link").href = url;

 const canvas = document.createElement("canvas");
 canvas.width = image.naturalWidth;
 canvas.height = image.naturalHeight;
 const context = canvas.getContext("2d");
 context.drawImage(image, 0, 0);
 const imageData = context.getImageData(
 0,
 0,
 image.naturalWidth,
 image.naturalHeight
 );

 const pointContainer = iq.utils.PointContainer.fromImageData(imageData);
 const palette = iq.buildPaletteSync([pointContainer], { colors: 4 });
 const points = palette._pointArray;
 setPalette(points);
 };

 image.onerror = function () {
 handleError("The image failed to load. Please double check the URL.");
 };

 document.getElementById("error-message").style.display = "none";
 document.getElementById("loader-wrapper").style.display = "block";
 document.getElementById("colors-wrapper").style.display = "none";
 document.getElementById("image-link").style.display = "none";

 image.src = url;
 });
The setPalette function sets the background colors of the color divs in order to display the palette. We also have a handleError function incase the image fails to load.
Then, we listen for form submissions. Whenever we get a new submission, we set the image element’s onload function to extract the image data in a format that is suitable for image-q.
So we draw the image in a canvas so that we can retrieve an ImageData object.
We pass that object to image-q, and we call iq.buildPaletteSync, which is the computationally expensive part. It returns four colors, which we pass to setPalette.
We also hide and unhide elements as appropriate.
Try generating a color palette. Notice that while image-q is processing, the time stops updating. If you try to click into the URL input, the UI also won’t respond. However, the spinning animation might still work. The explanation is that it’s possible for CSS animations to be handled by a separate compositor thread instead.
On Firefox, the browser eventually displays a warning:
👁 a warning issued by Firefox.
If you have a fast computer, the problem may not be as obvious because your CPU can churn through the work quickly. To simulate a slower device, you can use Chrome, which has a developer tools setting to throttle the CPU.
Open the performance tab and then its settings to reveal the option:
To fix the unresponsive UI, let’s use a worker. First, we’ll add a checkbox to the form to indicate if the site should use the worker or not. Add this HTML before the submission input.
<input type="checkbox" name="worker" />
<label for="worker"> Use worker</label>
<br />
Next, we’ll set up the worker in index.js. Even though there is widespread browser support for workers, let’s add a feature detection check with if (window.Worker) just incase.
let worker;
if (window.Worker) {
 worker = new Worker("worker.js");
 worker.onmessage = function (message) {
 setPalette(message.data.points);
 };
}
The onmessage method is how we’ll receive data from the worker.
Then, we’ll change the image onload handler to use the worker when the checkbox is checked.
// From before
const imageData = context.getImageData(
 0,
 0
 image.naturalWidth,
 image.naturalHeight
);

if (event.target.elements.worker.checked) {
 if (worker) {
 worker.postMessage({ imageData });
 } else {
 handleError("Your browser doesn't support web workers.");
 }
 return;
}

// From before
const pointContainer = iq.utils.PointContainer.fromImageData(imageData);
The worker’s postMessage method is how we send data to the worker.
Lastly, we need to create the worker itself in worker.js.
import * as iq from "image-q";

onmessage = function (e) {
 const pointContainer = iq.utils.PointContainer.fromImageData(
 e.data.imageData
 );
 const palette = iq.buildPaletteSync([pointContainer], { colors: 4 });
 postMessage({ points: palette._pointArray });
};
Note that we’re still using onmessage and postMessage, but now onmessage receives a message from index.js, and postMessage sends a message to index.js.
Try generating a palette with the worker, and you should see that the time keeps updating during the processing. The form also remains interactive instead of freezing.
The Web Workers API an effective way to make websites feel more responsive, especially when the website is more like an application rather than a display of mostly static data. As we’ve seen, setting up a worker can also be fairly straightforward, so identifying CPU-intensive code and moving it to a worker can be an easy win.
Workers do have restrictions, the main one being that they don’t have access to the DOM. The general mindset should be to try to let the main thread focus on the UI as much as possible, including updating the DOM, while moving expensive work to workers. By doing this when it makes sense, you can give your users an interface that doesn’t freeze and is consistently enjoyable to use.
Debugging code is always a tedious task. But the more you understand your errors, the easier it is to fix them.
LogRocket allows you to understand these errors in new and unique ways. Our frontend monitoring solution tracks user engagement with your JavaScript frontends to give you the ability to see exactly what the user did that led to an error.
👁 LogRocket Dashboard Free Trial BannerLogRocket records console logs, page load times, stack traces, slow network requests/responses with headers + bodies, browser metadata, and custom logs. Understanding the impact of your JavaScript code will never be easier!
Learn how next-browser gives AI agents runtime context for debugging Next.js apps, including React props, hydration, PPR, forms, and performance.
Build dynamic LLM routing in Next.js with OpenRouter, TanStack AI, task classification, model fallbacks, and cost-aware routing.
TSRX adds first-class control flow, conditional hooks, and scoped styles to React via a TypeScript compiler extension — no new framework required.
Learn how to build a full React Native auth system using Better Auth and Expo — with email/password login, Google OAuth, session persistence, and protected routes.
Hey there, want to help make our blog better?
Join LogRocket’s Content Advisory Board. You’ll help inform the type of content we create and get access to exclusive meetups, social accreditation, and swag.
Sign up now