 |
VOOZH | about |
|
VOOZH | about |
The Replay is a weekly newsletter for dev and engineering leaders.
Delivered once a week, it's your curated guide to the most important conversations around frontend dev, emerging AI tools, and the state of modern software.
Working with the camera, QR scanning, and text recognition is a complex issue for React Native apps. It’s a ton of work that requires the manipulation of a camera in native development. If you have trouble with cross-platform mobile development in React Native when you work with the camera, React Native Camera is exactly what you need.
👁 ImageToday I am back to talk about how we can easily handle utilizing a phone camera with React Native. Let me introduce you to React Native Camera.
In this article, I will demonstrate React Native Camera by developing a QR code scanner app. The app will enable us to scan a QR code in real time and display its contents on the screen through the app.
React Native Camera is a comprehensive camera component in React Native. It gives you control of the camera and communicates with the native OS and device hardware.
React Native Camera supports the following:
It’s a completely open-source project, and pull requests are always welcome. It also comes with great documentation.
It has 9.2k stars on GitHub and 175k user downloads per month on npm.
React Native Camera is based on the expo-camera module. Therefore, we can use React Native Camera with Expo.
You can install expo-camera by running the following command:
expo install expo-camera
It also works with face detection, barcode scanning, and taking pictures. You just need to import Camera from expo-camera:
import { Camera } from 'expo-camera';
Now, to understand React Native Camera properly, let’s create a simple React Native project with a QR scanner. I’m going to use an iOS device to build and test.
Before we get started, I need to create a new React Native project with the following lines of code:
react-native init react_native_scanner
cd react_native_scanner
npm run ios
Awesome, we’ve successfully created our React Native app.
Next, we should install the React Native Camera package for our project. Let’s install with the following commands:
npm install react-native-camera --save
cd ios && pod install && cd ..
Next, we need to add iOS permissions to our app Info.plist:
<key>NSCameraUsageDescription</key>
<string>Your message to user when the camera is accessed for the first time</string>

<key>NSPhotoLibraryAddUsageDescription</key>
<string>Your message to user when the photo library is accessed for the first time</string>

<key>NSPhotoLibraryUsageDescription</key>
<string>Your message to user when the photo library is accessed for the first time</string>

<key>NSMicrophoneUsageDescription</key>
<string>Your message to user when the microphone is accessed for the first time</string>
Now, we should insert the following lines of code inside our android/app/src/main/AndroidManifest.xml file:
<uses-permission android:name="android.permission.CAMERA" />

<uses-permission android:name="android.permission.READ_EXTERNAL_STORAGE" />
<uses-permission android:name="android.permission.WRITE_EXTERNAL_STORAGE" />

<uses-permission android:name="android.permission.RECORD_AUDIO"/>
Last but not least, we should change android/app/build.gradle file:
android {
 ...
 defaultConfig {
 ...
 missingDimensionStrategy 'react-native-camera', 'general' // <--- insert this line
 }
}
After that, if we run the app and everything is fine, then we are ready to code!
Let’s change our App.js file by adding the following imports:
import React, { useState } from 'react';
import { StyleSheet, Text, View, TouchableOpacity, SafeAreaView } from 'react-native';
import { RNCamera } from 'react-native-camera'
We will import and use the RNCamera component to communicate with the camera. If you are interested, you can read more about RNCamera here.
Next, we will modify our main screen. Let’s remove the previously generated code in order to add a topBar with SafeAreaView and a title with View and Text.
Then, I will add RNCamera as mentioned above to communicate with the camera, and a TouchableOpacity button to allow the user to scan a QR code:
<View style={styles.screen}>
 <SafeAreaView style={styles.saveArea}>
 <View style={styles.topBar}>
 <Text style={styles.topBarTitleText}>React Native Scanner</Text>
 </View>
 </SafeAreaView>

 <View style={styles.caption}>
 <Text style={styles.captionTitleText}>Welcome To React-Native-Camera Tutorial</Text>
 </View>

 <RNCamera style={styles.rnCamera} />

 <View style={styles.cameraControl}>
 <TouchableOpacity style={styles.btn}>
 <Text style={styles.btnText}>New QR Scan</Text>
 </TouchableOpacity>
 </View>
</View>
Let’s update the styling of our topBar to make it green, and title text to make it black:
const styles = StyleSheet.create({
 topBar: {
 height: 50,
 backgroundColor: '#62d1bc', // green
 alignItems: 'center',
 justifyContent: 'center',
 },
 topBarTitleText: {
 color: '#ffffff', // white
 fontSize: 20,
 },
 caption: {
 height: 120,
 justifyContent: 'center',
 alignItems: 'center',
 },
 captionTitleText: {
 color: '#121B0D', // black
 fontSize: 16,
 fontWeight: '600'
 },
});
I am going to use useState to store the QR code from React Native Camera. Let’s add the following line to our App.js with initial state null:
function App() {
 const [barcode, setBarcode] = useState(null);
 ...
}
We will store the QR code simply by calling setBarcode and display it with barcode.
Also, I added RNCamera with styling like so. This is so it will not take up too much space on the screen and we are able to see the rest of the app:
const styles = StyleSheet.create({
 ...
 rnCamera: {
 flex: 1,
 width: '94%',
 alignSelf: 'center',
 }
})
If you want to check out all styling options, you can check out the stylesheet on GitHub here.
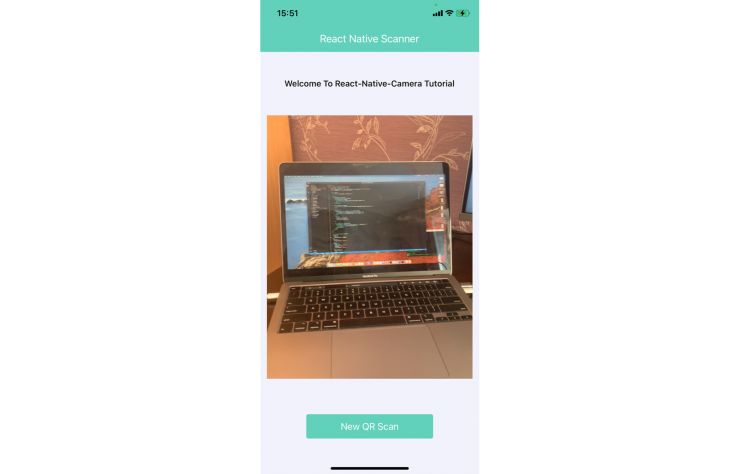
Now, if you run the app, our UI will look like the photo below:
👁 Screenshot of React Native scanner app without QR scanning functionality
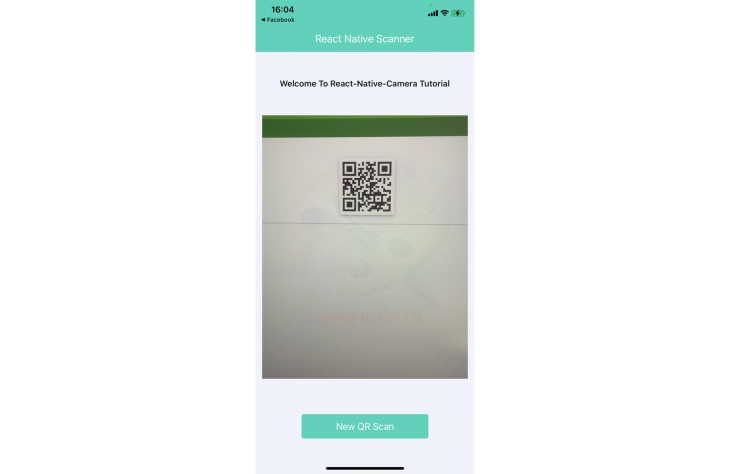
If you try to scan a QR code, you will not be able to read it yet. Therefore I will use the onBarCodeRead method to retrieve barcode information when the camera detects a QR code.
This function returns several properties, including:
data, a text presentation of QR coderawData, the encoded data in the QR codeuri, the path to the saved image in your app’s cache (iOS only)type, the type of QR code (qr, aztec, code93, etc.)bounds, the image size and origin data (x and y)👁 Screenshot of React Native Scanner app scanning QR code
Let’s update our App.js file to display information read from the QR code:
function App() {
 const [barcode, setBarcode] = useState(null);

 return (
 <View style={styles.screen}>
 <SafeAreaView style={styles.saveArea}>
 <View style={styles.topBar}>
 <Text style={styles.topBarTitleText}>React Native Scanner</Text>
 </View>
 </SafeAreaView>

 <View style={styles.caption}>
 <Text style={styles.captionTitleText}>Welcome To React-Native-Camera Tutorial</Text>
 </View>

 {barcode ? (
 <View style={[styles.rnCamera, styles.rmCameraResult]}>
 <Text style={styles.rmCameraResultText}>{barcode.data}</Text>
 <Text style={styles.rmCameraResultText}>{barcode.type}</Text>
 </View>
 ) : (
 <RNCamera
 style={styles.rnCamera}
 onBarCodeRead={setBarcode}
 />
 )}

 <View style={styles.cameraControl}>
 <TouchableOpacity style={styles.btn} onPress={() => setBarcode(null)}>
 <Text style={styles.btnText}>New QR Scan</Text>
 </TouchableOpacity>
 </View>
 </View>
 );
};
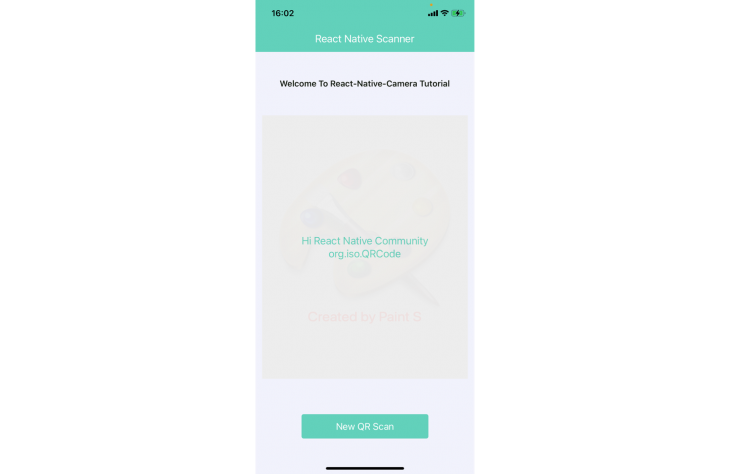
Above, we have extracted information from the QR code using the onBarCodeRead function and saved it in React state by calling the setBarcode method.
Then, we have displayed the barcode data and type, if the barcode is not null. If you want to scan again, you can press the New QR Scan button, and the state data will be set to null.
And that’s it! This is the final app:
👁 Screenshot of final react native scanner app
If you want to see all of the code, you can check out the Github repo here.
React Native Camera is an incredible package to help developers use the device camera for iOS and Android apps built with React Native. Besides our example QR code scanner, you can also do text recognition, face detection, and capture video and images.
Thanks for reading. I hope you found this piece useful. Happy coding!
LogRocket's Galileo AI watches sessions for you and and surfaces the technical and usability issues holding back your React Native apps.
LogRocket also helps you increase conversion rates and product usage by showing you exactly how users are interacting with your app. LogRocket's product analytics features surface the reasons why users don't complete a particular flow or don't adopt a new feature.
Start proactively monitoring your React Native apps — try LogRocket for free.
Learn how next-browser gives AI agents runtime context for debugging Next.js apps, including React props, hydration, PPR, forms, and performance.
Build dynamic LLM routing in Next.js with OpenRouter, TanStack AI, task classification, model fallbacks, and cost-aware routing.
TSRX adds first-class control flow, conditional hooks, and scoped styles to React via a TypeScript compiler extension — no new framework required.
Learn how to build a full React Native auth system using Better Auth and Expo — with email/password login, Google OAuth, session persistence, and protected routes.
Would you be interested in joining LogRocket's developer community?
Join LogRocket’s Content Advisory Board. You’ll help inform the type of content we create and get access to exclusive meetups, social accreditation, and swag.
Sign up now