 |
VOOZH | about |
|
VOOZH | about |
Editor’s note: This article was last updated by Abhinav Anshul on 8 June 2023 to include features of Lit 0.7.0, such as backward compatibility and a smaller framework size. For more information about Lit, check out “Getting started with lit-html and LitElement.”
👁 Lit Vs. React: A Comparison GuideSelecting a frontend framework can be a difficult decision for a developer because there are so many options. React is one of the most popular choices; it is well established and has an 83% satisfaction rating as of the 2022 State of JS Survey. Still, there are several other frameworks with interesting features and functionality that are worth investigating.
When selecting a frontend framework for your next project, consider the following questions:
One alternative to React is Lit, which has an overall 70% satisfaction rating in the 2022 State of JS Survey. Lit is easy to learn and use.
Backed by Google, Lit.js is a fast alternative to modern JavaScript frameworks. It is built on top of web components with a tiny boilerplate footprint, something that plagues modern JS frameworks.
In this article, you will learn how you can create modern web components using Lit.js by building a simple counter app and a to-dolList. You will get to learn how to use its various APIs for rendering HTML templates and making them reactive for the event handlers.
Finally, we’ll do a quick comparison between Lit.js and React.js and learn how to decide which to choose for your next project.
Jump ahead:
The Replay is a weekly newsletter for dev and engineering leaders.
Delivered once a week, it's your curated guide to the most important conversations around frontend dev, emerging AI tools, and the state of modern software.
Lit has several features that distinguish it from other frontend frameworks:
At the time of writing, the latest version of Lit.js is v0.7.0, which introduced some major changes across the library:
lit instead of lit-html. Although, as said earlier, lit-html is well supported as well: import {LitElement, html} from 'lit'UpdatingElement is now ReactiveElement, @internalProperty has been renamed to @state, and NodePart is now ChildPartLit’s core concepts and features are similar to those of React, but there are some significant differences. For example, React has been around since 2013, and is far more popular than Lit. At the time of this writing, React has around 20.2 million weekly downloads on npm compared to 984k weekly downloads on npm for Lit.
However, Lit takes up less memory. A public benchmark comparison showed lit-html to be eight to ten percent faster than React’s VDOM. Lit also has a minified +gzipped memory size of 6kB, compared to 2.5kB for React.
These two frameworks offer other cool features, as well. Let’s see how they compare.
JSX is a syntax extension to JavaScript that functions similarly to a templating language, but with the full power of JavaScript. React users can use JSX to easily write templates in JavaScript code. Lit templates serve a similar purpose, but express a component UI as a function of their state.
Here’s an example of JSX templating in React:
import 'react';
import ReactDOM from 'react-dom';

const name = 'World';
const el = (
 <>
 <h1>Hello, {name}</h1>
 <div>How are you? </div>
 </>
);
ReactDOM.render(
 el,
 mountNode
);
Here’s an example of templating in Lit:
import {html, render} from 'lit';

const name = 'World';
const el = html`
 <h1>Hello, ${name}</h1>
 <div>How are you?</div>`;

render(
 el,
 mountNode
);
As we can see in the above examples, Lit does not need a React fragment to group multiple elements in its templates. Instead, Lit templates are wrapped with an HTML tagged template literal.
Components are self-contained, reusable pieces of code. They perform the same action as JavaScript functions, but they work independently and return HTML. React components are classified into two types: class components and functional components.
The Lit equivalent of React component is called LitElement, which is an awesome way of writing components based on Lit HTML templates. LitELement follows the Object-Oriented Paradigm (OOP) and it provides a base class that helps you manage its properties and various attributes API.
Lit does not use JSX, so there’s no one-to-one correlation to a React functional component. However, it is simpler to write a function that takes in properties and then renders DOM based on those properties.
Here’s an example of a functional component in React:
function Welcome(props) {
 return <h1>Hello, {props.name}</h1>;
}

const el = <Welcome name="World"/>
ReactDOM.render(
 el,
 mountNode
);
And here’s the same example in Lit:
import {html, render} from 'lit';

function Welcome(props) {
 return html`<h1>Hello, ${props.name}</h1>`;
}

render(
 Welcome({name: 'World}),
 document.body.querySelector('#root')
);
state is a React object that contains data or information about the component. The state of a component can change over time. Whenever its state changes, the component re-renders.
Lit’s reactive properties are a mix of React’s state and props. When changed, reactive properties can trigger the component lifecycle, re-rendering the component and optionally being read or written to attributes. Reactive properties come in two variants:
Reactive properties are implemented in React like so:
import React from 'react';

class MyEl extends React.Component {
 constructor(props) {
 super(props)
 this.state = {name: 'there'}
 }

 componentWillReceiveProps(nextProps) {
 if (this.props.name !== nextProps.name) {
 this.setState({name: nextProps.name})
 }
 }
}
Reactive properties are implemented in Lit like so:
import {LitElement} from 'lit';
import {property} from 'lit/decorators.js';

class MyEl extends LitElement {
 @property() name = 'there';
}
Internal reactive state refers to reactive properties that are not exposed to the component’s public API. These state properties lack corresponding attributes and are not intended to be used outside of the component. The internal reactive state of the component should be determined by the component itself.
React and Lit have a similar lifecycle, with some small but notable differences. Let’s take a closer look at some of the methods that these frameworks have in common.
constructorThe constructor method is available in both React and Lit. It is automatically called when an object is created from class.
Here’s an example of the constructor method in React:
import React from 'react';
import Chart from 'chart.js';

class MyEl extends React.Component {
 constructor(props) {
 super(props);
 this.state = { counter: 0 };
 this._privateProp = 'private';
 }
Here’s an example of the constructor method in Lit:
class MyEl extends LitElement {
 static get properties() {
 return { counter: {type: Number} }
 }
 constructor() {
 this.counter = 0;
 this._privateProp = 'private';
 }
renderThe render method is available in both React and Lit. It displays the code inside the specified element.
Here’s an example of the render method in React:
render() {
 return <div>Hello World</div>
 }
Here’s an example of the render method in Lit:
render() {
 return html`<div>Hello World</div>`;
 }
componentDidMount vs. firstUpdated and connectedCallbackThe componentDidMount function in React is similar to a combination of Lit’s firstUpdated and connectedCallback lifecycle callbacks. This function is invoked after a component is mounted.
Here’s an example of the componentDidMount method in React:
componentDidMount() {
 this._chart = new Chart(this.chartElRef.current, {...});
 }

 componentDidMount() {
 this.window.addEventListener('resize', this.boundOnResize);
 }
Here’s an example of the firstUpdated and connectedCallback lifecycle callbacks in Lit:
firstUpdated() {
 this._chart = new Chart(this.chartEl, {...});
 }

 connectedCallback() {
 super.connectedCallback();
 this.window.addEventListener('resize', this.boundOnResize);
 }
componentDidUpdate vs. updatedThe componentDidUpdate function in React is equivalent to updated in Lit. It is invoked after a change to the component’s props or state.
Here’s an example of the componentDidUpdate method in React:
componentDidUpdate(prevProps) {
 if (this.props.title !== prevProps.title) {
 this._chart.setTitle(this.props.title);
 }
 }
Here’s an example of the updated method in Lit:
updated(prevProps: PropertyValues<this>) {
 if (prevProps.has('title')) {
 this._chart.setTitle(this.title);
 }
 }
componentWillUnmount vs.disconnectedCallbackThe componentWillUnmount function in React is equivalent to disconnectedCallback in Lit. This function is invoked after a component is destroyed or is unmounted.
Here’s an example of the componentWillUnmount method in React:
componentWillUnmount() {
 this.window.removeEventListener('resize', this.boundOnResize);
 }
}
Here’s an example of the disconnectedCallback method in Lit:
disconnectedCallback() {
 super.disconnectedCallback();
 this.window.removeEventListener('resize', this.boundOnResize);
 }
}
Hooks are functions that allow React functional components to “hook into” React state and lifecycle features. Hooks do not work within classes, but they allow us to use React without classes.
Unlike React, Lit does not offer a way to create custom elements from a function, but LitElement does address most of the main issues with React class components by:
Here’s an example of Hooks in React (at the time of making Hooks):
import React from 'react';
import ReactDOM from 'react-dom';

class MyEl extends React.Component {
 constructor(props) {
 super(props); // Leaky implementation
 this.state = {count: 0};
 this._chart = null; // Deemed messy
 }

 render() {
 return (
 <>
 <div>Num times clicked {count}</div>
 <button onClick={this.clickCallback}>click me</button>
 </>
 );
 }

 clickCallback() {
 // Errors because `this` no longer refers to the component
 this.setState({count: this.count + 1});
 }
}
Here’s the same example, using LitElement:
class MyEl extends LitElement {
 @property({type: Number}) count = 0; // No need for constructor to set state
 private _chart = null; // Public class fields introduced to JS in 2019

 render() {
 return html
 <div>Num times clicked ${count}</div>
 <button @click=${this.clickCallback}>click me</button>`;
 }

 private clickCallback() {
 // No error because `this` refers to component
 this.count++;
 }
}
Refs are React functions that allow us to access the DOM element and any React elements that we’ve created. They are used when we want to change the value of a child component without using props.
In Lit, refs are created using the @query and @queryAll decorators. These decorators are nearly equivalent to querySelector and querySelectorAll, respectively, and render directly to the DOM.
Here’s an example of the refs function in React:
const RefsExample = (props) => {
 const inputRef = React.useRef(null);
 const onButtonClick = React.useCallback(() => {
 inputRef.current?.focus();
 }, [inputRef]);

 return (
 <div>
 <input type={"text"} ref={inputRef} />
 <br />
 <button onClick={onButtonClick}>
 Click to focus on the input above!
 </button>
 </div>
 );
};
Here’s the same example in Lit using the @query decorator:
@customElement("my-element")
export class MyElement extends LitElement {
 @query('input') // Define the query
 inputEl!: HTMLInputElement; // Declare the prop

 // Declare the click event listener
 onButtonClick() {
 // Use the query to focus
 this.inputEl.focus();
 }

 render() {
 return html
 <input type="text">
 <br />
 <!-- Bind the click listener -->
 <button @click=${this.onButtonClick}>
 Click to focus on the input above!
 </button>
 ;
 }
}
You can build your own custom web components easily using Lit.js. To begin, you can start with a simple counter component that increments or decrements a number based on button clicks.
First, add a simple base class for LitElement:
import { LitElement, html } from 'lit';

class CounterApp extends LitElement {
 render() {
 return html`
 basic html templating
 `;
 }
}

customElements.define('x-counter', CounterApp);
Here the counter is called x-counter but you can name it anything you like. Now you can begin modifying the html template for the actual code:
<button @click="${() => this.value--}" >-</button>
 <p>${this.value}</p>
<button @click="${() => this.value++}">+</button>
There are two buttons responsible for incrementing and decrementing a value that will eventually be stored in a constructor function. To sum up the html template and the state value:
import { LitElement, html } from 'lit';

class CounterApp extends LitElement {
 constructor() {
 super();
 this.value = 0;
 }

 render() {
 return html`
 <button @click="${() => this.value--}">-</button>
 <p>${this.value}</p>
 <button @click="${() => this.value++}">+</button>
 `;
 }
}

customElements.define('x-counter', CounterApp);
However, there is one issue with this code, the value state won’t get re-rendered after the button clicks; to solve this, you need to somehow make sure the value state is being tracked and is being re-rendered whenever the state gets updated. Lit provides a @property API to add reactivity. When combining all, you get a simple x-counter web component built in Lit.js:
import { LitElement, html , property} from 'lit';
// import { property } from 'lit/decorators.js';

class CounterApp extends LitElement {
static get properties() {
 return {
 value: { type: Number }
 };
 }
// Alternatively you can use @property from decorators
// @property({ type: Number })

constructor() {
 super();
 this.value = 0;
 }

 render() {
 return html`
 <button @click="${() => this.value--}">-</button>
 <p>${this.value}</p>
 <button @click="${() => this.value++}">+</button>
 `;
 }
}

customElements.define('x-counter', CounterApp);
Let’s take a look at Lit in action by creating a sample to-do project. To get started, run the command to clone the Lit starter JavaScript project:
git clone https://github.com/lit/lit-element-starter-js.git
Then, cd to the project folder and install the required packages using this command:
npm install
When the installation is complete, proceed to the lit-element-starter-js/my-element.js file. Delete the boilerplates codes and create a Todo component with the following code snippet:
import {LitElement, html, css} from 'lit';
class Todo extends LitElement {
 constructor() {
 super();
 }
 render() {
 return html
 <div class="todos-wrapper">
 <h4>My Todos List</h4>
 <input placeholder="Add task..."/>
 <button>Add</button>
 <div class="list">
 #Todo List
 </div>
 </div>
 ;
 }
}
customElements.define('my-element', Todo);
The above code creates a Todo component with a constructor method, where all reactive properties of the application will be defined, and a render method, which renders JSX containing an input field and button.
Next, let’s define the properties of the application. Because this is a to-do application, we’ll need a TodosList to store the tasks and an input property to get user input.
Now, we’ll add the below code snippet to the Todos class:
static properties = {
 TodosList: {type: Array},
 input: {type: String},
 };
Then, we’ll use the below code to assign initial values to the TodosList and input properties in the constructor method:
 this.TodosList = [];
 this.input = null;
Next, we’ll create a method to add and update a to-do task:
setInput(event) {
 this.input = event.target.value;
 }

 addTodo() {
 this.TodosList.push({
 name: this.input,
 id: this.TodosList.length + 1,
 completed: false,
 });
 this.requestUpdate();
 }

 updateTodo(todo) {
 todo.completed = !todo.completed;
 this.requestUpdate();
 }
In the above code, we can see that the requestUpdate() function was called in the addTodo and updateTodo methods after modifying the state. These methods were mutating the TodosList property, so we called the requestUpdate() function to update the component state.
Next, we’ll modify the render method to add event listeners to the methods created above and to display the to-do tasks:
 render() {
 return html
 <div class="todos-wrapper">
 <h4>My Todos List</h4>
 <input placeholder="Add task..." @input=${this.setInput} />
 <button @click=${this.addTodo}>Add</button>
 <div class="list">
 ${this.TodosList.map(
 (todo) => html`
 <li
 @click=${() => this.updateTodo(todo)}
 class=${todo.completed && 'completed'}
 >
 ${todo.name}
 </li>
 )}
 </div>
 </div>
 ;
 }
Finally, let’s add some styling to make the application look more appealing:
static styles = css
 .todos-wrapper {
 width: 35%;
 margin: 0px auto;
 background-color: rgb(236, 239, 241);
 padding: 20px;
 }
 .list {
 margin-top: 9px;
 }
 .list li {
 background-color: white;
 list-style: none;
 padding: 6px;
 margin-top: 3px;
 }
 .completed {
 text-decoration-line: line-through;
 color: #777;
 }
 input {
 padding: 5px;
 width: 70%;
 }
 button {
 padding: 5px;
 }
 ;
Now, let’s run the application:
npm run serve
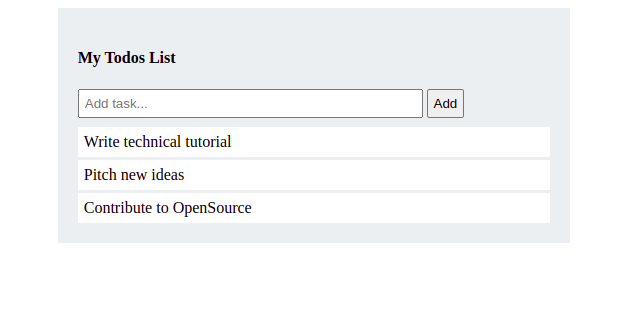
Here’s our sample to-do project!
Every framework has unique strengths and weaknesses. React powers the web applications of many large companies, such as Facebook, Twitter, and Airbnb. It also has an extensive community of developers and contributors.
If you are currently using React and are happy with that choice, then I see no reason for you to switch. However, if you are working on a project that requires really fast performance, then you might consider using Lit.
To learn more about Lit, check out its official documentation.
Install LogRocket via npm or script tag. LogRocket.init() must be called client-side, not
server-side
$ npm i --save logrocket

// Code:

import LogRocket from 'logrocket';
LogRocket.init('app/id');
// Add to your HTML:

<script src="https://cdn.lr-ingest.com/LogRocket.min.js"></script>
<script>window.LogRocket && window.LogRocket.init('app/id');</script>
Learn how next-browser gives AI agents runtime context for debugging Next.js apps, including React props, hydration, PPR, forms, and performance.
Build dynamic LLM routing in Next.js with OpenRouter, TanStack AI, task classification, model fallbacks, and cost-aware routing.
TSRX adds first-class control flow, conditional hooks, and scoped styles to React via a TypeScript compiler extension — no new framework required.
Learn how to build a full React Native auth system using Better Auth and Expo — with email/password login, Google OAuth, session persistence, and protected routes.
Hey there, want to help make our blog better?
Join LogRocket’s Content Advisory Board. You’ll help inform the type of content we create and get access to exclusive meetups, social accreditation, and swag.
Sign up now