 |
VOOZH | about |
|
VOOZH | about |
JavaScript remains the dominant programming language for the web, with several amazing frontend frameworks like React, Vue, Next.js, and more. However, in recent times, the Rust programming language has been gaining a lot of buzz for its performance and safety features.
👁 Migrating A Javascript Frontend To Leptos, A Rust Frontend FrameworkLots of new frontend frameworks have been built on top of Rust, including Leptos, which happens to be one of the most popular ones. In this guide, we’ll highlight why and how to migrate your JavaScript frontend to use the Leptos Rust frontend framework.
Let’s get into it.
Leptos is a relatively new Rust frontend framework for building interactive UI interfaces. It leverages signals and fine-grained reactivity with no virtual DOM to build complex systems at scale. It also supports server-side rendering and client-side rendering.
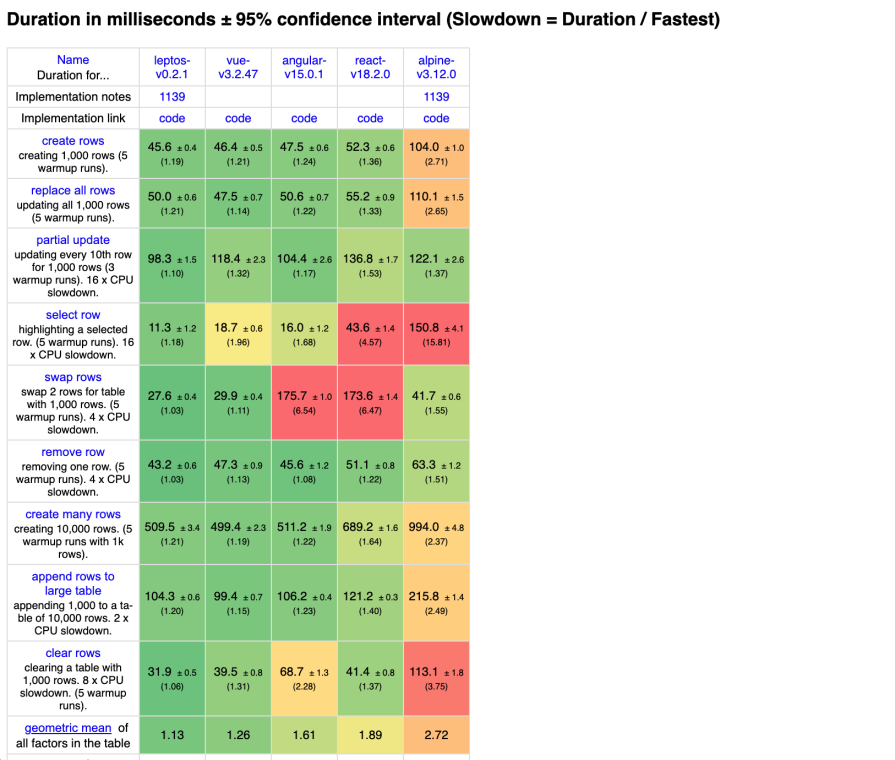
Recent performance metrics have shown that Leptos performs better than most popular JavaScript frameworks:
Not only do Leptos apps perform well, but you can build aesthetically pleasing UIs with Leptos as well.
Migrating your frontend to a new language and framework is a complex process so, it’s imperative that you have a good reason to take the leap. So, let’s highlight some of the reasons why you might want to migrate your JavaScript frontend to the Leptos Rust frontend framework.
Leptos applications are built with Rust and compile to WebAssembly (Wasm). Rust and Wasm are known for the their enhanced performance compared to JavaScript. So, migrating a JavaScript frontend to Rust means you are most likely to boost the performance of your application.
JavaScript is not fully memory-safe. While it uses the garbage collector to allocate and deallocate memory automatically, it doesn’t provide features that prevent you from accidentally or intentionally introducing memory-related bugs or vulnerabilities — for example, accessing memory that has been freed or using memory that is outside the bounds of an array.
This can lead to your application crashing on your users frequently.
One of Rust’s selling points is its guarantee of memory safety without sacrificing performance. Rust solves this problem with its ownership and borrowing feature, so your chances of introducing memory related bugs into your application are slimmer.
In today’s day and time, where we have computers with multiple cores, concurrency is an important concept and paradigm for building fast and scalable software. Interestingly, Rust has first-class support for concurrent programming.
Meanwhile, JavaScript is a single-threaded programming language. Even though a lot of work has gone in to allow JavaScript to support concurrency through various mechanisms such as asynchronous programming and web workers, JavaScript still doesn’t guarantee concurrency.
JavaScript being dynamically typed means the type of a variable is determined at runtime. This makes your JavaScript code prone to type-related errors that might not be caught until runtime.
On the other hand, Rust is statically typed, which means the types are checked at compile-time. This early detection of type errors eliminates or reduces the chances of runtime errors and improves code reliability.
While migrating from JavaScript to the Leptos Rust frontend framework sounds like a good idea with all the benefits, there are still some technical requirements for you and your team to be aware of before diving in. Let’s discuss them.
It’s important to know that Rust has a steeper learning curve compare to JavaScript. Your team needs a solid knowledge of the language fundamentals before proceeding with your migration.
While Leptos abstracts away some complexities, a solid understanding of core Rust concepts will make your migration a whole lot fun and will save you time.
Leptos supports a good number of popular libraries like Tailwind and its related CSS libraries. Even so, there’s a chance that you might not be able to use some of the libraries you’re currently using in your project and might have to look for their Rust alternatives.
So, be sure to double-check your critical libraries and be sure their alternatives exist in the Rust ecosystem. There’s a good chance the crates you need are available in Rust’s crates.io repository.
Now that we know exactly what we’re getting involved in, let’s get started with the actual migration process.
First things first, you’ll need to know the complexity, the features, and literally everything else about your existing app. Make a note of all of it, including all the available components. Nothing should be left out, as you might need to map functionalities to their Leptos implementations.
Once you have that clarity, go ahead and start setting up Leptos. All you need is to have Rust installed. From then onward, the Leptos documentation will be your best friend. There is also a video on YouTube to get you started with Leptos that you should check out.
Rust and Leptos are both easy to set up. First, install Rust with Rustup by running the command below:
curl --proto '=https' --tlsv1.2 -sSf https://sh.rustup.rs | sh
This will install everything you need to start working with Rust, including Cargo, the package manager for Rust.
Next, install Trunk and create a Rust project and by running the code below:
cargo install trunk && cargo init leptos-project
Note that Leptos uses Trunk to serve the client side application. Trunk is a zero-config Wasm web application bundler for Rust.
Now, install Leptos as a dependency in your Rust project:
cargo add leptos --features=csr
I am adding the csr features flag so that Cargo knows to install only the necessary features for building a client-side application with Leptos. This will enable us to leave out any features that are specific to the server-side functionality.
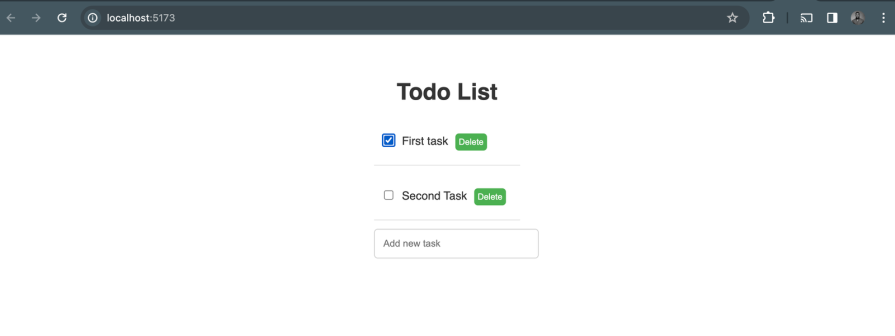
For illustration purposes, we’ll use bits and pieces of a React application I created as a case study throughout the rest of this guide. Right now, you have a basic Rust application with Leptos installed. To follow along, clone the React Todo project by running the command below:
git clone https://github.com/ezesundayeze/react-todo-sample-article
Install the dependencies and run the application by running the code below:
npm install && npm run dev
The output should look like this:
👁 Result Of Cloning React To Do Project To Set Up Migration To Leptos Rust Frontend Framework
Just like in React and most other frontend applications, Leptos has an entry point. You need to start by creating one for your project.
Let’s start by converting the React app entry point to Leptos entry point. Here is the entry point for the React app on GitHub:
ReactDOM.createRoot(document.getElementById('root')).render(
 <React.StrictMode>
 <App />
 </React.StrictMode>,
)
And this is the equivalent in Leptos:
use leptos::*;
fn main() {
 leptos::mount_to_body(App);
}
Secondly, to complete the main entry setup, create an index.html file in the root of your Leptos project. This file will serve as the root of the RSX. Add the following content to it:
<!DOCTYPE html>
<html>
 <head></head>
 <body></body>
</html>
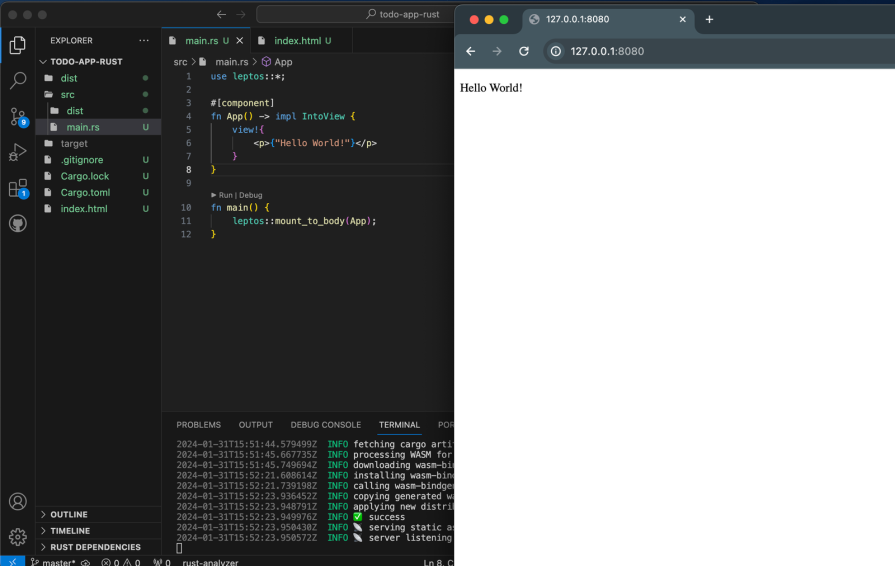
Now, let’s make a simple “Hello World” app to confirm our setup:
use leptos::*;
#[component]
fn App() -> impl IntoView {
 view!{
 <p>{"Hello World!"}</p>
 }
}
fn main() {
 leptos::mount_to_body(App);
}
Then go ahead and test your setup by running the command below in your terminal:
trunk serve --open
The output should look the the one below:
👁 Testing Leptos App Entry Point With Hello World Test Output
While React uses JSX to create component structures, Leptos uses its own unique template syntax called RSX that follows the same rules as HTML, but is written in Rust and type-safe.
Let’s look at a simple example of how a component signature works in Leptos. Below is a simple React base Button component that receives text as a prop:
// button.jsx
function Button({ text }) {
 return (
 <button>{text}</button>
 );
}
And here is the equivalent in the Rust Leptos framework:
// button.rs

#[component]
fn Button(text: Text) -> impl IntoView {
 view!{
 <button >{text}</button>
 }
}
In the React JSX Button component example above, we just have to return the JSX to the function.
Meanwhile, in the Leptos example, we need to do more than that. We must define the returned type and also return a view! macro, which is of type impl IntoView. Additionally, the function must be decorated with the #[component] annotation.
More so, just like in React, props are passed as function arguments. The component that receives the props receives them as HTML attributes as well. So, that’s a common feature for both Leptos and React.
Essentially, a component that receives props will be like the one below:
 view!{
 <TodoList todos={todos} />
}
The code above contains a TodoList component that accepts a list of to-dos as props. Following this signature, it woudn’t be too big of a deal to migrate basic components. However, some will require a state management implementation. So, let’s explore how state management works in the Leptos Rust frontend framework.
State management is the process of handling and modifying data that affects the component’s rendering. Leptos has a robust statement management system that powers its reactivity with signals.
Signals in Leptos are the center of reactivity. When a signal’s value changes, it signals all its subscribers, updating their corresponding components.
The way state management works in Rust is different, but some of the syntax may be similar to those of popular JavaScript frameworks, including React. So, it will likely not be too cumbersome to migrate your state, especially for small projects.
Let’s return to our linked GitHub project to see a practical example of how to address state management when migrating from React to Leptos. Here is the React version with the useState Hook:
import React, { useState } from "react";
import TodoList from "./TodoList";
import "./App.css";
function App() {
 const [tasks, setTasks] = useState([]);

 return (
 <div className="App">
 <h1>Todo List</h1>
 <TodoList
 tasks={tasks}
 />
 </div>
 );
}
export default App;
The equivalent in Leptos will look like the below:
#[component]
fn App() -> impl IntoView {
 let todos = create_signal(vec![]);
 view! {
 <div class="todo-app">
 <h1>"Todo App"</h1>
 <TodoList todos={todos} />
 </div>
 }
}
The Leptos team has designed parts of the framework to resemble what developers are used to seeing in other frameworks. As a result, the routing mechanism for Leptos looks quite similar to that of React Router, as you can see in the code below:
 view! {
 <Routes>
 <Route path="/" view=Home/>
 <Route path="/todos" view=todos/>
 <Route path="/todos/:id" view=singleTodo/>
 <Route path="/*any" view=|| view! { <h1>"Not Found"</h1> }/>
 </Routes>
 }
I find it very interesting to work with the Leptos Rust frontend framework because in most cases, a lot of the details are abstracted so you can just focus on writing your application logic. It also looks familiar to other frameworks I am used to, which helps reduce the learning curve.
You can learn more about Leptos routing in the documentation.
There is no doubt that a huge part of the migration process will involve reimplementing your component logic. While some UI-related parts might seem similar, the core logic will most likely be more Rust-y than the template-related code, which is where your knowledge of Rust will shine.
For example, Leptos uses the concept of signals to handle its state. This means you won’t need an external state management tool, as we’ve already seen previously.
Here is an example of Leptos signal initialization:
let todos = create_signal(vec![]);
While here is how the same thing works in React:
const [tasks, setTasks] = useState([]);
In our linked project, the implementation for deleting a task looks like this:
 const deleteTask = (taskId) => {
 setTasks(tasks.filter((task) => task.id !== taskId));
 };
A similar functionality, but in Leptos, looks like the code below:
 let delete_task = create_action(cx, |task_id: u32| {
 set_tasks.update(|tasks| tasks.retain(|task| task.id != task_id))
 });
Likewise, you’ll have to map out and re-implement the logic for each functionality.
Migrating your JavaScript frontend to Rust can be a tough and yet interesting challenge. In this guide, we covered some considerations and steps to help you migrate your frontend from Javascript UI frameworks and libraries like React to the Leptos Rust frontend framework.
I hope you found this tutorial helpful. To be honest, to have an even more successful migration experience, you should consider going through the Leptos documentation and follow along with the our previous tutorial on Leptos, which shows in more detail how to work with Leptos.
Later in your migration process, you should ensure you write tests for your Leptos components using the Leptos testing tool. Also, write your business logic tests with Rust to ensure that your migration is working as expected.
Happy hacking!
Debugging Rust applications can be difficult, especially when users experience issues that are hard to reproduce. If you’re interested in monitoring and tracking the performance of your Rust apps, automatically surfacing errors, and tracking slow network requests and load time, try LogRocket.
LogRocket lets you replay user sessions, eliminating guesswork around why bugs happen by showing exactly what users experienced. It captures console logs, errors, network requests, and pixel-perfect DOM recordings — compatible with all frameworks.
LogRocket's Galileo AI watches sessions for you, instantly identifying and explaining user struggles with automated monitoring of your entire product experience.
👁 LogRocket Dashboard Free Trial BannerModernize how you debug your Rust apps — start monitoring for free.
We built the same app in TanStack Start RSC and Next.js RSC. TanStack shipped 40% less JS and built 4x faster — but Next.js is still the safer production bet.
From RSC vulnerabilities and the Vercel breach to TypeScript 7.0 Beta and AI agents — the nine frontend storylines that defined H1 2026, ranked.
AI tools generate working React code fast, but miss race conditions, empty states, debouncing, and accessibility. Here’s how to catch bugs before production.
Learn how to use Gemini CLI subagents to delegate frontend, backend, testing, and docs tasks to specialized agents with guardrails and clear ownership.
Hey there, want to help make our blog better?
Join LogRocket’s Content Advisory Board. You’ll help inform the type of content we create and get access to exclusive meetups, social accreditation, and swag.
Sign up now