 |
VOOZH | about |
|
VOOZH | about |
Time is the most valuable asset we humans have. As developers, we spend far too much of that time doing two things: staring at our code wondering why the hell it’s not working, and waiting for our apps to build. Nobody likes to wait for the build to complete and then distribute it before going home. Why not automate it? CI/CD? Yes! And for React Native apps, too.
👁 React Native CI/CD Using GitHub ActionsToday, we have great tools available for CI/CD of React Native apps. GitHub Actions, GitLab CI/CD, CircleCI, Travis CI, and many others are helping developers save loads of time and resources. Today, we will use Github Actions for the CI/CD of our React Native application.
This post is a continuation of our previous post that discusses testing React Native apps with React Native Testing Library. Although it isn’t exactly prerequisite reading, we discussed a few pre-commit tasks to maintain the quality of code. Building on the same app, we will complete the CI/CD pipeline here.
The Replay is a weekly newsletter for dev and engineering leaders.
Delivered once a week, it's your curated guide to the most important conversations around frontend dev, emerging AI tools, and the state of modern software.
GitHub Actions allows us to define workflows that will run based on their associated conditions. Every repository can contain multiple workflows that trigger different jobs based on different events. GitHub on every trigger picks all YAML files in .github/workflows/ and executes the required workflows. If a workflow ends abruptly, then the action is marked as a failure.
To fulfill some basic tasks like checking our project or caching files, GitHub has a wide range of officially maintained actions. We can also leverage several open-source actions maintained by the community.
So, our set of requirements looks like this:
As indicated, our first requirement belongs to the CI (continuous integration) phase. That allows us to establish an automated way to keep development moving fast without breaking our application. CD (continuous delivery) picks up where CI ends. CD automates the delivery of our applications to the selected environments.
To recap, we have two different kinds of workflows: CI and CD. Any workflow can be executed on different triggers; in our case, the CI workflow will be executed on every pull request on protected branches, whereas CD workflows are executed on every push on protected branches.
To set up the CI workflow for our repo, we will add a new file ci.yml in .github/workflows/.
Our CI workflow trigger is a pull request on the protected branch. Here is how our workflow configurations should look:
name: Continuous Integration

on:
 pull_request:
 branches:
 - develop
 - alpha
 - main
As seen, this will execute on every pull request on defined branches.
Every workflow that we define via GitHub Actions is executed in a separate virtual machine. To execute anything on our codebase, we need to check out the repo on the assigned instance. As discussed earlier, GitHub has a wide variety of utility actions available to handle such tasks. Here we will use the Checkout action:
 - name: Checkout
 uses: actions/checkout@v2
Once our checkout is complete, we will set up our environment and project. To run any Node.js project in a GitHub VM, we can use the official Node setup action.
Since we are executing our tests using React Native Testing Library, we have to install some npm dependencies. In this step, we will set up a Node environment on runner and install our npm dependencies.
 - uses: actions/setup-node@master
 - uses: c-hive/gha-yarn-cache@v1

 - name: Install node modules
 run: |
 yarn install
To make our subsequent actions, we can cache the npm dependencies for our project. We have leveraged C-Hive’s one-liner Yarn module cache action.
Now that the Node environment and dependencies are available, let’s start executing our test suites. This is as simple as running our test using the local CLI.
 - name: Run test
 run: |
 yarn test-ci
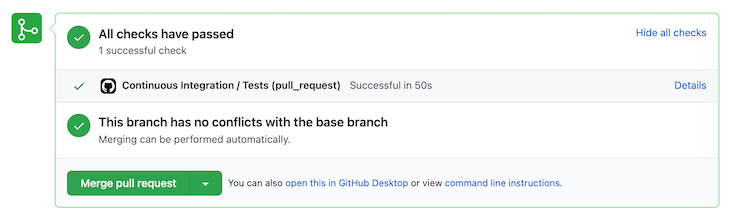
As discussed, this job will execute on every pull request; GitHub will display the result of the pipeline execution with every PR. Here’s a screenshot of how it looks:
👁 Successful Execution of the Pipeline in GitHub Actions
This wraps up our CI workflow. This workflow will make our application more scalable in terms of code quality as any code that is merged in our repo will be passing through our quality checks.
Since we have a decisive CI phase intact, any code that is merged into our protected branches passes all tests. Thus, once any PR is merged, it is safe to build our application. In our CD pipelines, we will begin with building our apps and publishing them as per our requirements.
For Android apps, the steps for our build job are as follows:
Just like we did with out npm dependencies, we will cache our Gradle dependencies and wrapper to keep our builds faster. We’ll use GitHub’s Cache action here:
 - name: Cache Gradle Wrapper
 uses: actions/cache@v2
 with:
 path: ~/.gradle/wrapper
 key: ${{ runner.os }}-gradle-wrapper-${{ hashFiles('gradle/wrapper/gradle-wrapper.properties') }}

 - name: Cache Gradle Dependencies
 uses: actions/cache@v2
 with:
 path: ~/.gradle/caches
 key: ${{ runner.os }}-gradle-caches-${{ hashFiles('gradle/wrapper/gradle-wrapper.properties') }}
 restore-keys: |
 ${{ runner.os }}-gradle-caches-
We are caching our Gradle dependencies and wrapper separately to ensure they are available for subsequent builds and to save us some valuable CI/CD minutes.
Now we will start the build process for our Android app:
 - name: Make Gradlew Executable
 run: cd android && chmod +x ./gradlew

 - name: Build Android App Bundle
 run: |
 cd android && ./gradlew bundleRelease --no-daemon
In some Linux environments, Gradle is not executable by default. So, to be on the safe side, we make sure gradlew is executable before we start our heavy build process.
Since all actions are executed as separate instances, having the Gradle daemon running doesn’t make sense; it will create an extra burden on memory. Therefore, we have added a --no-daemon flag to our build step.
For the security of the app, it’s recommended that we keep signing properties outside of the codebase. Once our build is complete, we will have an unsigned app bundle available. To sign this bundle, we will use an open-source signing action, r0adkll/sign-android-release.
Here is our step to sign a release:
 - name: Sign App Bundle
 id: sign_app
 uses: r0adkll/sign-android-release@v1
 with:
 releaseDirectory: android/app/build/outputs/bundle/release
 signingKeyBase64: ${{ secrets.ANDROID_SIGNING_KEY }}
 alias: ${{ secrets.ANDROID_SIGNING_ALIAS }}
 keyStorePassword: ${{ secrets.ANDROID_SIGNING_STORE_PASSWORD }}
 keyPassword: ${{ secrets.ANDROID_SIGNING_KEY_PASSWORD }}
This task uses secrets from our project. We can generate signingKeyBase64 using this command:
openssl base64 < some_signing_key.jks | tr -d '\n' | tee some_signing_key.jks.base64.txt
The content of the output .txt file will be a Base64 signing key.
GitHub Actions allows us to save the output of any job. These files can be downloaded later for testing or backup purposes. We will upload our signed app as an artifact of this job.
 - name: Upload Artifact
 uses: actions/upload-artifact@v2
 with:
 name: Signed App Bundle
 path: ${{steps.sign_app.outputs.signedReleaseFile}}
One crucial piece here is the path of our signed APK; this was generated via our previous step, sign_app, which output the path for the signed APK. Here, we will use the same path.
This concludes the build phase of the job! The signed bundle or APK is now available for us.
As mentioned in our requirements above, on every push to the develop branch, we have to distribute our application using Firebase App Distribution. To use Firebase CLI, we will install firebase-tools globally on the instance and make its PATH available.
 - name: Distribute app via Firebase App Distribution
 env:
 firebaseToken: ${{ secrets.FIREBASE_TOKEN }}
 firebaseGroups: ${{ secrets.FIREBASE_GROUPS }}
 firebaseAppId: ${{ secrets.FIREBASE_APP_ID }}
 notes: ${{ github.event.head_commit.message }}
 run: |
 yarn global add firebase-tools
 export PATH="$(yarn global bin):$PATH"
 firebase \
 appdistribution:distribute android/app/build/outputs/apk/release/app-release.apk \
 --app $firebaseAppId \
 --release-notes "$notes" \
 --groups "$firebaseGroups" \
 --token "$firebaseToken"
Here we are using firebaseToken, firebaseGroups, and firebaseAppId, all coming from our secrets. We have set these values from the secret in our env and then used env variables in our CLI command. This is another way of accessing secrets and other variables.
Also, we have accessed the message of the head commit from the GitHub event. Broad information about the job, commit, etc. is available in the workflow context.
Let’s go for a home run. In this step, we will distribute our signed app via Google Play Console. This process requires setting up the Google Play Developer API and attaching it with Play Console. On completion of this setup, we’ll get a JSON file with all the information about the service account. We’ll place that in our project secrets.
For this step, we will use the open-source r0adkll/upload-google-play, which does all the heavy lifting related to the Play API.
 - name: Deploy to Play Store (BETA)
 uses: r0adkll/upload-google-play@v1
 with:
 serviceAccountJsonPlainText: ${{ secrets.ANDROID_SERVICE_ACCOUNT }}
 packageName: com.testedapp
 releaseFile: a${{steps.sign_app.outputs.signedReleaseFile}}
 track: beta
 inAppUpdatePriority: 3
 userFraction: 0.5
 whatsNewDirectory: android/release-notes/
Here comes the euphoria — our tested app is now delivered to the end user without any manual intervention!
As discussed in the beginning, the main goal of CI/CD is to save developer time and keep the quality of the codebase and resulting application intact. Leveraging GitHub Actions can save loads of time that we would have spent on manually building and distributing our applications.
CI will also allow developers to pull only code that passes all our quality standards and tests, meaning fewer bugs and faster iterations. What else could make you happier — aside from free pizza?
One vital feature that I missed while working with GitHub Actions, however, is the ability to share steps among different jobs. In our case, we had to clone, install dependencies, and run tests in all of our jobs.
Currently, steps are defined in all of the scripts; this redundancy can be avoided if we share steps between different jobs. Let’s keep track of this discussion and hope this will arrive in GitHub Actions soon.
You can dive in further and see how multiple jobs can be executed in parallel and interdependently. Also, you can create workflow templates to share across different projects. Share the cool stuff you’re doing with GitHub Actions and React Native in the comments below!
LogRocket's Galileo AI watches sessions for you and and surfaces the technical and usability issues holding back your React Native apps.
LogRocket also helps you increase conversion rates and product usage by showing you exactly how users are interacting with your app. LogRocket's product analytics features surface the reasons why users don't complete a particular flow or don't adopt a new feature.
Start proactively monitoring your React Native apps — try LogRocket for free.
TSRX adds first-class control flow, conditional hooks, and scoped styles to React via a TypeScript compiler extension — no new framework required.
Learn how to build a full React Native auth system using Better Auth and Expo — with email/password login, Google OAuth, session persistence, and protected routes.
Compare the top AI development tools and models of June 2026. View updated rankings, feature breakdowns, and find the best fit for you.
Learn how Bloom filters reduce database lookups for username availability checks while preserving correctness at scale.
Would you be interested in joining LogRocket's developer community?
Join LogRocket’s Content Advisory Board. You’ll help inform the type of content we create and get access to exclusive meetups, social accreditation, and swag.
Sign up now