 |
VOOZH | about |
|
VOOZH | about |
In frontend development, testing user behavior is crucial for delivering great products. React Native Testing Library (RNTL) makes it a joy to test user journeys in our React Native apps. It has great APIs to make tests immune to implementation details.
👁 User Behavior Testing with React Native Testing LibraryBy the end of this tutorial, I promise you will feel this joy, too — and I won’t take up too much of your time getting there. You can find the full code for this demo on GitHub.
The Replay is a weekly newsletter for dev and engineering leaders.
Delivered once a week, it's your curated guide to the most important conversations around frontend dev, emerging AI tools, and the state of modern software.
Let’s begin with adding libraries that we will be using to make our testing a joyful experience.
yarn add -D @testing-library/react-native
One thing to note here — RNTL is a wrapper over react-testing-library that depends on Jest. This combination, in my humble opinion, is a match made in heaven and makes the testing experience amazing.
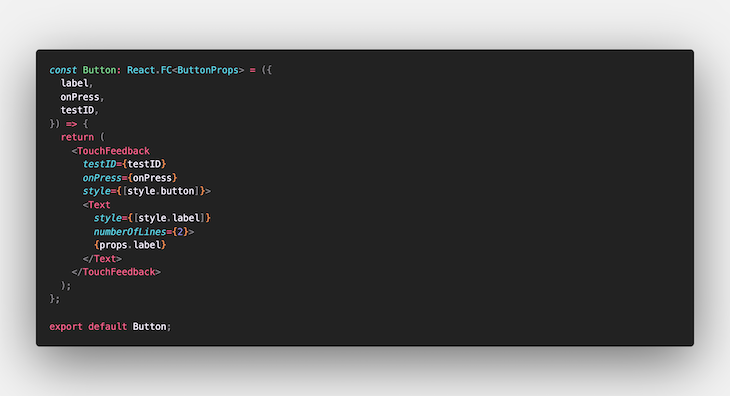
Button componentLet’s start small; if you are familiar with testing components, you can skip this section. We will test a simple button component just to make ourselves a bit more familiar with how RNTL works and what we are up to. Here is how our Button component looks:
👁 Code for the Button Component
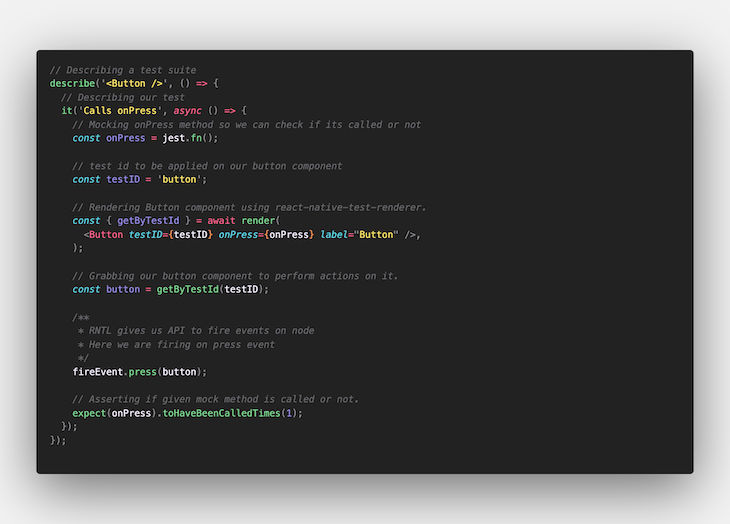
Here’s the full code for the Button component. We will test that it should call the onPress method when it is pressed by a user. Our test should look like this:
👁 Code for the Button Component Test Suite
RNTL provides a great API to grab components using attributes. Though there are a number of ways to grab a component, I feel getByTestId makes your test code more immune to UI and textual changes.
With the fireEvent API, we can mock many interactions, which allows us to test user behaviors. Here, we have created a mock method and asserted that it should be called only once when a user presses the button. We will use a similar structure for testing our flow further.
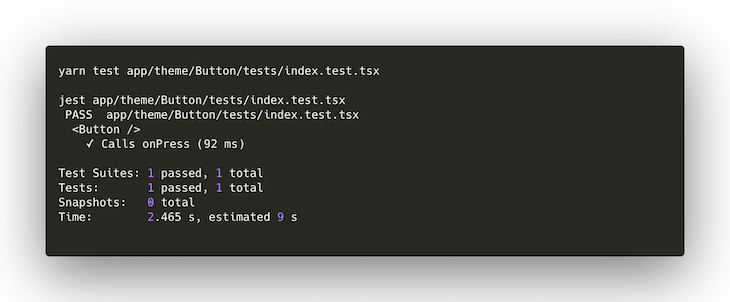
Here is how we will execute this test, along with the expected output:
👁 Expected Output for Our Button Component Test
Cool, so we have done some basic testing now and have a good idea of how things will shape up.
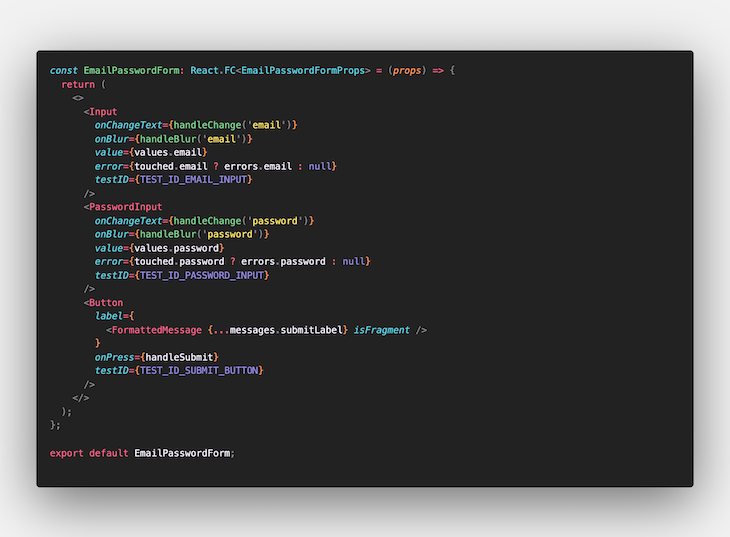
Let’s take a step forward and practice some real-world examples. We will test a form that takes email and password inputs from a user and passes them to the onSubmit method. We will also assert that it renders a validation error if a user has not entered a password. Here’s our component:
👁 Code for the Email Form Component
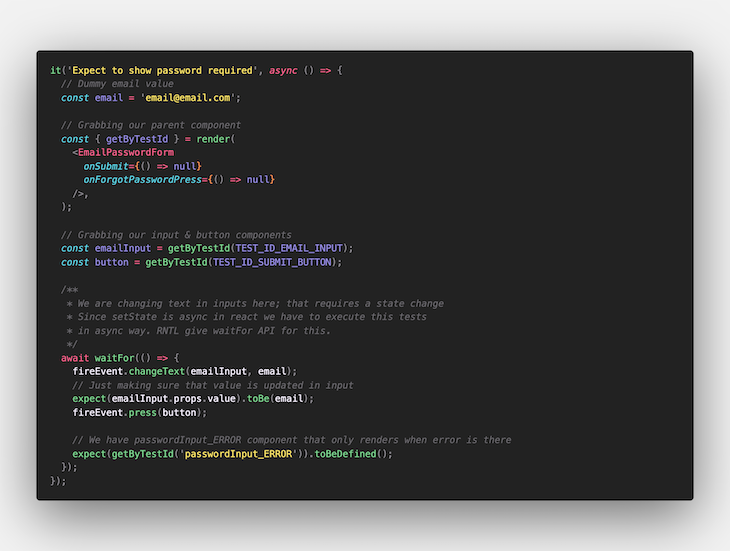
Let’s test our first use case: the component should display a “password required” error. Here’s our test will look:
👁 Code for the Email Form Component Test
Here we are testing an action that has an impact on state. Since setState is async in React, we have to execute this test in an async way. RNTL provides the waitFor API for this. Also, we have used the same fireEvent API here for changing the text of our input component.
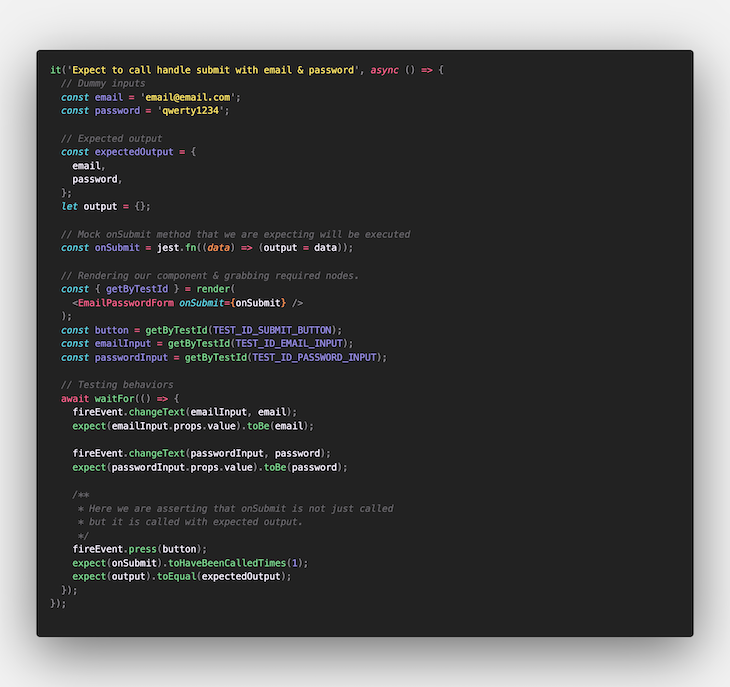
Moving to our next use case, we expect to call onSubmit with email and password:
👁 Mocking the Function Argument in the Form Component Test
We’re taking another step forward by asserting the mock function’s argument to make sure we have the expected output. Here is our full test suite for the EmailPasswordForm component.
Now that we’ve built up some confidence, let’s test our complete login flow. This isn’t just about testing methods being called. Login usually includes two main functions: it has some network API call that returns a token, and then we save that token in local storage for later use.
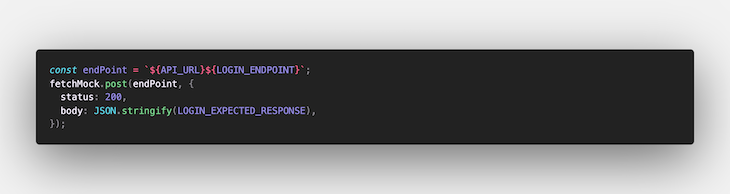
In order to make our test independent of server/network, we will mock our API hits. This is possible with the fabulous open source package fetch-mock-jest. It intercepts all fetch calls and resolves them with given response. This allows us to test all success and error cases. Let’s add it to our code base.
yarn add -D fetch-mock-jest
Here is the simplest mocking we will use; it mocks a login API call with an expected response.
AsyncStorageReact Native apps use a number of native bridges to access platform-specific functionalities. In our case, we have to make sure the login API response is stored in local storage.
RNTL allows us to mock these native bridges so we can run our tests without depending on devices or emulators. In order to mock these libraries, we will add the file jest.mock.js, which will code for mocking all of the native libraries we are using in our app. Here’s our mock file:
jest.mock('@react-native-community/async-storage', () => ({
 setItem: jest.fn(),
}));
One important point to note here: we have to mock all methods that we are using from libraries, as these are not added in our testing environment.
Now we will reference this file from our jest.configs.js file:
module.exports = {
 ...
 setupFiles: ['./jest.mock.js']
 ...
};
Adding this file to the setupFiles array will tell Jest to execute this file before running any test suite.
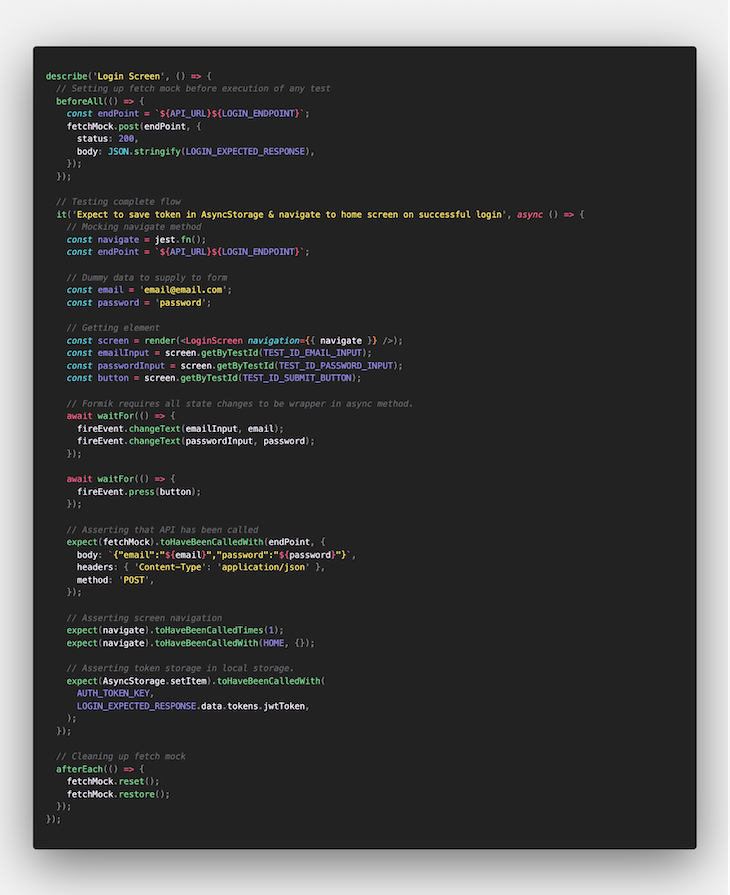
Now that we have our mocking in place, let’s take a look at how we’ll test our full flow:
👁 Full Test Flow for Our Login Screen
Don’t worry — it’s just lengthy, not hard to digest. We already know most of this.
To begin with, we have added fetchMock in our beforeAll hook to make sure our fetch mocking begins before this test suite starts. Here we have rendered our screen component with a mocked navigate method; this is how our screen will be rendered in the app.
After executing all user interactions, we start asserting things happen as we expect. Here is the list of our expectations:
jwtToken is stored in local storageIf all of these tests pass, we are sure that our login screen works the way we expect it to. This marks our login flow testing as complete.
Testing might take a bit longer to execute over time as our test suites grow in number and size. Linting our code before executing any tests will make sure we are not executing tests on code with any obvious bugs. We will add lint tasks in the pre-test script. Here’s what it looks like:
👁 Adding the Pre-test Linter
You can view the full package.json file here.
Who doesn’t like charts and dashboards to visualize performance? Here, we will integrate the Jest test reporter, which will deliver us a complete picture of our test execution. This will help us monitor what tests are breaking and how much time each test takes to complete.
Adding the reporter to our project:
yarn add -D jest-html-reporters
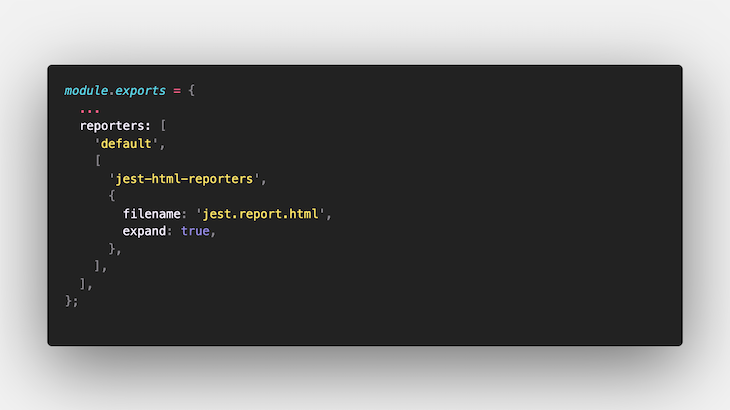
Next up, let’s add this reporter to our jest.configs.js file. Here’s how it looks:
👁 Adding Reporter to Our Configs File
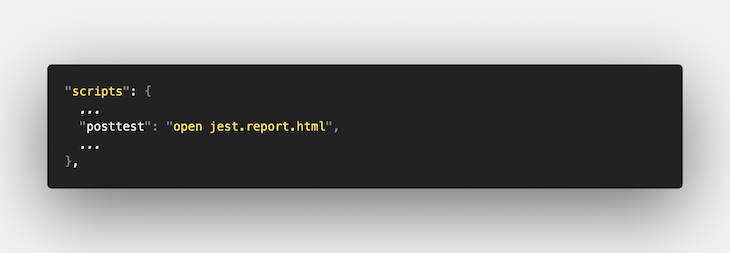
To get it running, let’s open up this reporter automatically every time our tests are executed. It’s simple — we’ll add it to our post-test script as an update to our package.json:
👁 Adding Reporter in the Post-test Script
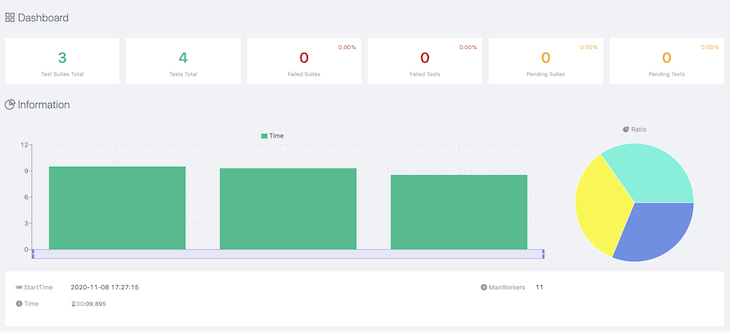
Here’s the test report for our project:
👁 Visualization of the Project Test Report
And here’s the .html file of the report.
For large-scale applications (and side projects that we work on every seventh day), it’s better to have solid checks in place to maintain code quality. These checks must be enforced to ensure that every PR that arrives in our repos is up to standard and passes defined criteria.
Pre-commit hooks can help us here. These hooks run before every commit. We can add our test task to make sure that no commit is allowed to break any of our tests. We are using husky here, which makes adding commit hooks much easier. This is our last library to add:
yarn add -D husky
Let’s set up our first pre-commit hook here. npx will help us with that:
npx husky add pre-commit "yarn test" # will create .husky/pre-commit file
Running this command will create a .husky/pre-commit file for us. It’s a bash script that will be executed before any commit.
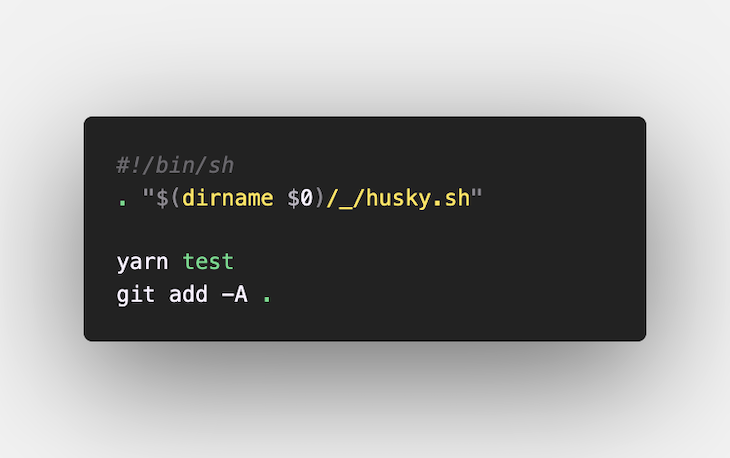
At times, our list tasks have a --fix option that makes changes to our files as we run the command. In our case, we added a Jest reporter in the section above, which will create a new reporting file as we run our tests. In order to add all of these changes to our commit after pre-commit hooks are executed, we will update our pre-commit file. This is how it looks:
👁 Final Update to Our Pre-commit File
Yes, I know how it feels when you have a complete testing ecosystem in place — more relaxed and confident that your code won’t break too soon.
React Native Testing Library makes it easier to follow best practices and keeps your testing experience joyful. It allows you to test your application in the same ways your users interact with it. Making sure all your use cases are covered provides a lot of confidence — you better believe it will get your app’s rating up.
Moving forward from here, you can try out Detox for end-to-end testing; it will help you test for cases that require native APIs, like notifications, deep linking, and sophisticated user interactions.
LogRocket's Galileo AI watches sessions for you and and surfaces the technical and usability issues holding back your React Native apps.
LogRocket also helps you increase conversion rates and product usage by showing you exactly how users are interacting with your app. LogRocket's product analytics features surface the reasons why users don't complete a particular flow or don't adopt a new feature.
Start proactively monitoring your React Native apps — try LogRocket for free.
Learn how next-browser gives AI agents runtime context for debugging Next.js apps, including React props, hydration, PPR, forms, and performance.
Build dynamic LLM routing in Next.js with OpenRouter, TanStack AI, task classification, model fallbacks, and cost-aware routing.
TSRX adds first-class control flow, conditional hooks, and scoped styles to React via a TypeScript compiler extension — no new framework required.
Learn how to build a full React Native auth system using Better Auth and Expo — with email/password login, Google OAuth, session persistence, and protected routes.
Would you be interested in joining LogRocket's developer community?
Join LogRocket’s Content Advisory Board. You’ll help inform the type of content we create and get access to exclusive meetups, social accreditation, and swag.
Sign up now