 |
VOOZH | about |
|
VOOZH | about |
As software projects continue to grow more complex, choosing the right architecture for your project at the outset is a crucial decision. Breaking down your project into smaller and more understandable components has many benefits, making it much easier to:
👁 React Logo Over a Gray BackgroundOne such architecture that can be used to achieve these benefits is the serverless architecture (also known as serverless computing or FaaS — function-as-a-service).
In this tutorial, we will learn how set up a serverless project using the Serverless Framework by building a sample GraphQL to-do API. We’ll use AWS (Lambda, DynamoDB, and AppSync) as our backend-as-a-service (BaaS).
There are many explanations about serverless architecture, but the best one I’ve come across is from this amazing piece by Mike Roberts:
Serverless architectures are application designs that incorporate third-party “Backend as a Service” (BaaS) services, and/or that include custom code run in managed, ephemeral containers on a “Functions as a Service” (FaaS) platform.
The Serverless Framework is an open-source project that helps developers deploy cloud applications on any FaaS provider.
For this tutorial, we will be covering how to use the Serverless Framework to deploy a sample serverless project to AWS with AWS AppSync, AWS Lambda, and DynamoDB integrations.
Now that we a have a brief overview of what serverless is and what we want to achieve, we can now dive in and set up our new project.
To set up the CLI, make sure you have Node and npm installed on your machine, then run the following command:
$ npm install -g serverless
After successful installation, register for a Serverless Dashboard account, then log in to your account from the CLI.
$ serverless login
This should open up a link in your browser that allows you to log in to your account.
To kick off the setup, you need to first download the AWS CLI, which varies according to your operating system. I’ll be covering macOS version in this tutorial, but you can find a guide for other operating systems here.
Run the following commands to download and install the CLI:
$ curl "https://awscli.amazonaws.com/AWSCLIV2.pkg" -o "AWSCLIV2.pkg"
$ sudo installer -pkg AWSCLIV2.pkg -target /
The following command verifies that the shell can find the aws command in your path.
$ which aws
/usr/local/bin/aws
In order to get your CLI config ready, you need to set up an AWS IAM role to provide the Serverless Framework temporary access to AWS access keys to deploy your services to AWS.
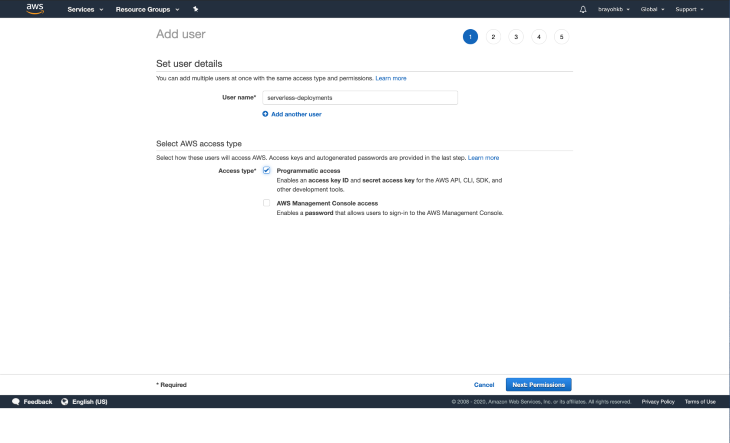
Navigate to the IAM console then select users on the navigation. Click on the Add user button, which should redirect you to a form to fill in the new user details.
Select a reasonable username for your new user and then, under access type, select Programmatic access and click Next: Permissions:
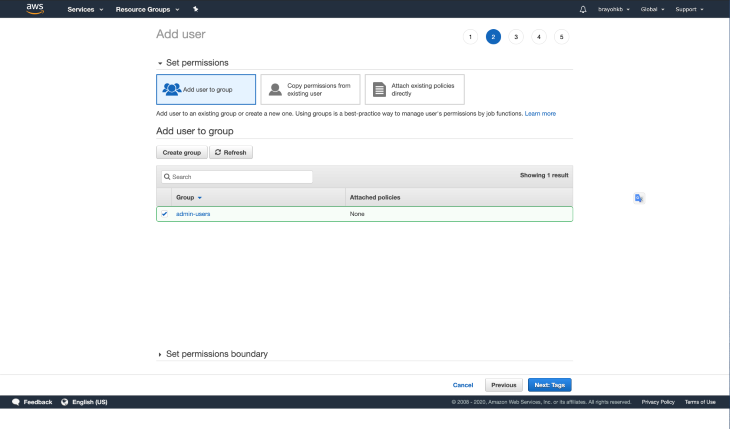
Our new user requires admin permissions to be able to interact with AWS services while deploying from our Serverless app or working with the CLI.
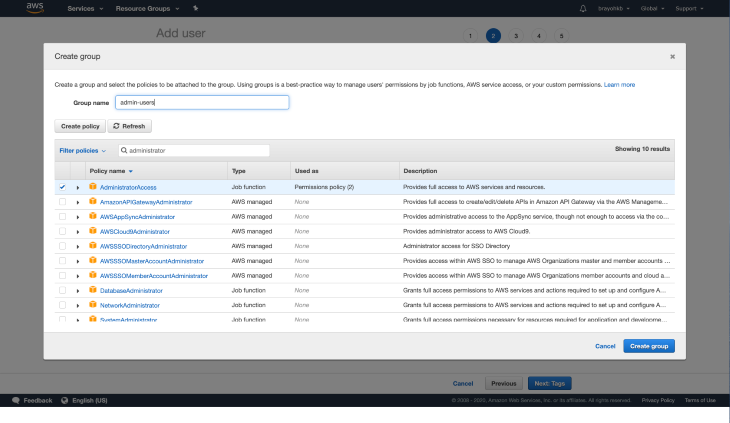
Since we don’t have a pre-existing group, we will be creating a new group by clicking on Create group. Input “administrator” in the Filter policies section, choose the AdministratorAccess policy, then choose a name for the group, preferably admin-users (or whatever suits you 🙂).
Click on Create group, which should create the new group, and pre-select the group:
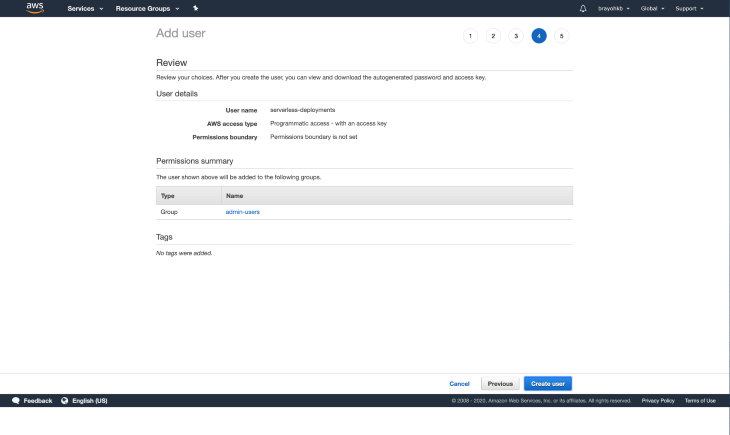
Click on Next: Tags, which takes you to the tags section. Tags are optional, so I’ll be skipping this part. Move on to the Review page, which should you an overview of the details you provided:
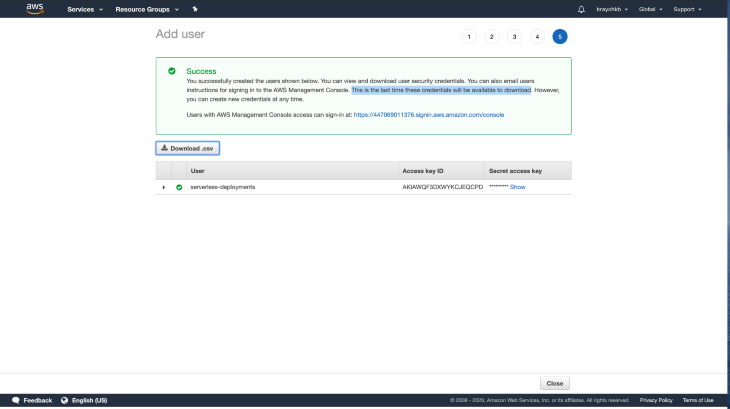
Click on Create user, which should create a new user and present you with your newly created access keys. You should take special care not to lose your credentials since they’re only availed to you only once, so make sure to download the CSV file and keep it somewhere safe.
Now that all our access keys are set, we can successfully configure the CLI:
$ aws configure
AWS Access Key ID [None]: NEW_KEY_ID
AWS Secret Access Key [None]: SECRET_ACCESS_KEY
Default region name [None]: us-east-2 or preferred region
Default output format [None]: json
These credentials are saved in a file in your user directory located at ~/.aws/credentials. The Serverless Framework picks up the default profile from this file when running deployments.
The file is editable and you can have multiple profiles, which allows you to carry out deployments according to the selected profile as follows:
$ serverless deploy --aws-profile your_profile_name_here
And here is the part you’ve all been waiting for! 🙂
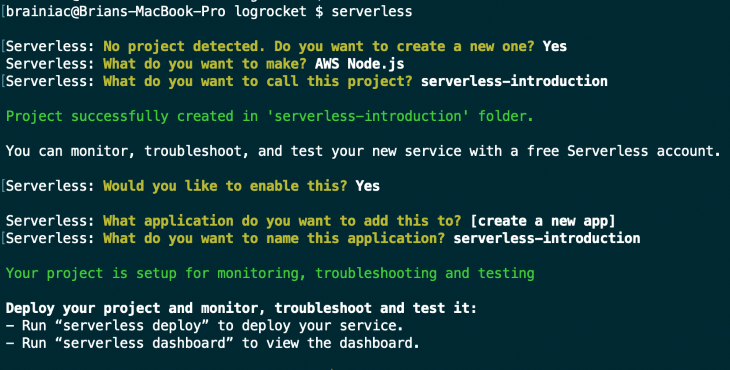
Now that we have everything all set and ready to go, navigate to your preferred workspace directory and run the following command to create a new Serverless project with a sample Node.js template to get started:
$ serverless
Choose the following options to have an easier time following this tutorial:
Congrats! You just created your first Serverless project!
Your directory structure should be as follows (if you don’t have tree installed, run brew install tree):
$ tree . -L 2 -a
.
├── .gitignore
├── .serverless
│ ├── cloudformation-template-create-stack.json
│ ├── cloudformation-template-update-stack.json
│ ├── serverless-introduction.zip
│ └── serverless-state.json
├── handler.js
└── serverless.yml
You will be working with the handler.js and serverless.yml files only, unless there’s a need to create new files. The purpose of the two files will be explained in detail in a later section of the article.
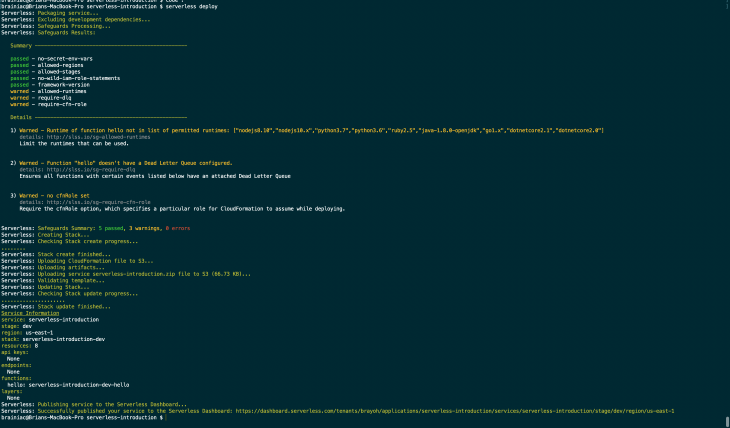
Now on to the next step, which is to deploy your new project to the cloud by running:
$ serverless deploy
Since the project doesn’t have many resources, this will probably take a few minutes to complete. After deployment is done, you should see a screen similar to this:
👁 Completed Serverless Project
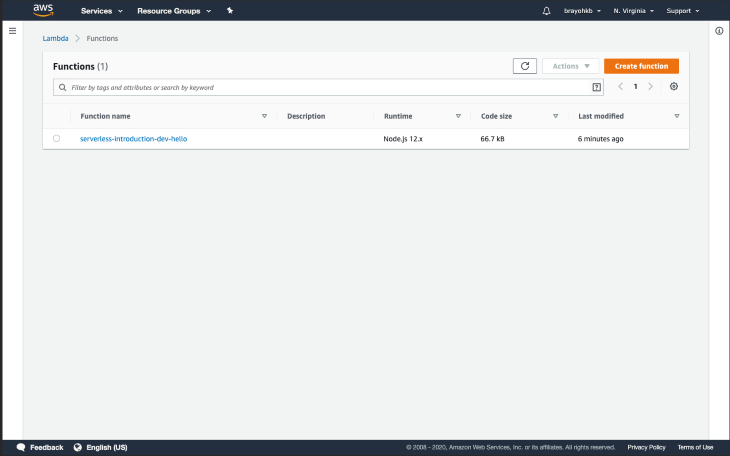
By default, your services are deployed to the us-east-1 region. If you navigate to your Lambda dashboard, you’ll have the sample hello function written in handler.js as part of the list, with the project name as the prefix and the function name as the suffix:
This confirms that have everything is all set, and we can now dive in to the various components of the Serverless framework.
The main concepts of the framework are:
A function is a block of code that performs a specific task. It can either return a value or a procedure. Functions should have a single purpose in order to follow to separation of concerns and achieve cleaner code. You can use a function for jobs such as:
A function is deployed independently; you can think of it as a microservice.
An event is anything that triggers an AWS Lambda function to execute. Sample events include:
For any event defined in AWS Lambda functions, the necessary infrastructure is automatically created (e.g., an API Gateway endpoint) and the AWS Lambda Functions are configured to listen to it.
Resources are AWS infrastructure components which your functions use such as:
All your functions, events, and AWS infrastructure components are automatically deployed by the Serverless Framework.
A service is a unit of organization. It’s like a project file where you define your functions, the events that trigger them, and the resources your functions need. These are all defined in the serverless.yml file, which looks something like this:
# serverless.yml

service: todo

functions:
 todoCreate:
 events: # Events that trigger this function
 - http: post todo/create
 todoDelete:
 events:
 - http: delete todo/delete

resources: # Resources needed by your functions, Raw AWS CloudFormation goes in here.
As in most developer communities, libraries/plugins always come in handy when you need to extend or overwrite the functionality of a project. The serverless.yml file supports a plugins: property where you can add all your required plugins. We will tackle this in the next section when working with AWS AppSync.
As mentioned in the introduction, in order to get our feet wet, we will set up a sample to-do API that will utilize AWS infrastructure components:
First off, you need to create a schema file in the root folder, where you will write your GraphQL schema:
$ touch schema.graphql
Open the file in your editor and add the following schema:
type ToDo {
 createdAt: AWSDateTime
 id: ID
 updatedAt: AWSDateTime
 description: String!
 completed: Boolean
 dueDate: AWSDateTime!
}

input ToDoCreateInput {
 description: String!
 dueDate: AWSDateTime!
}

input ToDoUpdateInput {
 id: ID!
 description: String
 dueDate: AWSDateTime
 completed: Boolean
}

type Mutation {
 createTodo(input: ToDoCreateInput): ToDo
 updateTodo(input: ToDoUpdateInput): ToDo
 deleteTodo(id: ID!): ToDo
}

type Query {
 listToDos: [ToDo!]
 getToDo(id: ID): ToDo
}

schema {
 query: Query
 mutation: Mutation
}
In order to create a new AppSync API, you need to install serverless-appsync-plugin, which helps with deploying, updating, and deleting AppSync APIs:
$ yarn add serverless-appsync-plugin
Then update your serverless.yml to the following:
service: serverless-introduction
app: serverless-introduction
org: brayoh
provider:
 name: aws
 runtime: nodejs12.x
 stage: ${opt:stage, env:stage, 'dev'}

plugins:
 - serverless-appsync-plugin
custom:
 appSync: # appsync plugin configuration
 name: ${self:service}-appsync-${self:provider.stage}
 authenticationType: API_KEY # since we dont have user login for now

functions:
 hello:
 handler: handler.hello
The plugins property is where we define the plugins we want to use after installing them via Yarn or npm.
The stage property is determined by three options:
opt:stage, which means the stage flag can be passed in when deploying to our serviceenv:stage, which means we have an environment variable called stageThis makes it easy to deploy to multiple stages, whether dev, testing, or production. You can learn more about how to pass environment variables in the documentation.
The appSync property is where you define your custom config for the serverless-appsync-plugin. For now, we’ve just added the API name, which has a prefix of our service name; the AWS component, which is AppSync in this case; and a suffix of the current stage, e.g., serverless-introduction-appsync-prod.
The authenticationType property is the authentication method that we want to use in our API. We have it set to API_KEY for now since we don’t have user login functionality; otherwise, we would have set it to AMAZON_COGNITO_USERPOOL. The API key is available in your AppSync API dashboard after deployment is done.
We can now re-deploy our app so as to create a new AppSync API:
$ serverless deploy
It will take a couple of minutes to deploy. Once deployment is done, you can navigate to your AWS AppSync dashboard, and you’ll see the new API that you’ve just deployed:
Awesome! Now that our API is deployed, we need to add a data source where the data will be saved. As mentioned earlier, we will be using DynamoDB for this tutorial.
Create a new configuration file inside a folder called resources:
$ mkdir resources && touch resources/dynamo-table.yml
Open the file and add the following CloudFormation Template, which defines our DynamoDB configuration:
Resources:
 PrimaryDynamoDBTable:
 Type: AWS::DynamoDB::Table
 Properties:
 AttributeDefinitions:
 - AttributeName: id
 AttributeType: S
 KeySchema: # primary composite key
 - AttributeName: id # partition key
 KeyType: HASH
 ProvisionedThroughput:
 ReadCapacityUnits: ${self:provider.tableThroughput}
 WriteCapacityUnits: ${self:provider.tableThroughput}
 BillingMode: PROVISIONED
 TableName: ${self:custom.resources.PRIMARY_TABLE}
 TimeToLiveSpecification:
 AttributeName: TimeToLive,
 Enabled: True
 Enabled: True
We specify the primary key for our database, which is the ID key. We also specify the table name and the throughput we need for Read and Write capacity units, which you choose according to your project requirements and budget.
Next, we then need to update our serverless.yml to include the above config:
# previous config....
provider:
 name: aws
 runtime: nodejs12.x
 region: eu-west-1
 stage: ${opt:stage, env:stage, 'dev'}
 tableThroughputs:
 default: 5
 prod: 10

custom:
 resources:
 PRIMARY_TABLE: ${self:service}-dynamo-table-${self:provider.stage}

 appSync: # appsync plugin configuration
 name: ${self:service}-appsync-${self:provider.stage}
 authenticationType: API_KEY # since we don't have user login for now
 dataSources:
 - type: AMAZON_DYNAMODB
 name: PrimaryTable
 description: "Primary Table"
 config:
 tableName: ${self:custom.resources.PRIMARY_TABLE}
 serviceRoleArn: { Fn::GetAtt: [AppSyncDynamoDBServiceRole, Arn] }
Next. we need to add a new CFT that provisions a new IAM role. This will be used to create a new data source from AppSync and grant permissions needed to carry out the needed operations:
$ touch resources/appsync-dynamodb-role.yml
Add the following content:
Resources:
 AppSyncDynamoDBServiceRole:
 Type: "AWS::IAM::Role"
 Properties:
 RoleName: ${self:service}-dynamo-role-${self:provider.stage}
 AssumeRolePolicyDocument:
 Version: "2012-10-17"
 Statement:
 - Effect: "Allow"
 Principal:
 Service:
 - "appsync.amazonaws.com"
 - "dynamodb.amazonaws.com"
 Action:
 - "sts:AssumeRole"
 Policies:
 - PolicyName: ${self:service}-dynamo-policy-${self:provider.stage}
 PolicyDocument:
 Version: "2012-10-17"
 Statement:
 - Effect: "Allow"
 Action:
 - dynamodb:DescribeTable
 - dynamodb:Query
 - dynamodb:Scan
 - dynamodb:GetItem
 - dynamodb:PutItem
 - dynamodb:UpdateItem
 - dynamodb:DeleteItem
 Resource:
 - "arn:aws:dynamodb:${self:provider.region}:*:*" # allow creation of tables in our current region
We also need to specify the permissions available to our CloudFormation role, which is used for deployment. To do this, update the serverless.yml file just under the tableThroughput property to include the following permissions:
tableThroughput: ${self:provider.tableThroughputs.${self:provider.stage}, self:provider.tableThroughputs.default}
iamRoleStatements:
 - Effect: Allow
 Action:
 - dynamodb:DescribeTable
 - dynamodb:Query
 - dynamodb:Scan
 - dynamodb:GetItem
 - dynamodb:PutItem
 - dynamodb:UpdateItem
 - dynamodb:DeleteItem
 Resource:
 - "arn:aws:dynamodb:${self:provider.region}:*:*"
The final step is to now include both templates in our serverless.yml file by importing them in the resources section, which should ideally be the last section of the file:
resources:
 - ${file(./resources/appsync-dynamo-role.yml)}
 - ${file(./resources/dynamo-table.yml)}
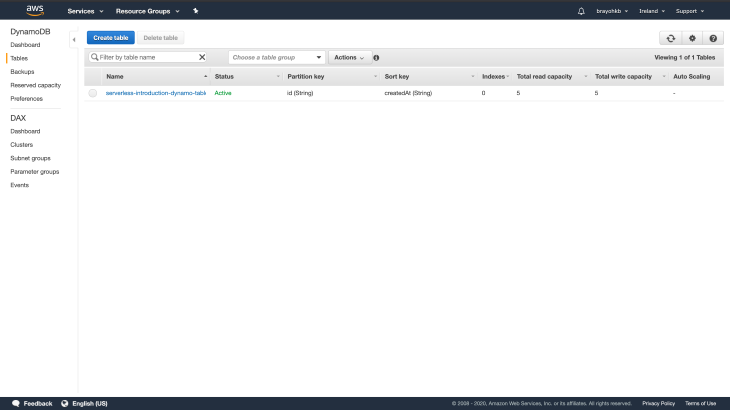
Now that we are all set, we can now deploy our application for the new changes to take effect. Once deployment is done, log in to the DynamoDB console. You should have a new table showing:
Now that we have our AppSync API and DynamoDB table all set, we move on to creating mapping templates for our queries and mutations.
A mapping template is a script written in Velocity Template Language (VTL) and applied to the payload using JSONPath expressions. We use mapping templates to map the payload from a method request to the corresponding integration request and from an integration response to the corresponding method response. You can read more about mapping templates for DynamoDB here.
To add mapping templates to our project, we start by creating a folder:
$ mkdir mapping-templates
To add a new mapping template to our serverless file, we require four properties:
- dataSource: our_data_source_here
 type: Mutation or Query
 field: the graphql mutation or query name
 request: path_to_request_mapping_template
 response: path_to_response_mapping_template
We will kick off by creating a request mapping template for the createToDo mutation:
$ mkdir mapping-templates/create_todo && touch mapping-templates/create_todo/request.vtl
The add the following code:
$util.qr($ctx.args.input.put("createdAt", $util.time.nowISO8601()))
$util.qr($ctx.args.input.put("updatedAt", $util.time.nowISO8601()))
{
 "version" : "2017-02-28",
 "operation" : "PutItem",
 "key" : {
 "id": $util.dynamodb.toDynamoDBJson($util.autoId())
 },
 "attributeValues" : $util.dynamodb.toMapValuesJson($ctx.args.input)
}
What we are doing here is handling how the data we get from any mutation request that comes in from our GraphQL server is saved to DynamoDB. We auto-generate the ID for the to-do item, then we add two timestamps to the payload: createdAt and updatedAt. The other attribute values — namely, description and dueDate — are mapped to their equivalent database rows.
Instead of repeating our response mapping template for every request, we will create two files to reuse across all our requests. We can do this using this neat little trick that allows creating multiple files with the same extension using a comma-separated list in braces:
$ touch mapping-templates/{common-item-response,common-items-response}.vtl
common-item-response.vtlThis will be the JSON response we send back for any database action that returns a single item
$util.toJson($ctx.result)
common-items-response.vtlThis will be the JSON response we send back for any database action that returns a multiple item:
$util.toJson($ctx.result.items)
Now we can update our Serverless file with the mapping templates property and add the above files to handle the mutation for creating a new to-do:
appSync: # appsync plugin configuration
 name: ${self:service}-appsync-${self:provider.stage}
 authenticationType: API_KEY # since we don't have user login for now
 dataSources:
 - type: AMAZON_DYNAMODB
 name: PrimaryTable
 description: "Primary Table"
 config:
 tableName: ${self:custom.resources.PRIMARY_TABLE}
 serviceRoleArn: { Fn::GetAtt: [AppSyncDynamoDBServiceRole, Arn] }
 mappingTemplates:
 - dataSource: PrimaryTable
 type: Mutation
 field: createTodo
 request: "create_todo/request.vtl"
 response: "common-item-response.vtl"
After this, we can now deploy our service to create a new resolver:
$ serverless deploy
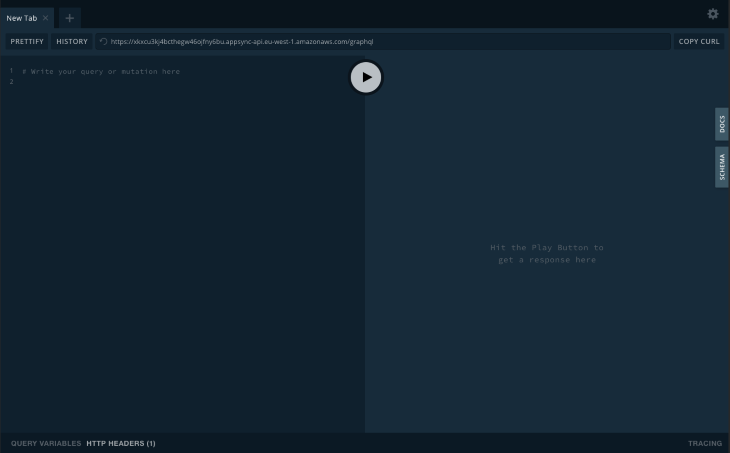
After deployment is done we can test our API by spinning up a local instance of GraphQL playground:
$ serverless graphql-playground
This will set up a new playground running on localhost:3000:
Add the following mutation:
mutation createTodo($input: ToDoCreateInput!) {
 createTodo(input: $input) {
 id
 createdAt
 updatedAt
 completed
 description
 dueDate
 }
}
Then add your payload under the query variables section. For the dueDate, make sure you use the following date format YYYY-MM-DDThh:mm:ss.sssZ to match the expected date format in DynamoDB.
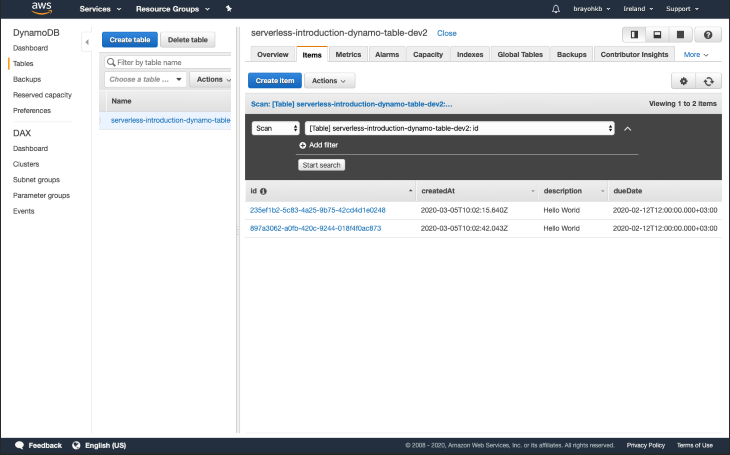
After you execute the mutation successfully, head over to your DynamoDB console and open up your table. You should have one item showing:
We did it! We’ve just saved our first item to the database successfully:
👁 Spongebob Squarepants and Patrick Star Cheering
Since most of the templates are the same as the one above, we’ll be adding them all at once:
get_todo/request.vtlIn order to fetch a to-do item, we require an ID in the query payload, which we then pass on to the DynamoDB resolver:
{
 "version": "2017-02-28",
 "operation": "GetItem",
 "key": {
 "id": $util.dynamodb.toDynamoDBJson($ctx.args.id),
 }
}
update_todo/request.vtlUpdating an item is somewhat complex, but I’ll try to break it down as easily as I can. Same as fetching an item, when updating, we require the ID field to be part of the payload. We then dynamically generate the update expression. If any value is null, we omit it. If any of the provided values are, omitted we also remove them.
Finally, the operation has a condition, which verifies whether the item currently in DynamoDB has the version field set to expectedVersion:
$util.qr($ctx.args.input.put("updatedAt", $util.time.nowISO8601()))
{
 "version" : "2017-02-28",
 "operation" : "UpdateItem",
 "key" : {
 "id" : { "S" : "${context.arguments.input.id}" }
 },
 ## Set up some space to keep track of things we're updating **
 #set( $expNames = {} )
 #set( $expValues = {} )
 #set( $expSet = {} )
 #set( $expRemove = [] )
 #set($ar=[])

 ## Iterate through each argument, skipping "id" and "expectedVersion" **
 #foreach( $entry in $context.arguments.input.entrySet() )
 #if( $entry.key != "id" )
 #if( (!$entry.value) && ("$!{entry.value}" == "") )
 ## If the argument is set to "null", then remove that attribute from the item in DynamoDB **
 #set( $discard = ${expRemove.add("#${entry.key}")} )
 $!{expNames.put("#${entry.key}", "$entry.key")}
 #else
 ##Otherwise set (or update) the attribute on the item in DynamoDB **
 $!{expSet.put("#${entry.key}", ":${entry.key}")}
 $!{expNames.put("#${entry.key}", "$entry.key")}
 $!{expValues.put(":${entry.key}", { "S" : "${entry.value}" })}
 #end
 #end
 #end
 ## Start building the update expression, starting with attributes we're going to SET **
 #set( $expression = "" )
 #if( !${expSet.isEmpty()} )
 #set( $expression = "SET" )
 #foreach( $entry in $expSet.entrySet() )
 #set( $expression = "${expression} ${entry.key} = ${entry.value}" )
 #if ( $foreach.hasNext )
 #set( $expression = "${expression}," )
 #end
 #end
 #end
 ## Continue building the update expression, adding attributes we're going to REMOVE **
 #if( !${expRemove.isEmpty()} )
 #set( $expression = "${expression} REMOVE" )
 #foreach( $entry in $expRemove )
 #set( $expression = "${expression} ${entry}" )
 #if ( $foreach.hasNext )
 #set( $expression = "${expression}," )
 #end
 #end
 #end
 ## Finally, write the update expression into the document, along with any expressionNames and expressionValues **
 "update" : {
 "expression" : "${expression}"
 #if( !${expNames.isEmpty()} )
 ,"expressionNames" : $utils.toJson($expNames)
 #end
 #if( !${expValues.isEmpty()} )
 ,"expressionValues" : $utils.toJson($expValues)
 #end
 }
}
delete_todo/request.vtlSame as fetching an item, when updating we require the ID field to be part of the payload, we then pass the new payload on to DynamoDB in order to hard delete the item from the DB:
{
 "version" : "2017-02-28",
 "operation" : "DeleteItem",
 "key" : {
 "id": $util.dynamodb.toDynamoDBJson($ctx.args.id),
 }
}
Now that we have all the mapping templates in place, we can then add them to the Serverless file:
- dataSource: PrimaryTable
 type: Mutation
 field: updateTodo
 request: "update_todo/request.vtl"
 response: "common-item-response.vtl"
- dataSource: PrimaryTable
 type: Mutation
 field: deleteTodo
 request: "delete_todo/request.vtl"
 response: "common-item-response.vtl"
- dataSource: PrimaryTable
 type: Query
 field: getToDo
 request: "get_todo/request.vtl"
 response: "common-item-response.vtl"
- dataSource: PrimaryTable
 type: Query
 field: listToDos
 request: "list_todos/request.vtl"
 response: "common-items-response.vtl"
Re-deploy your service and you should now have a fully working API with CRUD operations.
In order to test our CRUD operations, we will need mutations and queries which we can test in our playground.
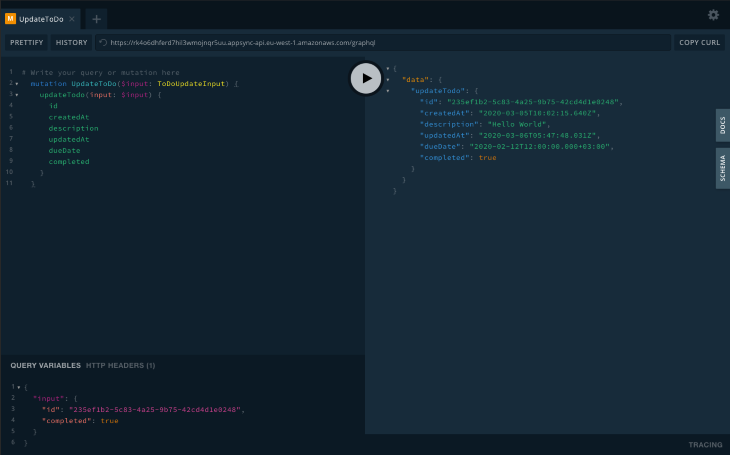
updateToDoTo test this mutation, you need to pick the ID of an existing item, then update one of the updatable fields, which are description, dueDate, and completed.
mutation UpdateToDo($input: ToDoUpdateInput) {
 updateTodo(input: $input) {
 id
 createdAt
 description
 updatedAt
 dueDate
 completed
 }
}
You then pass the values you want to update and run the mutation:
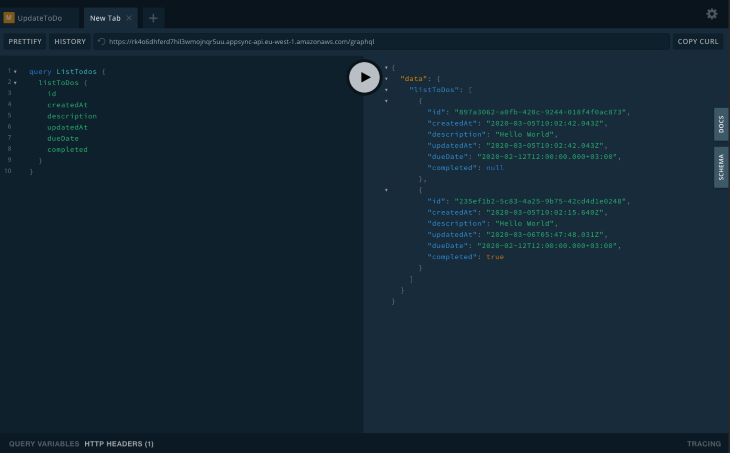
listToDosIn order to get all the to-do items in the DB, run the following query:
query ListTodos {
 listToDos {
 id
 createdAt
 description
 updatedAt
 dueDate
 completed
 }
}
Which should return an array of all available to-dos:
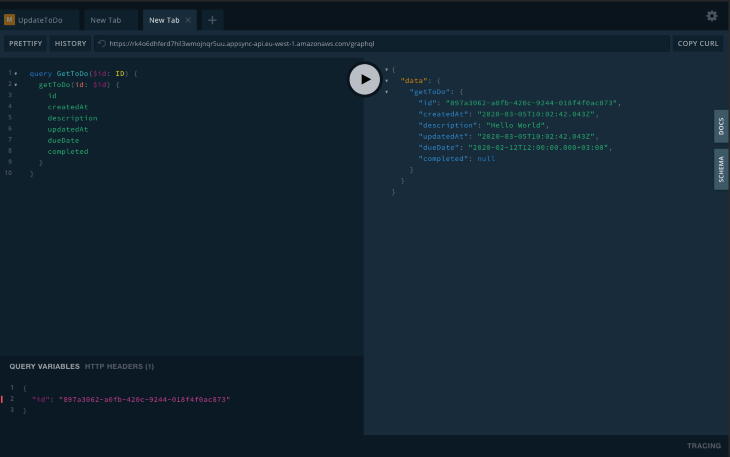
getToDoTo get a single item, run the following query:
query GetToDo($id: ID) {
 getToDo(id: $id) {
 id
 createdAt
 description
 updatedAt
 dueDate
 completed
 }
}
Which should return the item with the given ID:
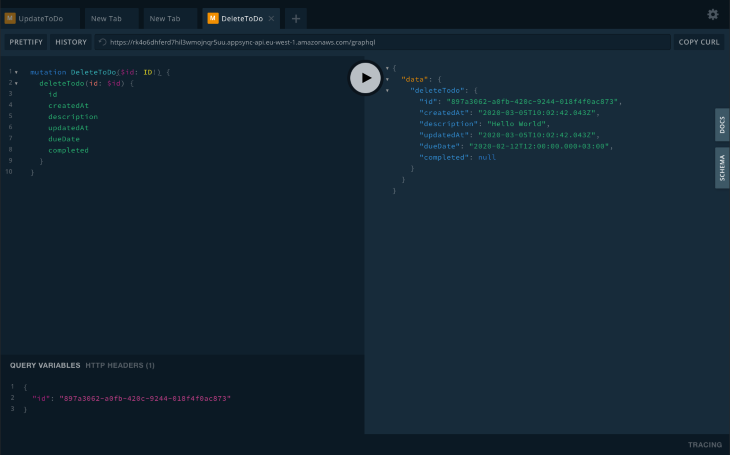
deleteToDoTo delete an item in the DB, run the following query:
mutation DeleteToDo($id: ID!) {
 deleteTodo(id: $id) {
 id
 createdAt
 description
 updatedAt
 dueDate
 completed
 }
}
Which should return the to-do item on successful execution:
For the last part of this article, we are going to create a new React app, which will then interact with our API for CRUD operations.
Since this is just a simple demo, we will start by bootstrapping a new react app inside our project folder using create-react-app:
$ create-react-app client
After which we will install all the required dependencies:
$ cd client && yarn add antd styled-components aws-appsync-subscription-link aws-appsync-auth-link @apollo/client graphql aws-appsync
Open the index.js file and add our app config as follows:
import React from "react";
import ReactDOM from "react-dom";
import { createAuthLink } from "aws-appsync-auth-link";
import { createSubscriptionHandshakeLink } from "aws-appsync-subscription-link";
import { AUTH_TYPE } from "aws-appsync";
import {
 ApolloProvider,
 ApolloClient,
 ApolloLink,
 InMemoryCache,
} from "@apollo/client";

/** Ant design */
import "antd/dist/antd.css";

/** App entry */
import App from "./App";

/** AWS config */
import AppSyncConfig from "./aws-exports";

const config = {
 url: AppSyncConfig.GraphQlApiUrl,
 region: process.env.REACT_APP_REGION,
 auth: {
 type: AUTH_TYPE.API_KEY,
 apiKey: AppSyncConfig.GraphQlApiKeyDefault,
 },
};
const client = new ApolloClient({
 link: ApolloLink.from([
 createAuthLink(config),
 createSubscriptionHandshakeLink(config),
 ]),
 cache: new InMemoryCache(),
 defaultOptions: {
 watchQuery: {
 fetchPolicy: "cache-and-network",
 },
 },
});

ReactDOM.render(
 <ApolloProvider client={client}>
 <App />
 </ApolloProvider>,
 document.getElementById("root")
);
After adding the above configuration, go back to the app URL and confirm that functionality is not broken.
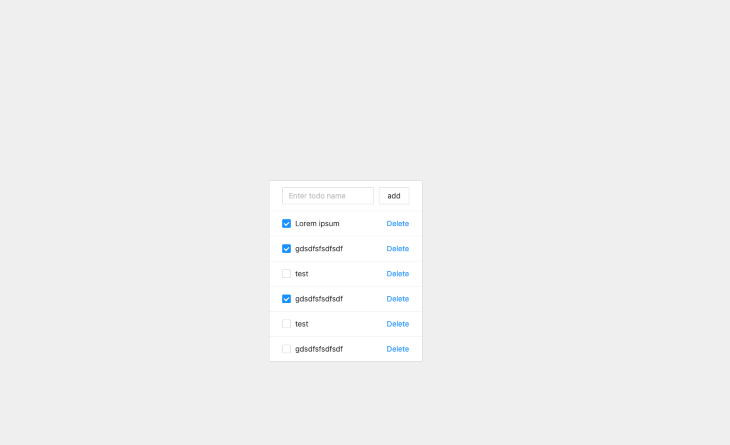
Since this article is for learning purposes, we will keep the design as minimal as possible, and we will be working with a single component just for demo purposes. We should always break down our components to be as simple as possible.
Since we will be using React Apollo version 3, we will take advantage of the Hooks feature, which keeps our implementation quite clean. Our component will be as follows:
import React from "react";
import styled from "styled-components";
import { List, Checkbox, Input, Button, Popconfirm, message } from "antd";
import { useMutation } from "@apollo/client";

/** App theme */
import Colors from "../../theme/colors";

/** GraphQL Queries */
import updateToDo from "../../graphql/mutations/updateToDo";
import createToDo from "../../graphql/mutations/createToDo";
import deleteToDo from "../../graphql/mutations/deleteToDo";
import listToDos from "../../graphql/queries/listToDos";

const DataList = (props) => {
 const [description, updateDescription] = React.useState("");
 const [updateToDoMutation] = useMutation(updateToDo);
 const [createToDoMutation] = useMutation(createToDo);
 const [deleteToDoMutation] = useMutation(deleteToDo);
 const { data } = props;

 function handleCheck(event, item) {
 event.preventDefault();
 const completed =
 typeof item.completed === "boolean" ? !item.completed : true;

 updateToDoMutation({
 variables: { input: { completed, id: item.id } },
 refetchQueries: [
 {
 query: listToDos,
 },
 ],
 })
 .then((res) => message.success("Item updated successfully"))
 .catch((err) => {
 message.error("Error occurred while updating item");
 console.log(err);
 });
 }

 function handleSubmit(event, item) {
 event.preventDefault();
 createToDoMutation({
 variables: { input: { description } },
 refetchQueries: [
 {
 query: listToDos,
 },
 ],
 })
 .then((res) => message.success("Item created successfully"))
 .catch((err) => {
 message.error("Error occurred while creating item");
 console.log(err);
 });
 }

 function handleKeyPress(event) {
 if (event.keyCode === 13) {
 // user pressed enter
 createToDoMutation({
 variables: { input: { description } },
 refetchQueries: [
 {
 query: listToDos,
 },
 ],
 })
 .then((res) => {
 message.success("Item created successfully");
 })
 .catch((err) => {
 message.error("Error occurred while creating item");
 console.log(err);
 });
 }
 }

 function handleDelete(event, item) {
 deleteToDoMutation({
 variables: { id: item.id },
 refetchQueries: [
 {
 query: listToDos,
 },
 ],
 })
 .then((res) => {
 message.success("Deleted successfully");
 })
 .catch((err) => {
 message.error("Error occurred while deleting item");
 console.log(err);
 });
 }

 return (
 <ListContainer>
 <List
 header={
 <div style={{ display: "flex" }}>
 <Input
 placeholder="Enter todo name"
 value={description}
 onChange={(event) => updateDescription(event.target.value)}
 style={{ marginRight: "10px" }}
 onKeyDown={handleKeyPress}
 />
 <Button name="add" onClick={handleSubmit}>
 add
 </Button>
 </div>
 }
 bordered
 dataSource={data}
 renderItem={(item) => (
 <List.Item>
 <Checkbox
 checked={item.completed}
 onChange={(event) => handleCheck(event, item)}
 >
 {item.description}
 </Checkbox>
 <Popconfirm
 title="Are you sure to delete this item?"
 onConfirm={(event) => handleDelete(event, item)}
 okText="Yes"
 cancelText="No"
 >
 <DeleteAction>Delete</DeleteAction>
 </Popconfirm>
 </List.Item>
 )}
 />
 </ListContainer>
 );
};

export default DataList;
As mentioned earlier, I chose to keep the design minimal, as shown below:
Hope you enjoyed this tutorial and you found it useful, I remember how much moving around I had to do in order to get all these resources together, it’s always hectic when starting out so I tried to compile everything into a single article. You can find the repo here for the complete project.
Install LogRocket via npm or script tag. LogRocket.init() must be called client-side, not
server-side
$ npm i --save logrocket

// Code:

import LogRocket from 'logrocket';
LogRocket.init('app/id');
// Add to your HTML:

<script src="https://cdn.lr-ingest.com/LogRocket.min.js"></script>
<script>window.LogRocket && window.LogRocket.init('app/id');</script>
We built the same app in TanStack Start RSC and Next.js RSC. TanStack shipped 40% less JS and built 4x faster — but Next.js is still the safer production bet.
From RSC vulnerabilities and the Vercel breach to TypeScript 7.0 Beta and AI agents — the nine frontend storylines that defined H1 2026, ranked.
AI tools generate working React code fast, but miss race conditions, empty states, debouncing, and accessibility. Here’s how to catch bugs before production.
Learn how to use Gemini CLI subagents to delegate frontend, backend, testing, and docs tasks to specialized agents with guardrails and clear ownership.
Would you be interested in joining LogRocket's developer community?
Join LogRocket’s Content Advisory Board. You’ll help inform the type of content we create and get access to exclusive meetups, social accreditation, and swag.
Sign up now