 |
VOOZH | about |
|
VOOZH | about |
In most of our applications, we authenticate our users to keep track of their activities and provide them with personalized experiences. There are lots of ways to achieve this, especially in Flutter. Some of the popular ways include adding authentication to our app by employing Firebase or building our own custom API and integrating it in our applications to deal with user authentication.
👁 Using Supabase For Authentication In FlutterHowever, those options may not be the best for your use case. This article will walk you through an introduction to the capabilities of Supabase, a Firebase alternative, and how to add authentication to your Flutter app using Supabase.
The Replay is a weekly newsletter for dev and engineering leaders.
Delivered once a week, it's your curated guide to the most important conversations around frontend dev, emerging AI tools, and the state of modern software.
Supabase is an open source alternative to Firebase.
Firebase is a Backend-as-a-Service (BaaS) by Google that enables developers to create iOS, Android, and web apps with out-of-the-box support to integrate tools for tracking analytics, reporting and fixing app crashes, authentication, storage, and NoSQL databases.
Even though Firebase has plenty of features, Supabase is more robust and can run on various platforms. Its portability makes it ideal for developers who are looking for a simple and flexible way to integrate third-party apps.
Supabase offers a straightforward API for incorporating third-party authentication services like Google, Apple, Twitter, Facebook, GitHub, Azure, GitLab, and Bitbucket. It also supports SAML-based enterprise logins.
One of the core differences between Supabase and Firebase is that while Firebase is not open source, Supabase is also free to use at the moment, and does not have any paid plan. Be mindful, the only major features that are currently active are that of database, authentication, and storage; other features such as cloud functions are still in development.
In today’s article, we would be exploring how authentication works with Supabase.
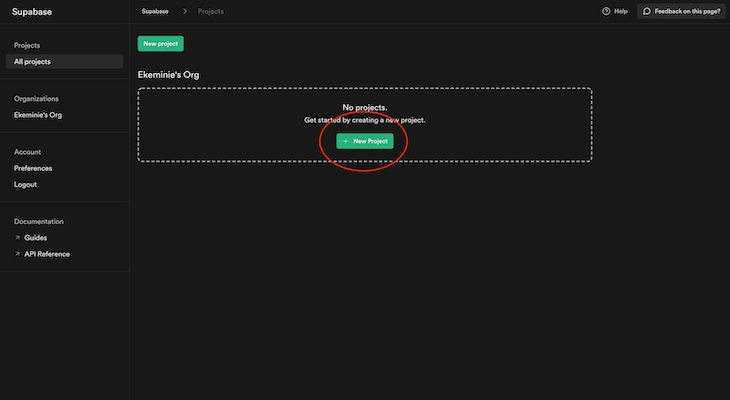
In order to use Supabase, you need to create a new project by signing in. Once logged in, create a new project by clicking the button as shown in the image below.
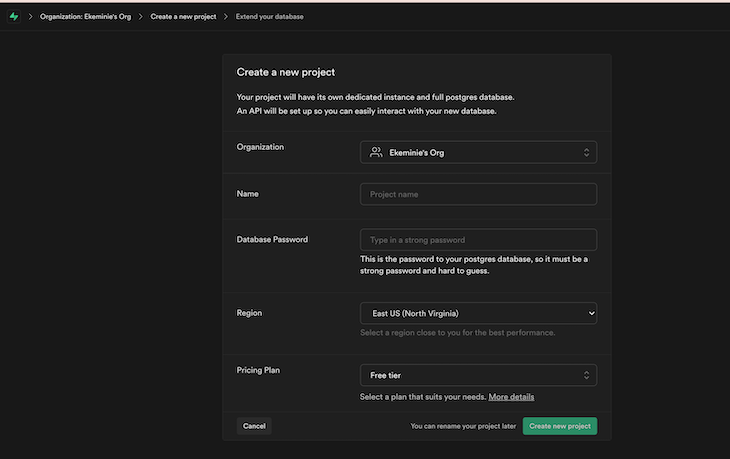
You’ll be prompted with a window to enter the name of your organization, and after that, you’ll proceed to the new screen shown below.
Once you are done with filling out the basic details and your project has been set up on the Supabase dashboard, there are two important things required for connecting to our Supabase backend from our Flutter application. Those are:
-a Supabase URL
-and a Supabase public API key
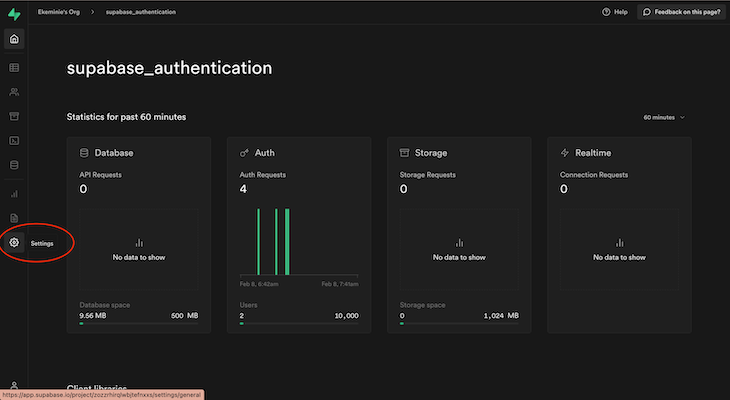
To get these, just click on the Settings tab.
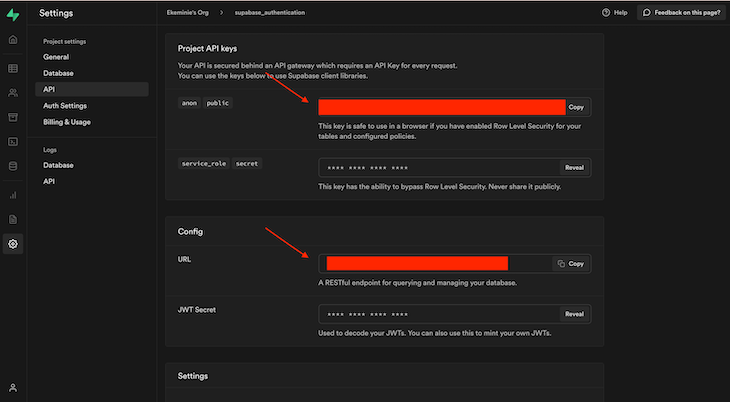
Then select API and you will have your URL, and API key, displayed. You can now copy these and save them in your application.
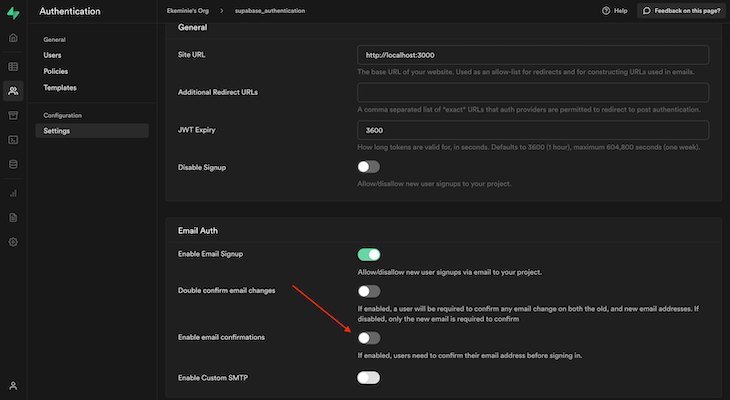
Supabase by default enables email verification, which means that when using Supabase authentication with this setting turned on, your users are required to verify their email addresses in order for their accounts to become active.
For simplicity and since this is just a tutorial, we are going to disable email verification. Feel free to use and explore other options at your own leisure.
Go to the Settings tab on your Supabase dashboard and click on Auth Settings, then click on Settings under the Configuration tab.
There you can toggle off Enable email confirmations.
👁 Toggle Off Enable Email Confirmations
Here we are going to create a simple Flutter project. We are going to have three widgets: for creating an account, logging in existing users, and a simple home screen that tells you if you are logged in or not.
But before that, let’s create a Supabase manager class to handle all of our initializations and authentication functions:
import 'package:flutter/material.dart';
import 'package:supabase/supabase.dart';
import 'package:supabase_authentication/core/toast.dart';

const String supabaseUrl = "your supabase url goes here ";
const String token =
 "your supabase token goes here";

class SupabaseManager {
 final client = SupabaseClient(supabaseUrl, token);


 Future<void> signUpUser(context, {String? email, String? password}) async {
 debugPrint("email:$email password:$password");
 final result = await client.auth.signUp(email!, password!);

 debugPrint(result.data!.toJson().toString());

 if (result.data != null) {
 showToastMessage('Registration Success', isError: false);
 Navigator.pushReplacementNamed(context, 'login');
 showToastMessage('Success', isError: false);
 } else if (result.error?.message != null) {
 showToastMessage('Error:${result.error!.message.toString()}',
 isError: true);
 }
 }

 Future<void> signInUser(context, {String? email, String? password}) async {
 debugPrint("email:$email password:$password");
 final result = await client.auth.signIn(email: email!, password: password!);
 debugPrint(result.data!.toJson().toString());

 if (result.data != null) {
 showToastMessage('Login Success', isError: false);
 Navigator.pushReplacementNamed(context, '/home');
 showToastMessage('Success', isError: false);
 } else if (result.error?.message != null) {
 showToastMessage('Error:${result.error!.message.toString()}',
 isError: true);
 }
 }


 Future<void> logout (context)async{
 await client.auth.signOut();
 Navigator.pushReplacementNamed(context, 'login');
 }
}
In the file above, we have two variables to store our token and Supabase URL. We also create a class, and inside this class we have an object of SupabaseClient that is required to make all our API calls to Supabase. It instantiated using our URL and token.
Subsequently we have the signup, sign-in, and logout functions.
Both the login and signup functions take in an email and password as parameters then pass them to the login and signup methods on the SupabaseClient object. The result is a session object from the SupabaseClient class that we check for to know if our request was successful or not. Then, a message is displayed to the user.
When login is complete, the user is navigated to the home screen page, and for signup, the user is taken to the login page.
The logout functionality simply does as it says, using the SupabaseClient object to sign out the user and navigate back to our authentication screen.
In our main activity, we have defined our routes in our Material app:
import 'package:flutter/material.dart';
import 'package:supabase_authentication/login.dart';
import 'package:supabase_authentication/signup.dart';

import 'homescreen.dart';

void main() {
 runApp(const MyApp());
}

class MyApp extends StatelessWidget {
 const MyApp({Key? key}) : super(key: key);

 // This widget is the root of your application.
 @override
 Widget build(BuildContext context) {
 return MaterialApp(
 title: 'Supabase Demo',
 debugShowCheckedModeBanner: false,
 initialRoute: 'login',
 routes: {
 'login': (_) => const LoginPage(),
 '/signup': (_) => const SignUpPage(),
 '/home': (_) => const HomeScreen(),
 },
 theme: ThemeData(
 primarySwatch: Colors.blue,
 ),
 home: const LoginPage(),
 );
 }
}
For this next part, we are simply going to create the visual portion of our applications that basically includes our signup page and login page, as well the final home screen we would take the user to after successful authentication.
This is what our sign-up page looks like:
import 'package:flutter/material.dart';
import 'package:supabase_authentication/homescreen.dart';
import 'package:supabase_authentication/login.dart';
import 'package:supabase_authentication/supabase_utils.dart';

class SignUpPage extends StatefulWidget {
 const SignUpPage({Key? key}) : super(key: key);

 @override
 _SignUpPageState createState() => _SignUpPageState();
}

class _SignUpPageState extends State<SignUpPage> {
 final _supabaseClient = SupabaseManager();
 final _emailController = TextEditingController();
 final _passwordController = TextEditingController();
 final _formKey = GlobalKey<FormState>();

 @override
 void dispose() {
 _emailController.dispose();
 _passwordController.dispose();
 super.dispose();
 }

 @override
 Widget build(BuildContext context) {
 return Scaffold(
 backgroundColor: Colors.white,
 appBar: AppBar(
 centerTitle: true,
 title: const Text("Sign Up Page"),
 ),
 body: SingleChildScrollView(
 child: Form(
 key: _formKey,
 child: Column(
 children: <Widget>[
 const SizedBox(
 height: 200,
 ),
 Padding(
 padding: const EdgeInsets.symmetric(horizontal: 15),
 child: TextFormField(
 controller: _emailController,
 decoration: const InputDecoration(
 border: OutlineInputBorder(),
 labelText: 'Email',
 hintText: 'Enter a valid email'),
 validator: (String? value) {
 if (value!.isEmpty || !value.contains('@')) {
 return 'Email is not valid';
 }
 },
 ),
 ),
 Padding(
 padding: const EdgeInsets.only(
 left: 15.0, right: 15.0, top: 15, bottom: 0),
 //padding: EdgeInsets.symmetric(horizontal: 15),
 child: TextFormField(
 obscureText: true,
 controller: _passwordController,
 decoration: const InputDecoration(
 border: OutlineInputBorder(),
 labelText: 'Password',
 hintText: 'Enter secure password'),
 validator: (String? value) {
 if (value!.isEmpty) {
 return 'Invalid password';
 }
 },
 ),
 ),
 const SizedBox(
 height: 20,
 ),
 Container(
 height: 50,
 width: 250,
 decoration: BoxDecoration(
 color: Colors.blue,
 borderRadius: BorderRadius.circular(20)),
 child: TextButton(
 onPressed: () {
 if (_formKey.currentState!.validate()) {
 _supabaseClient.signUpUser(context,
 email: _emailController.text,
 password: _passwordController.text);}
 },
 child: const Text(
 'Sign Up',
 style: TextStyle(color: Colors.white, fontSize: 25),
 ),
 ),
 ),
 const SizedBox(
 height: 130,
 ),
 TextButton(
 onPressed: () {
 Navigator.push(context,
 MaterialPageRoute(builder: (_) => const LoginPage()));

 },
 child: const Text('Already a User? Login'))
 ],
 ),
 ),
 ),
 );
 }
}
Our login widget is also similar:
import 'package:flutter/material.dart';
import 'package:supabase_authentication/signup.dart';
import 'package:supabase_authentication/supabase_utils.dart';

class LoginPage extends StatefulWidget {
 const LoginPage({Key? key}) : super(key: key);

 @override
 _LoginPageState createState() => _LoginPageState();
}

class _LoginPageState extends State<LoginPage> {
 final _supabaseClient = SupabaseManager();
 final _emailController = TextEditingController();
 final _passwordController = TextEditingController();
 final _formKey = GlobalKey<FormState>();

 @override
 void dispose() {
 _emailController.dispose();
 _passwordController.dispose();
 super.dispose();
 }

 @override
 Widget build(BuildContext context) {
 return Scaffold(
 backgroundColor: Colors.white,
 appBar: AppBar(
 centerTitle: true,
 title: const Text("Login Page"),
 ),
 body: SingleChildScrollView(
 child: Form(
 key: _formKey,
 child: Column(
 children: <Widget>[
 const SizedBox(
 height: 200,
 ),
 Padding(
 padding: const EdgeInsets.symmetric(horizontal: 15),
 child: TextFormField(
 controller: _emailController,
 decoration: const InputDecoration(
 border: OutlineInputBorder(),
 labelText: 'Email',
 hintText: 'Enter a valid email'),
 validator: (String? value) {
 if (value!.isEmpty || !value.contains('@')) {
 return 'Email is not valid';
 }
 },
 ),
 ),
 Padding(
 padding: const EdgeInsets.only(
 left: 15.0, right: 15.0, top: 15, bottom: 0),
 //padding: EdgeInsets.symmetric(horizontal: 15),
 child: TextFormField(
 controller: _passwordController,
 obscureText: true,
 decoration: const InputDecoration(
 border: OutlineInputBorder(),
 labelText: 'Password',
 hintText: 'Enter secure password'),
 validator: (String? value) {
 if (value!.isEmpty) {
 return 'Invalid password';
 }
 },
 ),
 ),
 TextButton(
 onPressed: () {},
 child: const Text(
 'Forgot Password',
 style: TextStyle(color: Colors.blue, fontSize: 15),
 ),
 ),
 Container(
 height: 50,
 width: 250,
 decoration: BoxDecoration(
 color: Colors.blue,
 borderRadius: BorderRadius.circular(20)),
 child: TextButton(
 onPressed: () {
 if (_formKey.currentState!.validate()) {
 _supabaseClient.signInUser(context,
 email: _emailController.text,
 password: _passwordController.text);}
 },
 child: const Text(
 'Login',
 style: TextStyle(color: Colors.white, fontSize: 25),
 ),
 ),
 ),
 const SizedBox(
 height: 130,
 ),
 TextButton(
 onPressed: () {

 Navigator.push(
 context,
 MaterialPageRoute(
 builder: (_) => const SignUpPage()));

 },
 child: const Text('New User? Create Account')),
 const SizedBox(
 height: 30,
 ),
 ],
 ),
 ),
 ),
 );
 }
}
And finally, we have our home screen:
import 'package:flutter/material.dart';
import 'package:supabase_authentication/supabase_utils.dart';


class HomeScreen extends StatefulWidget {
 const HomeScreen({Key? key}) : super(key: key);

 @override
 _HomeScreenState createState() => _HomeScreenState();
}

class _HomeScreenState extends State<HomeScreen> {
 final _supabaseClient = SupabaseManager();
 @override
 Widget build(BuildContext context) {
 return Scaffold(
 backgroundColor: Colors.white,
 appBar: AppBar(
 centerTitle: true,
 title: const Text("Home Page"),
 actions: <Widget>[
 PopupMenuButton<String>(
 onSelected: handleClick,
 itemBuilder: (BuildContext context) {
 return {'Logout',}.map((String choice) {
 return PopupMenuItem<String>(
 value: choice,
 child: Text(choice),
 );
 }).toList();
 },
 ),
 ],
 ),
 body:const SizedBox(
 height: double.infinity,
 child: Center(child: Text("You are successfully logged in"),)
 )

 );
 }

 void handleClick(String value) {
 switch (value) {
 case 'Logout':
_supabaseClient.logout(context);
 break;

 }
 }
}
Supabase makes the process of adding a backend solution to your application seamless. Authentication is an essential feature in most applications, and with the use of Supabase, you can solve this easily without having to build your own custom solution from the ground up.
Also keep in mind that Supabase supports other forms of authentication besides the ones covered in this article. Social authentication providers like Google, Facebook, GitHub, and others are also supported by Supabase. For more information on this, simply check out the Supabase documentation to learn more.
If you found this post on how to build a signature capture application informative or have a question, drop a comment below.
Install LogRocket via npm or script tag. LogRocket.init() must be called client-side, not
server-side
$ npm i --save logrocket

// Code:

import LogRocket from 'logrocket';
LogRocket.init('app/id');
// Add to your HTML:

<script src="https://cdn.lr-ingest.com/LogRocket.min.js"></script>
<script>window.LogRocket && window.LogRocket.init('app/id');</script>
Learn how next-browser gives AI agents runtime context for debugging Next.js apps, including React props, hydration, PPR, forms, and performance.
Build dynamic LLM routing in Next.js with OpenRouter, TanStack AI, task classification, model fallbacks, and cost-aware routing.
TSRX adds first-class control flow, conditional hooks, and scoped styles to React via a TypeScript compiler extension — no new framework required.
Learn how to build a full React Native auth system using Better Auth and Expo — with email/password login, Google OAuth, session persistence, and protected routes.
Would you be interested in joining LogRocket's developer community?
Join LogRocket’s Content Advisory Board. You’ll help inform the type of content we create and get access to exclusive meetups, social accreditation, and swag.
Sign up now