 |
VOOZH | about |
|
VOOZH | about |
Editor’s note: This article was last reviewed and updated on 4 October 2024.
👁 How To Use Props To Pass Data To Child Components In Vue 3You can send state from a parent component to a child component in Vue using props:
v-bind, allowing for automatic updates when the data changesString, Number, Array to validate the incoming data, ensuring proper validation and preventing potential errorsHandling props can be tricky. In this article, we’ll dive deeper into how to pass data between a parent component to its child using props in Vue 3. You can find the complete code for this tutorial on GitHub. Let’s get started!
The Replay is a weekly newsletter for dev and engineering leaders.
Delivered once a week, it's your curated guide to the most important conversations around frontend dev, emerging AI tools, and the state of modern software.
This article is suited for developers of all stages, including beginners. To follow along, you’ll need Node.js version ≥16.x installed. You can verify if you already have it installed by running the command node -v in your terminal or the command prompt.
You’ll also need a code editor; I highly recommend VS Code.
At the time of writing, Vue 3 is the latest version. To follow along, you’ll need Vue 3 installed globally on your machine.
Before getting started, download a Vue starter project. Unzip the downloaded project, navigate into the unzipped file, and then run the command below to keep all the dependencies up to date:
npm install
In Vue, props are custom attributes that you can register on any component. You define your data on the parent component and give it a value. Then, you go to the child component that needs that data and pass the value to a prop attribute. Therefore, the data becomes a property in the child component.
In a <script setup> component, the syntax looks like the following code:
<script setup>
const props = defineProps(['title'])

console.log(props.title)
</script>
In a non-<script setup> component, the syntax looks like this:
export default {
 props: ['title'],
 setup(props) {
 // setup() receives props as the first argument.
 console.log(props.title)
 }
}
To access this data dynamically from any component that needs it, you can use the root component App.vue as the parent component, store the data, and then register props.
Vue uses a more flexible approach to props where you can specify the type of a prop using JavaScript constructors:
export default {
 props: {
 propA: {
 type: String,
 }
 }
}
The types can be String, Number, Boolean, Array, or Object.
The String type accepts only string values, the prop with Number type accepts only numeric values, the prop with Boolean type accepts only Boolean values, and the prop with Array or Object type accepts only array or object values respectively.
Let’s say you have an array of objects that you want to display in two different components. For example, component A renders the artist names from the array of objects while component B renders the artist names and countries from the array of objects. Your first instinct might be to:
This solution is great initially but becomes more complicated as you add more components. Let’s demonstrate this with the starter project you’ve opened in VS Code.
Open the Test.vue file and copy the code block below:
<template>
 <div>
 <h1>Vue Top 20 Artists</h1>
 <ul>
 <li v-for="(artist, x) in artists" :key="x">
 <h3>{{artist.name}}</h3>
 </li>
 </ul>
 </div>
</template>
<script>
export default {
 name: 'Test',
 data (){
 return {
 artists: [
 {name: 'Davido', genre: 'afrobeats', country: 'Nigeria'},
 {name: 'Burna Boy', genre: 'afrobeats', country: 'Nigeria'},
 {name: 'AKA', genre: 'hiphop', country: 'South-Africa'},
 {name: 'Sarkodie', genre: 'hiphop', country: 'Ghana'},
 {name: 'Stormzy', genre: 'hiphop', country: 'United Kingdom'},
 {name: 'Lil Nas', genre: 'Country', country: 'United States'},
 {name: 'Nasty C', genre: 'hiphop', country: 'South-Africa'},
 {name: 'Shatta-walle', genre: 'Reagae', country: 'Ghana'},
 {name: 'Khalid', genre: 'pop', country: 'United States'},
 {name: 'ed-Sheeran', genre: 'pop', country: 'United Kingdom'}
 ]
 }
 }
}
</script>
Create a new file in the components folder called Test2.vue and paste the following code block inside it:
<template>
 <div>
 <h1>Vue Top Artist Countries</h1>
 <ul>
 <li v-for="(artist, x) in artists" :key="x">
 <h3>{{artist.name}} from {{artist.country}}</h3>
 </li>
 </ul>
 </div>
</template>
<script>
export default {
 name: 'Test2',
 data (){
 return {
 artists: [
 {name: 'Davido', genre: 'afrobeats', country: 'Nigeria'},
 {name: 'Burna Boy', genre: 'afrobeats', country: 'Nigeria'},
 {name: 'AKA', genre: 'hiphop', country: 'South-Africa'},
 {name: 'Sarkodie', genre: 'hiphop', country: 'Ghana'},
 {name: 'Stormzy', genre: 'hiphop', country: 'United Kingdom'},
 {name: 'Lil Nas', genre: 'Country', country: 'United States'},
 {name: 'Nasty C', genre: 'hiphop', country: 'South-Africa'},
 {name: 'Shatta-walle', genre: 'Reagae', country: 'Ghana'},
 {name: 'Khalid', genre: 'pop', country: 'United States'},
 {name: 'ed-Sheeran', genre: 'pop', country: 'United Kingdom'}
 ]
 }
 }
}
</script>
<style scoped>
li{
 height: 40px;
 width: 100%;
 padding: 15px;
 border: 1px solid saddlebrown;
 display: flex;
 justify-content: center;
 align-items: center;
 }
a {
 color: #42b983;
}
</style>
To register the new component you just created, open the App.vue file and copy the code below inside it:
<template>
<div id="app">
<img alt="Vue logo" src="./assets/logo.png">
<Test/>
<Test2/>
</div>
</template>
<script>
import Test from './components/Test.vue'
import Test2 from './components/Test2.vue'
export default {
name: 'app',
components: {
Test, Test2
}
}
</script>
In the VS Code terminal, serve up the application in the development environment with the following command:
npm run dev
It should look like the following:
You’ll notice that if you had only about five more components, you would have to keep copying the data in every component. Imagine there was a way that you could define the data in a parent component and then bring it into every child component that needs it by using the property name. This is where using props to pass data from parent to child components comes in handy.
Because you’ve chosen the root component to be your parent component, you first have to define the data object that you want to share dynamically inside of the root component.
If you’ve followed this article from the start, open up your App.vue file and copy the data object code block inside of the script section:
<template>
 <div id="app">
 <img alt="Vue logo" src="./assets/logo.png" />
 <Test />
 <Test2 />
 </div>
</template>

<script>
import Test from "./components/Test.vue";
import Test2 from "./components/Test2.vue";
export default {
 name: "app",
 components: {
 Test,
 Test2,
 },
 data() {
 return {
 artists: [
 { name: "Davido", genre: "afrobeats", country: "Nigeria" },
 { name: "Burna Boy", genre: "afrobeats", country: "Nigeria" },
 { name: "AKA", genre: "hiphop", country: "South-Africa" },
 { name: "Sarkodie", genre: "hiphop", country: "Ghana" },
 { name: "Stormzy", genre: "hiphop", country: "United Kingdom" },
 { name: "Lil Nas", genre: "Country", country: "United States" },
 { name: "Nasty C", genre: "hiphop", country: "South-Africa" },
 { name: "Shatta-walle", genre: "Reagae", country: "Ghana" },
 { name: "Khalid", genre: "pop", country: "United States" },
 { name: "Ed Sheeran", genre: "pop", country: "United Kingdom" },
 ],
 };
 },
};
</script>
To receive props in a component, you have to specify the props that you want to receive inside of that component. After defining the data, go into the two test components, and delete the data objects inside them, and add the specifications in the script section, as shown below:
<script>
export default {
 name: 'Test',
 props: ['artists']
}
</script>
To let the Vue engine know that you have props you want to dynamically pass to child components, you have to indicate this in the Vue instance. This is done in the template section as shown here:
<template>
 <div id="app">
 <Test v-bind:artists="artists"/>
 <Test2 v-bind:artists="artists" />
 </div>
</template>
The v-bind directive in Vue is used to bind HTML attributes or component props dynamically. In the code above, we used v-bind to bind artists, which is the name of the data object array in the script section, and artists, the prop name in the test components, which you set up in the section above.
If you set it up without the following directive, you won’t see any output; neither the Vue compiler nor ESLint will flag it as an error or warning:
 <Test artists="artists"/>
 <Test2 artists="artists"/>
Therefore, it’s important to pay attention and remember to use v-bind for every dynamic binding.
After you’ve set up the props in your Vue app, you can then use them inside of your component as if the data were defined inside of the same component. Therefore, in our demo case, you can set up method calls and easily access this.artists.
By strongly typing the props, you can also ensure that your component only receives exactly the data type you want it to. In our demo, for instance, you can ensure that only arrays get passed down to your component by setting up authentication as follows:
<script>
export default {
 name: 'Test',
 props: {
 artists: {
 type: Array
 }
 }
}
</script>
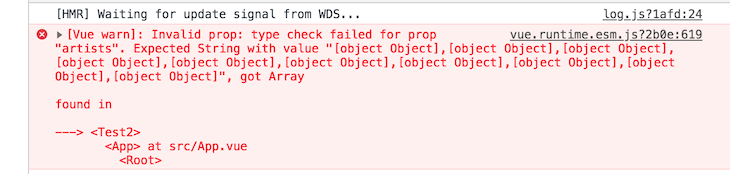
Therefore, whenever you add a wrong type, say, a String, you’ll get a warning in the console telling you that the type it received is not the type it expected:
👁 Vue 3 Unexpected Error Types
You can set default values for props using the default property in the props option:
<script>
export default {
 props: {
 propWithDefaultString: {
 type: String,
 default: 'Default String',
 },
 }
}
The default value of a prop should correspond with the specified type.
Working with multiple props is similar to working with a single prop, but you need to declare and define each prop in the component’s props option.
Using the component in a parent component, you can pass values for each prop as follows:
<template>
 <div>
 <ChildComponent prop1="Hello" :prop2="100" :prop3="true" />
 </div>
</template>

<script>
import ChildComponent from './ChildComponent.vue';

export default {
 name: "ParentComponent",
 components: {
 ChildComponent,
 },
}
</script>
In the child component definition, declare the props option as an object where each property represents a prop. You can specify the type, default value, and other options for each prop:
<script>
export default {
 props: {
 prop1: {
 type: String,
 required: true,
 },
 prop2: {
 type: Number,
 default: 42,
 },
 prop3: {
 type: Boolean,
 default: false,
 }
 }
}
</script>
In the above code, prop1 is a required prop of type String, prop2 is an optional prop of type Number with a default value of 42, while prop3 is an optional prop of type Boolean with a default value of false.
You can use the props in the child component’s methods or computed properties just like any other data property:
<script>
export default {
 props: {
 ...
 },
 methods: {
 combineProps() {
 return `${this.prop1} - ${this.prop2} - ${this.prop3 ? 'True' : 'False'}`;
 },
 },
}
</script>
In the child component’s template, you can access the props using the {{ }} syntax:
<template>
 <div>
 <p>Prop 1: {{ prop1 }}</p>
 <p>Prop 2: {{ prop2 }}</p>
 <p>Prop 3: {{ prop3 }}</p>
 </div>
</template>
In the Vue 3 Composition API, working with multiple props is slightly different than in the Options API discussed above:
defineProps function to declare props, while the Options API uses a props option objectprops argument passed to the setup function, while in the Options API, they are directly available within the component’s optionstoRefsIn the Composition API, you can use the defineProps function to declare and define props:
<script>
export default {
 props: {
 prop1: {
 type: String,
 required: true,
 },
 prop2: {
 type: Number,
 default: 42,
 },
 prop3: {
 type: Boolean,
 default: false,
 },
 },
 setup(props) {
 console.log(props.prop1, props.prop2, props.prop3);

 return {
 props
 };
 },
};
</script>
The first argument in the setup function is the props argument. You can use the prop values directly in the template as follows:
<template>
 <div>
 <p>Prop 1: {{ props.prop1 }}</p>
 <p>Prop 2: {{ props.prop2 }}</p>
 <p>Prop 3: {{ props.prop3 }}</p>
 </div>
</template>
You may want to destructure the props object in the setup function; by doing this, the destructured variables will lose reactivity. It is therefore recommended to always access props in the form of props.xxx.
But if you need to destructure the props, or need to pass a prop into an external function while retaining reactivity; you can do so with the toRefs() and toRef() utility APIs:
<script>
import { toRefs } from 'vue'

export default {
 props: {
 ...
 }
 setup(props) {
 const { prop1 } = toRefs(props)
 console.log(prop1.value)

 return {
 prop1
 }
 }
}
</script>
Here, we use toRefs to turn the props into an object of refs to destructure. prop1 is a ref that tracks props.prop1.
You can use the destructured prop values directly in the template as follows:
<template>
 <div>
 <p>Prop 1: {{ prop1 }}</p>
 </div>
</template>
In Vue 3, you can pass functions as props to child components in a similar way to passing any other data.
In the parent component, define a function that you want to pass as a prop:
<template>
 <div>
 <ChildComponent :customFunction="functionA" />
 </div>
</template>

<script>
import ChildComponent from './ChildComponent.vue';

export default {
 name: "ParentComponent",
 components: {
 ChildComponent,
 },
 methods: {
 functionA() {
 console.log('Function from the parent component');
 },
 },

};
</script>
In the child component, declare the prop to accept a function. You can do this by adding a props option and specifying the type as Function:
<script>
import { PropType } from 'vue';

export default {
 props: {
 customFunction: {
 type: Function as PropType<() => void>,
 required: true,
 },
 },
 methods: {
 executeFunction() {
 this.customFunction();
 },
 },
};
</script>
You can then use it in the child component template as follows:
<template>
 <div>
 <button @click="executeFunction">Call Parent Function</button>
 </div>
</template>
In this article, we explored how to send state from parent to child components in Vue using Vue 3 props. We demonstrated how to define props for both static and dynamic data and how to enforce prop types for better validation. We also discussed how to send state as an object in Vue, making it easier to pass complex data structures.
For additional information, check out Vue’s official documentation on props.
Happy coding!
Debugging Vue.js applications can be difficult, especially when users experience issues that are difficult to reproduce. If you’re interested in monitoring and tracking Vue mutations and actions for all of your users in production, try LogRocket.
👁 LogRocket Dashboard Free Trial BannerLogRocket lets you replay user sessions, eliminating guesswork by showing exactly what users experienced. It captures console logs, errors, network requests, and pixel-perfect DOM recordings — compatible with all frameworks.
With Galileo AI, you can instantly identify and explain user struggles with automated monitoring of your entire product experience.
Modernize how you debug your Vue apps — start monitoring for free.
Build dynamic LLM routing in Next.js with OpenRouter, TanStack AI, task classification, model fallbacks, and cost-aware routing.
TSRX adds first-class control flow, conditional hooks, and scoped styles to React via a TypeScript compiler extension — no new framework required.
Learn how to build a full React Native auth system using Better Auth and Expo — with email/password login, Google OAuth, session persistence, and protected routes.
Compare the top AI development tools and models of June 2026. View updated rankings, feature breakdowns, and find the best fit for you.
Would you be interested in joining LogRocket's developer community?
Join LogRocket’s Content Advisory Board. You’ll help inform the type of content we create and get access to exclusive meetups, social accreditation, and swag.
Sign up now