 |
VOOZH | about |
|
VOOZH | about |
In today’s software architecture, containers have become almost indispensable. They play a major role in almost all modern, production-level projects.
👁 Using Dev Containers In Vs Code For An Easier Dev Setup ProcessThe flexibility and usability of containers can be further extended to set up a dev environment quickly and without hassle. In this post, we will explore the concept of dev containers and walk through how to set up and use dev containers with VS Code.
To get the most out of this article, you should have some basic familiarity with dev containers, Docker, and running Docker containers. Let’s start with a brief recap of what exactly dev containers are and what benefits they bring to our dev environment setup.
The Replay is a weekly newsletter for dev and engineering leaders.
Delivered once a week, it's your curated guide to the most important conversations around frontend dev, emerging AI tools, and the state of modern software.
Containers are a very malleable tool, allowing developers to essentially “ship their computer” to the users. Their builds can be completely reproducible, they are more lightweight than a full-blown virtual machine (VM), and popular containerization tools like Docker are easy and convenient to use.
Dev containers are a type of container used specifically for development purposes. You can use them to set up your development environment or to run the tests in a specific environment.
Many commercial developer platforms support dev containers, such as GitHub and GitPod. This provides you with a cloud-based developer environment that you can set up with a single configuration file and a click.
When setting up a container build using a tool like Docker, you specify all the setup instructions —configurations, package dependencies, etc. — in the Dockerfile. This makes the container build completely reproducible — you only have to set up Docker correctly, and then you can manage the rest of the setup via the Dockerfile.
Dev containers can be especially useful for monorepos containing multiple projects using multiple programming languages and dependencies. Consider a typical dev setup process for this kind of project — you would need to:
In other words, you have to spend a lot of time fiddling with the setup before you can start any actual development, not to mention the time spent debugging the setup itself if you experience any errors. You can easily avoid this cumbersome manual setup by using dev containers.
VS Code has some great extensions that allow us to use this popular code editor along with dev containers. Let’s go through a hands-on example of how to set up and use dev containers with VS Code.
To get started, create a new directory and open VS Code in it. Open the extensions side panel and install the Remote Development extension pack from the marketplace. This extension allows us to create and connect to dev containers directly from VS Code.
Now in the project directory, create a directory named .devcontainer. Naming your file this way is important, as the name helps VS Code detect the Dockerfiles we want to use for our dev containers.
For our first example, we will set up a Ruby dev environment. Start by creating a Dockerfile in the .devcontainer directory and adding the following code:
FROM ruby:alpine3.18
This will use the official Ruby image from an Alpine base image.
Next, we need to create a devcontainer.json file, which we can use to add various configurations and specify which Dockerfile we want VS Code to use. Create the file in the .devcontainer directory and add the following code:
{
 "name": "Ruby-test",
 "build": {
 "dockerfile": "Dockerfile"
 }
}
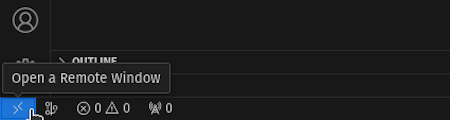
Now at the bottom left of your VS Code window, you should see an icon. Hovering over this icon should show a pop-up tooltip that says Open a remote window:
👁 Popup Tooltip In Vs Code To Open A Remote Window
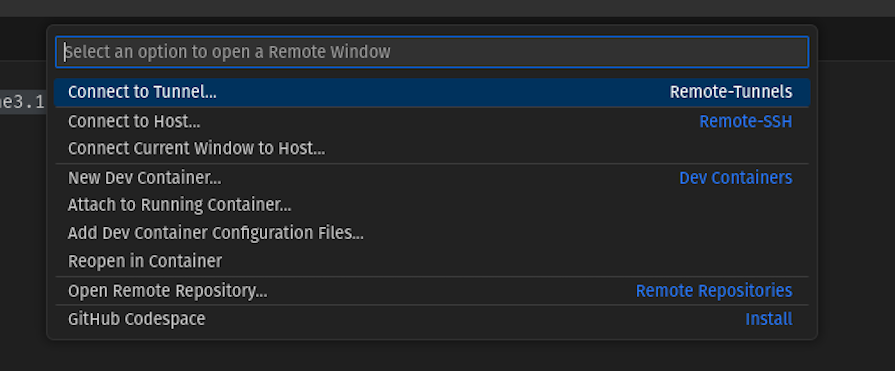
After clicking on this, it will open the VS Code command palette, where you should see several options related to working with dev containers:
👁 Vs Code Command Palette Open To Show Options Related To Working With Dev Containers
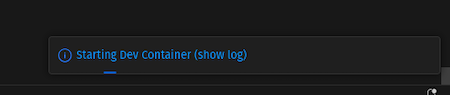
From this list of options, select Reopen in Container. This can take a second, but VS Code will eventually relaunch. When this happens, a small progress pop-up will be visible at the bottom right of your window:
👁 Popup Indicating Progress Of Starting Dev Container Process
If you click on show log, it will open a terminal with logs for building the container. Wait for it to finish. After, VS Code’s standard welcome page will open automatically.
Once all this is done, you can open a new terminal in VS Code either by using the + button or using ctr + shift + ~. Your window should now show a command prompt running inside the container.
The command prompt you see should look different from your normal command prompt. Usually, your prompt would be formatted something like the following: username@os-name. However, you should see that it now looks something like /workspaces/project # or root@container-hash instead.
At this point, you can type ruby --version to check that Ruby is indeed installed and set up correctly. Create a directory called ruby-test and a file inside it called test.rb. Add the following code to this file and save it:
puts "Hello Dev-container World!"
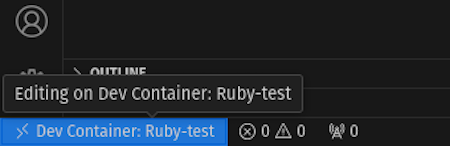
Now in the VS Code terminal, you can run ruby ./ruby-test/test.rb and it will print out the string defined above. Once you are done with this, you can again click on the bottom-left icon, which now displays the name of the dev container from the JSON file:
👁 Bottom Left Icon In Vs Code Window Now Labeled With Dev Container Name From Json File
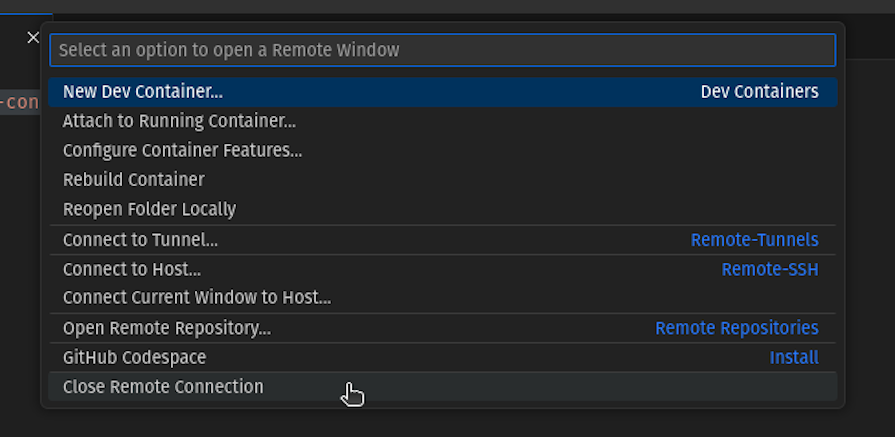
As before, clicking this will open the command palette. From this palette, select the Close remote connection option:
👁 Vs Code Command Palette With User Pointer Hovering Over Option To Close Remote Connection
This will close the dev container and open the default VS Code window. Now, if you close this default window and open VS Code in our project directory, you will see that the ruby-test directory and test.rb file are still there.
Congratulations 🎉 You have created and used your first dev container! As you can see, you can change the files in your dev container, and those changes will be retained in the actual files as well.
While using dev containers, you might realize that you need some dependency added. You can simply add that in the Dockerfile, save it, and then open the command palette again.
In the command palette, you should see an option labeled Rebuild container. This option will build the container again, adding the new dependency this time as well.
Not only can you continue your development work while making sure that this dependency change is version-tracked, but other developers can also use the added dependency as well.
Apart from specifying the Dockerfile in the devcontainer.json file, you can also use this file to specify other configuration options. One such option is postCreateCommand, which you can use to specify a command to be run in the container after building the container.
The command you specify using postCreateCommand runs only once — after you create the container, and right after the Docker image is built, not upon each start of the container. As a result, you can use this configuration option for other setup steps that need to be done once after building the container.
For example, if your dev container uses MongoDB, you can add a mongodump that contains some basic dev data and use mongorestore to seed the DB from this data. You can also specify a command to be run every time the container starts using postStartCommand .
If you have a monorepo with multiple individual projects, each using a different programming language or stack, there are various ways to set up dev containers for this project.
One option is to have a single gigantic container image with dependencies you can use for each project. However, this makes the built image considerably large, and it will need to be rebuilt each time any dependency of any project changes. Moreover, someone working on one part may not need all the other parts.
Another option is to instead split up the dev containers on a per-project basis. You can then just use whichever one is needed at a given time. Let’s see this in action.
First, let’s add a Node dev container alongside the Ruby one we already created. To do so, we’ll need to change our structure a bit by creating a directory named ruby inside the .devcontainer directory. Then, we’ll move the existing Dockerfile and devcontainer.json file inside the new ruby directory.
As a reminder, this was our previous structure:
.
├── .devcontainer
│ ├── devcontainer.json
│ └── Dockerfile
└── ruby-test
 └── test.rb
Meanwhile, our new structure will look like this:
.
├── .devcontainer
│ └── ruby
│ ├── devcontainer.json
│ └── Dockerfile
└── ruby-test
 └── test.rb
Now, create another directory named node in .devcontainer and add a Dockerfile and a devcontainer.json file.
In the Dockerfile, add the following code:
FROM node:20
In the devcontainer.json file, add the following code:
{
 "name": "node-test",
 "build": {
 "dockerfile": "Dockerfile"
 }
}
Now if open the command palette and select the Reopen in container option, the palette will show options for both Node and Ruby:
If you select node-test, it will use the Node Dockerfile, and if you select Ruby-test, it will use the Ruby Dockerfile. This way, we can have multiple independent dev containers that can each be updated without having to rebuild the others.
Not only can we use multiple dev containers in a single project, but we can also use multiple connected dev containers to run connected services. Let’s see how.
In this section, we will create an example that uses a Node.js frontend, a Python backend, and Mongo DB as its database. Since we’re focusing on the dev container setup, we won’t see the actual code in detail. You can get the code for this demo from this GitHub repo.
To start, we’ll create two directories named frontend and backend in the project directory. In the backend directory, we will create a server.py file. In the frontend directory, we will create an index.html file.
We will also create two Dockerfiles named frontend.Dockerfile and backend.Dockerfile.
Finally, we will create a directory named app-frontend in the .devcontainer directory and create docker-compose.yaml and devcontainer.json in the new app-frontend directory. In the end, our setup will look like so:
.
├── .devcontainer
│ ├── app-frontend
│ │ ├── devcontainer.json
│ │ └── docker-compose.yaml
│ ├── node
│ │ ├── devcontainer.json
│ │ └── Dockerfile
│ └── ruby
│ ├── devcontainer.json
│ └── Dockerfile
├── backend
│ └── server.py
├── frontend
│ └── index.html
├── frontend.Dockerfile
├── backend.Dockerfile
└── ruby-test
 └── test.rb
The frontend.Dockerfile should contain the following code:
FROM node:20
RUN npm install -g http-server -y
COPY ./frontend /frontend
WORKDIR /frontend
CMD ["http-server",".","-p","3000"]
The backend.Dockerfile should contain the following code:
FROM python:3.9.18-alpine3.18
RUN pip install flask
COPY ./backend /backend
WORKDIR /backend
# we must specify the host as 0.0.0.0 otherwise cannot access outside container
CMD ["flask","--app","/backend/server.py","run","--host","0.0.0.0"]
This sets up a basic Flask server for the backend and an HTTP server for the frontend to serve HTML files. We are keeping this simple here, but you can set this up with any framework or library of your choosing.
Finally, in the docker-compose.yaml file, we will add the following code:
version: "3.8"
services:
 frontend:
 networks:
 - app_demo
 build:
 dockerfile: "./frontend.Dockerfile"
 context: "../../"
 ports:
 - 3000
 backend:
 networks:
 - app_demo
 build:
 dockerfile: "./backend.Dockerfile"
 context: "../../"
 ports:
 - 5000
 db:
 image: mongo:7.0.2
 volumes:
 - type: volume
 source: dbdata
 target: /var/lib/mongodb
 networks:
 - app_demo
 ports:
 - 27017
networks:
 app_demo:

volumes:
 dbdata:
The code above defines three services: backend, frontend, and db. For each service, we use the Dockerfile of the same name, and use the context as the project directory.
Note that the Dockerfile’s path is taken relative to the context directory. So, even if the compose file is stored at the .devcontainer/app-frontend/docker-compose.yaml directory’s filepath, the Dockerfile path is simply given as ./frontend.Dockerfile. This is because the context is taken relative to the project root.
In each service, we also exposed ports so that the individual services can connect to each other. Finally, we have specified the services to be connected via a custom network named app_demo.
Specifying the custom network is not strictly necessary, as Docker will expose them on the host network by default. However, this way we also get a dedicated network connecting these three.
We can also optionally specify the ports on the host, via which we can connect to these services using the syntax host:container in the ports array.
Finally, in the devcontainer.json file, add the following code:
{
 "name": "app-frontend",
 "dockerComposeFile":"./docker-compose.yaml",
 "service": "frontend",
 "workspaceFolder": "/frontend",
 "mounts": ["type=bind,source=../../frontend,target=/frontend"],
 "shutdownAction": "stopCompose"
}
In this code, we specify the name for this setup, the Docker Compose file, and most importantly, specify which service in the compose file we want to connect with VS Code. The workspaceFolder specifies which directory inside the container should be opened with VS Code.
We also specify that the frontend directory should be mounted at the /frontend path and that the mount type should be bind. This ensures that any changes done inside the container are reflected on our host system.
After that’s all done, we can reopen VS Code in a container and select app-frontend, which will set up Docker Compose and open VS Code in the frontend container. Here we can access other services via their names and ports.
For example, if we run curl backend:5000, we will get the default response from our Flask server. This way, the backend can connect to the DB and the frontend can connect to the backend as needed.
You can see the whole code in this GitHub repo.
If you don’t want to use either VS Code or Docker, you can still use dev containers. While VS Code extensions provide an easy way to set up dev containers, these dev containers are ultimately still plain old containers and can be directly used without VS Code.
For example, let’s see how we can accomplish the above setup without using VS Code — although we’ll still be using Docker and not a Docker alternative.
First, we will create a new docker-compose file in the root directory and copy over the contents of the previous file. This by itself is already a valid docker-compose file and only needs slight modifications.
Then, we will need to specify the mount info in this file itself instead of in the dockerconfig.json file. Here’s how we’ll do so:
...
frontend:
 networks:
 - app_demo
 build:
 dockerfile: "./frontend.Dockerfile"
 context: "."
 volumes:
 - type: bind
 source: ./frontend
 target: /frontend
...
Next, we need to specify the host port in order to access the HTTP server from the host. We will use port 3000 for both and only expose the frontend server, but others can be exposed as well:
...
ports:
 - 3000:3000
...
Now if we run the docker compose up command in a terminal, it should start building and running the containers. Once all the containers are up and running, you can visit localhost:3000 in your browser and see the frontend.
If you want to run any command inside the container, you can use commands such as docker exec to open a shell in the container.
As we have added a bind volume, any changes you make in the files will be reflected inside the container and vice versa. You might want to add nodemon or something similar to watch the file changes.
Another thing to note is that if you create files from inside the container, you might need to set the ownership and permissions of the file correctly. This will ensure you can edit them outside the container properly as well.
In this way, we can also use dev containers without using VS Code.
We have seen how easy setting up and using dev containers is — even when setting up multiple dev containers for a single project in the next section. However, it’s also important to understand some of the challenges that we might face while using dev containers.
If you’re developing on Linux, running containers might not use a lot of CPU or RAM, as they are essentially a process just like any other process.
However, if you’re developing on Windows or Mac, running Docker will consume a considerable amount of resources. Each container running on top of it will also need some more CPU and RAM.
If your machine isn’t very powerful, or you don’t want to allocate resources to running Docker, then a conventional setup would be a better choice instead of using dev containers.
This issue will be present no matter what base OS you use. The container image itself, as well as the dev container, will consume space in your storage.
The image we used above is pretty minimal and uses only around 75 MB. However, it is very common for base images to have sizes of around 500MB up to 1GB.
Apart from the base image, any extra packages you install, along with any commands you add to the Dockerfile, will also increase its size. Not only that, but VS Code also stores the container state on disk to reuse it across reboots, which also takes up some space.
In my own experience, I’ve seen low disk space warnings on my machine and identified old or unused Docker base images as major space consumers. Be careful while choosing the base image, and make sure you factor in storage space on your local development machine when using dev containers.
If your development is OS-agnostic or Linux-based, then dev containers should work just fine. However, if you need some other OS such as Windows or Mac, dev containers might not be as useful.
Windows does provide some images. However, you’ll need to check each image’s license carefully before use, and using dev containers might not be as perfect as running an actual Windows machine.
Furthermore, MacOS does not have an official container image, so you will not be able to do Mac-based development via dev containers.
In the end, containers are just processes running on the host OS. Thus, you cannot emulate different architectures with dev containers.
Also, there are some limits regarding what parts of the host system can be shared with dev containers. If you are working with something like systemd or dbus, simply using dev containers might not be enough.
We have seen what are dev containers, how they are beneficial for easy development setup, and how we can use them with VS Code and extensions as well as without VS Code. We also explored some of the drawbacks of dev containers and discussed when you may not want to use them.
That said, dev containers still provide enough benefits to outweigh the disadvantages in most cases. Whether you just want a single dev container to streamline your setup process or you need a more complex dev container setup, there’s likely a use case where dev containers can make your life easier.
You can check out the code we explored throughout this article in this GitHub repo. If you have further questions about using dev containers both with and without VS Code, feel free to comment below.
Install LogRocket via npm or script tag. LogRocket.init() must be called client-side, not
server-side
$ npm i --save logrocket

// Code:

import LogRocket from 'logrocket';
LogRocket.init('app/id');
// Add to your HTML:

<script src="https://cdn.lr-ingest.com/LogRocket.min.js"></script>
<script>window.LogRocket && window.LogRocket.init('app/id');</script>
TSRX adds first-class control flow, conditional hooks, and scoped styles to React via a TypeScript compiler extension — no new framework required.
Learn how to build a full React Native auth system using Better Auth and Expo — with email/password login, Google OAuth, session persistence, and protected routes.
Compare the top AI development tools and models of June 2026. View updated rankings, feature breakdowns, and find the best fit for you.
Learn how Bloom filters reduce database lookups for username availability checks while preserving correctness at scale.
Would you be interested in joining LogRocket's developer community?
Join LogRocket’s Content Advisory Board. You’ll help inform the type of content we create and get access to exclusive meetups, social accreditation, and swag.
Sign up now