 |
VOOZH | about |
|
VOOZH | about |
The act project is a powerful tool that you can use with GitHub Actions to quickly test and refine a continuous integration and continuous delivery (CI/CD) pipeline. With act, you can use Docker containers locally to directly run steps in GitHub Actions. act helps developers run independent stages in a pipeline, and it generally improves the feedback loop whenever you’re building pipelines with GitHub Actions.
In this article, we’ll introduce act in a sample project, install it, and then cover the different ways that act can improve your experience building and testing GitHub Actions. To follow along, check out my sample project on GitHub. Let’s get started!
Jump ahead:
The Replay is a weekly newsletter for dev and engineering leaders.
Delivered once a week, it's your curated guide to the most important conversations around frontend dev, emerging AI tools, and the state of modern software.
Before we begin working with act, we should have a basic understanding of how GitHub Actions work. Similar to CI/CD tools like CircleCI, Jenkins, and more, GitHub Actions allow you to define a pipeline in a YAML file. GitHub will then run your pipeline on specific events, which could include opening a pull request or merging into the master branch.
GitHub Actions’ syntax looks like the following:
name: Node.js CI
'on':
 push:
 branches:
 - master
jobs:
 build:
 runs-on: ubuntu-latest
 steps:
 - uses: actions/checkout@v3
 - name: Use Node.js 16.x
 uses: actions/setup-node@v3
 with:
 node-version: 16.x
 cache: npm
 - run: npm install
 - run: npm run build
In the example above, a GitHub Action is defined with a build job that checks out your code, does an npm install, and builds the project. You could have additional jobs that are reliant on this one, but the steps can also be their own actions. For example, if you wanted to cache the node modules, you could just add the following code:
 - run: npm install
 - run: npm run build
 - name: Cache node modules
 uses: actions/cache@v3
 env:
 cache-name: cache-node-modules
 with:
 path: ~/.npm
 key: >-
 ${{ runner.os }}-build-${{ env.cache-name }}-${{
 hashFiles('**/package-lock.json') }}
 restore-keys: |
 ${{ runner.os }}-build-${{ env.cache-name }}-
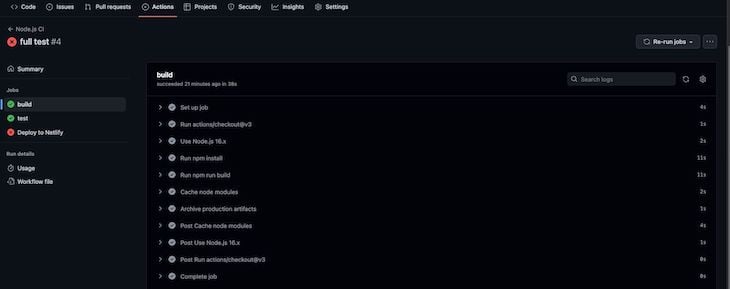
The actions/cache@v3 is its own action that is run as a step in this pipeline. You can also build out these actions. For example, by enabling them in your GitHub repo, you can run CI/CD on pushes to master and other events. In GitHub, this looks like the following:
You can drill down into the different stages and even see a history of the actions as they run. In the GitHub Actions documentation, there is a detailed definition of this syntax; I recommend checking it out.
In the next sections, we’ll learn how to do all of this locally instead of having to rely on the GitHub console and events to test out our pipeline.
act?act acts as a CLI on your local machine, supporting Linux, Mac, and Windows. I work on a Mac, so I used brew to install act with the following command:
brew install act
To learn more about the installation, check out the instructions in the GitHub repo.
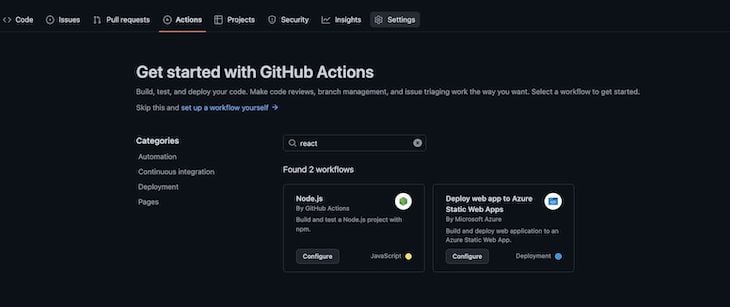
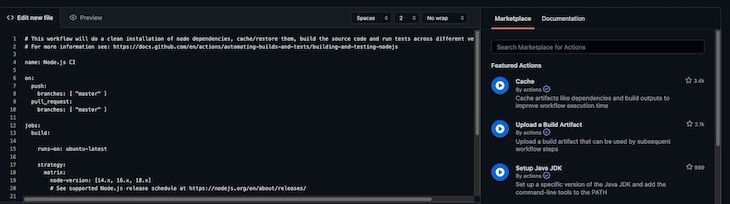
Once you have act installed, using it is easy. Inside the .github folder in your repo, call the CLI directly with act from a terminal inside a project that has a GitHub action YAML file setup. If you don’t have GitHub Actions set up yet, click the actions option at the top of your GitHub project, and GitHub will walk you through creating a starter YAML file:
👁 Github Actions Set Up Yaml File
👁 GitHub Actions Edit YAML File
There are a lot of different options, but I found the following to be the most useful:
# List all the actions in your YAML file
act -l

# List actions for a specific event (here the event is push)
act push -l

# Get Act to run the workflow as if a specific push to master event occured
act push

# Get Act to run a specific job
act -j test

# pass secrets into a job so that the GitHub action can consume them
act -s MY_TOKEN_SECRET=<token> -s MY_NETLIFY_SITE_ID=<site_id>

# run a GitHub action that uses artifacts between jobs
act --artifact-server-path /tmp/artifacts push
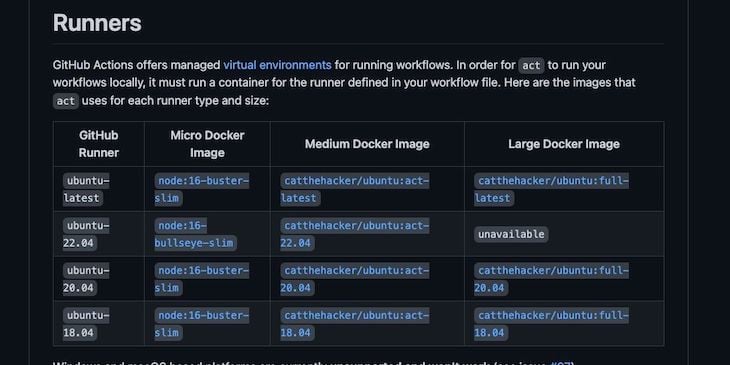
When these commands run, act builds a Docker container to run your GitHub actions inside. The images listed on the act GitHub project include the following:
👁 Github Actions Builds Docker Container
If your GitHub Action job specifies an image to use, it will pull the image and run it in the act container to do the work.
act in actionAs I stated in the intro, I used a sample project with Act to test out some of the features. The project is a very simple, basic to-do list app with React. I included one test that I could create a stage in the pipeline for, and I also included a stage to deploy to Netlify.
The code below represents the actual YAML file that I built for the GitHub Actions in this project:
name: Node.js CI
'on':
 push:
 branches:
 - master
jobs:
 build:
 runs-on: ubuntu-latest
 steps:
 - uses: actions/checkout@v3
 - name: Use Node.js 16.x
 uses: actions/setup-node@v3
 with:
 node-version: 16.x
 cache: npm
 - run: npm install
 - run: npm run build
 - name: Cache node modules
 uses: actions/cache@v3
 env:
 cache-name: cache-node-modules
 with:
 path: ~/.npm
 key: >-
 ${{ runner.os }}-build-${{ env.cache-name }}-${{
 hashFiles('**/package-lock.json') }}
 restore-keys: |
 ${{ runner.os }}-build-${{ env.cache-name }}-
 - name: Archive production artifacts
 uses: actions/upload-artifact@v3
 with:
 name: built-project
 path: build
 retention-days: 1
 test:
 needs: build
 runs-on: ubuntu-latest
 steps:
 - uses: actions/checkout@v3
 - name: Use Node.js 16.x
 uses: actions/setup-node@v3
 with:
 node-version: 16.x
 cache: npm
 - name: Download build for testing
 uses: actions/download-artifact@v3
 with:
 name: built-project
 - run: npm install
 - run: npm run pipeline-test
 deploy:
 needs: [build, test]
 runs-on: ubuntu-latest
 name: 'Deploy to Netlify'
 steps:
 - uses: actions/checkout@v3
 - name: Download build for deployment
 uses: actions/download-artifact@v3
 with:
 name: built-project
 - uses: jsmrcaga/[email protected]
 with:
 NETLIFY_AUTH_TOKEN: ${{ secrets.MY_TOKEN_SECRET }}
 NETLIFY_SITE_ID: ${{ secrets.MY_NETLIFY_SITE_ID }}
 NETLIFY_DEPLOY_TO_PROD: true
 build_command: "echo build command not required since we are using artifacts"
As you can see, I have three different jobs:
build: Builds the project, caches the node modules, and caches the built assetstest: Runs the associated tests with the project. In this case, it’s just the one App.test.tsx filedeploy: Takes the assets that were built in the first job and then deploys them to Netlify using the Netlify Deploy GitHub ActionThe test job is dependent on the build job, and the deploy job is dependent on the test and build jobs. I also used caching and storing artifacts between stages. These topics are beyond the scope of this article, but for reference, I recommend checking out the GitHub Actions documentation.
Using Act with this pipeline, I was able to do several things, including running the jobs independently as well as directly seeing data about the jobs. I found this to be really helpful because I could build the pipeline without having to directly interact with the GitHub console. This saved significant time that I would have otherwise spent deploying and updating the YAML file, then waiting for the console to complete.
In the sample project, I list the associated jobs as follows:
➜ getting-started-with-act git:(master) act -l
WARN ⚠ You are using Apple M1 chip and you have not specified container architecture, you might encounter issues while running act. If so, try running it with '--container-architecture linux/amd64'. ⚠
Stage Job ID Job name Workflow name Workflow file Events
0 build build Node.js CI node.js.yml push
1 test test Node.js CI node.js.yml push
2 deploy Deploy to Netlify Node.js CI node.js.yml push
The warning message indicates that act noticed the type of machine I’m using. If I wanted to, I could specify the architecture and avoid seeing that message. Next, I’ll look at the dependencies of the jobs on the push event:
➜ getting-started-with-act git:(master) act push -l
WARN ⚠ You are using Apple M1 chip and you have not specified container architecture, you might encounter issues while running act. If so, try running it with '--container-architecture linux/amd64'. ⚠
Stage Job ID Job name Workflow name Workflow file Events
0 build build Node.js CI node.js.yml push
1 test test Node.js CI node.js.yml push
2 deploy Deploy to Netlify Node.js CI node.js.yml push
If I just want to run the build job independently, I’ll use the code below:
➜ getting-started-with-act git:(master) act -j build
WARN ⚠ You are using Apple M1 chip and you have not specified container architecture, you might encounter issues while running act. If so, try running it with '--container-architecture linux/amd64'. ⚠
[Node.js CI/build] 🚀 Start image=node:16-buster-slim
[Node.js CI/build] 🐳 docker pull image=node:16-buster-slim platform= username= forcePull=false
[Node.js CI/build] 🐳 docker create image=node:16-buster-slim platform= entrypoint=["tail" "-f" "/dev/null"] cmd=[]
[Node.js CI/build] 🐳 docker run image=node:16-buster-slim platform= entrypoint=["tail" "-f" "/dev/null"] cmd=[]
[Node.js CI/build] ☁ git clone 'https://github.com/actions/setup-node' # ref=v3
[Node.js CI/build] ☁ git clone 'https://github.com/actions/cache' # ref=v3
[Node.js CI/build] ☁ git clone 'https://github.com/actions/upload-artifact' # ref=v3
[Node.js CI/build] ⭐ Run Main actions/checkout@v3
[Node.js CI/build] 🐳 docker cp src=/Users/andrewevans/Documents/projects/getting-started-with-act/. dst=/Users/andrewevans/Documents/projects/getting-started-with-act
[Node.js CI/build] ✅ Success - Main actions/checkout@v3
[Node.js CI/build] ⭐ Run Main Use Node.js 16.x
[Node.js CI/build] 🐳 docker cp src=/Users/andrewevans/.cache/act/actions-setup-node@v3/ dst=/var/run/act/actions/actions-setup-node@v3/
[Node.js CI/build] 🐳 docker exec cmd=[node /var/run/act/actions/actions-setup-node@v3/dist/setup/index.js] user= workdir=
[Node.js CI/build] 💬 ::debug::isExplicit:
[Node.js CI/build] 💬 ::debug::explicit? false
If I want to run the build and test jobs together, I need to specify a location for the artifacts. The GitHub Action that passes artifacts between jobs uses a default location within the GitHub servers.
Since I’m running this locally in a Docker container, I have to specify a location for it to use in the container. In the images below, you can see the job kickoff, and then successfully build and store the artifact:
[Node.js CI/build] 🐳 docker exec cmd=[bash --noprofile --norc -e -o pipefail /var/run/act/workflow/3] user= workdir=
|
| > [email protected] build
| > react-scripts build
|
| Creating an optimized production build...
| Compiled successfully.
|
| File sizes after gzip:
|
| 47.11 kB build/static/js/main.172f414d.js
| 1.79 kB build/static/js/787.de4328d8.chunk.js
| 313 B build/static/css/main.51a848c0.css
|
| The project was built assuming it is hosted at /.
| You can control this with the homepage field in your package.json.
|
| The build folder is ready to be deployed.
| You may serve it with a static server:
|
| npm install -g serve
| serve -s build
|
| Find out more about deployment here:
|
| https://cra.link/deployment
|
[Node.js CI/build] ✅ Success - Main npm run build
[Node.js CI/build] ⭐ Run Main Cache node modules
Often times, you’ll have secrets that you need to pass to specific jobs. When running with act, you can do this directly in the command line with the following code:
act -s MY_SECRET=<first_secret> push
There are a lot of other things you can do with act as you develop. I found it very helpful to be able to run jobs independently to debug issues that occurred.
As I stated earlier, I also included a deploy stage to upload the artifacts to Netlify. I had some issues passing in tokens, and I ultimately realized it was an issue with the way I had generated the token in Netlify. Regardless, you can still see how you could have a deploy stage. You could test this with other providers like AWS, Azure, etc.
This article is just the tip of the iceberg of what you can do with act. By running Docker alongside act, I was able to see the containers running and the images that were pulled down. I also went through multiple iterations of running parts of jobs and then consulting the documentation to clean up the code. It greatly helped in the development of the pipeline, even if it was necessarily simple.
I highly recommend checking out the act project and reading more about it in the repo’s README. I’ve found that act has a fairly strong community, so any issues I saw usually had an associated GitHub issue that I could consult for help.
Thanks for reading! Follow my writing on rhythmandbinary.com and Twitter at @AndrewEvans0102.
There’s no doubt that frontends are getting more complex. As you add new JavaScript libraries and other dependencies to your app, you’ll need more visibility to ensure your users don’t run into unknown issues.
LogRocket is a frontend application monitoring solution that lets you replay JavaScript errors as if they happened in your own browser so you can react to bugs more effectively.
👁 LogRocket Dashboard Free Trial BannerLogRocket works perfectly with any app, regardless of framework, and has plugins to log additional context from Redux, Vuex, and @ngrx/store. Instead of guessing why problems happen, you can aggregate and report on what state your application was in when an issue occurred. LogRocket also monitors your app’s performance, reporting metrics like client CPU load, client memory usage, and more.
Build confidently — start monitoring for free.
Learn how to use Gemini CLI subagents to delegate frontend, backend, testing, and docs tasks to specialized agents with guardrails and clear ownership.
Learn how next-browser gives AI agents runtime context for debugging Next.js apps, including React props, hydration, PPR, forms, and performance.
Build dynamic LLM routing in Next.js with OpenRouter, TanStack AI, task classification, model fallbacks, and cost-aware routing.
TSRX adds first-class control flow, conditional hooks, and scoped styles to React via a TypeScript compiler extension — no new framework required.
Would you be interested in joining LogRocket's developer community?
Join LogRocket’s Content Advisory Board. You’ll help inform the type of content we create and get access to exclusive meetups, social accreditation, and swag.
Sign up now