 |
VOOZH | about |
|
VOOZH | about |
Editor’s note: This article was updated on 26 July 2024 by Isaac Okoro to include information about concurrent rendering and RSCs in React 18, enhancements to RSC integration in Next 14 and 15 RC, and more.
👁 What You Need To Know About React Server ComponentsSince React rose to the surface as a prominent tool in modern web development, its rendering strategies have always been a cause of concern for developers.
A traditional single-page application (SPA) in React ships an empty div element with a large bundle of JavaScript — which includes React and other application code — to the user’s browser (client). The client is then responsible for making data fetches to a database, computing the UI, and making the resulting HTML interactive.
This process is known as client-side rendering (CSR):
The problem with this approach is that it creates unacceptably slow websites because of the heavy lifting done by the client. The Core Web Vitals for SPAs are also likely to be subpar at best, causing poor SEO performance.
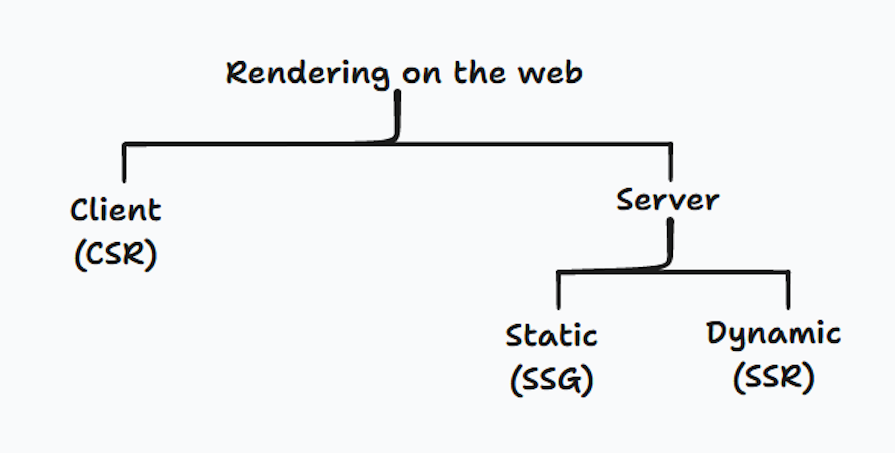
Thankfully, React has continued to mature and has received many significant contributions from its community to improve its rendering performance. The React core team, and the engineers working on frameworks like Gatsby and Next.js, have created solutions for rendering pages on the server to reduce the workload on the client.
These solutions include static site generation (SSG) and server-side rendering (SSR). SSG occurs at build time, meaning it takes place when the application is initially deployed on the server, while in SSR the routes are rendered at request time.
Both SSR and SSG fetch the content for your route or webpage on the server and generate the resulting HTML. This way, users have content to look at as opposed to a blank screen. The generated UI is later made interactive after client-side JavaScript has been executed to add interactivity to the page — this is known as hydration.
React Server Components (RSCs, or simply Server Components) represent the latest advancement in pre-rendering content on the web. They introduce a new mental model to the framework, allowing us to craft components that span both server and client realms.
With RSCs, server rendering can now happen at the component level without having to wait for an entire webpage to render on the server — like in SSR. Server Components also seamlessly interweave with Client Components to offer a versatile blend of server-side efficiency and dynamic client-side interactivity.
In this post, I’ll walk you through all you need to know about React Server Components and how you can start using them in your next project.
The Replay is a weekly newsletter for dev and engineering leaders.
Delivered once a week, it's your curated guide to the most important conversations around frontend dev, emerging AI tools, and the state of modern software.
As described by Vercel:
React Server Components allow you to write UI that can be rendered and optionally cached on the server.
In Server Components, component logic such as data fetching and database mutations is executed exclusively on the server. This proximity to the data source eliminates unnecessary client-server round trips, letting your app simultaneously fetch data and pre-render your components on the server.
Take a look at this example Server Component:
import getBlogPosts from '@/lib/getVideoCourse'
import AddPostButton from '@components/add-post' // client component

export async function ServerComopnent(){
 const posts = await getBlogPosts()

 return(
 <>
 {posts.map((post, index) => {
 <Post key={index} post={post} />
 })}
 <AddPostButton />
 </>
 )
}
Here, we are able to asynchronously fetch data from an external source and pre-render the content entirely on the server. The generated HTML template is then seamlessly streamed into the client-side React tree. Server Components can also import Client Components as seen with the AddPostButton import above.
Using Server Components offers many performance benefits because they never re-render, resulting in faster page loading times. Unlike in rendering techniques like SSR and SSG, the HTML generated by RSCs is not hydrated on the server and no JS is shipped to the client. This significantly increases page load time and reduces the total JavaScript bundle size.
Other advantages of Server Components in web development include:
So at this point, you may be wondering…
The term Client Component can be somewhat misleading because every component renders on the server at request time. However, in React, Client Components are those with the ability to handle state management and engage with standard web APIs and event listeners to facilitate user interactions on the client side.
In contrast, Server Components do not have access to the browser and therefore cannot perform client-side interactive actions. This means they’re incompatible with React Hooks like useState and useEffect.
Client Components are simply the regular React components with which we are already familiar. Because every component in Next.js 13 is a Server Component by default, however, we have to explicitly mark a component as a Client Component using the "use client" directive at the top of the file.
This way, the component can make use of event handlers and client-side Hooks like useState, useContext, useEffect, etc.:
// AddButton.tsx
"use client"
import { useState } from 'react'
import { addNewPost } from '@lib/addNewPost'

const [isLoading, setIsLoading] = useState(false)

export default function AddButton(){
 return (
 <button onClick={addNewPost({ /* new post */ })}>
 {isLoading ? 'Loading...' : 'Add New Post'}
 </button>
 )
}
The relationship between client and server components is also important to take note of. In the first Server Component shown earlier, you can see this AddPostButton Client Component being imported into it.
A good practice to take note of when nesting server components within a client component is that you should always use the React children prop to create a placeholder in your Client Component for your server component as shown in the code block below:
"use client"
export default function ClientComponent({ children }){
 return (
 <div>
 {children}
 </div>
 )
}
Now you can proceed to nest a Server Component within the Client Component:
// page.tsx (server component)
import ServerComponent from './ServerComponent'
import ClientComponent from './ClientComponent'

export default function Home(){
 return(
 <ClientComponent>
 <ServerComponent />
 </ClientComponent>
 )
}
For more clarity on interweaving server and client components, you can reference this video, which explains it clearly.
The key to using the correct component type lies in discerning the structure and requirements of each component in your application. The Next.js documentation has a table that shows the right use cases for server and client components.
At the time of writing, the only stable way to use React Server Components in Next.js is with the Next.js App Router. The App Router allows us to use React’s latest features, such as Server Components and streaming. Next.js 13 also ships with an extended version of the fetch API, allowing us to cache data and memoize any duplicate requests.
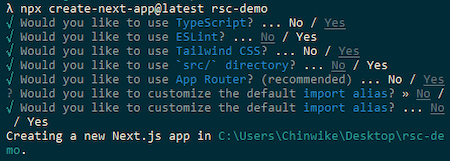
Set up a new Next project by running the command below:
npx install create-next-app@latest
This will launch a questionnaire to help you configure your application. Make sure to opt into the App Router when prompted. Here is an image showing all my selections for the scope of this tutorial:
By default, every component in the Next.js App Router is a Server Component:
// app/page.tsx
export default function Home() {
 console.log('Live from a server component')
 return (
 <main>
 <h2>This is a server component</h2>
 </main>
 )
}
Logging anything to the console from a Server Component returns the output in a server environment:
We’ve previously seen how data fetching is executed in RSCs by attaching the async keyword to the component to enable asynchronous fetching on the server.
Let’s now apply this to create a simple application that renders a list of JavaScript tutorials. I’ve created a demo project that uses JSON Server as a database running on localhost:4000. If you wish to replicate it, everything you need to follow is located in this repository:
// app/page.tsx
interface Video {
id: string
image: string
title: string
views: string
published: string
}
async function fetchVideos() {
const videos = await fetch('http://localhost:4000/tutorials').then((res) =>
res.json()
)
return videos
}
export default async function Home() {
const videos: Video[] = await fetchVideos()
return (
<>
{videos.map((video, index) => (
<li className='mb-6' key={index}>
<a
href={`https://www.youtube.com/watch?v=${video.id}`}
target='_blank'
rel='noopener noreferrer'
className='hover:opacity-80'
>
<Image
src={video.image}
alt={video.title}
width={420}
height={200}
className='mb-4 rounded-md'
/>
<h4>{video.title}</h4>
<div>
{video.views} • {video.published}
</div>
</a>
</li>
))}
</>
)
}
Here is what our app looks like:
👁 Javascript Tutorials Single Page App
A major drawback of the popular SSR technique is that it fetches and displays all content to the user in a waterfall manner. This means all asynchronous requests have to be fulfilled and the UI generated before hydrating happens on the client.
In nontrivial apps, this approach can be inefficient and lead to extended loading times. This is where RSCs alongside React Suspense come into play to improve SSR’s performance.
React Suspense allows us to pause a component’s rendering within the React tree and display a loading component as a placeholder while content is fetched in the background and streamed in chunks to the client. Once the content is ready, it seamlessly replaces the loading UI within the component enclosed by Suspense:
import { Suspense } from 'react'
import SkeletonScreen from './loading'

export const async function Home(){
 const posts = await getPosts()

 return (
 <Suspense fallback={SkeletonScreen}>
 {videos.map(post => (
 // posts UI...
 ))}
 </Suspense>
 )
}
Here’s the result:
Next.js integrates Suspense directly into the App Router with a special loading.js file. This file will automatically wrap the page.js file with Suspense and render the custom UI in loading.js. Here is a mock representation of the React tree:
<Layout>
 <Suspense fallback={Loading.js}>
 <Page />
 </Suspense>
</Layout>
We can create this file and write the Loading component here instead:
// app/loading.tsx
export default function SkeletonScreen() {
 return (
 <>
 {Array(6)
 .fill(6)
 .map((item, index) => (
 <li className='my-5' key={index}>
 <div className='bg-[#DDDDDD] rounded-md w-[420px] mb-4 h-[200px] '></div>
 <div className='bg-[#DDDDDD] rounded-md h-[20px] w-2/3 mb-2'></div>
 <div className='bg-[#DDDDDD] rounded-md h-[20px] w-11/12 mb-2'></div>
 <div className='bg-[#DDDDDD] rounded-md h-[20px] w-1/2'></div>
 </li>
 ))}
 </>
 )
}
And now the fallback will appear without having to directly use the Suspense component.
Concurrent rendering in React is a feature that works under the hood and allows React to optimize performance, improve application responsiveness and user experience by first breaking down the rendering phase and then prioritizing the most urgent of those tasks.
Let’s see an example to enable us to understand this.
With versions before React 18, React renders your application in a single, uninterrupted process. If you have a time-consuming task — like, say, complex calculation or data fetching — then this can block the UI rendering process, causing unexpected behaviors and noticeable delays in older devices and complex applications.
Here are some features of concurrent mode that address those issues:
Suspense component — Another feature introduced with concurrent rendering is the Suspense component. This component allows React to display a fallback UI, like a loading spinner or indicator, on a part of the UI that’s waiting for data that hasn’t arrived yet. This promotes conversion rates and prevents empty content areasRSCs leverage concurrent mode features to better coordinate how components are rendered on the server and then streamed to the client. Together, RSCs and concurrent mode help reduce the amount of JavaScript sent to the user’s browser, speeding up load times and improving performance.
Next.js has been rapidly evolving, and the integration of React Server Components (RSC) has seen significant improvements in versions 14 and 15 RC. Let’s delve into the key enhancements.
Next.js 14 introduced server actions, support for Turbopack, and partial pre-rendering:
Meanwhile, the Next.js 15 Release Candidate (RC) introduced:
The introduction of RSCs initially came with challenges when attempting to integrate third-party packages seamlessly. However, advancements in Next.js and the broader React ecosystem have improved compatibility and introduced new approaches.
Third-party libraries designed for client-side React components will work as expected within Client Components in RSC applications. The "use client" directive can be employed to ensure correct behavior.
If you are trying to integrate a library that heavily relies on DOM manipulation or a global state, then there’s a high chance that you might encounter issues working with server components. When that happens, you might want to consider libraries such as React Query and SWR specifically designed for SSR.
With the enhanced fetch API introduced in Next 13, which works harmoniously with Server Components, you may find yourself less reliant on these external tools for data fetching and caching.
Incorporating React Server Components into your web development toolkit can lead to substantial improvements in performance, SEO, and data handling, ultimately enhancing the user experience across various applications. As the concept evolves, developers should stay engaged with updates and best practices to fully leverage the benefits of RSCs in their projects.
Install LogRocket via npm or script tag. LogRocket.init() must be called client-side, not
server-side
$ npm i --save logrocket

// Code:

import LogRocket from 'logrocket';
LogRocket.init('app/id');
// Add to your HTML:

<script src="https://cdn.lr-ingest.com/LogRocket.min.js"></script>
<script>window.LogRocket && window.LogRocket.init('app/id');</script>
TSRX adds first-class control flow, conditional hooks, and scoped styles to React via a TypeScript compiler extension — no new framework required.
Learn how to build a full React Native auth system using Better Auth and Expo — with email/password login, Google OAuth, session persistence, and protected routes.
Compare the top AI development tools and models of June 2026. View updated rankings, feature breakdowns, and find the best fit for you.
Learn how Bloom filters reduce database lookups for username availability checks while preserving correctness at scale.
Hey there, want to help make our blog better?
Join LogRocket’s Content Advisory Board. You’ll help inform the type of content we create and get access to exclusive meetups, social accreditation, and swag.
Sign up now