
- DZone
- Coding
- Frameworks
- Simplified Spring Swagger
Simplified Spring Swagger
Learn more about using Spring Boot Swagger-enabled REST projects.
Join the DZone community and get the full member experience.
Join For FreeIn this tutorial, we are going to try out a Spring Boot Swagger-enabled REST project and explore how the validation constraints can be utilized automatically for enriching Swagger models.
We are going to refer to https://www.baeldung.com/swagger-2-documentation-for-spring-rest-api and https://spring.io/guides/gs/rest-service/ as starting points.
Prerequisites:
Java 8.x
Maven 3.x
Steps
Start by creating a Maven JAR project. Below, you will see the initial pom.xml:
xxxxxxxxxx
<?xml version="1.0" encoding="UTF-8"?>
<project xmlns="http://maven.apache.org/POM/4.0.0" xmlns:xsi="http://www.w3.org/2001/XMLSchema-instance"
xsi:schemaLocation="http://maven.apache.org/POM/4.0.0 http://maven.apache.org/xsd/maven-4.0.0.xsd">
<modelVersion>4.0.0</modelVersion>
<groupId>eg</groupId>
<artifactId>sample</artifactId>
<version>0.1.0</version>
<parent>
<groupId>org.springframework.boot</groupId>
<artifactId>spring-boot-starter-parent</artifactId>
<version>2.0.5.RELEASE</version>
</parent>
<dependencies>
<dependency>
<groupId>org.springframework.boot</groupId>
<artifactId>spring-boot-starter-web</artifactId>
</dependency>
<dependency>
<groupId>com.jayway.jsonpath</groupId>
<artifactId>json-path</artifactId>
<scope>test</scope>
</dependency>
<dependency>
<groupId>io.springfox</groupId>
<artifactId>springfox-swagger2</artifactId>
<version>2.9.2</version>
</dependency>
<dependency>
<groupId>io.springfox</groupId>
<artifactId>springfox-swagger-ui</artifactId>
<version>2.9.2</version>
</dependency>
</dependencies>
<properties>
<java.version>1.8</java.version>
</properties>
<build>
<plugins>
<plugin>
<groupId>org.springframework.boot</groupId>
<artifactId>spring-boot-maven-plugin</artifactId>
</plugin>
</plugins>
</build>
</project>
This is the initial POM.xml.
Now, let's create a small Java bean class.
package sample;
import javax.validation.constraints.Email;
import javax.validation.constraints.Max;
import javax.validation.constraints.Min;
import javax.validation.constraints.NotBlank;
import javax.validation.constraints.NotNull;
import javax.validation.constraints.Pattern;
import javax.validation.constraints.Size;
import javax.xml.bind.annotation.XmlAccessType;
import javax.xml.bind.annotation.XmlAccessorType;
import javax.xml.bind.annotation.XmlRootElement;
import org.hibernate.validator.constraints.CreditCardNumber;
@XmlRootElement(name="person")
@XmlAccessorType(XmlAccessType.FIELD)
public class Person {
private long id;
private String firstName;
@NotNull
@NotBlank
@Size(max = 10)
private String lastName;
@Pattern(regexp = ".+@.+\\..+", message = "Please provide a valid email address")
private String email;
@Email()
private String email1;
@Min(18)
@Max(30)
private int age;
@CreditCardNumber
private String creditCardNumber;
public String getCreditCardNumber() {
return creditCardNumber;
}
public void setCreditCardNumber(String creditCardNumber) {
this.creditCardNumber = creditCardNumber;
}
public long getId() {
return id;
}
public void setId(long id) {
this.id = id;
}
public String getEmail1() {
return email1;
}
public void setEmail1(String email1) {
this.email1 = email1;
}
@Size(min = 2)
public String getFirstName() {
return firstName;
}
public void setFirstName(String firstName) {
this.firstName = firstName;
}
public String getLastName() {
return lastName;
}
public void setLastName(String lastName) {
this.lastName = lastName;
}
public String getEmail() {
return email;
}
public void setEmail(String email) {
this.email = email;
}
public int getAge() {
return age;
}
public void setAge(int age) {
this.age = age;
}
}
This is an example Java bean.
Now, let's create a controller.
xxxxxxxxxx
package sample;
import javax.validation.Valid;
import org.springframework.web.bind.annotation.RequestBody;
import org.springframework.web.bind.annotation.RequestMapping;
import org.springframework.web.bind.annotation.RequestMethod;
import org.springframework.web.bind.annotation.RestController;
@RestController
public class PersonController {
@RequestMapping( path="/person", method=RequestMethod.POST)
public Person person(@Valid @RequestBody Person person) {
return person;
}
}
Above is a sample REST Controller.
Here is an example Swagger configuration:
xxxxxxxxxx
package sample;
import org.springframework.context.annotation.Bean;
import org.springframework.context.annotation.Configuration;
import com.google.common.base.Predicates;
import springfox.documentation.builders.PathSelectors;
import springfox.documentation.builders.RequestHandlerSelectors;
import springfox.documentation.spi.DocumentationType;
import springfox.documentation.spring.web.plugins.Docket;
import springfox.documentation.swagger2.annotations.EnableSwagger2;
@Configuration
@EnableSwagger2
public class SwaggerConfig {
@Bean
public Docket api() {
return new Docket(DocumentationType.SWAGGER_2).select()
.apis(Predicates.not(RequestHandlerSelectors.
basePackage("org.springframework.boot")))
.paths(PathSelectors.any()).build();
}
}
SwaggerConfig
The Spring Boot application class is shown below:
xxxxxxxxxx
package sample;
import org.springframework.boot.SpringApplication;
import org.springframework.boot.autoconfigure.SpringBootApplication;
@SpringBootApplication
public class SampleApplication {
public static void main(String[] args) {
SpringApplication.run(SampleApplication.class, args);
}
}
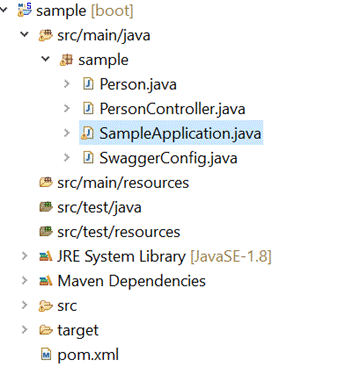
At this stage, this is what the sample project looks like in Eclipse IDE:
Above are the project contents.
Next, execute the “mvn clean package” from command prompt or terminal. Then, execute “java -jar target\sample-0.1.0.jar.”
You can also launch the application by running the SampleApplication.java class from your IDE.
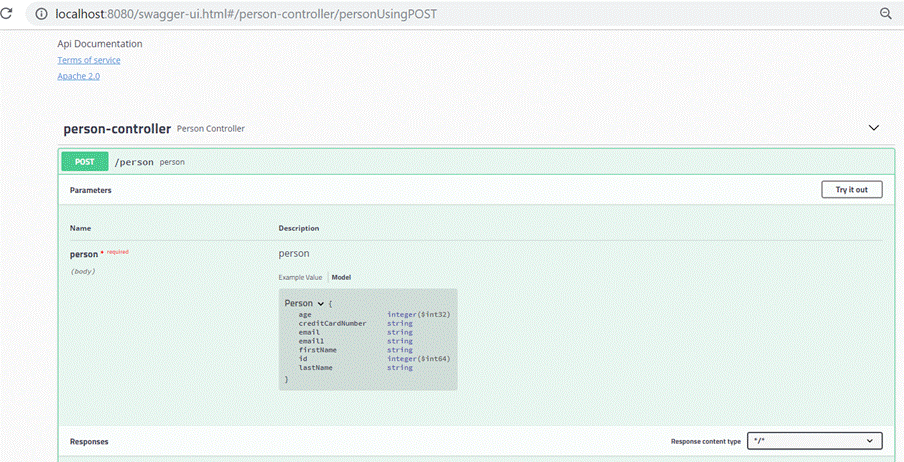
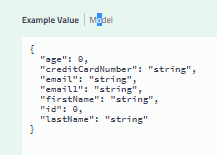
Now, let's visit the Swagger UI — http://localhost:8080/swagger-ui.html:
Press “Try it out” button. Then, press the execute button. The validation errors are reported below.
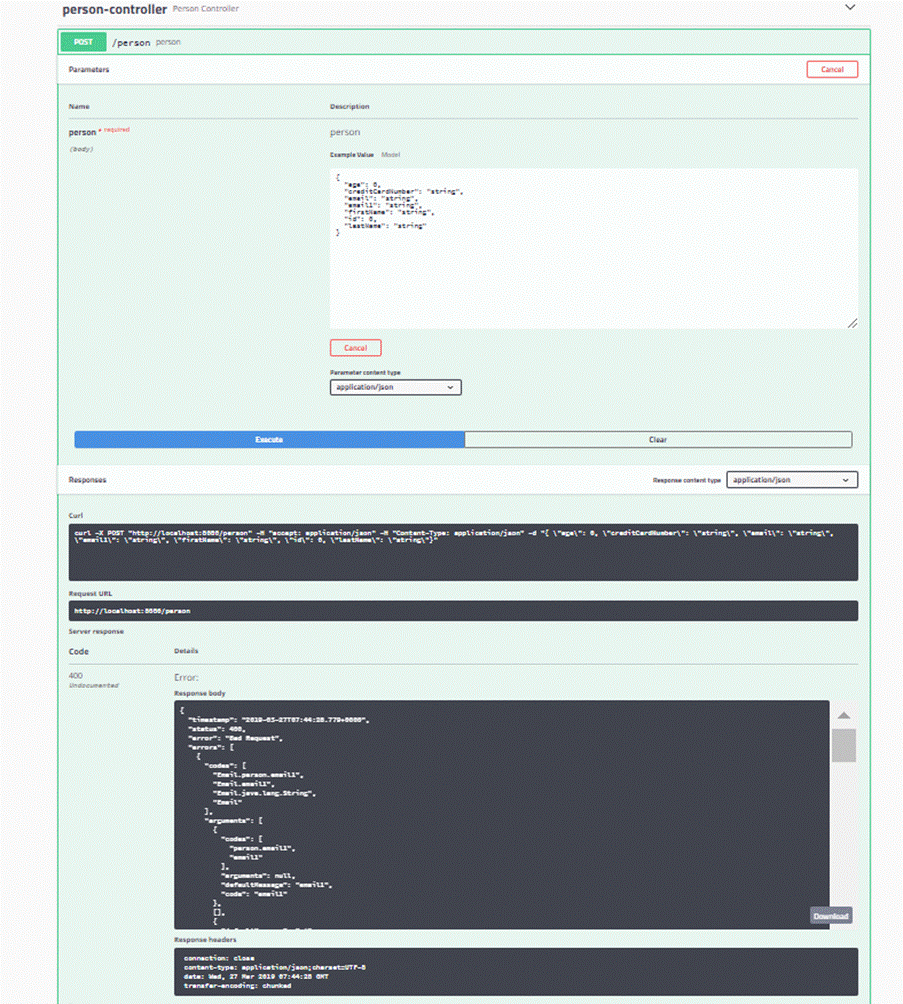
Showing below the details for more readability.
Input |
Response |
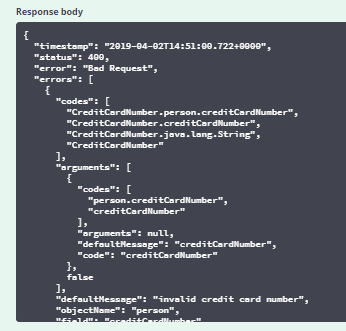
Note: For now, try with Parameter content Type of “application/json.”
If you are trying the application/XML parameter content type, adjust manually the <Person> tag to <Person>.
While this is great, what about the validation constraints? Is it possible to bring them out automatically in the Swagger specifications of this sample project?
Now, add the spring-swagger-simplified dependency into the pom.xml:
xxxxxxxxxx
<dependency>
<groupId>org.bitbucket.tek-nik</groupId>
<version>1.0.9</version>
<artifactId>spring-swagger-simplified</artifactId>
</dependency>
Then, add this dependency and make one additional change.
xxxxxxxxxx
package sample;
import org.springframework.boot.SpringApplication;
import org.springframework.boot.autoconfigure.SpringBootApplication;
import org.springframework.context.annotation.ComponentScan;
@SpringBootApplication
@ComponentScan(basePackages = { "org.bitbucket.tek.nik.simplifiedswagger", "sample" })
public class SampleApplication {
public static void main(String[] args) {
SpringApplication.run(SampleApplication.class, args);
}
}
Above is the updated main application class
Note: the change is in line 7 and line 9.
Note: in case you used a different package name, please replace "sample” with the package name used just above in the @ComponentScan.
Stop and relaunch the application.
Revisit the Swagger UI — http://localhost:8080/swagger-ui.html
The difference is in how the model is reported.
Earlier |
Now |
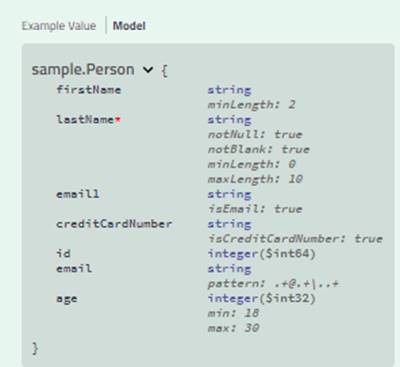
Also note that if you are trying the application/XML parameter content type, now there is no need to adjust manually the <Person> tag to <person>. These are some of the additional benefits offered by above spring-swagger-simplified maven jar.
Note: Instead of this approach you can get similar benefits also by using springfox-bean-validators dependency instead of spring-swagger-simplified.
However lets explore spring-swagger-simplified a little more.
In PersonController lets add one more method.
@RequestMapping(path = "/personByLastName", method = RequestMethod.GET)
public Collection<Person> findByLastName(@NotNull
@NotBlank
@Size(max = 10)String lastName){
List<Person> hardCoded= new ArrayList<>();
Person person= new Person();
person.setAge(20);
person.setCreditCardNumber("4111111111111111");
person.setEmail("[email protected]");
person.setEmail1("[email protected]");
person.setFirstName("Somefirstname");
person.setLastName(lastName);
person.setId(1);
hardCoded.add(person);
return hardCoded;
}
The swagger documentation corresponding to this method will now look like this.
| 👁 Image |
|
With spring-swagger-simplified
|
Without spring-swagger-simplified |
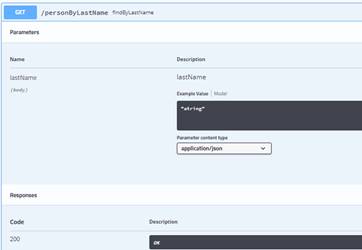
Even parameters show the constraints- see the green text and some of the other differences – eg body vs query- query being definitely the correct representation in this method. Adding springfox-bean-validators does cause the *required and that’s all it offers in this scenario. Using spring-swagger-simplified causes overall better documentation in this scenario.
This was only a brief introduction to the capabilities of this jar. For a more complete understanding of the various features, please try out this more detailed example project with many more fetaures — https://bitbucket.org/tek-nik/simplified-swagger-examples/.
Please also refer to https://dzone.com/articles/doing-more-with-swaggger-and-spring where we discuss global exception handling amongst other details as part II of this article.
Troubleshooting Tips
- Ensure prerequisites
- If using the Eclipse IDE, we might need to do a Maven update on the project after creating all the files.
- In the SampleApplication main class, make sure you have the correct package name in
@ComponentScan. Avoid typos in the package name there. - In the Swagger UI, if you are unable to access the “Model” definitions link, it might be because you need to come out of the “try it out “ mode. Click on one or two Cancel buttons that might be visible.
Opinions expressed by DZone contributors are their own.
Related
-
Building a CRUD Application With Spring and SimpleJdbcMapper
-
How to Marry MDC With Spring Integration
-
How Spring and Hibernate Simplify Web and Database Management
-
Functional Endpoints: Alternative to Controllers in WebFlux