 |
VOOZH | about |
|
VOOZH | about |
If you have a WordPress site, it’s important that you have enough memory allocated to run the software smoothly. Depending on your site’s size and complexity, you may need to increase it. However, before you do, you’ll need to determine your current memory limit.
In this guide, we’ll show you how to check your current WordPress memory limit and how to increase it if necessary, as well as answer some of the most frequently asked questions about WordPress memory limits.
The WordPress PHP memory limit is the maximum amount of memory that a PHP script can use. If a WordPress site exceeds its PHP memory limit, it will likely experience errors. These errors can include the “white screen of death,” slow page loading, and database connection issues.
Often, the error will appear as follows:
“Fatal error: Allowed memory size of XXXXXXX bytes exhausted (tried to allocate YYYYYYY bytes) in /path/to/file.php on line ZZZ.”
You’ll come across this error when trying to install WordPress plugins or themes, run updates, or perform some other action on your site.
There are a few ways to check your WordPress memory limit:
Let’s review each of these options in more detail.
The fastest way is with the built-in Site Health tool:
With that said, here are other methods to check your WordPress memory limit:
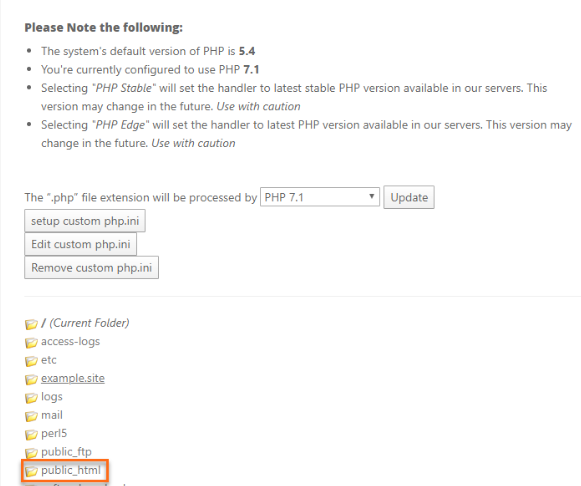
The first place to check your WordPress memory limit is in your hosting account. Many hosts will list the current PHP memory limit in the account control panel. In cPanel, this is located under the Software section. Click PHP Selector, then navigate to the document root of the directory you’d like to work with. You’ll likely see information as follows and this will tell you which PHP version your site is currently using:
Then, go to Options and scroll down until you see the line that reads memory_limit. Your site’s current settings should be visible here.
The second place you can check your WordPress memory limit is in the wp-config.php file. This file is located in the root directory of your WordPress site. To access it, you’ll need to connect to your site using an FTP client like Filezilla or through the File Manager in cPanel. Once you’re connected, open the wp-config.php file in a text editor like Notepad++.
Next, search for the following line of code:
define('WP_MEMORY_LIMIT', '256M');This line of code defines the maximum amount of memory that can be used by WordPress. The number following WP_MEMORY_LIMIT represents the maximum memory limit in megabytes. In this example, it’s set to 256MB.
If this line is not present in your wp-config.php file, you can add it to the end of the file. Be sure to save your changes before exiting.
If you’re not sure where to find your WordPress memory limit or you’re unable to access your hosting account or wp-config.php file, you can always contact your WordPress host and ask them what the current PHP memory limit is for your site. To do this, you’ll typically need to open a support ticket with your host or send them an email.
If you want an easy way to check your WordPress memory limit (and other site details), you can use the WordPress built-in Site Health tool, which gives you an overview of your site’s health, including the current PHP memory limit.
This module will show you the current memory limit for your WordPress site. To access it, go to Tools → Site Health in your WordPress dashboard and click on the Info tab. Expand Media Handling and, under Server, look for the PHP memory limit.
Another option is to use a plugin to get access to this information. Here are two that are up for the task:
If you need to increase your WordPress memory limit, here’s the optimal process to follow:
In some cases, you may also need to take the following additional steps:
Let’s review each of these in more detail.
Before you make any changes to your WordPress site, it’s important to back up your data first. This will ensure that you have a copy of your site that you can revert back to if something goes wrong. There are a few different ways to back up your WordPress site:
Jetpack provides the simplest method of backing up your WordPress site. You can download a copy in just a few clicks without having to deal with accessing your server. And if something goes wrong while increasing your memory limit, you can restore that backup even if your website is completely down. The best part? In the future, you’ll be protected with automated, real-time backups that save your site every single time a change occurs.
Learn more about how to back up your WordPress site with Jetpack.
If you want to increase your WordPress memory limit, the first place to start is with your wp-config.php file. This file is located in the root directory of your WordPress site. You can navigate here using an FTP client or through the File Manager in cPanel as previously mentioned.
To edit your wp_memory_limit, simply download the file and open it in a text editor. Then look for the line that says:
define('WP_MEMORY_LIMIT', '64M');Replace the memory limit with a higher number. For example, if you wanted to increase your memory limit to 256M, you would use:
define('WP_MEMORY_LIMIT', '256M');Save your changes. Upload the file back to your server. Your site’s memory limit should now be increased.
If you’re unable to edit the wp_memory_limit in your wp-config.php file, or if you want to increase the memory limit for more than just WordPress, you can edit the memory_limit setting in your PHP.ini file.
The PHP.ini file is located in the root directory of your WordPress site, but if your hosting provider uses cpanel, you can easily change the memory limit from that dashboard.
Navigate to cpanel, and find the MultiPHP INI Editor in the Software section. From the dropdown that appears, select your website. Look for “memory_limit” and change it to whatever number you’d like. Save your changes. Your memory limit should now be increased.
If you’re still unable to increase your WordPress memory limit using the previous methods, you can try adding the following line of code to your .htaccess file:
php_value memory_limit 256MThe .htaccess file is located in the root directory of your WordPress site. If you don’t see this file, make sure that you’ve enabled hidden files in your FTP client.
You can do this by going to the Server or Connection settings in your FTP client and checking the box that says Show hidden files. You can do this in cPanel as well by going to File Manager, clicking Settings in the top right corner then checking the box that reads Show Hidden Files (dotfiles).
Explore the benefits of Jetpack
Learn how Jetpack can help you protect, speed up, and grow your WordPress site. Get up to 50% off your first year.
Explore plansIf you’ve tried all of the above and you’re still unable to increase your WordPress memory limit, your last resort is to contact your hosting provider. You may need to upgrade your hosting plan to accomplish this, especially if you’ve used up your resources.
Your host should be able to help you increase your memory limit and point you in the right direction if you need to upgrade your hosting plan to something more robust, like a managed WordPress hosting plan, or even a VPS or dedicated server.
| Method | Best For | Pros | Cons |
| wp-config.php | Most WordPress sites; users without server access. | Easy, safe, specific to WordPress . | Can be overridden by server-level settings. |
| php.ini | Users with VPS or dedicated hosting; server-wide changes. | Most powerful method; affects all PHP scripts. | Not available on most shared hosting plans. |
| .htaccess | An alternative if wp-config.php fails on some hosts. | Simple to implement. | Less common; can cause server errors if syntax is wrong. |
| Hosting Support | Beginners; users on locked-down hosts. | Easiest and safest option. | May require a plan upgrade; not instant. |
If you’ve increased the memory limit and still face errors, the issue may not be the limit itself, but a plugin or theme consuming too much memory.
How to find the culprit:
Deactivate all plugins: If the error disappears, reactivate them one by one until the error returns. The last plugin you activated is the problem.
Use a diagnostic plugin: A plugin like Query Monitor can help you identify which plugins or processes are making high memory requests.
Switch to a default theme: Temporarily switch to a default WordPress theme (like Twenty Twenty-Three). If the error is resolved, your theme is the issue.
Here are some answers to common questions people have about the WordPress memory limit:
There are a few reasons why you might need to increase your memory limit on WordPress:
The general rule of thumb is that you should have at least 64MB of memory allocated for WordPress. However, this can vary depending on the size and complexity of your site. If you’re not sure how much memory your site needs, you can start with 64MB and increase it as needed.
There are a few signs that you may need to increase your WordPress memory limit:
If you don’t increase your WordPress memory limit, you may see errors on your site, or your site may load slowly. In some cases, it may even crash.
Generally speaking, no. However, if you allocate too much memory to WordPress, it can cause your server to slow down and impact your site speed.
If you try to allocate more memory to WordPress than your server has, you’ll see an error message saying “Fatal error: Allowed memory size of xxxxxxx bytes exhausted.” This means that you need to increase the amount of memory your server has, or reduce the amount of memory WordPress is trying to use.
The maximum memory limit for WordPress is 512MB. However, depending on your server and WordPress settings, you may not be able to allocate this much memory to WordPress.
The wp_memory_limit setting defines the maximum amount of memory that can be used by WordPress. The wp_max_memory_limit setting defines the maximum amount of memory that can be used by WordPress and any plugins or themes. If you’re having errors with a plugin or theme, you may need to increase the wp_max_memory_limit setting.
If you’ve tried all of the above and you’re still having problems, your best bet is to contact your hosting provider and ask them for help. They’ll be able to take a look at your server and WordPress settings and help you figure out what’s going on.
Learning things like how to increase your WordPress memory limit is an exciting part of expanding your skills as a site owner. We hope you’ve found this post helpful. If you’re still seeing errors or slow performance, we recommend contacting your hosting provider for help.
Rob works on building tools for creators and their audiences. He's focused on building an open, calm platform that will be loved by bloggers, newsletter publishers, podcasters, and readers alike. He's worked on marketing and product for 15 years, primarily at Automattic, Mailchimp, and UPS.
Explore the benefits of Jetpack
Learn how Jetpack can help you protect, speed up, and grow your WordPress site. Get up to 50% off your first year.
Explore plansHave a question?
Comments are closed for this article, but we're still here to help! Visit the support forum and we'll be happy to answer any questions.
View support forum