
After setting up the membership plugin and creating a few membership levels, you may want to begin applying content protection to your site. This ensures that only members with the appropriate access level can view your premium content. Non-members (or members without the required access level) will see a protection message in place of the actual content.
Table of Contents
- Applying Content Protection
- Example Protection Message
- Testing Content Protection
- Setting a Default Protection Template for New Posts and Pages
- Apply Post and Page Protection in Bulk
- Section or Partial Protection
- Full Page Style Protection
- Site-wide Full Page Protection
- Custom Post Type Posts
- Customizing the Default Protection Message
Applying Content Protection
Applying content protection with Simple Membership plugin is pretty easy. Use the following steps:
- Edit the Post or Page that you want to protect in WordPress editor.
- Scroll down to the section titled Simple WP Membership Protection.
- Select Yes, Protect this content option.
- Check the membership levels that should have access to that post/page’s content.
- Hit the Update/Save/Publish button to save the changes.
Note: When you protect a post/page using simple membership, ONLY users logged into the simple membership plugin will be able to view the actual content of that page. Everyone else will see a message telling them that the content is protected. This is the behavior most of our users want from this plugin.
A small number of our users occasionally want the WordPress admin user to be able to view protected posts or pages from the front-end. To achieve this, you’ll need to import the WordPress user into Simple Membership and assign them a membership level. The admin user can then view content based on the permissions of that membership level.
Example Protection Message
Once you apply content protection to a page, post, or category, the Simple Membership plugin automatically replaces the protected content with a short message for any visitor who doesn’t have the required membership level.
Here’s an example of what a typical protection message looks like on the front-end:
You can customize this protection message in two ways:
- Use the free Custom Messages addon to edit it from the WordPress admin interface.
- Modify the translation file to customize this and any other text shown by the plugin.
Testing Content Protection
Do the following to test and see how the content protection works:
- Create a test post/page on your site with some sample text.
- Apply content protection to this post/page.
- Create a test member account for yourself (assign a membership level that will have access to the content).
- Open a different browser window where you are not logged-in as admin. (Or use a different computer).
- Go to this test page in this new browser (it should show a protected message).
- Log in using the newly created test member account (via the membership login page).
- The test page’s content should now be visible to you.
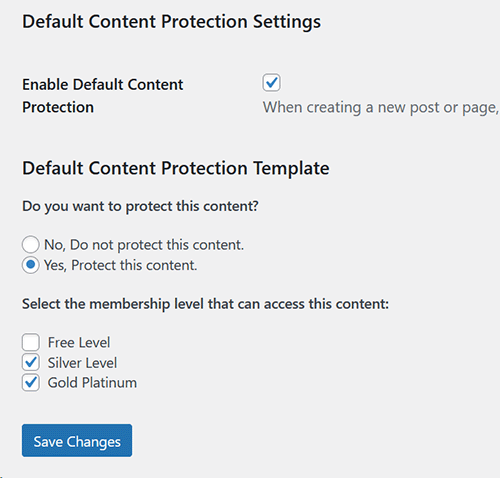
Setting a Default Protection Template for New Posts and Pages
You can configure a default content protection template that will automatically apply to new posts and pages. When enabled, the content protection settings for each new post or page will be pre-filled with the values from this template.
This is particularly useful if you frequently create posts or pages with the same protection settings, as it helps streamline your workflow and save time.
To enable and configure this feature:
- Go to Simple Membership → Membership Level → Manage Content Protection.
- Scroll down to the section labeled “Default Content Protection Settings”.
- Set your desired protection options and click Save.
Refer to the screenshot below for guidance.
Apply Post and Page Protection in Bulk
Read this documentation to learn how to use the bulk protection for your posts and pages.
Section or Partial Protection
If you want to apply partial protection then check this free addon. The partial protection lets you protect some parts of your posts and pages.
Full Page Style Protection
If you want to hide the full page of a protected post or page then check this free addon. This is useful if you don’t want the visitors to see any portion of your restricted posts or pages.
Site-wide Full Page Protection
Refer to the Site-wide Full Page Protection section of the free Full Page Protection addon documentation to learn how to enable this feature.
Custom Post Type Posts
If you are using a plugin that uses custom post type posts and you want to apply protection to those custom posts, then check this free addon.
Customizing the Default Protection Message
If you want to customize the default protection message displayed by the plugin, you can use this option.