 |
VOOZH | about |
|
VOOZH | about |
| Other languages Deutsch; ; Español ; français ; Nederlands ; Türkçe ; |
Your Mageia distribution will give you great satisfaction on the condition you choose with care the extra software you decide to add to it. That means:
Mageia has tools that will help you with the first aspect and fully take care of the other three aspects for you. We strongly recommend that you use them. These tools are:
You can find them in the Mageia Control Center:
If you are running KDE: open Menu button -> Tools -> System Tools -> Configure your computer
If you are running GNOME: open System -> Administration -> Configure your computer
These are graphical tools. If you prefer the command-line, you can have a look at the URPMI page.
The first thing to do after an install is to add software sources (a.k.a. repositories, media, mirrors). That means you must select the media sources that will be used to install and update packages and applications.
| Note: Take care to choose repositories applicable to your system's architecture. For example, 32-bit (called i586), 64-bit (called x86_64) or noarch (architecture-independent) |
This is a wise choice if you are not an expert because the sources are safe, automatically match your distribution (release, architecture, ...) and provide tested software.
Mageia official repositories for final release versions contain at least:
core repositories which contains the free-open-source packages, i.e. software licensed under a free-open-source license.nonfree repositories which contains some programs which are not free, or closed source. For example, this repository includes nVidia and ATI graphics card proprietary drivers and firmware for various WiFi cards etc.tainted repositories includes packages released under a free license. However, they may infringe patents and copyright laws in some countries, e.g. multimedia codecs needed to play various audio/video files; packages needed to play commercial video DVD's, etc.Each media has 4 sub-media:
release the packages as of the release day.updates the packages updated since the release day for security or bug concerns. Everyone should have this medium, even with a very slow internet connection.backports some new versions of packages backported from Cauldron.testing which is used for temporary tests of new updates, to allow the bug reporters and the QA team to validate the corrections.It is the easiest way since the system will automatically choose the media sources that seem the best for you (depending on your geographical location, bandwidth, ...).
In the Mageia Control Center, click on Software management (on the left) and on Configure media sources for install and update
In the newly opened window you will probably see one or two entries corresponding to the CD or DVD you used for the installation (even if you had put the CD or DVD on a USB-stick). You could leave them enabled, but then you would be required to load the CD/DVD each time the system needs to install software contained on that media, which can be very annoying. If you have a good internet connection, it is better to only use the official online repositories. In that case: select all the entries that refer to a CD/DVD and click on Remove.
To install the official online repositories, click on Add.
You will then be asked for permission to retrieve the mirror list. Answer Yes to proceed.
After a while (depending on your bandwidth), you will see the available media list.
Note that using the automatic way, the column "Type" says "Mirror list"
Using this list, you can activate/deactivate media by ticking the box in the Enabled column. By default, only the more tested media are enabled (for example, Testing is not enabled).
Similarly, updates are possible from the media with the Update column ticked. For security reasons, these boxes are locked. To change them, you need to use the console and type:
| # drakrpm-edit-media --expert |
| Note: The system looks for the requested rpm in the different media in the same order as they occur in the list, and installs the first result that is found. Use the arrows at the right to change this order |
You can choose alternative media sources if you encounter problems (slowness, disconnections, ...) with the automatically configured media sources.
In the Mageia Control Center, click on Software management (on the left) and on Configure media sources for install and update
In the newly opened window, select all the media (using the Shift key) and click on Remove.
Click on Yes to accept their removal.
In the menu, click on File > Add a specific media mirror.
You will then be asked for permission to retrieve the mirror list. Answer Yes to proceed.
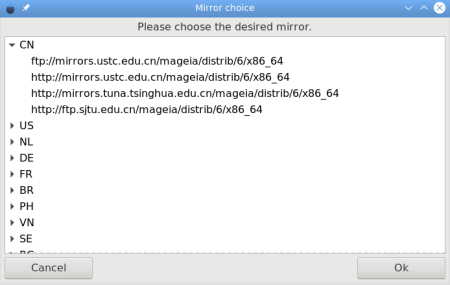
A new window will then appear with a list of countries. Select yours (or one very close to it) with a click on the little arrow.
Then, all the available media sources for that country are displayed. Click on the one you want, and then on OK.
Downloading in progress:
After a while (depending on your bandwidth), you will see the available media list.
Note that the column "Type" now says "HTTP", compared to the "Mirror list" in the automatic way
Using this list, you can activate/deactivate media by ticking the box in the Enabled column. By default, only the more tested media are enabled (for example, Testing is not enabled).
Similarly, updates are possible from the media with the Update column ticked. For security reasons, these boxes are locked. To change them, you need to use the console and type:
| # drakrpm-edit-media --expert |
| Note: The system looks for the requested rpm in the different media in the same order as they occur in the list, and installs the first result that is found. Use the arrows at the right to change this order |
| 👁 Dragon-head.png |
Here be dragons! It is possible to install several media sources, for example in case the first one fails. If you do that, be smart and choose sources that do not sync from the same mirror. |
For more information, see this page
This section and the following one deals with how to declare an ISO file on the local HDD or LAN as a media. This is very useful for those with limited bandwidth or an unreliable internet connection, as well as being faster than any internet download. It also avoids problems often encountered when reading a physical device such as a DVD or USB key.
The first step is to create a folder that will be used to mount the loop device, this can be done in a terminal as root.
| # mkdir -p /pinst/rpms/dvd4 |
The second step is to define a loop device in the /etc/fstab file.
This requires editing the file with root (Administrator) privileges.
| Note: For security reasons, it is not recommended to run a text editor in GUI mode as root. Please use terminal editors like nano or vim.
|
There are a few ways to achieve this:
/etc/fstab with your favorite text editor./etc/fstab with your favorite text editor.su -c '<name-of-your-favourite-text-editor> /etc/fstab'
/etc/fstab is loaded in your text editor, you have to (very carefully) add the following line:| {absolute-path-to-iso} {absolute-path-to-mount-point} iso9660 loop |
/ partition, such as /home. That way, if you reformat / (as in a fresh Mageia installation), you won't lose the ISO././etc/fstab, I have the lines:| # iso's /pinst/isos/mga4/Mageia-4.1-x86_64-DVD.iso /pinst/rpms/dvd4 iso9660 loop |
| # mount /pinst/rpms/dvd4 |
mount will find the other parameters from /etc/fstab.
The final step is setting up local sources from the ISO, shown in the next section.
In the Mageia Control Center, click on Software management (on the left) and on Configure media sources for install and update.
Select File -> add a custom medium.
Once the parameters are defined, click Ok.
Now you should verify the order of the sources configured.
The first package found with a given name found is preferred over those found later, and the sources are scanned from top to bottom.
By default, local sources are near the top, followed by ISO sources, followed by online sources.
So you should make sure the sources are in the order that you want.
Change the order of the sources by pressing the up and down arrows to the right.
Generally, if you have configured sources in loop device, they should be with the ISO sources automatically added. Also, make sure that any corresponding ISO sources are disabled, otherwise you will still be prompted to insert them.
There are exceptions to these general rules.
For instance, if you add a third party source, whether from an ISO (loop device), local folder, or remote repository (see next section), you will probably want to give higher priority to packages from Mageia sources, and thus put the third party sources at the bottom.
When finished, click OK to exit.
You may come across third-party package repositories for Mageia Linux. These may carry newer versions of applications than are available in the official repositories, or applications that are not available in the official repositories at all.
In general, we advise that you use the official repositories whenever possible, but if you truly need an application or version that is not available from the official repositories, using a third-party repository is a safer option than using a package for a different distribution, or installing from source code.
Mageia cannot provide any support for packages provided by third parties: if you encounter problems while using such packages, please request support from the third-party provider. We strongly recommend that you first check whether an application is available in the official repositories and if it is, use that package, even if it is not the absolute latest version of the application. Having the latest (perhaps broken) version is not as important as having a package that works.
In the Mageia Control Center, click on Software management (on the left) and on Configure media sources for install and update. Click on File -> Add a medium, and a windows pops up where you can provide information about:
Examples with other repositories:
https://ftp.blogdrake.org (Mageia 9, i586 & x86_64)
For this repository, add by example, /mageia/mageia9/i586 to the above URL and check the box Create media for a whole distribution:, the URL looks like:
https://ftp.blogdrake.org/mageia/mageia9/i586
https://repository.mageialinux-online.org (Mageia 8 and 9)
For this repository, add /9/x86_64 to the URL above and check the box Create media for a whole distribution:, the URL looks like this:
https://repository.mageialinux-online.org/9/x86_64
You can also add the MLO package repositories to your list of repositories via the Mageia Control Center (MCC). However: you cannot activate the MLO Update media directly in MCC. These checkboxes are grayed out and cannot be checked.
To check the Update boxes, you first need to log in to MCC as root as an "expert". You can do this with the following command in the text console:
su -c "drakrpm-edit-media --expert"
MCC will now open in graphical expert mode. You can now check the Update boxes with your mouse, in the column next to the names of the MLO package repositories. It is sufficient to check only the three update checkboxes for MLO_core, MLO_nonfree and MLO_tainted. You will now receive updates of the MLO packages that you have installed on your PC.
On Mageia Linux Online (MLO) you will find, among other things, the Mageia version of the privacy-safe chat app Signal Desktop. After you have added the MOL package repository to your media, you can install Signal Desktop from the Mageia Control Center (MCC), or via the text console using the command URPMI.
Now all you need to do is link Signal Desktop on your Linux PC to the Signal app on your Android phone or iPhone. You can do this in the phone app: Settings -> Linked Devices.
This tool is very simple. When you click on 👁 MageiaUpdate.png
it searches for available updates and lists any that are found. You then have the option to accept or reject any of these. When you are ready, click on Update and all the packages in the list that are 'checked' will be updated.
However, your system will periodically search for updates automatically, and will display an update notification icon in the taskbar if any updates are available.
This tool, known as Drakrpm (or rpmdrake) is a program for installing, uninstalling and updating packages. It is the graphical user-interface of URPMI.
At each start up, it will check online package lists (called 'media') downloaded straight from Mageia's official servers, and will show you the latest applications and packages available for your computer.
You can filter the results to show installed applications only (default), available updates only, or only packages that are not installed. You can also search by the name of a package. Additionally, you can view summary or full descriptions of packages and the file names included in the packages.
Legend of the Status column:
Applying the filters, you can find your software either by category (in the area 6 above) or by name/summary/description... (using area 4). A list of packages corresponding to your query (and the chosen medium), is shown with their status - installed/not installed/an update... To change this status, just tick or untick the box to the left of the package name and click on Apply.
Examples in the screenshot above:
urpme --auto-orphans