 |
VOOZH | about |
|
VOOZH | about |
Microsoft Excel is the gold standard in data analysis tools. There’s no question about it – industry experts, professionals and veterans still lean heavily on Excel’s prowess and Swiss Army Knife nature to slice and dice their data.
I still remember my initial days learning Excel – I was mesmerized by the incredible array of formulas and functions Excel offered. This remains unparalleled in the industry. No matter what task you’re working on, data manipulation, exploration, visualization, etc., Microsoft Excel seemingly has a solution for everything!
Excel provides tons of applications and functionalities that we can use according to our own use case. But it can become overwhelming at times, especially if you’re new to the tool. Let me help you out! In this article, we will be discussing some crucial Excel tricks that will make you an efficient analyst, regardless of the domain you’re coming from.
And if you want to learn more about Excel formulas and functions, you should check out the free course that covers a plethora of functions, including VLookUp!
Have you been in a situation where you want to print multiple pages in an Excel sheet? Then you must be familiar with this caveat – when you scroll beyond the first page, you’ll notice that the column headers are missing. This leads to flipping through pages continuously creating constant confusion.
In this handy Excel trick, I will take you step-by-step through the process or you can check out this video:
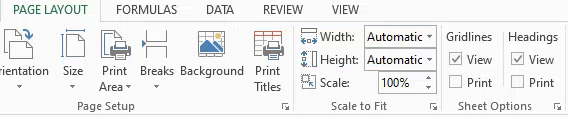
In the Home tab on the ribbon, click on Page Layout:
Locate Print Titles and then click on it. Print titles will help you select rows and columns that you want to select as titles to print them on all printed pages:
On clicking the “Page Title“, a “page setup” box will open up. This setup has a lot of options that you may tweak to explore:
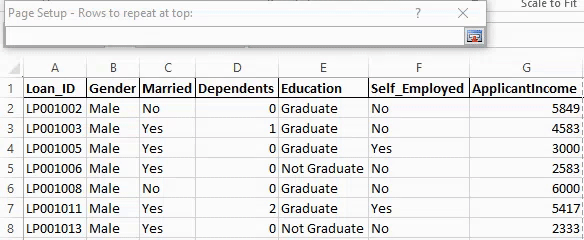
You’ll see a “Rows to repeat at top” field. Click the button in front of it and then select the row you want as the column header:
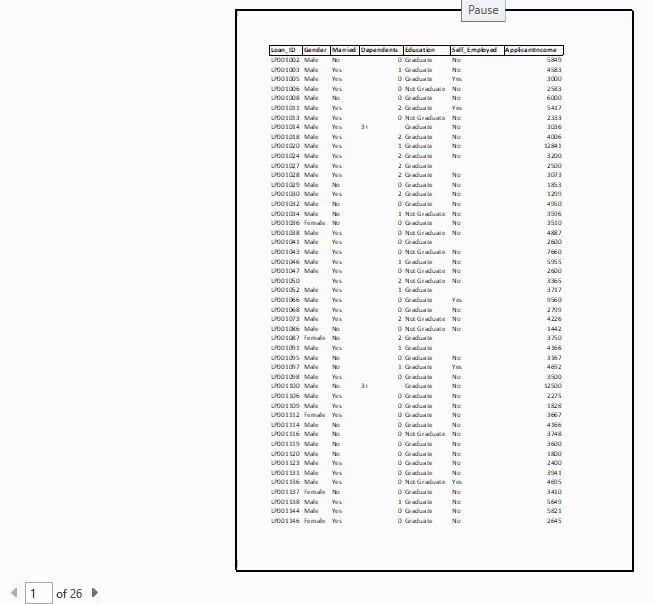
Finally, Go to Print or press “CTRL + P” and when you scroll to the second page, you’ll notice that you have the column headers!
Flash Fill is a lifesaver when you are working on a large dataset, especially when you need to fill data that is already present in other columns!
Flash Fill automatically fills the data in your column when it senses a pattern.
Follow the video below or refer to the steps after that:
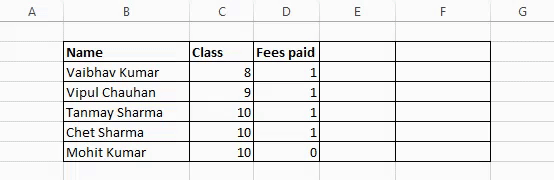
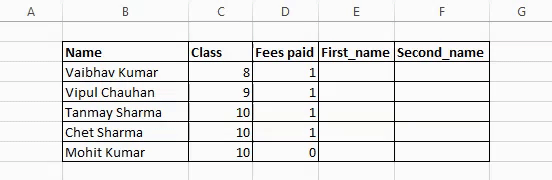
Here, we have 3 columns: Names, class, and Fees paid. Now, we want to add 2 more columns for first name and last name. We can manually input the data or split the Names columns but we will go with a much better option – Flash Fill.
Note: Flash fill is available in Excel 2013 or later versions.
Enter the new columns – First_name, Second_name which will contain the first name and the last name of each student respectively.
In First_name, enter the name in the first cell:
As you type the text in the next cell of First_name, flash fill automatically detects a pattern and presents you a preview. Just press Enter and voila, you have all the cells of the column filled up!
We will repeat the same steps for the Second_name and automatically fill its content:
Finally, our data looks like this:
As seen in this example, Flash Fill works wonderfully when you need to input the data you already have. Do try this hack for yourself as it is a big time-saver!
The world of data is expanding at an exponential rate. It is practically impossible to understand the nature of our data in one glance. As I said earlier, Excel is a wonderful data analysis tool and it provides plenty of options to choose from.
One such option is the famous heatmap. It is particularly useful when you want to create a quick comparative view of the data in visual form. This saves you from scrolling and crunching numbers in your mind, thus leading to confusion.
You can choose from ample colour scale options provided by Excel to suit your requirements.
Let us get down to action and see how can we create a heatmap in Excel!
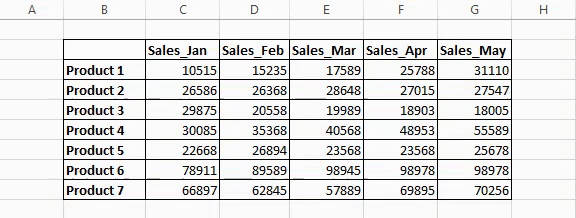
Here’s a sample data of a company containing monthly sales numbers of 7 unique products. Are you able to make sense out of it in the first glance?
I know many of you didn’t even try as this a daunting task! So let us see how to make a heatmap in Excel and quickly unearth insights from this kind of data.
You can either watch the below video or follow the steps I have mentioned after this:
Select the data for which you want to visualize the heatmap:
In the ribbon, go to Home -> Conditional Formatting:
Once you get into the conditional formatting dropdown, hover on Colour Scales. Here, you will see a bunch of different colour scales spanning from red to green to blue.
To get a preview of the different heatmaps, you can take your mouse and hover over the different colour scales. Select the option you find most suitable for your use case:
The final step is to visually understand the data and form your logic. In this case, I chose a Green – Yellow – Red colour scale. The green coloured cells show good performance of a product in terms of sales and red coloured cells show poor sales performance of the product.
Heatmap is a great way to visualize your data according to conditions. Another great thing about these heatmaps is that they are dynamic. Even if you change the data for any cell value, the whole heatmap will change and adapt itself to the change in the order of value.
In this article, we covered 3 classic Excel tricks to become an efficient analyst. I hope these tricks will help you with day-to-day niche tasks and save you a lot of time.
You can also check out and enroll in the free Excel Formulas and Functions course to enhance your learning and take a big step towards becoming a better analyst, regardless of your domain.
Let me know your Excel hacks, tips, and tricks in the comments section below!
Product Growth Analyst at Analytics Vidhya. I'm always curious to deep dive into data, process it, polish it so as to create value. My interest lies in the field of marketing analytics.
GPT-4 vs. Llama 3.1 – Which Model is Better?
Llama-3.1-Storm-8B: The 8B LLM Powerhouse Surpa...
A Comprehensive Guide to Building Agentic RAG S...
Top 10 Machine Learning Algorithms in 2026
45 Questions to Test a Data Scientist on Basics...
90+ Python Interview Questions and Answers (202...
8 Easy Ways to Access ChatGPT for Free
Prompt Engineering: Definition, Examples, Tips ...
What is LangChain?
What is Retrieval-Augmented Generation (RAG)?
It's good to know a few new tricks in excel. Your videos are small and easy to understand, that's a great point. Keep up the momentum man.
I sincerely appreciate this videos. I'll appreciate other offers that can be useful for business intelligence. Thank you.
Edit
Resend OTP
Resend OTP in 45s