 |
VOOZH | about |
|
VOOZH | about |
This article was published as a part of the Data Science Blogathon.
A graphical user interface (GUI) is the interface that gives flexibility for user interaction. It fascinates me because of its interactivity. More engaging the application, the better it is when it comes to game development. The most common components of the GUI are the main window, button, text entry, labels, menu, and many more. The most common options for GUI development in Python are Tkinter, wxPython, and JPython. We will be discussing Tkinter in this article and create a tiny game and visualize the result.
Python provides a standard GUI library named Tkinter. Tkinter module helps in creating GUI applications in a fast and easy way. Tkinter provides 15 types of widgets. Some common ones are Button, Label, Frame, Menu. The message, Radiobutton, Text, Scrollbar, and so on. You can read more about it here and here.
In this article. we will create a small number game. The user will keep on getting numerical questions. They will answer them and click enter to go to the next question till they decide to exit and process the result. Correct and incorrect answers will be captured to display the result at the end. We will use widgets like Label, End, Entry, Text, Button. Let’s get started with implementation without further ado.
It’s usually a good idea to keep all imports separately. At least, I like it that way!
import tkinter
import random
from random import randint
from tkinter import Button
import matplotlib.pyplot as plt
import numpy as np
We will create the interface layout. Decide on layout size and an attractive caption
root = tkinter.Tk()
root.title("Are you smart!!")
root.geometry("400x200")
correct_result=0
correct_answers=0
total_questions=0
incorrect_answer=0
We will create small definitions to accomplish tasks that make code easy to maintain and neat to read
def evaluate(event):
 global correct_result
 global user_input
 user_input_given = user_input.get()
 if str(user_input_given) == str(correct_result):
 global correct_answers
 correct_answers += 1
 nextQuestion()
 else:
 global incorrect_answer
 incorrect_answer += 1
 result = tkinter.Label(root, text="Hard Luck!!nThe correct answer is : "+str(correct_result), font=('Helvetica', 10))
 result.pack()
 nextQuestion()
 root.after(1500, result.destroy)
We will use random to create random integer and random choice for ‘+’, ‘-‘ and ‘*’ operator so that users can get random sets of numerical questions to answer
def nextQuestion():
 user_input.focus_set()
 user_input.delete(0, tkinter.END)
 global first_num
 first_num = randint(1,15)
 global second_num
 second_num = randint(1,15)
 global character
 character = random.choice("+-*")
 global correct_result
 if character == '*':
 correct_result = first_num*second_num
 if character == '+':
 correct_result = first_num+second_num
 if character == '-':
 correct_result = first_num-second_num
 text="Enter the value of "+str(first_num)+" "+character+" "+str(second_num)
 global total_questions
 total_questions += 1
 user_question.config(text=text)
 user_question.pack()
We will create a tiny function to exit and interface and record the results
def exitThis():
 print("Total Questions attended : "+str(total_questions))
 print("Total Correct Answers : "+str(correct_answers))
 print("Total Incorrect Answers : "+str(incorrect_answer))
 root.destroy()
We will create an initial set of question-based on random integer and a random set of numerical operator
first_num = randint(1,15)
second_num = randint(1,15)
character = random.choice("+-*")
if character == '*':
 correct_result = first_num*second_num
if character == '+':
 correct_result = first_num+second_num
if character == '-':
 correct_result = first_num-second_num
We will create the text and layout of the interface
user_question = tkinter.Label(root, text="Enter the value of "+str(first_num)+" "+character+" "+str(second_num), font=('Helvetica', 10))
user_question.pack()
user_input = tkinter.Entry(root)
root.bind('<Return>',evaluate)
user_input.pack()
user_input.focus_set()
exitButton = Button(root, text="EXIT and Check Result", command=exitThis)
exitButton.pack(side="top", expand=True, padx=4, pady=4)
root.mainloop()
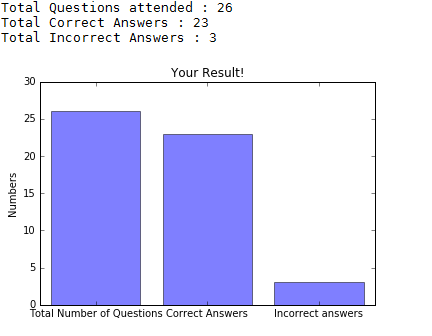
We will use a bar and pie chart to show the result to users after they decide to exit the game
#Plotting the bar graph
plt.figure(0)
objects = ('Total Number of Questions','Correct Answers','Incorrect answers')
y_pos = np.arange(len(objects))
stats = [total_questions,correct_answers,incorrect_answer]
plt.bar(y_pos, stats, align='center', alpha=0.5)
plt.xticks(y_pos, objects)
plt.ylabel('Numbers')
plt.title('Your Result!')
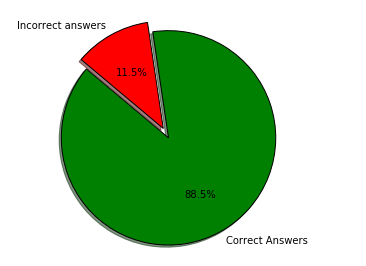
#Plotting the pie chart
if str(total_questions) != "0":
plt.figure(1)
labels = 'Correct Answers','Incorrect answers'
sizes = [correct_answers,incorrect_answer]
colors = ['green', 'red']
explode = (0.1, 0) # explode 1st slice
plt.pie(sizes, explode=explode, labels=labels, colors=colors,
autopct='%1.1f%%', shadow=True, startangle=140)
plt.axis('equal')

#Show both the graphs
plt.show()
If you have come this far, you must have really been intrigued! So, here is how it looks finally
Do share your thoughts if this article was interesting or helped you in any way. Always open to improvements and suggestions. You can find the code on Github
The media shown in this article are not owned by Analytics Vidhya and is used at the Author’s discretion.
GPT-4 vs. Llama 3.1 – Which Model is Better?
Llama-3.1-Storm-8B: The 8B LLM Powerhouse Surpa...
A Comprehensive Guide to Building Agentic RAG S...
Top 10 Machine Learning Algorithms in 2026
45 Questions to Test a Data Scientist on Basics...
90+ Python Interview Questions and Answers (202...
8 Easy Ways to Access ChatGPT for Free
Prompt Engineering: Definition, Examples, Tips ...
What is LangChain?
What is Retrieval-Augmented Generation (RAG)?
Edit
Resend OTP
Resend OTP in 45s