
eBook – Guide Spring Cloud – NPI EA (cat=Spring Cloud)
eBook – Mockito – NPI EA (tag = Mockito)
👁 announcement - icon
Mocking is an essential part of unit testing, and the Mockito library makes it easy to write clean and intuitive unit tests for your Java code.
Get started with mocking and improve your application tests using our Mockito guide:
eBook – Java Concurrency – NPI EA (cat=Java Concurrency)
👁 announcement - icon
Handling concurrency in an application can be a tricky process with many potential pitfalls. A solid grasp of the fundamentals will go a long way to help minimize these issues.
Get started with understanding multi-threaded applications with our Java Concurrency guide:
eBook – Reactive – NPI EA (cat=Reactive)
👁 announcement - icon
Spring 5 added support for reactive programming with the Spring WebFlux module, which has been improved upon ever since. Get started with the Reactor project basics and reactive programming in Spring Boot:
eBook – Java Streams – NPI EA (cat=Java Streams)
👁 announcement - icon
Since its introduction in Java 8, the Stream API has become a staple of Java development. The basic operations like iterating, filtering, mapping sequences of elements are deceptively simple to use.
But these can also be overused and fall into some common pitfalls.
To get a better understanding on how Streams work and how to combine them with other language features, check out our guide to Java Streams:
eBook – Jackson – NPI EA (cat=Jackson)
eBook – HTTP Client – NPI EA (cat=Http Client-Side)
eBook – Maven – NPI EA (cat = Maven)
eBook – Persistence – NPI EA (cat=Persistence)
eBook – RwS – NPI EA (cat=Spring MVC)
Course – LS – NPI EA (cat=Jackson)
👁 announcement - icon
Get started with Spring and Spring Boot, through the Learn Spring course:
>> LEARN SPRINGCourse – RWSB – NPI EA (cat=REST)
👁 announcement - icon
Explore Spring Boot 3 and Spring 6 in-depth through building a full REST API with the framework:
Course – LSS – NPI EA (cat=Spring Security)
👁 announcement - icon
Yes, Spring Security can be complex, from the more advanced functionality within the Core to the deep OAuth support in the framework.
I built the security material as two full courses - Core and OAuth, to get practical with these more complex scenarios. We explore when and how to use each feature and code through it on the backing project.
You can explore the course here:
Course – LSD – NPI EA (tag=Spring Data JPA)
👁 announcement - icon
Spring Data JPA is a great way to handle the complexity of JPA with the powerful simplicity of Spring Boot.
Get started with Spring Data JPA through the guided reference course:
Partner – Moderne – NPI EA (cat=Spring Boot)
👁 announcement - icon
Refactor Java code safely — and automatically — with OpenRewrite.
Refactoring big codebases by hand is slow, risky, and easy to put off. That’s where OpenRewrite comes in. The open-source framework for large-scale, automated code transformations helps teams modernize safely and consistently.
Each month, the creators and maintainers of OpenRewrite at Moderne run live, hands-on training sessions — one for newcomers and one for experienced users. You’ll see how recipes work, how to apply them across projects, and how to modernize code with confidence.
Join the next session, bring your questions, and learn how to automate the kind of work that usually eats your sprint time.
Course – LJB – NPI EA (cat = Core Java)
1. Overview
In our last Spring Cloud article, we added Zipkin support into our application. In this article, we’re going to be adding a front-end application to our stack.
Up until now, we’ve been working entirely on the back end to build our cloud application. But what good is a web app if there’s no UI? In this article, we will solve that issue by integrating a single page application into our project.
We will be writing this app using Angular and Bootstrap. The style of Angular code feels a lot like coding a Spring app which is a natural crossover for a Spring developer! While the front end code will be using Angular, the content of this article can be easily extended to any front end framework with minimal effort.
In this article, we will be building an Angular app and connecting it to our cloud services. We will demonstrate how to integrate login between a SPA and Spring Security. We’ll also show how to access our application’s data using Angular’s support for HTTP communication.
2. Gateway Changes
With the front end in place, we’re going to switch to form based login and secure parts of UI to privileged users. This requires making changes to our gateway security configuration.
2.1. Update HttpSecurity
First, let’s update configure(HttpSecurity http) method in our gateway SecurityConfig.java class:
@Bean
public SecurityWebFilterChain filterChain(ServerHttpSecurity http) {
 http.formLogin()
 .authenticationSuccessHandler(
 new RedirectServerAuthenticationSuccessHandler("/home/browser/index.html"))
 .and().authorizeExchange()
 .pathMatchers("/book-service/**", "/rating-service/**", "/login*", "/").permitAll()
 .pathMatchers("/eureka/**").hasRole("ADMIN")
 .anyExchange().authenticated()
 .and().logout().and().csrf().disable()
 .httpBasic(withDefaults());
 return http.build();
}
First, we add a default success URL to point to /home/browser/index.html as this will be where our Angular app lives. Next, we configure the ant matchers to allow any request through the gateway except for the Eureka resources. This will delegate all security checks to back-end services.
Next, we removed the logout success URL, as the default redirect back to the login page will work fine.
2.2. Add a Principal Endpoint
Next, let’s add an endpoint to return the authenticated user. This will be used in our Angular app to log in and identify the roles our user has. This will help us control what actions they can do on our site.
In the gateway project, add an AuthenticationController class:
@RestController
public class AuthenticationController {

 @GetMapping("/me")
 public Principal getMyUser(Principal principal) {
 return principal;
 }
}
The controller returns the currently logged in user object to the caller. This gives us all the information we need to control our Angular app.
2.3. Add a Landing Page
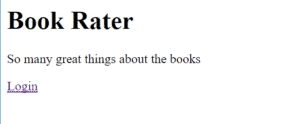
Let’s add a very simple landing page so that users see something when they go to the root of our application.
In src/main/resources/static, let’s add an index.html file with a link to the login page:
<!DOCTYPE html>
<html lang="en">
<head>
 <meta charset="UTF-8">
 <title>Book Rater Landing</title>
</head>
<body>
 <h1>Book Rater</h1>
 <p>So many great things about the books</p>
 <a href="/login">Login</a>
</body>
</html>
3. Angular CLI and the Starter Project
Before starting a new Angular project make sure to install the latest versions of Node.js and npm.
3.1. Install the Angular CLI
To begin, we will need to use npm to download and install the Angular command line interface. Open a terminal and run:
npm install -g @angular/cliThis will download and install the CLI globally.
3.2. Install a New Project
While still in the terminal, navigate to the gateway project and go into the gateway/src/main folder. Create a directory called “angular” and navigate to it. From here run:
ng new uiBe patient; the CLI’s setting up a brand new project and downloading all the JavaScript dependencies with npm. It’s not uncommon for this process to take many minutes.
The ng command’s the shortcut for the Angular CLI, the new parameter instructs that CLI to create a new project, and the ui command gives our project a name.
3.3. Run the Project
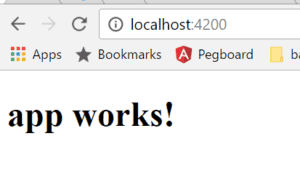
Once the new command’s complete. Navigate to the ui folder that was created and run:
ng serveOnce the project builds navigate to http://localhost:4200. We should see this in the browser:
👁 angular2 start 1
Congratulations! We just built an Angular app!
3.4. Install Bootstrap
Let’s use npm to install bootstrap. From the ui directory run this command:
npm install [email protected] --saveThis will download bootstrap into the node_modules folder.
In the ui directory, open the angular.json file. This is the file that configures some properties about our project. Find the projects > styles property and add a file location of our Bootstrap CSS class:
"styles": [
 "styles.css",
 "../node_modules/bootstrap/dist/css/bootstrap.min.css"
],
This will instruct Angular to include Bootstrap in the compiled CSS file that’s built with the project.
3.5. Set the Build Output Directory
Next, we need to tell Angular where to put the build files so that our spring boot app can serve them. Spring Boot can serve files from two locations in the resources folder:
- src/main/resources/static
- src/main/resource/public
Since we’re already using the static folder to serve some resources for Eureka, and Angular deletes this folder each time a build is run, let’s build our Angular app into the public folder.
Open the angular.json file again and find the options > outputPath property. Update that string:
"outputPath": "../../resources/static/home",If the Angular project’s located in src/main/angular/ui, then it will build to the src/main/resources/public folder. If the app in another folder this string will need to be modified to set the location correctly.
3.6. Automate the Build With Maven
Lastly, we will set up an automated build to run when we compile our code. This ant task will run the Angular CLI build task whenever “mvn compile” is run. Add this step to the gateway’s POM.xml to ensure that each time we compile we get the latest ui changes:
<plugin>
 <artifactId>maven-antrun-plugin</artifactId>
 <executions>
 <execution>
 <phase>generate-resources</phase>
 <configuration>
 <tasks>
 <exec executable="cmd" osfamily="windows"
 dir="${project.basedir}/src/main/angular/ui">
 <arg value="/c"/>
 <arg value="ng"/>
 <arg value="build"/>
 </exec>
 <exec executable="/bin/sh" osfamily="mac"
 dir="${project.basedir}/src/main/angular/ui">
 <arg value="-c"/>
 <arg value="ng build"/>
 </exec>
 </tasks>
 </configuration>
 <goals>
 <goal>run</goal>
 </goals>
 </execution>
 </executions>
</plugin>
We should note that this set up does require that the Angular CLI be available on the classpath. Pushing this script to an environment that does not have that dependency will result in build failures.
Now let’s start building our Angular application!
4. Angular
In this section of the tutorial, we build an authentication mechanism for our page. We use basic authentication and follow a simple flow to make it work.
Users have a login form where they can enter their username and password.
Next, we use their credentials to create a base64 authentication token and request the “/me” endpoint. The endpoint returns a Principal object containing the roles of this user.
Lastly, we will store the credentials and the principal on the client to use in subsequent requests.
Let’s see how this’s done!
4.1. Template
In the gateway project, navigate to src/main/angular/ui/src/app and open the app.component.html file. This is the first template that Angular loads and will be where our users will land after logging in.
Here, we’re going to add some code to display a navigation bar with a login form:
<nav class="navbar navbar-toggleable-md navbar-inverse fixed-top bg-inverse">
 <button class="navbar-toggler navbar-toggler-right" type="button"
 data-toggle="collapse" data-target="#navbarCollapse"
 aria-controls="navbarCollapse" aria-expanded="false"
 aria-label="Toggle navigation">
 <span class="navbar-toggler-icon"></span>
 </button>
 <a class="navbar-brand" href="#">Book Rater
 <span *ngIf="principal.isAdmin()">Admin</span></a>
 <div class="collapse navbar-collapse" id="navbarCollapse">
 <ul class="navbar-nav mr-auto">
 </ul>
 <button *ngIf="principal.authenticated" type="button"
 class="btn btn-link" (click)="onLogout()">Logout</button>
 </div>
</nav>

<div class="jumbotron">
 <div class="container">
 <h1>Book Rater App</h1>
 <p *ngIf="!principal.authenticated" class="lead">
 Anyone can view the books.
 </p>
 <p *ngIf="principal.authenticated && !principal.isAdmin()" class="lead">
 Users can view and create ratings</p>
 <p *ngIf="principal.isAdmin()" class="lead">Admins can do anything!</p>
 </div>
</div>
This code sets up a navigation bar with Bootstrap classes. Embedded in the bar is an inline login form. Angular uses this markup to interact with JavaScript dynamically to render various parts of the page and control things like form submission.
Statements like (ngSubmit)=”onLogin(f)” simply indicate that when the form is submitted call the method “onLogin(f)” and pass the form to that function. Within the jumbotron div, we have paragraph tags that will display dynamically depending on the state of our principal object.
Next, let’s code up the Typescript file that will support this template.
4.2. Typescript
From the same directory open the app.component.ts file. In this file we will add all the typescript properties and methods required to make our template function:
import {Component} from '@angular/core';
import {RouterOutlet} from '@angular/router';
import {Principal} from "./principal";
import {HttpClientModule, HttpResponse} from "@angular/common/http";
import {Book} from "./book";
import {HttpService} from "./http.service";
import {CommonModule} from '@angular/common';

@Component({
 selector: 'app-root',
 standalone: true,
 imports: [RouterOutlet, CommonModule, HttpClientModule],
 providers: [HttpService],
 templateUrl: './app.component.html',
 styleUrl: './app.component.css'
})
export class AppComponent {
 selectedBook: Book = null;
 principal: Principal = new Principal(false, []);
 loginFailed: boolean = false;

 constructor(private httpService: HttpService){}

 ngOnInit(): void {
 this.httpService.me()
 .subscribe((response) => {
 let principalJson = response.json();
 this.principal = new Principal(principalJson.authenticated, principalJson.authorities);
 }, (error) => {
 console.log(error);
 });
 }

 onLogout() {
 this.httpService.logout()
 .subscribe((response) => {
 if (response.status === 200) {
 this.loginFailed = false;
 this.principal = new Principal(false, []);
 window.location.replace(response.url);
 }
 }, (error) => {
 console.log(error);
 });
 }
}
This class hooks into the Angular life cycle method, ngOnInit(). In this method, we call the /me endpoint to get the user’s current role and state. This determines what the user sees on the main page. This method will be fired whenever this component is created which is a great time to be checking the user’s properties for permissions in our app.
We also have an onLogout() method that logs our user out and restores the state of this page to its original settings.
There’s some magic going on here though. The httpService property that’s declared in the constructor. Angular is injecting this property into our class at runtime. Angular manages singleton instances of service classes and injects them using constructor injection, just like Spring!
Next, we need to define the HttpService class.
4.3. HttpService
In the same directory create a file named “http.service.ts”. In this file add this code to support the login and logout methods:
import {Injectable} from "@angular/core";
import {Observable} from "rxjs";
import {HttpClientModule, HttpResponse, HttpClient, HttpHeaders, HttpRequest, HttpContext} from "@angular/common/http";

@Injectable({providedIn: 'root'})
export class HttpService {

 constructor(private http: HttpClient) { }

 me(): Observable {
 return this.http.get("/me", {'headers': this.makeOptions()})
 }

 logout(): Observable {
 return this.http.post("/logout", '', {'headers': this.makeOptions()})
 }

 private makeOptions(): HttpHeaders {
 return new HttpHeaders({'Content-Type': 'application/json'});
 }
}
In this class, we’re injecting another dependency using Angular’s DI construct. This time it’s the HttpClient class. This class handles all HTTP communication and is provided to us by the framework.
These methods each perform an HTTP request using angular’s HTTP library. Each request also specifies a content type in the headers.
Now we need to do one more thing to get the HttpService registered in the dependency injection system. Open the app.component.ts file and find the providers property. Add the HttpService to that array. The result should look like this:
providers: [HttpService],4.4. Add Principal
Next, let’s add our Principal DTO object in our Typescript code. In the same directory add a file called “principal.ts” and add this code:
export class Principal {
 public authenticated: boolean;
 public authorities: Authority[] = [];
 public credentials: any;

 constructor(authenticated: boolean, authorities: any[], credentials: any) {
 this.authenticated = authenticated;
 authorities.map(
 auth => this.authorities.push(new Authority(auth.authority)))
 this.credentials = credentials;
 }

 isAdmin() {
 return this.authorities.some(
 (auth: Authority) => auth.authority.indexOf('ADMIN') > -1)
 }
}

export class Authority {
 public authority: String;

 constructor(authority: String) {
 this.authority = authority;
 }
}
We added the Principal class and an Authority class. These are two DTO classes, much like POJOs in a Spring app. Because of that, we do not need to register these classes with the DI system in angular.
Next, let’s configure a redirect rule to redirect unknown requests to the root of our application.
4.5. 404 Handling
Let’s navigate back into the Java code for the gateway service. In the where GatewayApplication class resides add a new class called ErrorPageConfig:
@Component
public class ErrorPageConfig implements ErrorPageRegistrar {

 @Override
 public void registerErrorPages(ErrorPageRegistry registry) {
 registry.addErrorPages(new ErrorPage(HttpStatus.NOT_FOUND,
 "/home/index.html"));
 }

}
This class will identify any 404 response and redirect the user to “/home/index.html”. In a single page app, this is how we handle all traffic not going to a dedicated resource since the client should be handling all navigable routes.
Now we’re ready to fire this app up and see what we built!
4.6. Build and View
Now run “mvn compile” from the gateway folder. This will compile our java source and build the Angular app to the public folder. Let’s start the other cloud applications: config, discovery, and zipkin. Then run the gateway project. When the service starts, navigate to http://localhost:8080 to see our app. We should see something like this:
👁 Book Rater
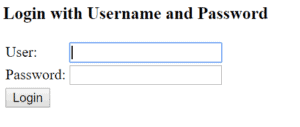
Next, let’s follow the link to the login page:
👁 ng2 login 1
Log in using the user/password credentials. Click “Login”, and we should be redirected to /home/index.html where our single page app loads.
👁 Book Rater App
It looks like our jumbotron is indicating we’re logged in as a user! Now log out by clicking the link in the upper right corner and log in using the admin/admin credentials this time.
👁 Book Rate App
Looks good! Now we’re logged in as an admin.
5. Conclusion
In this article, we have seen how easy it is to integrate a single page app into our cloud system. We took a modern framework and integrated a working security configuration into our application.
Using these examples, try to write some code to make a call to the book-service or rating-service. Since we now have examples of making HTTP calls and wiring data to the templates, this should be relatively easy.
The code backing this article is available on GitHub. Once you're logged in as a Baeldung Pro Member, start learning and coding on the project.