 |
VOOZH | about |
|
VOOZH | about |
| 👁 Altavista Babel Fish - Translate this page |
||||||||
|
A method of joining squares together should be considered from the very beginning of planning a project. Decide whether you want to—seam with the same yarn as the weaving yarn, use a contrasting color or contrasting texture yarn, have the seams as invisible as possible, or make the seams a design element. SAMPLE! If you have any doubts, take time to experiment with several yarns and techniques.
A few options are: sewing with a whip stitch, cross stitch, running stitch, back stitch or other variation, crocheted slip stitch, single crochet, knitted 3-needle bind-off. There are dozens of choices!
Here are books (some out-of-print) that I refer to for joining ideas:
| 👁 Joinings, Edgings, and Trims, Finishing Details for Handcrafted Products |
Joinings, Edgings, and Trims, Finishing Details for Handcrafted Products by Jean Wilson. Van Nostrand Reinhold Co., 1983 |
| 👁 Yo's Needlecraft How To Vol. 3 No. 1 - 101 Ways to Seam, Join & Pick Up Stitches |
Yo’s Needlecraft “How To” Vol. 3 No.1—101 Ways to Seam, Join & Pick Up Stitches by Yo Furuta. Nihon Vogue Co., Ltd. (This is a knit and crochet book.) |
| 👁 Finishes in the Ethnic Tradition |
Finishes in the Ethnic Tradition by Suzanne Baizerman and Karen Searle. Dos Tejedoras |
| 👁 Image |
Compendium of Finishing Techniques by Naomi McEneely. Interweave Press, 2003 |
👁 Before choosing a seaming method
Design. Do you want the joins to be invisible? That’s difficult and sometimes impossible. Or do you want the seams to be the main event? That’s easy! OR do you want the seams to be subtle, with a design element that’s a complement to the weaving and the project? There’s the creative challenge!
Orientation. It’s important to identify right side, wrong side, top and bottom edges. On Weave-It, Loomette, and Weavette looms, the starting and stopping yarn tails (woven in) are at the bottom left corner and top right corner. The bottom right corner has two tiny loops and is easy to identify. With some seaming methods and with most pattern weaves, you will want all pieces to have the same orientation. With some, you will want to have them mirrored.
Yarn tails vs. long seams. Most instructions suggest leaving the ending yarn tails for seaming. Your choice, but I never do it! (I weave in all yarn tails before removing from the loom.) It’s supremely annoying to make a bunch of short seams and then try to finish them off invisibly. If you are not a “finisher” this may cause you to abandon the whole project. My method is to arrange all pieces on a table and then seam all rows and then all columns (or vice versa). For instance, in a piece that has four rows and four columns (16 squares), I will make six seams, one between each row and one between each column. (With the yarn tail method, I would need to make 24 seams!) The disadvantage of long seams that cross each other is that it cannot be done in your lap or wadded up and thrown into a bag. You must maintain the correct orientation of the pieces on a table or work surface.
Four corners. The published weaving books never tell you what to do when you are seaming and get to the corners where four pieces meet. This is an area of absolute treachery! Too tight and you’ll get a pucker. Too loose and you’ll have a hole.
Blocking. It’s necessary to block pieces before assembly. All of the little edge loops should be open and easily identifiable. And the module size will probably change during blocking. My preferred method for natural fibers is to use a steam iron to blast the piece and then pat it flat by hand. If the weaving has a deeply textured weave, skip the pat. If the fiber is synthetic, use a pressing cloth and low heat.
Sample. It’s a lot to think about, but all of these details can be worked out by making a generous seamed sample with four pieces arranged in a square, so you can figure out how to handle the interior corner. (And a project size cannot be accurately predicted without first making a blocked and seamed sample.)
👁 Hand-Sewn or embroided seams
The overcast seam, as illustrated in Weave-It manuals, is easy to execute and challenging to make look decent—at least for me. I tend to get either a hard, ugly ridge, or one that’s full of holes. If you choose to use it, take your time in experimenting with seam yarn, which doesn’t have to be the same yarn that you weave with. |
👁 overcast seam |
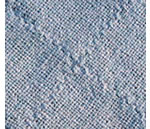
The lacy stitch seam is just a variation of an overcast seam, going through fewer loops. I do like this seam for felted items because it’s quick and the seams pretty much disappear in the felting process. (However, I stitch having all pieces in the same orientation, not mirrored as pictured below.) |
👁 Lacy Stitch Seam |
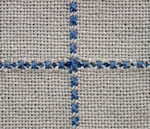
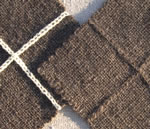
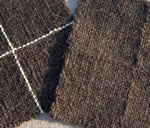
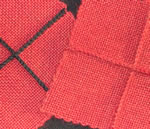
If you want your seam to be highly decorative and visible, the cross stitch seam has much to recommend it. Be aware that the method illustrated in Weave-It and Weavette booklets only crosses in the front. My cross stitch seam is crossed on both sides and is completely reversible.
| 👁 Weave-It Cross Stitch Seam |
👁 My Cross Stitch Seam |
| Weave-It Cross Stitch Seam | My Cross Stitch Seam |
The Bucilla loom manual suggests another sewn seam that is similar to the mattress stitch that knitters often use to join seams. It’s easy, fairly inconspicuous and on small items that don’t require very strong seams, it’s not bad at all. Try it for items made of laceweight wool or mohair.
| 👁 Mattress Stitch Diagram |
👁 Mattress Stitch Seam |
| Mattress Stitch Diagram | Mattress Stitch Seam |
My favorite seam is the crocheted slip stitch. It’s strong and flexible. (If your weaving yarn is bulky, you might want to choose a lighter weight for the seam.) With a contrast yarn, it’s a decorative design element. With a matching yarn, it’s subtle—only hinting at pieced construction. Mirrored edges are overlapped. With a crochet hook, enter two overlapped loops; pull up a loop of seaming yarn from below; *enter the next two overlapped loops; pull up a new loop and bring it through the loop on the hook. Not too tight. Repeat from * to end of seam. (Check tension often.) This makes a chain stitch on one side, with the appearance of a backstitch on the reverse. Either one can be used as the public side.
| 👁 Slip Stitch Front Slip Stitch Front |
👁 Slip Stitch Back Slip Stitch Seam Back |
A variation of the slip stitch seam is the alternating slip stitch. Definitely choose a light weight yarn for this seam. Pieces should all be oriented in the same direction. Butt the sides together and work slip stitch as above, but only go through one loop at a time, alternating from side-to-side. It makes a highly decorative zigzag chain on the front and a simple zigzag on the back.
Single crochet seams are easy. They make a bold statement when worked on the public side of the project. With sides mirrored, hold pieces with wrong sides together. Single crochet into each set of loops across.
| 👁 Single Crochet Front Single Crochet Seam Front |
👁 Single Crochet Back Single Crochet Seam Back |
👁 Coming Soon-knitted seams, machine-made seams, woven applique and insertions