 |
VOOZH | about |
|
VOOZH | about |
OpenAI has developed an AI-powered chatbot named `ChatGPT`, which is used by users to have their answers to questions and queries. One can access ChatGPT on searchingness easily. But some users want to access this chatbot on their Linux System. It can be accessed as a Desktop application on Ubuntu or can be accessed by the Linux terminal.
In this article, we are going to discuss two ways to get ChatGPT on our terminal in Linux System. They are Terminalgpt and Shell-GPT (sgpt).
We can say that TermialGPT is a chatbot for our terminal which is powered by OpenAI's GPT. It can be used to get real-time responses on a wide range of topics and questions.
We are going to install and configure terminalgpt in our Linux System. There are many Linux distributions, but in this article, we are going to use Ubuntu (22.04.2 LTS (Jammy Jellyfish)). We need to follow some simple steps to use it:
We need to install Node.js in our Linux system because the package we are going to install in our system requires `npx` and we know that both `npm` and `npx` are typically installed along with Node.js.
wget https://nodejs.org/dist/v18.16.0/node-v18.16.0-linux-x64.tar.gz
Here we have used `wget` to download the Node.js binary package for Linux.
tar -xvf node-v18.16.0-linux-x64.tar.gz
The tar command is used to extract the contents of the downloaded tarball.
sudo mv node-v18.16.0-linux-x64 /usr/local/
Here, the mv command is used to move the extracted Node.js directory to the /usr/local directory. The /usr/local directory is commonly used for locally installed software.
sudo ln -s /usr/local/node-v18.16.0-linux-x64/bin/node /usr/local/bin/node
sudo ln -s /usr/local/node-v18.16.0-linux-x64/bin/npm /usr/local/bin/npm
These commands create symbolic links (ln -s) that point to the Node.js executable (node) and the Node Package Manager (npm) in the /usr/local/bin directory. This step allows you to run Node.js and npm from anywhere in the system.
node -vnpm -v
These commands will display the installed versions of Node.js and npm, respectively.
npx terminalgpt
This installed terminalgpt in our system.
npm install -g lowdb steno inquirer
The latest versions of the lowdb, steno, and inquirer packages are installed globally on our system.
Go to the OpenAI website at https://www.openai.com/
Sign in or create an account: If you already have an account, sign in using your credentials. Otherwise, click on the "Sign Up" button to create a new account.
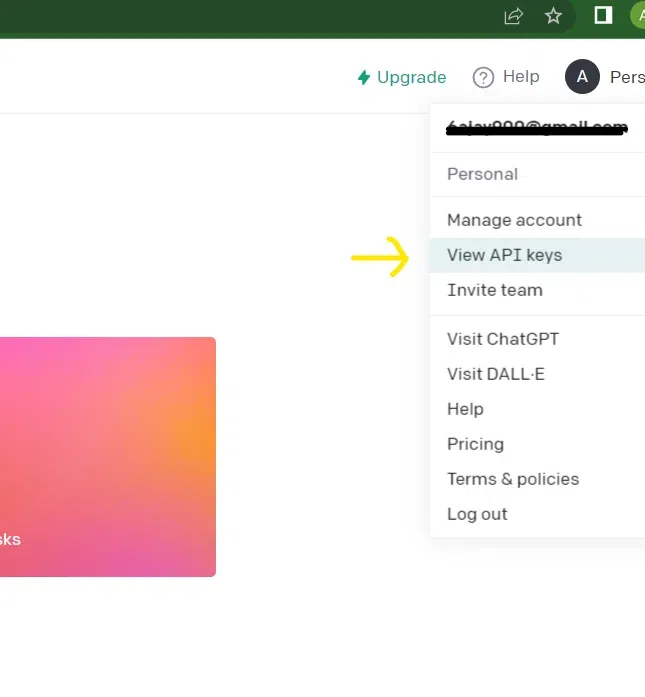
On the top right corner CLICK on profile. You will see `view API keys` Clicke on it.
After selecting view API keys, Click on Create new secrete key
Enter your desired key name here and click on create secret key.
Copy your Key from the prompt.
Note: Copy the Prompted key and save it somewhere. Do not share your key with anyone, for security reasons.
npx terminalgpt chat
This will ask us to enter our API key, enter your API key that you have copied from the prompt.
We have this option (enter your API key) appears only once.
Now we can ask any question we want to the terminalgpt.
For Example:
npx terminalgpt chat
This time it will not ask to enter API again. Now we can ask any question we want.
"What is the capital of India"
SGPT is known as ShellGPT which is a powerful toll that utilizes OpenAI's GPT (Generative pre-trained Transformer) that provides an interactive shell experience to the User. It can be used to execute commands, get code completions, give answers to the questions we ask.
In this article we are going to Install SGPT in our linux system (Ubuntu). One can follow easy steps of installation and configuration.
sudo apt update
sudo apt upgrade -y
These are used in Ubuntu and other Debian-based systems to update and upgrade the installed software packages.
If Python 3 is not already installed, run the following command:
sudo apt install python3 -y
Install PIP (Python package manager) using this command.
sudo apt install python3-pip -y
To install SGPT, execute the following command:
pip install shell-gpt --user
Edit our shell configuration file (e.g., ~/.bashrc), use text editor like nano for adding this line in the end of the file:
nano ~/.bashrc
#Add this line in the endexport
PATH=$PATH:~/.local/bin
Refresh the shell configuration or open a new terminal to get the updated terminal.
#use this command to refresh the terminal
source ~/.bashrc
Go to the OpenAI website at https://www.openai.com/
Sign in or create an account: If you already have an account, sign in using your credentials. Otherwise, click on the "Sign Up" button to create a new account.
On the top right corner CLICK on profile. You will see `view API keys` Click on it.
After selecting view API keys, Click on Create new secrete key
Enter your desired key name here and click on Create secret key.
Copy your Key from the prompt.
Note: Copy the Prompted key and save it somewhere. Do not share your key with anyone, for security reasons.
nano ~/.config/shell_gpt/.sgptrc
Add the following line to the file.
OPENAI_API_KEY=<YOUR_API_KEY>
replacing <YOUR_API_KEY> with your actual OpenAI API key
To test if SGPT is working correctly, open a new terminal and run the command:
sgpt --shell
Now you can ask it questions related to shell.
For Example:
sgpt --shell "echo hello"
type option(e)
sgpt --shell "ls"
type option(e)
👁 ImageCertainly, it has few Options.
#use this to see all the available options
sgpt --help
Create
In this article we have discussed two ways for using chatgpt on our Linux terminal, both ways are opensource and very useful. First, we discussed how can we use terminalgpt on our terminal, we have discussed step-by-step installation of it. Then we discussed Shell-GPT (sgpt) and its complete installation on our system. A user can easily understand and chatgpt on their Linux System easily by going through this article step by step.