
iSCSI is a block level Protocol for managing storage devices over TCP/IP Networks, specially over long distances. iSCSI target is a remote hard disk presented from an remote iSCSI server (or) target. On the other hand, the iSCSI client is called the Initiator, and will access the storage that is shared in the Target machine.
The following machines have been used in this article:
Server (Target):
Operating System – Red Hat Enterprise Linux 7
iSCSI Target IP – 192.168.0.29
Ports Used : TCP 860, 3260
Client (Initiator):
Operating System – Red Hat Enterprise Linux 7
iSCSI Target IP – 192.168.0.30
Ports Used : TCP 3260
Step 1: Installing Packages on iSCSI Target
To install the packages needed for the target (we will deal with the client later), do:
# yum install targetcli -y
When the installation completes, we will start and enable the service as follows:
# systemctl start target
# systemctl enable target
Finally, we need to allow the service in firewalld:
# firewall-cmd --add-service=iscsi-target
# firewall-cmd --add-service=iscsi-target --permanent
And last but not least, we must not forget to allow the iSCSI target discovery:
# firewall-cmd --add-port=860/tcp
# firewall-cmd --add-port=860/tcp --permanent
# firewall-cmd --reload
Step 2: Defining LUNs in Target Server
Before proceeding to defining LUNs in the Target, we need to create two logical volumes as explained in Part 6 of RHCSA series (“Configuring system storage”).
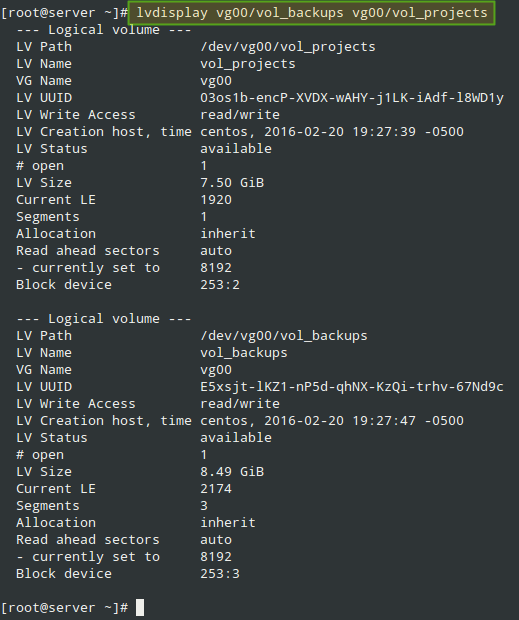
This time we will name them vol_projects and vol_backups and place them inside a volume group called vg00, as shown in Fig. 1. Feel free to choose the space allocated to each LV:
After creating the LVs, we are ready to define the LUNs in the Target in order to make them available for the client machine.
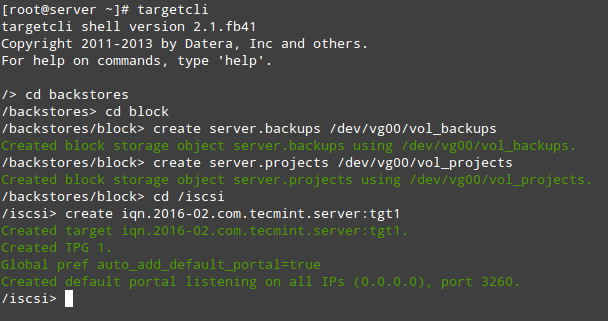
As shown in Fig. 2, we will open a targetcli shell and issue the following commands, which will create two block backstores (local storage resources that represent the LUN the initiator will actually use) and an Iscsi Qualified Name (IQN), a method of addressing the target server.
Please refer to Page 32 of RFC 3720 for more details on the structure of the IQN. In particular, the text after the colon character (:tgt1) specifies the name of the target, while the text before (server:) indicates the hostname of the target inside the domain.
# targetcli
# cd backstores
# cd block
# create server.backups /dev/vg00/vol_backups
# create server.projects /dev/vg00/vol_projects
# cd /iscsi
# create iqn.2016-02.com.tecmint.server:tgt1
With the above step, a new TPG (Target Portal Group) was created along with the default portal (a pair consisting of an IP address and a port which is the way initiators can reach the target) listening on port 3260 of all IP addresses.
If you want to bind your portal to a specific IP (the Target’s main IP, for example), delete the default portal and create a new one as follows (otherwise, skip the following targetcli commands. Note that for simplicity we have skipped them as well):
# cd /iscsi/iqn.2016-02.com.tecmint.server:tgt1/tpg1/portals
# delete 0.0.0.0 3260
# create 192.168.0.29 3260
Now we are ready to proceed with the creation of LUNs. Note that we are using the backstores we previously created (server.backups and server.projects). This process is illustrated in Fig. 3:
# cd iqn.2016-02.com.tecmint.server:tgt1/tpg1/luns
# create /backstores/block/server.backups
# create /backstores/block/server.projects
The last part in the Target configuration consists of creating an Access Control List to restrict access on a per-initiator basis. Since our client machine is named “client”, we will append that text to the IQN. Refer to Fig. 4 for details:
# cd ../acls
# create iqn.2016-02.com.tecmint.server:client
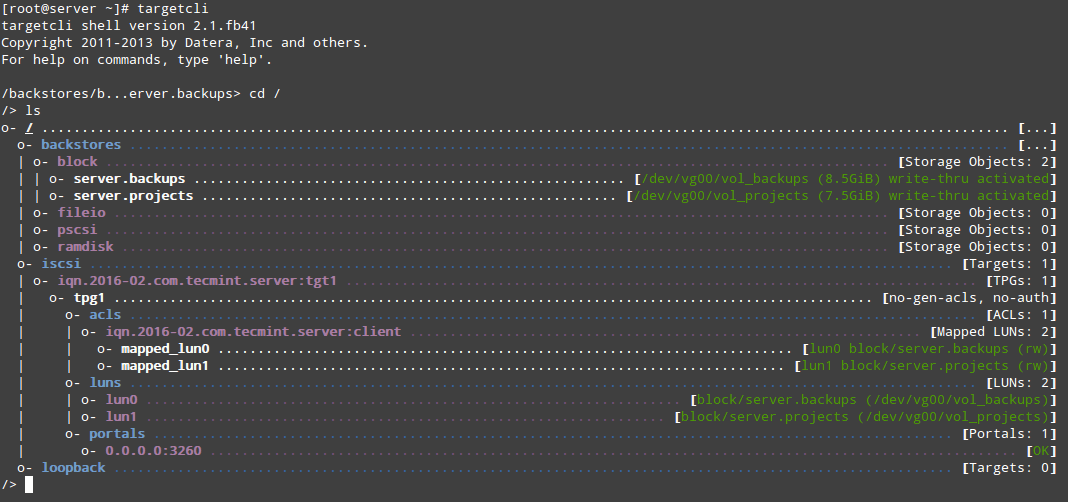
At this point we can the targetcli shell to show all configured resources, as we can see in Fig. 5:
# targetcli
# cd /
# ls
To quit the targetcli shell, simply type exit and press Enter. The configuration will be saved automatically to /etc/target/saveconfig.json.
As you can see in Fig. 5 above, we have a portal listening on port 3260 of all IP addresses as expected. We can verify that using netstat command (see Fig. 6):
# netstat -npltu | grep 3260
This concludes the Target configuration. Feel free to restart the system and verify that all settings survive a reboot. If not, make sure to open the necessary ports in the firewall configuration and to start the target service on boot. We are now ready to set up the Initiator and to connect to the client.
Step 3: Setting up the Client Initiator
In the client we will need to install the iscsi-initiator-utils package, which provides the server daemon for the iSCSI protocol (iscsid) as well as iscsiadm, the administration utility:
# yum update && yum install iscsi-initiator-utils
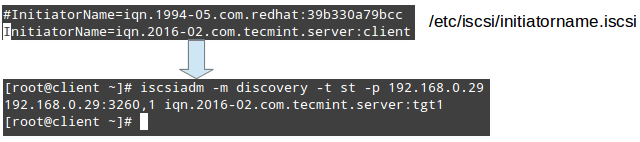
Once the installation completes, open /etc/iscsi/initiatorname.iscsi and replace the default initiator name (commented in Fig. 7) with the name that was previously set in the ACL on the server (iqn.2016-02.com.tecmint.server:client).
Then save the file and run iscsiadm in discovery mode pointing to the target. If successful, this command will return the target information as shown in Fig. 7:
# iscsiadm -m discovery -t st -p 192.168.0.29
The next step consists in restarting and enabling the iscsid service:
# systemctl start iscsid
# systemctl enable iscsid
and contacting the target in node mode. This should result in kernel-level messages, which when captured through dmesg show the device identification that the remote LUNs have been given in the local system (sde and sdf in Fig. 8):
# iscsiadm -m node -T iqn.2016-02.com.tecmint.server:tgt1 -p 192.168.0.29 -l
# dmesg | tail
From this point on, you can create partitions, or even LVs (and filesystems on top of them) as you would do with any other storage device. For simplicity, we will create a primary partition on each disk that will occupy its entire available space, and format it with ext4.
Finally, let’s mount /dev/sde1 and /dev/sdf1 on /projects and /backups, respectively (note that these directories must be created first):
# mount /dev/sde1 /projects
# mount /dev/sdf1 /backups
Additionally, you can add two entries in /etc/fstab in order for both filesystems to be mounted automatically at boot using each filesystem’s UUID as returned by blkid.
Note that the _netdev mount option must be used in order to defer the mounting of these filesystems until the network service has been started:
You can now use these devices as you would with any other storage media.
Summary
In this article we have covered how to set up and configure an iSCSI Target and an Initiator in RHEL/CentOS 7 disitributions. Although the first task is not part of the required competencies of the EX300 (RHCE) exam, it is needed in order to implement the second topic.
Don’t hesitate to let us know if you have any questions or comments about this article – feel free to drop us a line using the comment form below.
Looking to setup iSCSI Target and Client Initiator on RHEL/CentOS 6, follow this guide: Setting Up Centralized iSCSI Storage with Client Initiator.
If this article helped you solve a problem, consider buying a coffee. It helps keep TecMint free, supports the authors, and keeps the project going.
Got Something to Say? Join the Discussion... Cancel reply