
Domain Name Service (DNS) is a Naming service that maps IP addresses and fully qualified domain names to one another. Computers that runs DNS are called name servers.
Here I have installed and configured cache server using forwarder, forward look-up and reserve look-up. In most of the place, we need a reserve lookups. Caching server will not hold any domain names, it will only work as a Pointing server. Before going in depth we need to know about DNS server and how it works.
What is DNS?
Here is an easy way to understand the DNS and how it works.
If we need to access tecmint.com in browser, the system will look for tecmint.com. Here at the end of the .com there will be a (.) so what is this ?.
The (.) represent the namespace Root server, there are total 13 root servers globally available. While we accessing tecmint.com it will ask to name server as per operating system configuration. In Ubuntu, we used to configure the name-server in /etc/resolv.conf, while accessing tecmint.com my browser will ask to root name-servers, if the root name-server don’t have my requested domain information it will cache my requested information and forward my request to (TLD) Top Level Domain name-server, even in TLD name-server my request is not available it will be cached and forwarded to Authoritative name-server.
While the domain registration, our domain registerer will define which authoritative name-server should our domain use. So, authoritative name servers have our domain information’s, while our request reach ANS it will reply for the query that tecmint.com have 111.111.222.1 at the same time it will be cached in Authoritative name-server and send the request back to browser. Every above steps are done within milliseconds.
Hope you got what is DNS now, and how it works. Now let us set up a Caching DNS Server in Ubuntu Server 14.04 LTS.
Step 1: Installing DNS Server
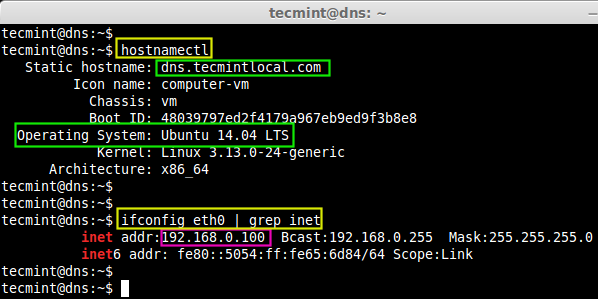
First, take a look at the my local DNS server information such as static IP address and hostname, which is used to for this article purpose.
IP Address:	192.168.0.100
Hostname:	dns.tecmintlocal.com
To verify that the above settings are correct, we can use ‘hostnamectl‘ and ‘ifconfig‘ commands.
$ hostnamectl
$ ifconfig eth0 | grep inet
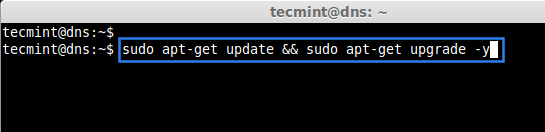
Next, we update the default repositories and do a system upgrade, before setting-up DNS cache server.
$ sudo apt-get update && sudo apt-get upgrade -y
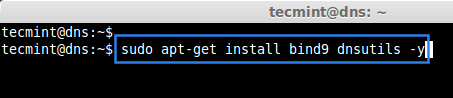
Now, install the DNS Packages bind and dnsutils using the following command.
$ sudo apt-get install bind9 dnsutils -y
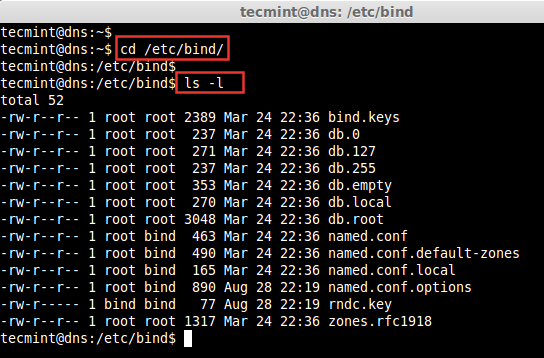
Once, dns installed, move to the bind configuration directory, under /etc/bind.
$ /etc/bind/
$ ls -l
Step 2: Setting DNS Cache Server
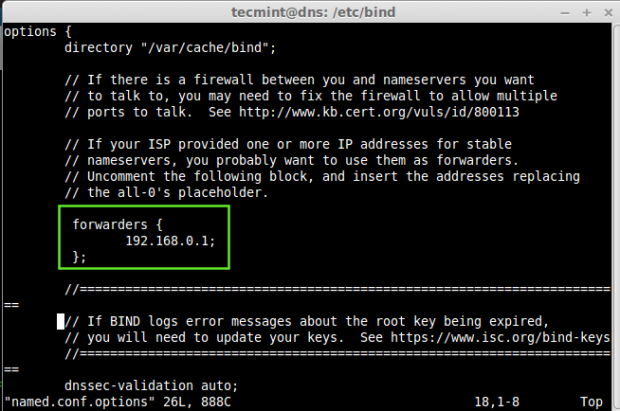
First of all, we setup and configure caching server here. Open and edit the file named.conf.options using vim editor.
$ sudo vim named.conf.options
Now, here the word ‘forwarders‘ is used to cache domain name requests. So, here we are going to use my router as the forwarder. Uncomment the // in-front of the line’s as shown in the picture.
forwarders {
 192.168.0.1;
 };
Save and exit the file using wq!. Now its time to start the bind server for a small testing.
$ sudo /etc/init.d/bind9 start
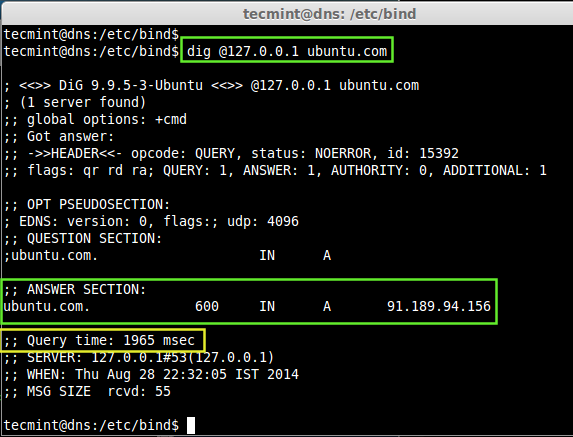
If we need to test whether caching works, we can use dig command and check whether the cache working or not.
For example purpose, we going to dig ubuntu.com now, at first, it will won’t be cache, so it may may take some milliseconds, once it cached it will be in lightning speed.
$ dig @127.0.0.1 ubuntu.com
A dig command is a tool for DNS look-ups. To know more about Dig command read the below topic.
Here, we can see in the above image at first dig it took 1965 milliseconds for my query and shows which ipaddress is binded to ubuntu.com.
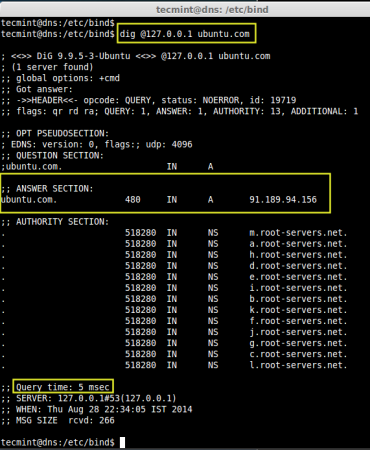
Let us try for one more dig and see the Query time.
Cool!, In the second try we got the query within 5 milliseconds. Hope you know what is caching server now. The above image shows, that total 13 root servers are caching Ubuntu.com, because millions of peoples already accessed Ubuntu official site.
Step 3: Setting Master DNS Server
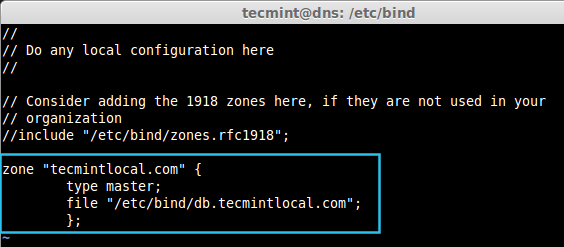
Create a MASTER DNS Server, Here I’m defining the domain name as tecmintlocal.com, edit the file named.conf.local using vim editor.
$ sudo vim /etc/bind/named.conf.local
Enter the DNS-Master entry as shown below.
zone "tecmintlocal.com" {
 type master;
 file "/etc/bind/db.tecmintlocal.com";
 };
- zone: Hosts details in Domain
.
- type: Master DNS.
- file: Location to store zone information.
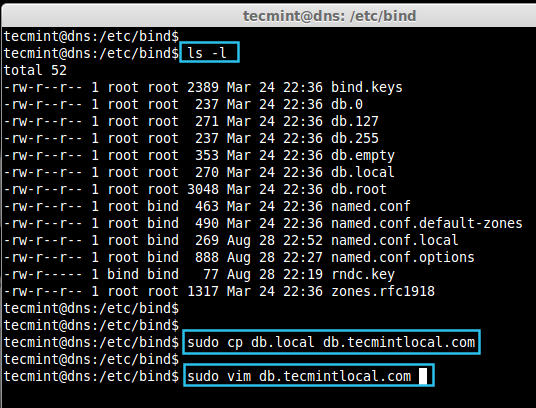
Create the zone file db.tecmintlocal.com (Forward look-ups) from making a copy from db.local.
$ sudo cp db.local db.tecmintlocal.com
Now open and edit the copied zone file using vim editor.
$ sudo vim db.tecmintlocal.com
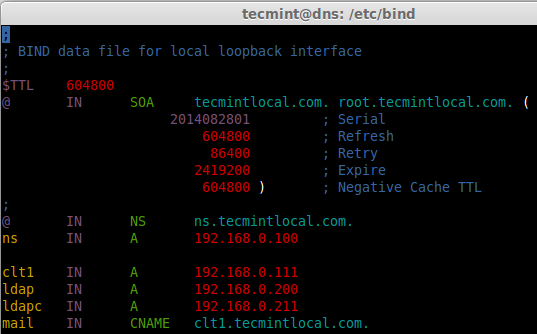
Next, add the following example entry, which I have used for tutorial purpose. I use the same for other virtual machine setups too. Modify the below entry as per your requirement.
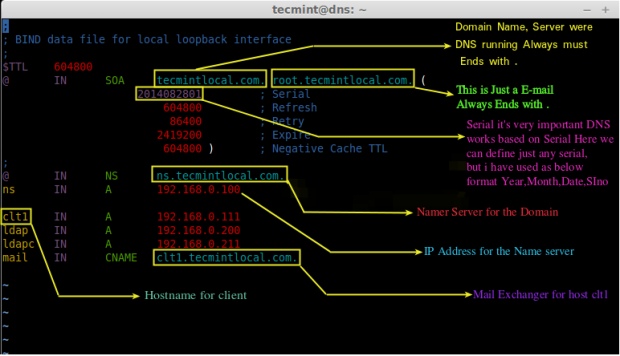
;
; BIND data file for local loopback interface
;
$TTL 604800
@ IN SOA tecmintlocal.com. root.tecmintlocal.com. (
 2014082801 ; Serial
 604800 ; Refresh
 86400 ; Retry
 2419200 ; Expire
 604800 ) ; Negative Cache TTL
;
@ IN NS ns.tecmintlocal.com.
ns IN A 192.168.0.100

clt1 IN A 192.168.0.111
ldap IN A 192.168.0.200
ldapc IN A 192.168.0.211
mail IN CNAME clt1.tecmintlocal.com.
Save and exit the file using wq!.
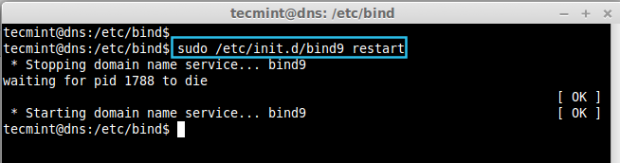
Finally, restart the bind DNS service using below command.
$ sudo service bind9 restart
We need to confirm, whether our above zone setup works. Let us check using dig command. Run the command as follows from localhost query.
$ dig @127.0.0.1 mail.tecmintlocal.com
Let’s ping and test the clt1.tecmintlocal.com, before that we need to change the dns-server entry to localhost in our dns server machine and restart the network to get effect.
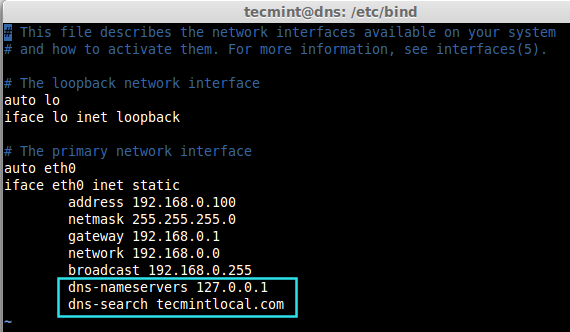
Open and edit the Network interface settings and enter the DNS entry.
$ sudo vim /etc/network/interfaces
Change the DNS entry in the interface as below.
auto lo
iface lo inet loopback
auto eth0
iface eth0 inet static
 address 192.168.0.100
 netmask 255.255.255.0
 gateway 192.168.0.1
 network 192.168.0.0
 broadcast 192.168.0.255
 dns-nameservers 127.0.0.1
	 dns-search tecmintlocal.com
After adding entry, restart the Network using following command.
$ sudo ifdown eth0 && sudo ifup eth0
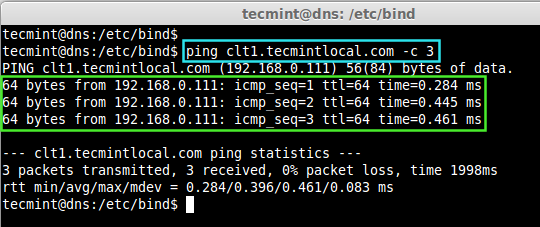
If restarting network does not take effect, We must need a restart. Now Let’s ping and check the clt1.tecmintlocal.com, while its replying, we need to get the ip address what we defined for host-name clt1.
$ ping clt1.tecmintlocal.com -c 3
Setting Reverse DNS Lookups
Again open and edit the file named.conf.local.
$ sudo vim /etc/bind/named.conf.local
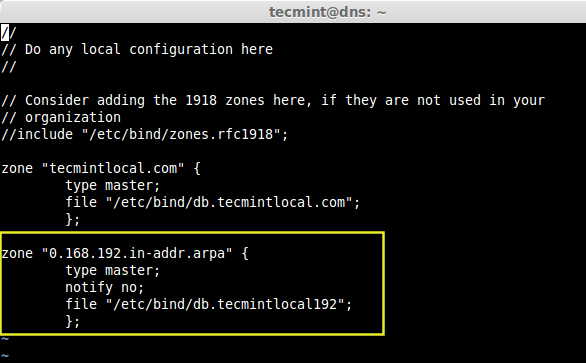
Now add the following reverse dns lookup entry as shown.
zone "0.168.192.in-addr.arpa" {
 type master;
 notify no;
 file "/etc/bind/db.tecmintlocal192";
 };
Save and exit the file using wq!. Now create a db.tecmintlocal192 file, as I have mentioned in the master file above for reverse look-up, copy the db.127 to db.tecmintlocal192 using following command.
$ sudo cp db.127 db.tecmintlocal192
Now, open and edit a file db.tecmintlocal192 for setup the reverse look-up.
$ sudo vim db.tecmintlocal192
Enter the following entry as below, modify the below entry as per your requirement.
;
; BIND reverse data file for local loopback interface
;
$TTL 604800
@ IN SOA ns.tecmintlocal.com. root.tecmintlocal.com. (
 2014082802 ; Serial
 604800 ; Refresh
 86400 ; Retry
 2419200 ; Expire
 604800 ) ; Negative Cache TTL
;
@ IN NS ns.
100 IN PTR ns.tecmintlocal.com.

111 IN PTR ctl1.tecmintlocal.com.
200 IN PTR ldap.tecmintlocal.com.
211 IN PTR ldapc.tecmintlocal.com.
Restart the bind service using.
Now, verify the reserve look-up entry.
$ host 192.168.0.111
While we do a reverse look-up using an ip address as shown above, it want to reply with a name as above image shows.
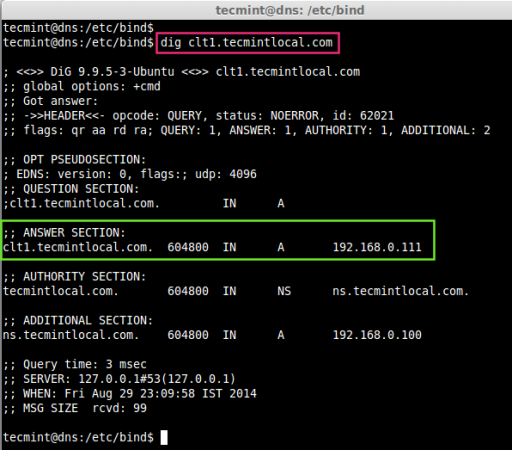
Let’s do a check using dig command too.
$ dig clt1.tecmintlocal.com
Here, we can see the Answer for our Query in Answer Section as domain-name clt1.tecmintlocal.com has the ip address 192.168.0.111.
Step 4: Setting Client Machine
Just change the ip address and dns entry in client machine to Our local dns server 192.168.0.100, if so our client machine will get assigned host-name from local DNS-server.
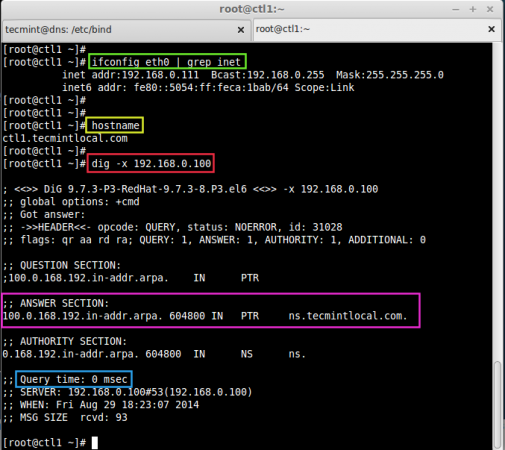
Let us check the host-name of our client using following series of commands.
$ ifconfig eth0 | grep inet
$ hostname
$ dig -x 192.168.0.100
Understanding zone file entry in dns, This image will give you a small explanation what we have defined in zone file entry.
That’s it! in this article, we have seen how to setup a local DNS server for our office or home use.
Soon you can read about the article how to troubleshoot a DNS server using various tool and fix it. There are many tools which are use to troubleshoot the DNS servers. Read the below article to know about some troubleshooting tips.
8 Nslookup Commands for DNS Troubleshooting
If this article helped you solve a problem, consider buying a coffee. It helps keep TecMint free, supports the authors, and keeps the project going.
Got Something to Say? Join the Discussion... Cancel reply