VOOZH about

URL: https://www.tecmint.com/install-hestia-control-panel-ubuntu-debian/

⇱ How to Install Hestia Control Panel on Ubuntu and Debian


Skip to content

Hestia Control Panel (HestiaCP) is a free web hosting tool for Linux that offers both a web and command-line interface to easily manage domain names, websites, email accounts, and DNS zones.

In this article, we will guide you through the process of installing HestiaCP on Ubuntu 22.04 LTS and Debian 12.

Prerequisites

Before we begin, make sure you have the following:

  • A fresh Ubuntu or Debian server with a minimum of 4 GB RAM.
  • A valid domain name pointing to your server’s IP address.
TecMint Weekly Newsletter
Get the Learn Linux 7 Days Crash Course free when you join 34,000+ Linux professionals reading every Thursday.
Check your email for a magic link to get started.
Something went wrong. Please try again.

Step 1: Install Required Packages

First, update your server’s package list and upgrade all the installed existing packages to their latest versions.

sudo apt update
sudo apt upgrade -y

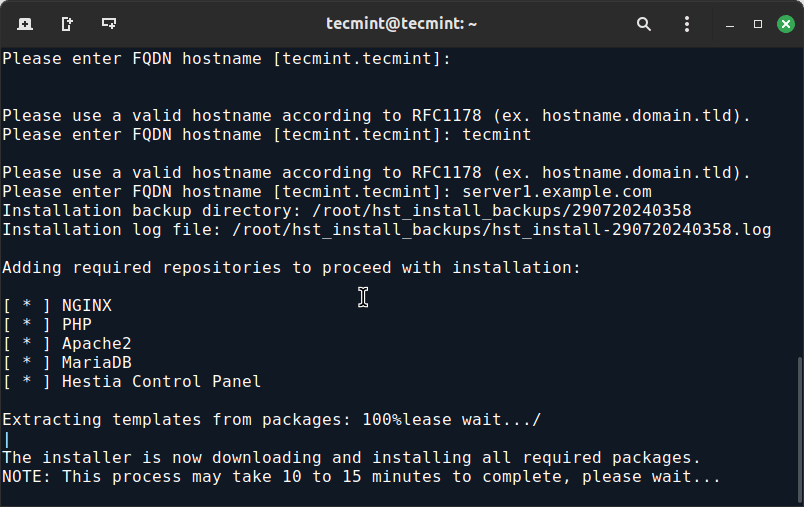
Next, set a fully qualified domain name (FQDN) as your server’s hostname and verify the hostname change.

sudo hostnamectl set-hostname yourdomain.com
hostnamectl

Next, install the required dependencies using the following command:

sudo apt install ca-certificates software-properties-common apt-transport-https gnupg wget unzip -y

Step 2: Install Hestia Control Panel

Download the latest HestiaCP installation script from the official GitHub repository using the following wget command.

wget https://raw.githubusercontent.com/hestiacp/hestiacp/release/install/hst-install.sh

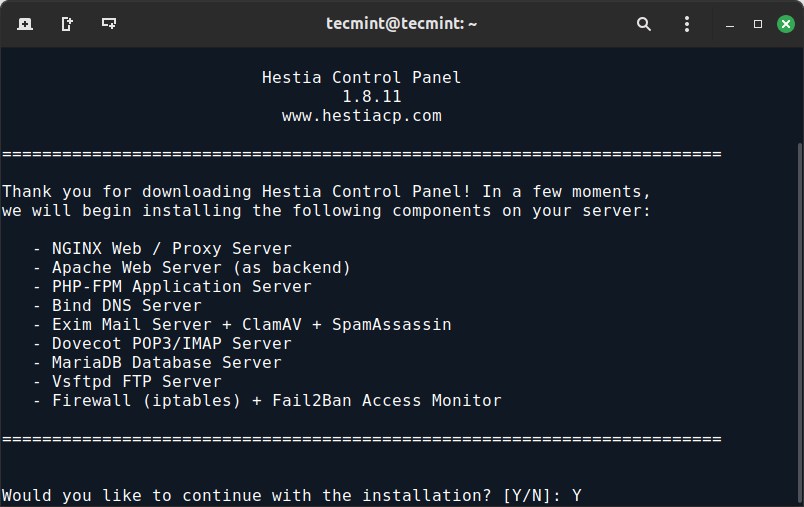
Run the installation script and follow the on-screen prompts.

bash hst-install.sh

During the installation process, you’ll be prompted to confirm the installation and choose the software packages to install.

👁 Install Hestia Control Panel
Install Hestia Control Panel

By default, Hestia installs the following:

  • Nginx Web/Proxy Server
  • Apache Web Server (as backend)
  • PHP-FPM Application Server
  • Bind DNS Server
  • Exim Mail Server + SpamAssassin
  • Dovecot POP3/IMAP Server
  • MariaDB Database Server
  • Vsftpd FTP Server
  • Firewall (iptables) + Fail2Ban Access Monitor.

When prompted, enter the required information:

  • Admin email address
  • FQDN hostname
  • MySQL root password
  • Confirm installation

The installation process may take some time to complete.

👁 Hestia Installation Process
Hestia Installation Process

Step 3: Access Hestia Control Panel

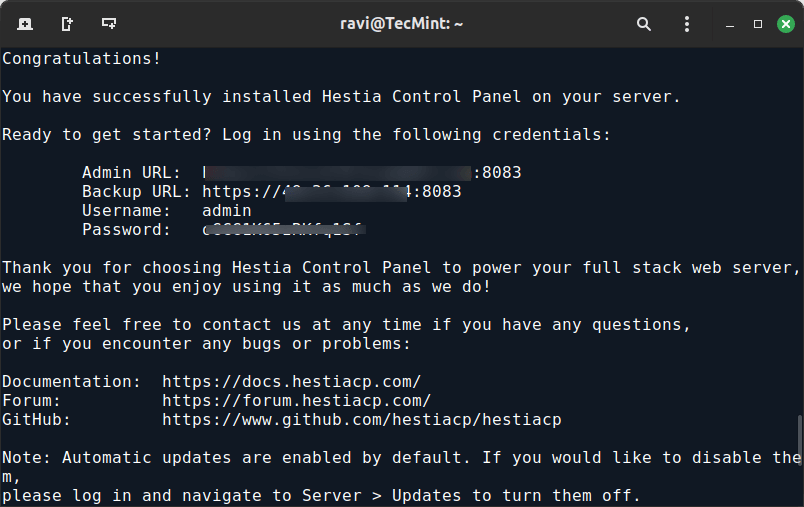
Once the installation is complete, Hestia will provide you with the login URL, username, and password.

👁 Hestia Installation Summary
Hestia Installation Summary

By default, the URL will be:

https://yourdomain.com:8083
OR
https://server-ip:8083

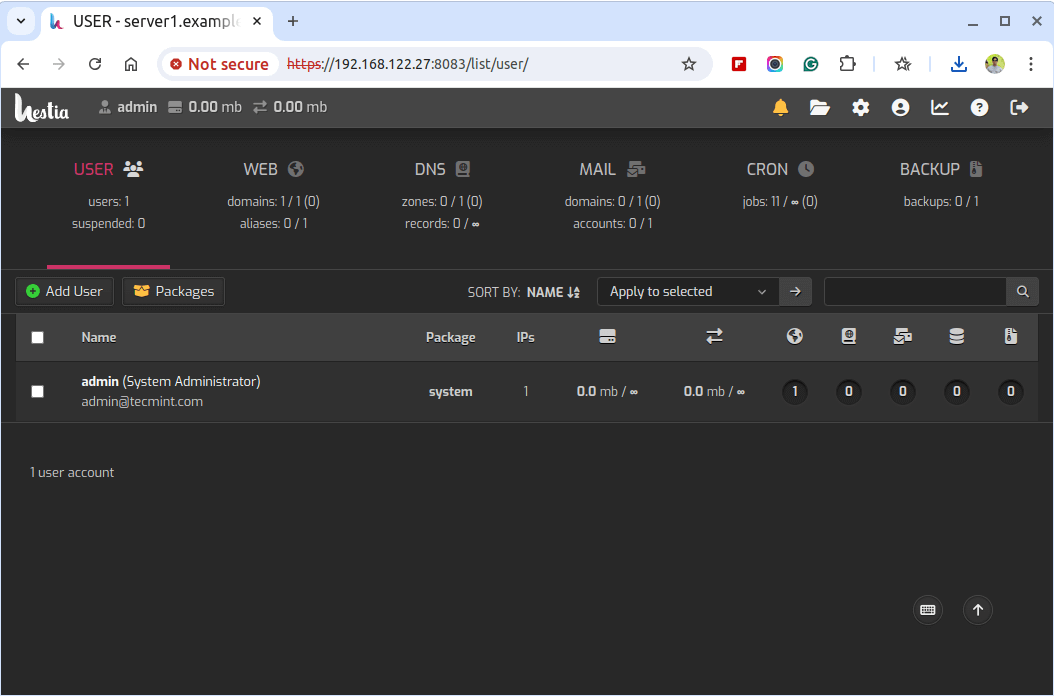
Open this URL in your web browser. You might encounter a security warning because the SSL certificate is self-signed. Proceed by adding an exception.

Log in using the credentials provided at the end of the installation process. You’ll be taken to the Hestia dashboard, where you can start managing your server.

👁 Hestia Control Panel Dashboard
Hestia Control Panel Dashboard

Step 4: Secure Your Hestia Installation

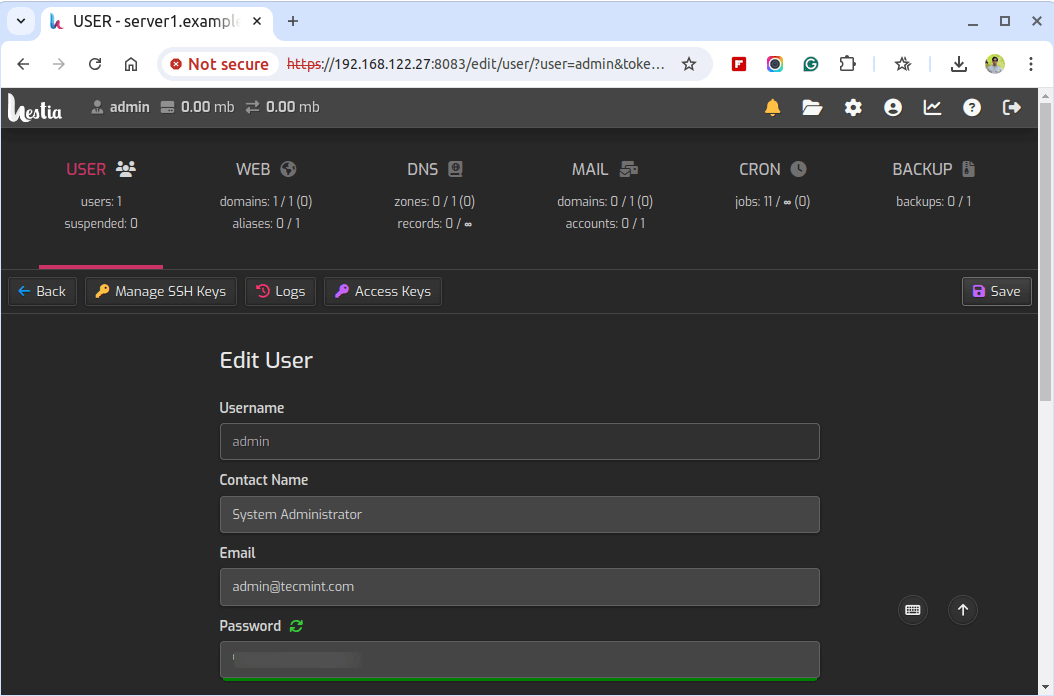
For security reasons, change the default admin password immediately by navigating to Users > Admin > Edit > Change Password.

👁 Change Hestia Admin Password
Change Hestia Admin Password

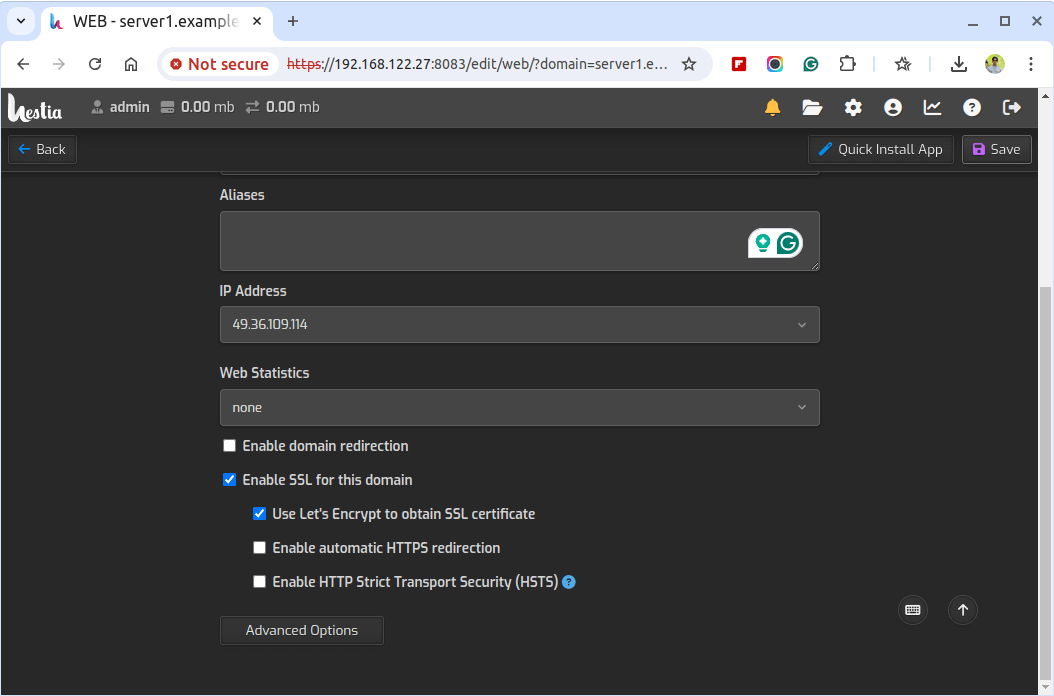
For a more secure connection, set up SSL certificates for your domains by going to Web > Your Domain > Edit > Enable Let’s Encrypt SSL.

👁 Enable SSL on Hestia Control Panel
Enable SSL on Hestia Control Panel

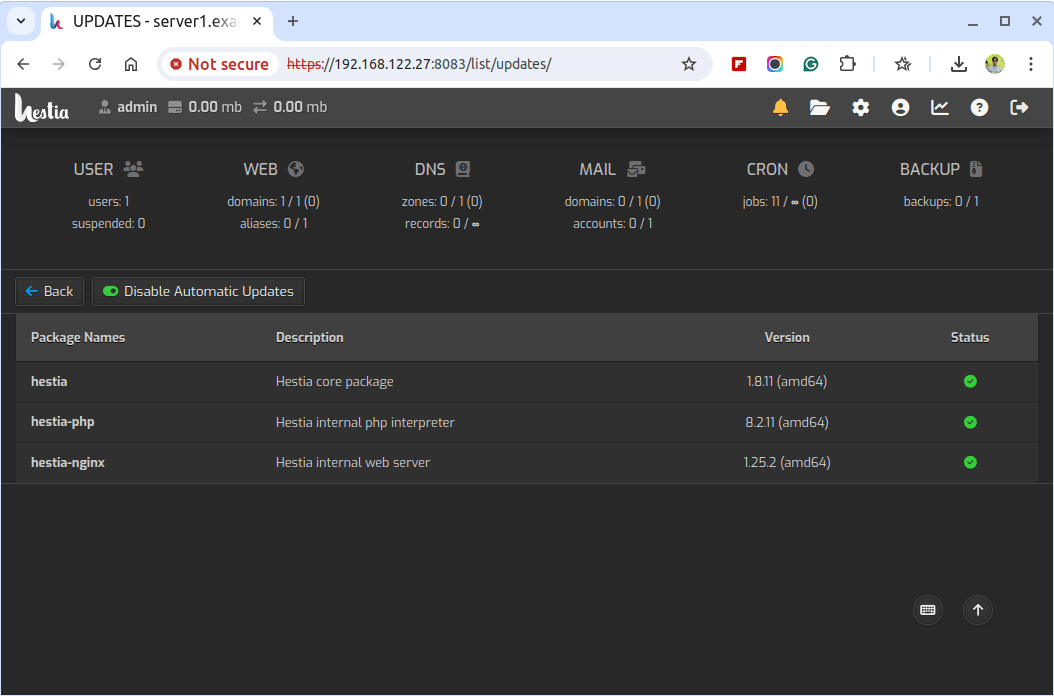
Keep your Hestia Control Panel up-to-date by regularly checking for updates at Settings > Updates > Check for Updates.

👁 Hestia Control Panel Updates
Hestia Control Panel Updates
Conclusion

Hestia Control Panel simplifies the management of web servers with its user-friendly interface and robust features. By following this guide, you should have Hestia installed and configured on your Ubuntu or Debian server, ready to manage your web domains, email accounts, databases, and more.

Regular maintenance, such as updating the panel and backing up data, will ensure your server runs smoothly and securely.

If this article helped, share it with someone on your team.
TecMint Weekly Newsletter
Get the Learn Linux 7 Days Crash Course free when you join 34,000+ Linux professionals reading every Thursday.
Check your email for a magic link to get started.
Something went wrong. Please try again.
TecMint has been free for 14 years. Help keep it that way.
Google AI Overviews and tools like ChatGPT have cut into search traffic for independent tech sites like TecMint. Running this site costs over $2,000 every month for hosting, infrastructure, and paying authors to keep the content accurate and tested.

If this article helped you solve a problem, consider buying a coffee. It helps keep TecMint free, supports the authors, and keeps the project going.
☕ Buy Me a Coffee
Ravi Saive
I'm Ravi Saive, an award-winning entrepreneur and founder of several successful 5-figure online businesses, including TecMint.com, GeeksMint.com, UbuntuMint.com, and the premium learning hub Pro.Tecmint.com.

Each tutorial at TecMint is created by a team of experienced Linux system administrators so that it meets our high-quality standards.

30 Comments

Leave a Reply
  1. please help how i can fix this???????
    Deprecated: mysql_connect(): The mysql extension is deprecated and will be removed in the future: use mysqli or PDO instead in /var/www/new/ehcp/config/adodb/drivers/adodb-mysql.inc.php on line365

    Reply
    • Add the following line to /etc/php.ini file to get rid of php errors. Make sure to restart after making changes.

      error_reporting = E_ALL ^ E_DEPRECATED
      
      Reply
  2. Hello , I have installed EHCP using alesbd.com domain according to this guideline. I have configured dns as well. I can host another domain . But I could not upload my website under the domain alesbd.com . It shows EHCP default page always. Now what should i do ?

    thanks

    Reply
    • For other domain, you have to create Apache VirtualHost with webroot directory.

      Reply
  3. how i solved the error apt-get during installation of ehcp

    please help me

    Reply
    • What apt-get error you getting on the screen? can post the error output here? it will help us to identify the problem.

      Reply
  4. on the page http://*.*.46.4/ehcp/ write error:
    “Deprecated: mysql_connect(): The mysql extension is deprecated and will be removed in the future: use mysqli or PDO instead in /var/www/new/ehcp/config/adodb/drivers/adodb-mysql.inc.php on line 370”

    Why is this error, how to fix it? Please help me

    Reply
    • Add the following line in /etc/php.ini to get rid of such errors. Make sure you restart Apache after making changes to php.ini file.

      error_reporting = E_ALL ^ E_DEPRECATED
      
      Reply
  5. sir
    1. how does EHCP compare with WebMin
    2. How do i uninstall EHCP

    thanks

    Reply
  6. Bad, bad, bad.

    I follow the instructions on the web ONLY to find out when the install.sh runs that install.sh SHOULD NOT be run on CentOS systems.

    Why didn’t you say this BEFORE saying to invoke install.sh? Now I don’t have a clean CENTOS and possibly cant install this manually?

    Yes, no warranty. But a WARNING would have been nice. I’m struggling with CentOS as it is, this just added more frustration on me.

    Reply
  7. Hi Ravi,

    I have just installed LAMP on my cloud server from RackSpace using Cent Os 6.4. I am confused which CPanel I should use between EHCP or Webmin?

    PS: I was using big rock share hosting previous to this. Can you please help me choosing which is best for managing multiple domains??

    Thanks

    Reply
    • If you planning to host multiple domains then it’s better to go with CPanel hosting.

      Reply
  8. the command should be tar -zxvf ehcp_latest.tgz not tar -zxvf ehcp.tgz

    Reply
    • Yeah that was a typo, corrected now Thanks..

      Reply
  9. There is a rather large error in command in the second step.

    The file name is incorrect!

    Reply
    • Which command and what error you talking about? can you post here.

      Reply
  10. Hi.
    I followed your verry detailed installation guide but…
    When I activate one domaine its not possible to reach the http/docs folders with net2ftp (cant log in with user/pass) it says
    The error occured in file /var/www/new/ehcp/net2ftp/includes/filesystem.inc.php on line 56.
    • function ftp_openconnection (/var/www/new/ehcp/net2ftp/modules/browse/browse.inc.php on line 223)
    • function net2ftp_module_printBody (/var/www/new/ehcp/net2ftp/main.inc.php on line 313)
    • function net2ftp (/var/www/new/ehcp/net2ftp/index.php on line 59) ◦ argument 0: printBody

    Can you help?

    Reply
  11. Thanks for this nice guide.

    Keep the good work up.

    Reply
  12. succesed install, but canot login to filemanager

    Reply
    • What http response you getting? I mean error

      Reply
  13. Keep up the good work i will return often.

    Reply
  14. thanks for the tutorial, i’m just finding this way to use EHCP.

    Reply
  15. And this is first time that I announce unattended and light install modes, even before ehcp.net itself… Your analysis of ehcp is quite good. So, I shared such a surprise for ehcp users/server admins.

    Reply
  16. fix typo:

    ./install.sh light unattended

    light install mode skips some packages which are not crucial for a hosting operation. This is new testing version of ehcp.

    Reply
  17. Unattended install is in our roadmap. You can test it by downloading ehcp.net/ehcp_yeni.tgz

    extract it, use:
    ./install.sh unattended

    or:
    ./install.sh light nattended

    or, one liner:
    wget ehcp.net/ehcp_yeni.tgz ; tar -zxvf ehcp_yeni.tgz ; cd ehcp; ./install.sh unattended light

    As you noted, we may also use -y for install.. Thanks for suggestion.

    Reply
  18. Would love an alternate installer that didn’t ask me to confirm every installation part. I have to type y-return a zillion times during the install process.
    Why not have the -y option?

    Reply
  19. dude ehcp can’t be install n cent os :) and only support debian based systems

    Reply
    • The installation provided here was practically tested on CentOS 6.4 and its working fine so far without any problem.

      Reply
      • Can you help me install this with centos 6.4, how to manually install this

        Reply
        • Yes! what kind of help you looking from me? If you want to me setup EHCP for you, will charge a minimum rate.

          Reply

Got Something to Say? Join the Discussion... Cancel reply

Free Course
Get a free Linux course before you go.
Subscribe to TecMint Weekly and get the Learn Linux 7 Days Crash Course free. Read by 34,000+ Linux professionals every Thursday.
Check your email for a magic link to get started.