
In our last article, we showed how to speed up Nginx performance with Ngx_Pagespeed on CentOS 7. In this tutorial, we will explain how to install Nginx with ngx_pagespeed on Debian and Ubuntu system to improve performance of Nginx websites.
Nginx [engine x] is a free and open-source, popular HTTP server powering many sites on the web: well known for its high-performance and stability. It also works as a reverse proxy, generic mail and TCP/UDP proxy server, and can additionally be deployed as a load balancer.
Ngx_pagespeed is a free and open source Nginx module intended for improving the speed of sites as well as reducing page load time; it drastically lowers the time it takes for users to view and interact with with content on your site.
Suggested Read: Install Mod_Pagespeed to Improve Apache Server Performance
Ngx_pagespeed Features:
- HTTPS support with URL control.
- Image optimization: stripping meta-data, dynamic resizing, recompression.
- CSS and JavaScript minification, concatenation, inlining, and outlining.
- Small resource inlining.
- Deferring image and JavaScript loading.
- HTML rewriting.
- Cache lifetime extension.
- Allows configuring for multiple servers and many others.
Step 1: Nginx Installation from Source
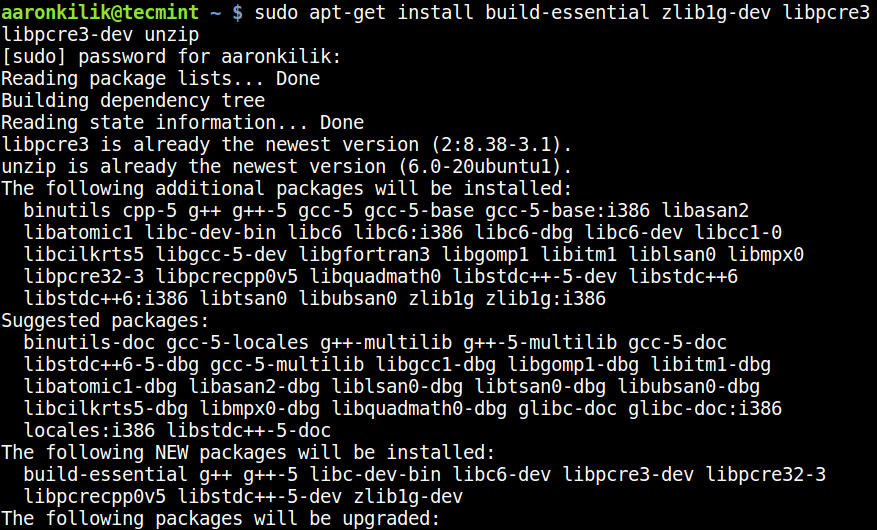
1. To install Nginx with ngx_pagespeed from source required following packages to be installed on the system.
$ sudo apt-get install build-essential zlib1g-dev libpcre3 libpcre3-dev unzip
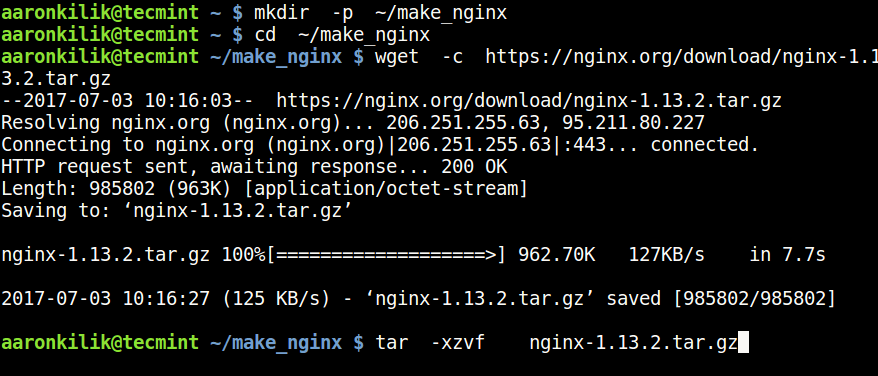
2. Next, download source files of the latest version of Nginx (1.13.2 at the time of this writing) using the wget command and extract the files as shown below.
$ mkdir -p ~/make_nginx
$ cd ~/make_nginx
$ wget -c https://nginx.org/download/nginx-1.13.2.tar.gz
$ tar -xzvf nginx-1.13.2.tar.gz
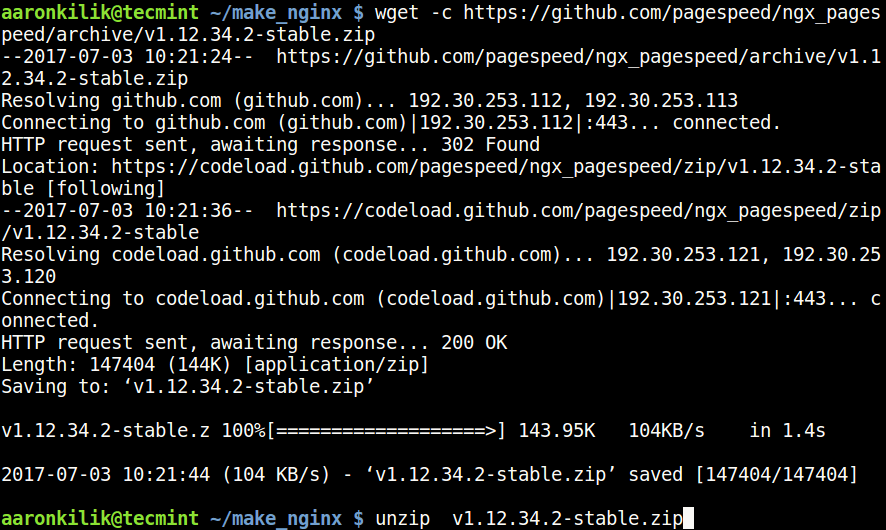
3. Next, get the ngx_pagespeed source files and unzip the compressed file like this.
$ wget -c https://github.com/pagespeed/ngx_pagespeed/archive/v1.12.34.2-stable.zip
$ unzip v1.12.34.2-stable.zip
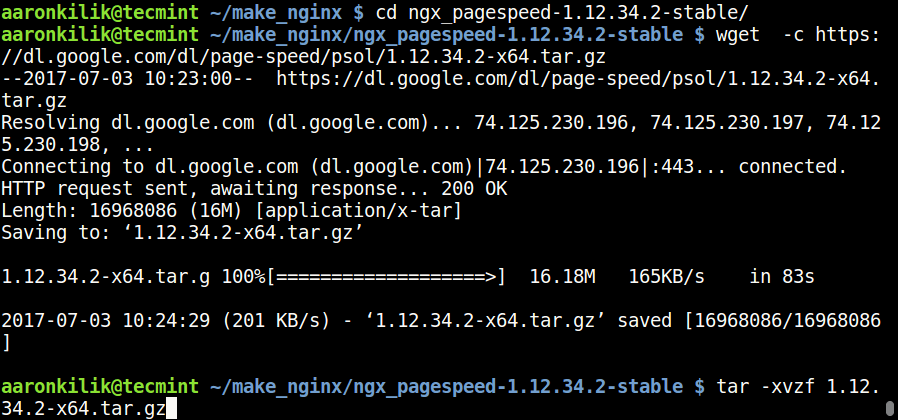
4. Then move into the unzipped ngx_pagespeed directory and download the PageSpeed optimization libraries to compile Nginx as follows.
$ cd ngx_pagespeed-1.12.34.2-stable/
$ wget -c https://dl.google.com/dl/page-speed/psol/1.12.34.2-x64.tar.gz
$ tar -xvzf 1.12.34.2-x64.tar.gz
Step 2: Configure and Compile Nginx with Ngx_Pagespeed
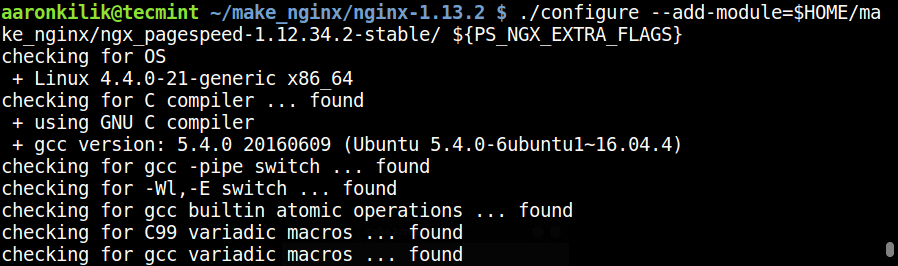
5. Next move into the nginx-1.13.2 directory, and configure the Nginx source using the following commands.
$ cd ~/make_nginx/nginx-1.13.2
$ ./configure --add-module=$HOME/make_nginx/ngx_pagespeed-1.12.34.2-stable/ ${PS_NGX_EXTRA_FLAGS}
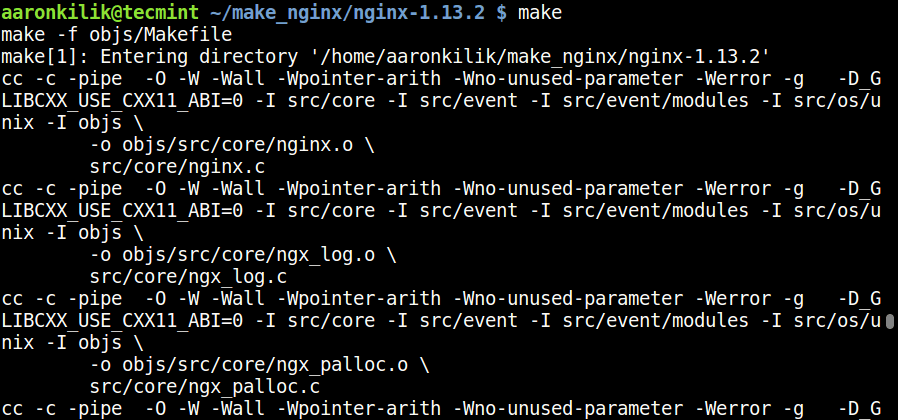
6. Next, compile and install Nginx as follows.
$ make
$ sudo make install
7. After the installation process is complete, run the commands below to create the necessary symlinks for Nginx.
$ sudo ln -s /usr/local/nginx/conf/ /etc/nginx
$ sudo ln -s /usr/local/nginx/sbin/nginx /usr/sbin/nginx
Step 3: Creating Nginx Unit File for SystemD
8. Here, you will have to manually create the Nginx unit file since systemd is the init system on newer versions of Debian and Ubuntu system
Fisrt, create the file /lib/systemd/system/nginx.service.
$ sudo vi /lib/systemd/system/nginx.service
Then download the NGINX systemd service file paste the unit file configuration into the file.
[Unit]
Description=The NGINX HTTP and reverse proxy server
After=syslog.target network.target remote-fs.target nss-lookup.target

[Service]
Type=forking
PIDFile=/var/run/nginx.pid
ExecStartPre=/usr/sbin/nginx -t
ExecStart=/usr/sbin/nginx
ExecReload=/bin/kill -s HUP $MAINPID
ExecStop=/bin/kill -s QUIT $MAINPID
PrivateTmp=true

[Install]
WantedBy=multi-user.target
Save the file and close it.
9. Now, start nginx service for the time being, and enable it to start at system boot by using the commands below.
$ sudo systemctl start nginx
$ sudo systemctl enable nginx
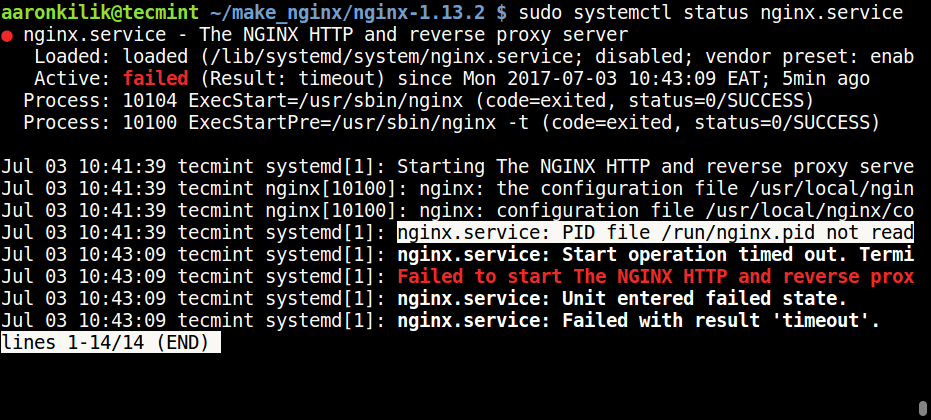
Important: After starting Nginx service, you may see an error as shown in the screen shot below.
systemd[1]: nginx.service: PID file /run/nginx.pid not readable (yet?) after start: No such file or directory
To solve it, open the Nginx configuration /etc/nginx/nginx.conf file and append the following line.
#pid logs/nginx.pid;
to
pid /run/nginx.pid;
Finally restart the nginx service again.
$ sudo systemctl daemon-reload
$ sudo systemctl start nginx
$ sudo systemctl status nginx
Step 4: Configure Nginx With Pagespeed Module
10. Now that Nginx is installed and running on your system, you need to enable the Ngx_pagespeed module. First create a directory where the module will cache the files for your website and set the suitable permissions on this directory as follows.
$ sudo mkdir -p /var/ngx_pagespeed_cache
$ sudo chown -R nobody:nogroup /var/ngx_pagespeed_cache
11. To enable the Ngx_pagespeed module, open the Nginx configuration file.
$ sudo vi /etc/nginx/nginx.conf
Add following Ngx_pagespeed configuration lines within the server block.
# Pagespeed main settings

pagespeed on;
pagespeed FileCachePath /var/ngx_pagespeed_cache;


# Ensure requests for pagespeed optimized resources go to the pagespeed
# handler and no extraneous headers get set.

location ~ "\.pagespeed\.([a-z]\.)?[a-z]{2}\.[^.]{10}\.[^.]+" { add_header "" ""; }
location ~ "^/ngx_pagespeed_static/" { }
location ~ "^/ngx_pagespeed_beacon" { }
Note: If you have deployed any nginx virtual hosts on the server, add the above pagespeed directives to each server block to enable Ngx_pagespeed on each site.
The following is a working example of the Nginx configuration file with Ngx_pagespeed enabled in the default virtual host.
#user nobody;
worker_processes 1;
#error_log logs/error.log;
#error_log logs/error.log notice;
#error_log logs/error.log info;
pid /run/nginx.pid;

events {
 worker_connections 1024;
}
http {
 include mime.types;
 default_type application/octet-stream;

 #log_format main '$remote_addr - $remote_user [$time_local] "$request" '
 # '$status $body_bytes_sent "$http_referer" '
 # '"$http_user_agent" "$http_x_forwarded_for"';
 #access_log logs/access.log main;
 sendfile on;
 #tcp_nopush on;
 #keepalive_timeout 0;
 keepalive_timeout 65;
 #gzip on;
 server {
 listen 80;
 server_name localhost;
 #charset koi8-r;
 #access_log logs/host.access.log main;
	# Pagespeed main settings
	pagespeed on;
	pagespeed FileCachePath /var/ngx_pagespeed_cache;
	# Ensure requests for pagespeed optimized resources go to the pagespeed
	# handler and no extraneous headers get set.
	location ~ "\.pagespeed\.([a-z]\.)?[a-z]{2}\.[^.]{10}\.[^.]+" { add_header "" ""; }
	location ~ "^/ngx_pagespeed_static/" { }
	location ~ "^/ngx_pagespeed_beacon" { }
	location / {
 root html;
 index index.html index.htm;
 }

 #error_page 404 /404.html;
 # redirect server error pages to the static page /50x.html
 #
 error_page 500 502 503 504 /50x.html;
 location = /50x.html {
 root html;
 }
 # proxy the PHP scripts to Apache listening on 127.0.0.1:80
 #
 #location ~ \.php$ {
 # proxy_pass http://127.0.0.1;
 #}
 # pass the PHP scripts to FastCGI server listening on 127.0.0.1:9000
 #
 #location ~ \.php$ {
 # root html;
 # fastcgi_pass 127.0.0.1:9000;
 # fastcgi_index index.php;
 # fastcgi_param SCRIPT_FILENAME /scripts$fastcgi_script_name;
 # include fastcgi_params;
 #}
 # deny access to .htaccess files, if Apache's document root
 # concurs with nginx's one
 #
 #location ~ /\.ht {
 # deny all;
 #}
 }
 # another virtual host using mix of IP-, name-, and port-based configuration
 #
 #server {
 # listen 8000;
 # listen somename:8080;
 # server_name somename alias another.alias;
 # location / {
 # root html;
 # index index.html index.htm;
 # }
 #}
 # HTTPS server
 #
 #server {
 # listen 443 ssl;
 # server_name localhost;
 # ssl_certificate cert.pem;
 # ssl_certificate_key cert.key;

 # ssl_session_cache shared:SSL:1m;
 # ssl_session_timeout 5m;
 # ssl_ciphers HIGH:!aNULL:!MD5;
 # ssl_prefer_server_ciphers on;
 # location / {
 # root html;
 # index index.html index.htm;
 # }
 #}
}
Save and close the file.
12. Then check if the syntax of the Nginx configuration file is error free by running the command below, if it’s correct, you will see the output below:
$ sudo nginx -t

nginx: the configuration file /usr/local/nginx/conf/nginx.conf syntax is ok
nginx: configuration file /usr/local/nginx/conf/nginx.conf test is successful
13. Afterwards restart Nginx server to effect the recent changes.
$ sudo systemctl restart nginx
Step 5: Testing Nginx with Ngx_pagespeed
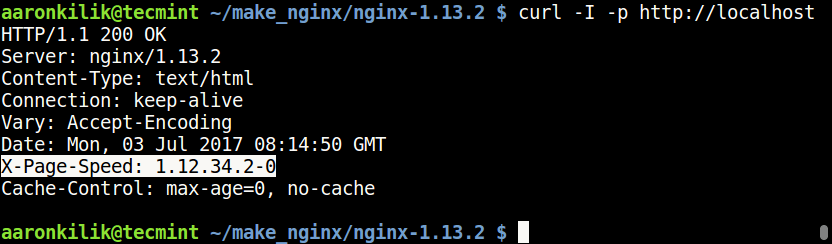
14. Now test whether Ngx-pagespeed is now working in conjunction with Nginx using the cURL command below.
$ curl -I -p http://localhost
If you have failed to see the above header, then go back to step 10 and attentively go through the instructions to enable Ngx-pagespeed with the successive steps.
Ngx-pagespeed Github repository: https://github.com/pagespeed/ngx_pagespeed
If you want to secure Nginx web server, then we suggest reading through this useful tutorial: The Ultimate Guide to Secure, Harden and Improve Performance of Nginx.
That is it! In this tutorial, we explained how to install Nginx with ngx_pagespeed on Debian and Ubuntu. If you’ve any queries do send us using our comments form form below.
If this article helped you solve a problem, consider buying a coffee. It helps keep TecMint free, supports the authors, and keeps the project going.
Got Something to Say? Join the Discussion... Cancel reply