
In the previous two articles of this Postfix series you learned how to set up and manage the email server database through phpMyAdmin, and how to configure Postfix and Dovecot to handle incoming and outgoing mail. In addition, we explained how to set up a mail client, such as Thunderbird, for the virtual accounts we created previously.
- Setup Postfix Mail Server and Dovecot with MariaDB – Part 1
- How to Configure Postfix and Dovecot with Virtual Domain Users – Part 2
- Install and Configure RoundCube Webmail Client with Virtual Users in Postfix – Part 4
- Use Sagator, an Antivirus/Antispam Gateway to Protect Your Mail Server – Part 5
Since no email server setup can be complete without taking precautions against viruses and spam, we are going to cover that topic in the current article.
Please keep in mind that even when *nix-like operating systems are usually considered to be virus-free, chances are clients using other operating systems will also connect to your email server.
For that reason, you need to provide them with the confidence that you have taken the necessary measures to protect them to the extent possible from such threats.
Configuring SpamAssassin for Postfix
In the process of receiving email, spamassassin will stand between the outside world and the email services running on your server itself. If it finds, according to its definition rules and configuration, that an incoming message is spam, it will rewrite the subject line to clearly identify it as such. Let’s see how.
The main configuration file is /etc/mail/spamassassin/local.cf, and we should make sure the following options are available (add them if they are not present or uncomment if necessary):
report_safe 0
required_score 8.0
rewrite_header Subject [SPAM]
- When report_safe is set to 0 (recommended value), incoming spam is only modified by modifying the email headers as per rewrite_header. If it is set to 1, the message will be deleted.
- To set the aggressivity of the spam filter, required_score must be followed by an integer or decimal number. The lesser the number, the more sensitive the filter becomes. Setting required_score to a value somewhere between 8.0 and 10.0 is recommended for a large system serving many (~100s) email accounts.
Once you’ve saved those changes, enable and start the spam filter service, and then update the spam rules:
# systemctl enable spamassassin
# systemctl start spamassassin
# sa-update
For more configuration options, you may want to refer to the documentation by running perldoc Mail::SpamAssassin::Conf in the command line.
Integrating Postfix and SpamAssassin
In order to efficiently integrate Postfix and spamassassin, we will need to create a dedicated user and group to run the spam filter daemon:
# useradd spamd -s /bin/false -d /var/log/spamassassin
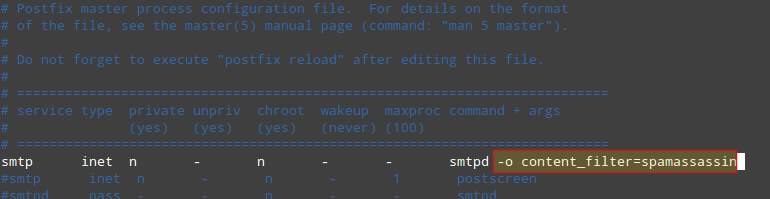
Next, add the following line at the bottom of /etc/postfix/master.cf:
spamassassin unix - n n - - pipe flags=R user=spamd argv=/usr/bin/spamc -e /usr/sbin/sendmail -oi -f ${sender} ${recipient}
And indicate (at the top) that spamassassin will serve as content_filter:
-o content_filter=spamassassin
Finally, restart Postfix to apply changes:
# systemctl restart postfix
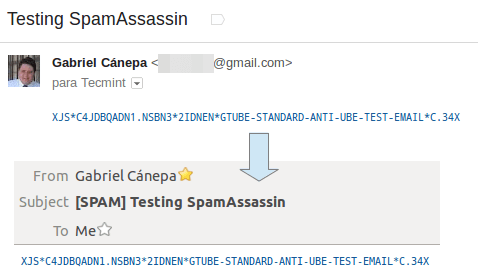
To verify that SpamAssassin is working properly and detecting incoming spam, a test known as GTUBE (Generic Test for Unsolicited Bulk Email) is provided.
To perform this test, send an email from a domain outside your network (such as Yahoo!, Hotmail, or Gmail) to an account residing in your email server. Set the Subject line to whatever you want and include the following text in the message body:
XJS*C4JDBQADN1.NSBN3*2IDNEN*GTUBE-STANDARD-ANTI-UBE-TEST-EMAIL*C.34X
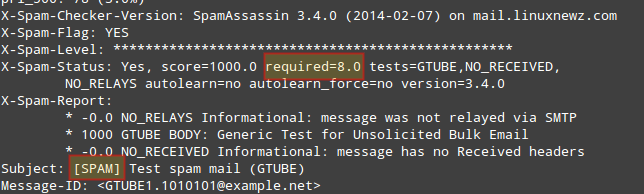
For example, sending the above text in a message body from my Gmail account produces the following result:
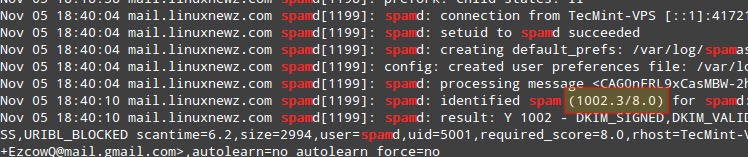
And shows the corresponding notice in the logs:
# journalctl | grep spam
As you can see in the image above, this email message got a spam score of 1002.3. Additionally, you can test spamassassin right from the command line:
# spamassassin -D < /usr/share/doc/spamassassin-3.4.0/sample-spam.txt
The above command will produce some really verbose output that should include the following:
If these tests are not successful, you may want to refer to the spamassassin integrations guide.
Starting ClamAV and Update Virus Definitions
To begin, we will need to edit /etc/clamd.d/scan.conf. Uncomment the following line:
LocalSocket /var/run/clamd.scan/clamd.sock
and comment out or delete the line:
Example
Then enable and start the clamav scanner daemon:
# systemctl enable [email protected]
# systemctl start [email protected]
and don’t forget to set the antivirus_can_scan_system SELinux boolean to 1:
# setsebool -P antivirus_can_scan_system 1
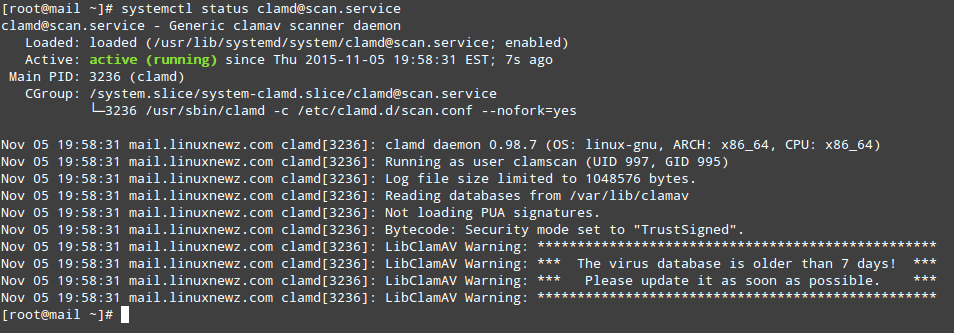
At this point it is worth and well to check on the service’s status:
As you can see in the image above, our virus signatures are older than 7 days. To update them we will use a tool called freshclam that was installed as part of the clamav-update package.
The easiest way to update the virus definitions is through a cron job that executes as often as desired (once a day for example, at 1 am server time as indicated in the following example is considered enough):
00 01 * * * root /usr/share/clamav/freshclam-sleep
You can also update the virus definitions manually, but before you’ll also have to remove or comment out the following line in /etc/freshclam.conf.
Example
Now you should be able to run:
# freshclam
which will update the virus definitions as desired:
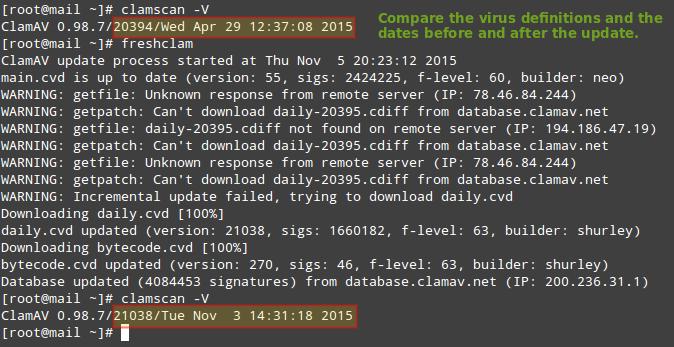
Testing ClamAV for Virus in Emails
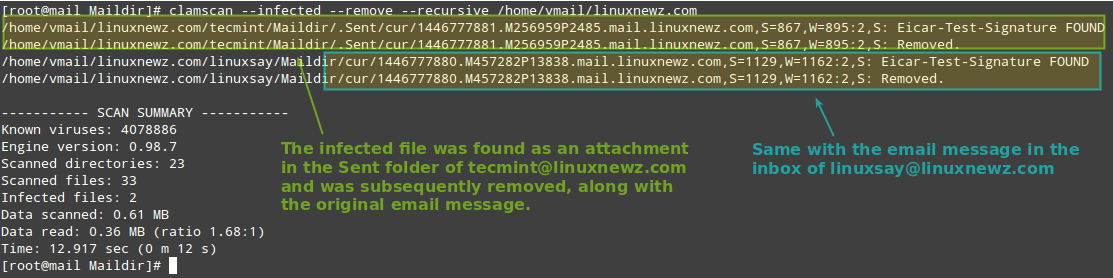
To verify ClamAV is working properly, let’s download a test virus (which we can get from http://www.eicar.org/download/eicar.com) to the Maildir of [email protected] (which is located in /home/vmail/linuxnewz.com/tecmint/Maildir) to simulate an infected file received as a mail attachment:
# cd /home/vmail/linuxnewz.com/tecmint/Maildir
# wget http://www.eicar.org/download/eicar.com
And then scan the /home/vmail/linuxnewz.com directory recursively:
# clamscan --infected --remove --recursive /home/vmail/linuxnewz.com
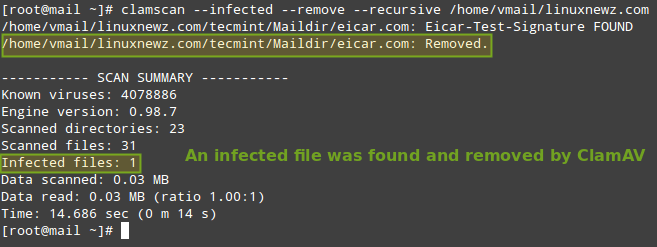
Now, feel free to set up this scan to run through a cronjob. Create a file named /etc/cron.daily/dailyclamscan, insert the following lines:
#!/bin/bash
SCAN_DIR="/home/vmail/linuxnewz.com"
LOG_FILE="/var/log/clamav/dailyclamscan.log"
touch $LOG_FILE
/usr/bin/clamscan --infected --remove --recursive $SCAN_DIR >> $LOG_FILE
and grant execute permissions:
# chmod +x /etc/cron.daily/dailyclamscan
The above cronjob will scan the mail server directory recursively and leave a log of its operation in /var/log/clamav/dailyclamscan.log (make sure the /var/log/clamav directory exists).
Let’s see what happens when we send the eicar.com file from [email protected] to [email protected]:
Summary
If you followed the steps outlined in this tutorial and in the previous two articles of this series, you now have a working Postfix email server with spam and antivirus protection.
DISCLAIMER: Please note that server security is a vast subject and cannot be adequately covered in a short series like this.
For that reason, I highly encourage you to become familiar with the tools used in this series and their man pages. Although I have done my best to cover the essential concepts associated with this topic, do not assume that after going through this series you are fully qualified to set up and maintain a email server in a production environment.
This series is intended as a starting point and not as an exhaustive guide to mail server administration in Linux.
You will probably think of other ideas that can enrich this series. If so, feel free to drop us a note using the comment form below. Questions and other suggestions are appreciated as well – we look forward to hearing from you!
If this article helped you solve a problem, consider buying a coffee. It helps keep TecMint free, supports the authors, and keeps the project going.
Got Something to Say? Join the Discussion... Cancel reply