
Scrot (SCReenshOT) is an open source, powerful and flexible, command line utility for taking screen shots of your Desktop, Terminal or a Specific Window manually or automatically by Cron job. Scrot is similar to Linux ‘import‘ command, but uses ‘imlib2‘ library to capture and save images. It supports multiple image formats (JPG, PNG, GIF, etc), which you can specify while taking screen shots by using the tool.
Features of Scrot
- With scrot we can take screen shots easily without any additional work.
- We can also optimize the quality of the screen shots image (with the -q switch, followed by a quality level between 1 and 100. The default quality level is 75.
- It is very easy to installation and use.
- We can capture a specific window or a rectangular area on the screen with the help of switch.
- Can get all screen shots in a particular directory and also can store all screen shots in a remote PC or network server.
- Can monitor all Desktop PC in admin absent and prevent to unwanted activities.
Installing Scrot in Linux
We can install ‘Scrot‘ on any Linux distribution. If you’re using RedHat or Debian based distribution, you can use a package manager tool like yum or apt-get to install it as shown below.
# yum install scrot [On RedHat based Systems]
$ sudo apt-get install scrot [On Debian based Systems]
If you wish to install it from source code, then use the following commands.
$ wget http://linuxbrit.co.uk/downloads/scrot-0.8.tar.gz
$ tar -xvf scrot-0.8.tar.gz
$ cd /scrot-0.8
$ ./configure
$ make
$ su -c "make install"
Note: RedHat users, need to specify prefix location with configure command.
$ ./configure --prefix=/usr
How to Use Scrot to take Screen shots
As I said above, scrot can capture an entire desktop, a terminal or a specific window. With the help of scrot you can also take screen shots of a shell/terminal of a system that doesn’t have a GUI support.
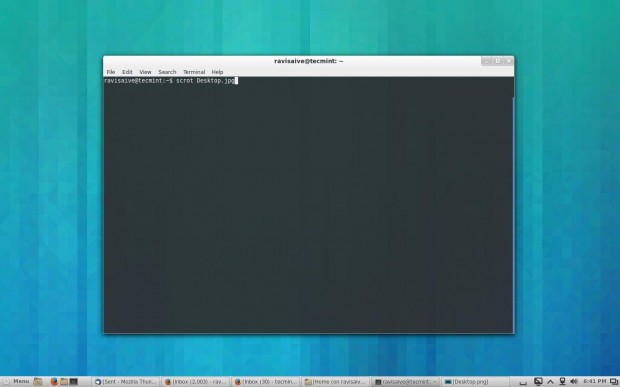
Take Full Desktop Screen Shot
Let’s take a entire screen shot of the Desktop, using the following command in your terminal.
$ scrot /home/tecmint/Desktop.jpg
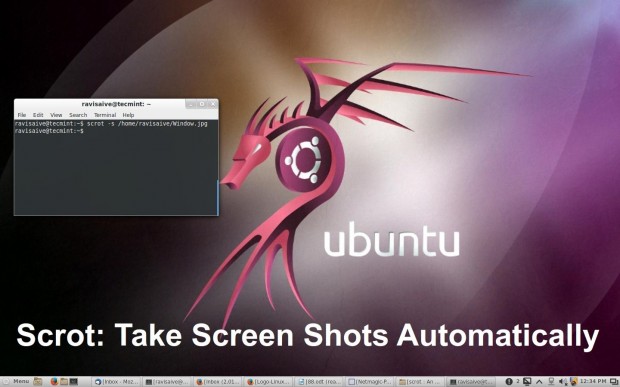
Take Specific Window Screen Shot
If you would like to capture a specific area on the screen, you can use the following command with ‘-s’ switch that allows you to interactively select the area with your mouse that you wish to take screen shot.
scrot -s /home/tecmint/Window.jpg
Adjusting the Image Quality
With the help of ‘-q‘ switch, you can specify the quality level of the image between 1 and 100. The default image level is set to 75, and the image output will be different depending upon the file format you specify.
The following command will capture an image at 90% the quality of the original high quality screen.
$ scrot -q 90 /home/tecmint/Quality.jpg
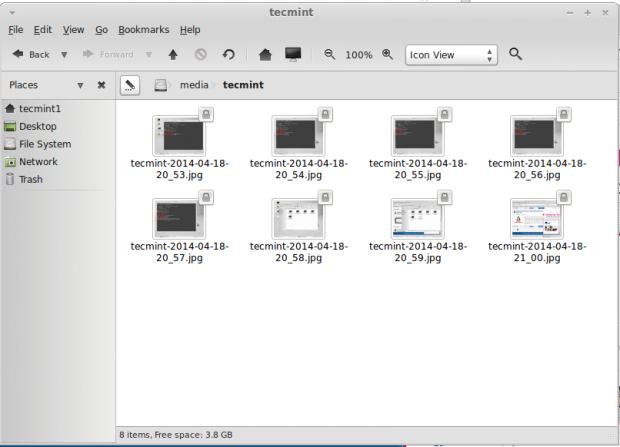
Take Screen Shots Automatically
Now if you would like to get automatically screen shots, than you need to create a simple shell script. Create a file ‘screen.sh‘ with ‘touch‘ command and add the following content to it.
#!/bin/sh
DISPLAY=:0 scrot 'tecmint-%Y-%m-%d-%H_%M.jpg' -q 20 && mv /home/tecmint/*.jpg /media/tecmint
Now grant ‘777‘ permission and set an Cron job.
$ chmod 777 screen.sh
Open a ‘crontab‘ file and add the following entry. You can define custom interval time.
$ crontab -e
*/1 * * * * sh /home/tecmint/screen.sh
The above Cron entry will run every ‘1‘ minute and take screen shots and store them under ‘/media/tecmint‘ directory with filename as date and time. After running script for 1 minute, this is what I found in my ‘tecmint’ directory.
Reference Links
http://linuxbrit.co.uk/software/
If this article helped you solve a problem, consider buying a coffee. It helps keep TecMint free, supports the authors, and keeps the project going.
Got Something to Say? Join the Discussion... Cancel reply