
If you’re a newcomer to the home lab ecosystem, you might believe bulky rigs and ex-enterprise systems are the only hardware that could keep up with typical virtualization tools. But in reality, you can turn practically any functional PC into a reliable server node for your home lab experiments, including dinosaur systems that can’t meet Windows 11’s minimum requirements.
In fact, turning an aged laptop into a home server is one of the best ways you can breathe new life into your computing companion. Sure, there are a couple of caveats to using a laptop as a dedicated workstation (some more dire than others), but as long as you exercise due caution, it’s more than enough for home lab experiments.
Don't just revive your old laptop, turn it into a home server
General-purpose Linux distros aren't the only way to resurrect your outdated computing companion
Any ol’ laptop can run virtual guests
If my decade-old system can do it, then so can yours
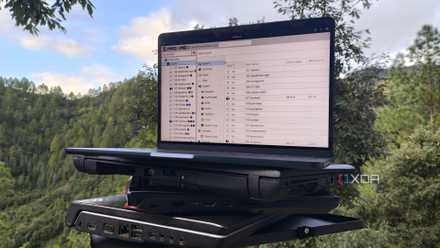
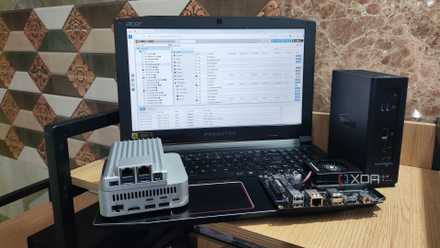
When it comes to building a home server, you’ve got a lot of options to choose from for the OS and virtualization tools. Better yet, the minimum requirements on many of these platforms are so low that you can run them on potato machines released over a decade ago. Take Proxmox, for example. As long as your laptop has an x86 processor and 1GB of memory, it’s good enough to serve as a PVE host. Source: Yours truly, who has deployed this beast of a virtualization platform on everything from an old Acer Predator Helios 300 system to a dinosaur Lenovo G510 laptop. The latter, in particular, is surprisingly decent at running containerized services – to the point where the obsolete laptop can still host a dozen apps (including those inside a nested CasaOS) before its 4GB of RAM starts to hit the red zone.
That’s a budget-friendly laptop released back in 2014. On somewhat modern laptops like my Helios 300, I can easily run a handful of virtual machines alongside LXCs without a noticeable decline in performance. For reference, neither of these laptops is qualified to run Windows 11. But arm them with Proxmox, and they turn into highly-capable workstations for server experiments.
Proxmox
You can also opt for lightweight NAS or container-only setups
Leaving Proxmox aside, you’re free to experiment with different server platforms on your old laptop. Now, I wouldn’t recommend using USB HDDs to build a Network-Attached Storage server, but if your aged laptop supports extra SATA drives, you can turn it into a decent backup rig with OpenMediaVault. In fact, repurposing systems into OMV servers is a great way to add some redundancy to your primary NAS, and you can use them as remote workstations for 3-2-1 backup pipelines if you don’t want to shell out hundreds of bucks on an offsite machine.
Alternatively, you could ditch PVE and OMV altogether and rely on a containerization platform on a low-end laptop. YunoHost and UmbrelOS are rock-solid options if you want tools that you can install the same way as a conventional ISO file, while CasaOS and Cosmos Cloud are just as effective for your container-hosting needs once you configure them on top of a pre-existing distro. Speaking of the underlying OS, you can even go for a barebones CLI distribution and equip it with only those services that you require for an efficient home server. I tend to stick with Ubuntu Server due to its terrific compatibility with most laptops, but DietPi and good ol’ Arch Linux are just as valid for your DIY workstation.
I'm addicted to installing Proxmox on old devices
Proxmox has become my favorite virtualization platform for revitalizing outdated systems
Maintenance is fairly easy on a laptop
You don’t need to connect extra peripherals to your laptop
Although laptops are undoubtedly weaker than similarly priced desktop rigs, they do have certain perks that can benefit your home lab experiments. After all, you get a built-in keyboard, mouse, and display on your laptop, meaning you don’t need to scrounge around for I/O devices or look into adapters when troubleshooting your portable workstation or tweaking its BIOS options.
Most laptops also have Wi-Fi and Bluetooth connectivity, and the latter is extremely handy when you’re planning to host Home Assistant. On paper, the built-in battery also sounds like a sweet deal, but in reality, it’s a double-edged sword that can cause more harm than good…
You’ll want to take a couple of precautions with your laptop-powered node
I recommend tossing the battery out altogether
If you’re expecting your laptop’s battery to act as a stand-in for a UPS, let me stop you there. Sure, it can keep your makeshift server active long enough for you to initiate a graceful shutdown when there’s an outage. But keeping the battery plugged in to the AC adapter at all times will cause it to swell up eventually. On a particularly old laptop, you might already have a degraded battery, and charging it 24/7 can turn it into a potential fire hazard.
Personally, I’ve unplugged the batteries on my old laptops, as I already have a dedicated UPS in my home lab. But if you’re not willing to get rid of the battery or have a system that doesn’t let you unmount it, you can tweak the BIOS settings to cap the max charge limit well under 80%, thereby slowing your battery’s degradation rate.
In the name of all that’s holy, please don’t close its lid
Another piece of advice I’ve often seen on forums is that you should close the laptop’s lid when it’s operational. Well, I’m here to tell you that it’s a terrible idea. Laptops tend to pull air through the keyboard, with certain models adding small vents right around the hinges. Closing the lid while your laptop is still busy with server operations will block these vents and choke the airflow. Considering how prone laptops are to thermal throttling, you really don’t want to trap the heat in their chassis. Worst-case scenario, you might end up damaging your monitor, keyboard, and laptop internals.