
Source: https://git.zabbix.com/projects/ZBX/repos/zabbix/browse/templates/media/glpi?at=release/7.4
GLPI webhook
Overview
This guide describes how to integrate your Zabbix installation with your GLPI installation using the Zabbix webhook feature, providing instructions on setting up a media type, user, and action in Zabbix.
The webhook supports both legacy REST API (V1) and RESTful API (V2). This webhook creates tickets in the GLPI Assistance section. Created tickets have the following urgency mapping:
| Severity in Zabbix | Urgency in GLPI |
|---|---|
| 0 - Not classified | Very low |
| 1 - Information | Very low |
| 2 - Warning | Low |
| 3 - Average | Medium |
| 4 - High | High |
| 5 - Disaster | Very high |
- When a problem is updated in Zabbix, the webhook updates the ticket's title and urgency in GLPI and adds a followup entry with the update comment.
- When a problem is resolved in Zabbix, the webhook updates the ticket's title and adds a followup entry with resolution details.
- Created tickets have the status "New" and resolved tickets - "Solved".
- Due to the specifics of the webhook, the number of retries is, by default, set to 1. We recommend not changing this setting; should a transaction error occur, additional duplicate objects (tickets, followups) may be created during the retry.
Tested on
- GLPI 10.0.18, 10.0.24, 11.0.5, 11.0.6
Requirements
Zabbix version: 7.4 and higher.
Parameters
After importing the webhook, you can configure it using webhook parameters.
Configurable parameters
The configurable parameters are intended to be changed according to the webhook setup as well as the user's preferences and environment.
| Name | Value | Description |
|---|---|---|
| zabbix_url | {$ZABBIX.URL} | Current Zabbix URL. |
| glpi_legacy_api | false | Boolean value (true/false) to set API version: false (default) enables Modern API v2 with OAuth2 Bearer token authentication, true enables Legacy API v1 with Session-Token authentication. |
| glpi_app_token | GLPI application token (optional; specify if the token is set in the API client settings). | |
| glpi_user_token | <PLACE GLPI USER TOKEN> | GLPI user token. |
| glpi_client_id | <PLACE GLPI CLIENT ID> | GLPI client ID. |
| glpi_client_secret | <PLACE GLPI CLIENT SECRET> | GLPI client secret. |
| glpi_username | <PLACE GLPI USERNAME> | GLPI username. |
| glpi_password | <PLACE GLPI USER PASSWORD> | GLPI user password. |
| glpi_url | <PLACE GLPI URL> | URL of GLPI installation. |
| glpi_urgency_autoregistration | Low | String value of GLPI urgency to assign to autoregistration event tickets. |
| glpi_urgency_discovery | Low | String value of GLPI urgency to assign to discovery event tickets. |
| glpi_urgency_internal | Low | String value of GLPI urgency to assign to internal event tickets. |
| severity_not_classified | Very low | GLPI urgency to assign to tickets when event has Zabbix severity "Not classified". |
| severity_information | Very low | GLPI urgency to assign to tickets when event has Zabbix severity "Information". |
| severity_warning | Low | GLPI urgency to assign to tickets when event has Zabbix severity "Warning". |
| severity_average | Medium | GLPI urgency to assign to tickets when event has Zabbix severity "Average". |
| severity_high | High | GLPI urgency to assign to tickets when event has Zabbix severity "High". |
| severity_disaster | Very high | GLPI urgency to assign to tickets when event has Zabbix severity "Disaster". |
Internal parameters
Internal parameters are reserved for predefined macros that are not meant to be changed.
| Name | Value | Description |
|---|---|---|
| event_source | {EVENT.SOURCE} | Numeric value of the event source. Possible values: 0 - Trigger, 1 - Discovery, 2 - Autoregistration, 3 - Internal, 4 - Service. |
| event_value | {EVENT.VALUE} | Numeric value of the event that triggered an action (1 for problem, 0 for recovering). |
| event_severity | {EVENT.SEVERITY} | Name of the event severity. |
| event_nseverity | {EVENT.NSEVERITY} | Numeric value of the event severity. Possible values: 0 - Not classified, 1 - Information, 2 - Warning, 3 - Average, 4 - High, 5 - Disaster. |
| event_update_nseverity | {EVENT.UPDATE.NSEVERITY} | Numeric value of the event update severity. Possible values: 0 - Not classified, 1 - Information, 2 - Warning, 3 - Average, 4 - High, 5 - Disaster. |
| event_update_severity | {EVENT.UPDATE.SEVERITY} | Name of the event update severity. |
| event_update_status | {EVENT.UPDATE.STATUS} | Numeric value of the problem update status. Possible values: 0 - Webhook was called because of problem/recovery event, 1 - Update operation. |
| alert_subject | {ALERT.SUBJECT} | 'Default subject' value from action configuration. |
| alert_message | {ALERT.MESSAGE} | 'Default message' value from action configuration. |
| event_id | {EVENT.ID} | Numeric ID of the event that triggered an action. |
| trigger_id | {TRIGGER.ID} | Numeric ID of the trigger of this action. |
| glpi_problem_id | {EVENT.TAGS.__zbx_glpi_problem_id} | GLPI problem ID. |
Please be aware that each webhook supports an HTTP proxy. To use this feature, add a new media type parameter with the name
http_proxyand set its value to the proxy URL.
Service setup
RESTful API (V2) with OAuth2 - recommended configuration for GLPI 11+:
- Enable access to the GLPI API:
- In the GLPI web interface, go to Setup > General > API.
- Switch the toggle to activate Enable API and click the Save button.
- Add an OAuth client:
- Go to Setup > OAuth clients.
- Click the Add button on the top of the page.
- Set the client name; enter api in the Scopes field and Password in Grants.
- Click the Add button.
- Open the settings of the created client, and then copy and save the client ID and client secret.
- Create a new user profile with permissions to create tickets and followups (alternatively, you can use an existing profile with sufficient privileges):
- Go to Administration > Profiles and click the Add button on the top of the page.
- Specify the profile name and set the Profile's Interface option to Standard Interface, and then click the Add button.
- Open the created profile and click the Assistance tab.
- In the Tickets section, set the Update, Create, and See all tickets permissions.
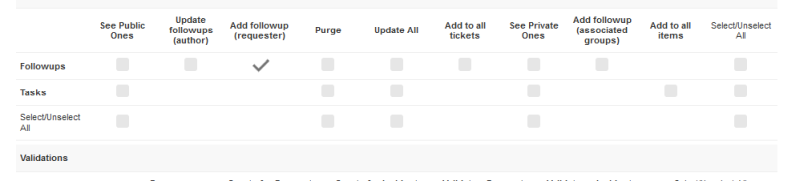
- In the Followups/Tasks section, set the Add (Requester) permission for the Followups row.
- Click the Save button.
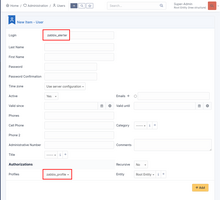
- Create a new user:
- Go to Administration > Users and click the Add button on the top of the page.
- Specify the user login and set the Authorization > Profile option to the profile you created in the previous step (or any other existing profile with permissions to create tickets and followups).
- Set the password for the user.
- Click the Add button.
GLPI 11+ continues to support REST API (V1) without requiring OAuth2/V2. Note that V1 is not recommended for new integrations.
REST API (V1) - legacy configuration for GLPI 10:
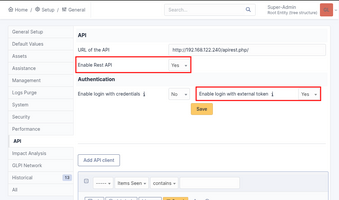
- Enable access to the GLPI REST API:
- In the GLPI web interface, go to Setup > General > API.
- Set the Enable Rest API and Enable login with external token options to Yes and click the Save button.
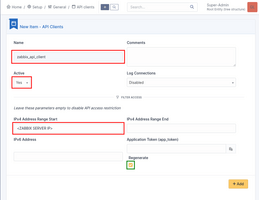
- Add a new API client:
- Click the Add API client button.
- Specify the API client name and set the Active option to Yes.
- For security reasons, you may want to restrict the API client to the IP address of Zabbix server and/or create an additional application token (will be generated by default; you can uncheck the Regenerate checkbox if you don't want to use it).
- Click the Add button.
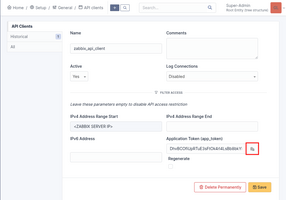
- If you've opted to create an application token, open the settings of the created API client, and then copy and save the generated application token.
- Create a new user profile with permissions to create tickets and followups (alternatively, you can use an existing profile with sufficient privileges):
- Go to Administration > Profiles and click the Add button on the top of the page.
- Specify the profile name and set the Profile's Interface option to Standard Interface, and then click the Add button.
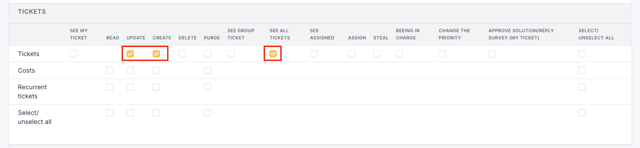
- Open the created profile and click the Assistance tab.
- Set the Update, Create, and See all tickets permissions in the Tickets section.
- Set the Add followup (Requester) permission for the Followups line in the Followups/Tasks section.
- Click the Save button.
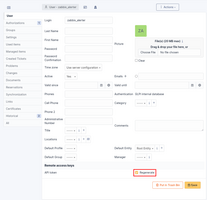
- Create a new user:
- Go to Administration > Users and click the Add User button on the top of the page.
- Specify the user login and set the Profiles option to the profile that you created in the previous step (or any other existing profile with permissions to create tickets and followups).
- Click the Add button.
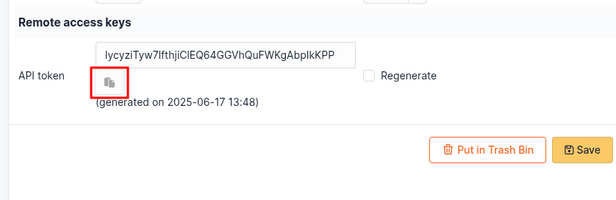
- Open the profile of the created user and check the Regenerate checkbox of the API token option; click Save.
- Copy and save the generated user API token.
Zabbix configuration
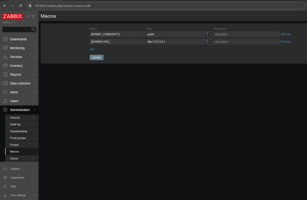
- Before you can start using the GLPI webhook, you need to set the global macro
{$ZABBIX.URL}:
- In the Zabbix web interface, go to Administration > Macros in the top-left drop-down menu.
- Set up the global macro
{$ZABBIX.URL}which will contain the URL to the Zabbix frontend. The URL should be either an IP address, a fully qualified domain name, or a localhost. - Specifying a protocol is mandatory, whereas the port is optional. Depending on the web server configuration, you might also need to append
/zabbixto the end of the URL. Good examples:http://zabbix.comhttps://zabbix.lan/zabbixhttp://server.zabbix.lan/http://localhosthttp://127.0.0.1:8080
- Bad examples:
zabbix.comhttp://zabbix/
- Import the media type:
- In the Alerts > Media types section, import the
media_glpi.yamlfile.
- It is also possible to set GLPI ticket urgency by parameters. Predefined parameter values are already in place; note that they use the default GLPI urgency.
Please adjust these values to suit your GLPI environment.
The following parameters apply to Zabbix events that support severities:
severity_not_classified- for Zabbix severity "Not Classified"severity_information- for Zabbix severity "Information"severity_warning- for Zabbix severity "Warning"severity_average- for Zabbix severity "Average"severity_high- for Zabbix severity "High"severity_disaster- for Zabbix severity "Disaster"
And the following for Zabbix events that do not have severities:
glpi_urgency_internal- for Zabbix internal eventsglpi_urgency_discovery- for Zabbix discovery eventsglpi_urgency_autoregistration- for Zabbix autoregistration events
- Open the imported GLPI media type and set the following webhook parameters:
glpi_url- the frontend URL of your GLPI installation, without any path suffix (e.g. http://glpi.example.com:8080).glpi_legacy_api- determine whether you are using RESTful API V2 with OAuth2 authorization (default, parameter valuefalse) or legacy API (parameter valuetrue).
If using RESTful API V2 with OAuth2, set the required parameters:
glpi_client_id- the client ID that was generated during the creation of the OAuth client.glpi_client_secret- the client secret that was generated during the creation of the OAuth client.glpi_username- GLPI username created for the webhook.glpi_password- password for the GLPI webhook user.
If using legacy API, set the parameters:
glpi_app_token- if you've opted to use an application token during the creation of API client, specify it here; otherwise leave it empty.glpi_user_token- the user token that was generated during the creation of the GLPI user.
-
Click the Enabled checkbox to enable the media type and click the Update button to save the webhook settings.
-
Create a Zabbix user and add media:
- To create a new user, go to the Users > Users section and click the Create user button in the top-right corner. In the User tab, fill in all the required fields (marked with red asterisks).
- In the Media tab, click Add and select GLPI from the Type drop-down list. Though the Send to field is not used in the GLPI webhook, it cannot be left empty. To comply with frontend requirements, enter any symbol in the field.
- Make sure this user has access to all the hosts for which you would like problem notifications to be sent to GLPI.
- Done! You can now start using this media type in actions and create ticket items in GLPI.
For more information, please see Zabbix and GLPI documentation.
Feedback
Please report any issues with the media type at https://support.zabbix.com.
You can also provide feedback, discuss the media type, or ask for help at ZABBIX forums.
Source: https://git.zabbix.com/projects/ZBX/repos/zabbix/browse/templates/media/glpi?at=release/7.2
GLPi webhook
Overview
This guide describes how to integrate your Zabbix installation with GLPi using the Zabbix webhook feature, providing instructions on setting up a media type, user, and action in Zabbix.
This webhook creates problem records in the GLPi Assistance section. Created problems have the following severity mapping:
| Severity in Zabbix | Urgency in GLPi |
|---|---|
| 0 - Not classified | Medium (default) |
| 1 - Information | Very low |
| 2 - Warning | Low |
| 3 - Average | Medium |
| 4 - High | High |
| 5 - Disaster | Very high |
When an on Update action occurs in Zabbix, the webhook updates the problem's title and severity and adds a follow-up entry with the update comment. When a problem is resolved in Zabbix, the webhook updates the problem's title and adds a follow-up entry with resolution details. Created problems have the status "New", and resolved problems - "Solved".
Due to the specifics of the webhook, the number of retries is, by default, set to 1. We recommend not changing this setting; should a transaction error occur, additional duplicate objects (problems, followups) may be created during the retry.
Tested on
- GLPI 10.0.16
Requirements
Zabbix version: 7.2 and higher.
Parameters
After importing the webhook, you can configure it using webhook parameters.
Configurable parameters
The configurable parameters are intended to be changed according to the webhook setup as well as the user's preferences and environment.
| Name | Value | Description |
|---|---|---|
| zabbix_url | {$ZABBIX.URL} | Current Zabbix URL. |
| glpi_token | <PLACE GLPI TOKEN> | GLPi user token. |
| glpi_url | <PLACE GLPI URL> | URL of GLPi installation. |
Internal parameters
Internal parameters are reserved for predefined macros that are not meant to be changed.
| Name | Value | Description |
|---|---|---|
| event_source | {EVENT.SOURCE} | Numeric value of the event source. Possible values: 0 - Trigger, 1 - Discovery, 2 - Autoregistration, 3 - Internal, 4 - Service. |
| event_value | {EVENT.VALUE} | Numeric value of the event that triggered an action (1 for problem, 0 for recovering). |
| event_severity | {EVENT.SEVERITY} | Name of the event severity. |
| event_nseverity | {EVENT.NSEVERITY} | Numeric value of the event severity. Possible values: 0 - Not classified, 1 - Information, 2 - Warning, 3 - Average, 4 - High, 5 - Disaster. |
| event_update_nseverity | {EVENT.UPDATE.NSEVERITY} | Numeric value of the event update severity. Possible values: 0 - Not classified, 1 - Information, 2 - Warning, 3 - Average, 4 - High, 5 - Disaster. |
| event_update_severity | {EVENT.UPDATE.SEVERITY} | Name of the event update severity. |
| event_update_status | {EVENT.UPDATE.STATUS} | Numeric value of the problem update status. Possible values: 0 - Webhook was called because of problem/recovery event, 1 - Update operation. |
| alert_subject | {ALERT.SUBJECT} | 'Default subject' value from action configuration. |
| alert_message | {ALERT.MESSAGE} | 'Default message' value from action configuration. |
| event_id | {EVENT.ID} | Numeric ID of the event that triggered an action. |
| trigger_id | {TRIGGER.ID} | Numeric ID of the trigger of this action. |
| glpi_problem_id | {EVENT.TAGS.__zbx_glpi_problem_id} | GLPi problem ID. |
Please be aware that each webhook supports an HTTP proxy. To use this feature, add a new media type parameter with the name
http_proxyand set its value to the proxy URL.
Service setup
1. In GLPi, create a user or choose an existing user - one with permission to create problems and followups.
2. Create an API token. Head to your GLPi user profile, check the Regenerate box next to API token, and hit Save.
3. Copy the API token of your new integration to use it in Zabbix.
Zabbix configuration
1. Start by setting up the global macro {$ZABBIX.URL} containing an URL to the Zabbix frontend. Note that if an HTTP/HTTPS schema is not present in the URL, HTTPS will be used by default.
The global macro can also be used, for example, to populate a custom field in Jira with a URL linking to event information or a graph.
2. Import the GLPi media type from the file media_glpi.yaml.
3. In the imported media, change the values of the variable glpi_token and glpi_url.
For more information about Zabbix webhook configuration, please see Zabbix documentation.
4. Create a Zabbix user and add Media with the GLPi media type. Though the Send to field is not used in the GLPi webhook, it cannot be left empty. To comply with frontend requirements, enter any symbol in the field.
Make sure the user you created has access to all the hosts for which you would like Zabbix problem notifications to be converted into GLPi problems.
For more information, please see Zabbix and GLPi documentation.
Feedback
Please report any issues with the media type at https://support.zabbix.com.
You can also provide feedback, discuss the media type, or ask for help at ZABBIX forums.
Source: https://git.zabbix.com/projects/ZBX/repos/zabbix/browse/templates/media/glpi?at=release/7.0
GLPI webhook
Overview
This guide describes how to integrate your Zabbix installation with your GLPI installation using the Zabbix webhook feature, providing instructions on setting up a media type, user, and action in Zabbix.
The webhook supports both legacy REST API (V1) and RESTful API (V2). This webhook creates tickets in the GLPI Assistance section. Created tickets have the following urgency mapping:
| Severity in Zabbix | Urgency in GLPI |
|---|---|
| 0 - Not classified | Very low |
| 1 - Information | Very low |
| 2 - Warning | Low |
| 3 - Average | Medium |
| 4 - High | High |
| 5 - Disaster | Very high |
- When a problem is updated in Zabbix, the webhook updates the ticket's title and urgency in GLPI and adds a followup entry with the update comment.
- When a problem is resolved in Zabbix, the webhook updates the ticket's title and adds a followup entry with resolution details.
- Created tickets have the status "New" and resolved tickets - "Solved".
- Due to the specifics of the webhook, the number of retries is, by default, set to 1. We recommend not changing this setting; should a transaction error occur, additional duplicate objects (tickets, followups) may be created during the retry.
Tested on
- GLPI 10.0.18, 10.0.24, 11.0.5, 11.0.6
Requirements
Zabbix version: 7.0 and higher.
Parameters
After importing the webhook, you can configure it using webhook parameters.
Configurable parameters
The configurable parameters are intended to be changed according to the webhook setup as well as the user's preferences and environment.
| Name | Value | Description |
|---|---|---|
| zabbix_url | {$ZABBIX.URL} | Current Zabbix URL. |
| glpi_legacy_api | false | Boolean value (true/false) to set API version: false (default) enables Modern API v2 with OAuth2 Bearer token authentication, true enables Legacy API v1 with Session-Token authentication. |
| glpi_app_token | GLPI application token (optional; specify if the token is set in the API client settings). | |
| glpi_user_token | <PLACE GLPI USER TOKEN> | GLPI user token. |
| glpi_client_id | <PLACE GLPI CLIENT ID> | GLPI client ID. |
| glpi_client_secret | <PLACE GLPI CLIENT SECRET> | GLPI client secret. |
| glpi_username | <PLACE GLPI USERNAME> | GLPI username. |
| glpi_password | <PLACE GLPI USER PASSWORD> | GLPI user password. |
| glpi_url | <PLACE GLPI URL> | URL of GLPI installation. |
| glpi_urgency_autoregistration | Low | String value of GLPI urgency to assign to autoregistration event tickets. |
| glpi_urgency_discovery | Low | String value of GLPI urgency to assign to discovery event tickets. |
| glpi_urgency_internal | Low | String value of GLPI urgency to assign to internal event tickets. |
| severity_not_classified | Very low | GLPI urgency to assign to tickets when event has Zabbix severity "Not classified". |
| severity_information | Very low | GLPI urgency to assign to tickets when event has Zabbix severity "Information". |
| severity_warning | Low | GLPI urgency to assign to tickets when event has Zabbix severity "Warning". |
| severity_average | Medium | GLPI urgency to assign to tickets when event has Zabbix severity "Average". |
| severity_high | High | GLPI urgency to assign to tickets when event has Zabbix severity "High". |
| severity_disaster | Very high | GLPI urgency to assign to tickets when event has Zabbix severity "Disaster". |
Internal parameters
Internal parameters are reserved for predefined macros that are not meant to be changed.
| Name | Value | Description |
|---|---|---|
| event_source | {EVENT.SOURCE} | Numeric value of the event source. Possible values: 0 - Trigger, 1 - Discovery, 2 - Autoregistration, 3 - Internal, 4 - Service. |
| event_value | {EVENT.VALUE} | Numeric value of the event that triggered an action (1 for problem, 0 for recovering). |
| event_severity | {EVENT.SEVERITY} | Name of the event severity. |
| event_nseverity | {EVENT.NSEVERITY} | Numeric value of the event severity. Possible values: 0 - Not classified, 1 - Information, 2 - Warning, 3 - Average, 4 - High, 5 - Disaster. |
| event_update_nseverity | {EVENT.UPDATE.NSEVERITY} | Numeric value of the event update severity. Possible values: 0 - Not classified, 1 - Information, 2 - Warning, 3 - Average, 4 - High, 5 - Disaster. |
| event_update_severity | {EVENT.UPDATE.SEVERITY} | Name of the event update severity. |
| event_update_status | {EVENT.UPDATE.STATUS} | Numeric value of the problem update status. Possible values: 0 - Webhook was called because of problem/recovery event, 1 - Update operation. |
| alert_subject | {ALERT.SUBJECT} | 'Default subject' value from action configuration. |
| alert_message | {ALERT.MESSAGE} | 'Default message' value from action configuration. |
| event_id | {EVENT.ID} | Numeric ID of the event that triggered an action. |
| trigger_id | {TRIGGER.ID} | Numeric ID of the trigger of this action. |
| glpi_problem_id | {EVENT.TAGS.__zbx_glpi_problem_id} | GLPI problem ID. |
Please be aware that each webhook supports an HTTP proxy. To use this feature, add a new media type parameter with the name
http_proxyand set its value to the proxy URL.
Service setup
RESTful API (V2) with OAuth2 - recommended configuration for GLPI 11+:
- Enable access to the GLPI API:
- In the GLPI web interface, go to Setup > General > API.
- Switch the toggle to activate Enable API and click the Save button.
- Add an OAuth client:
- Go to Setup > OAuth clients.
- Click the Add button on the top of the page.
- Set the client name; enter api in the Scopes field and Password in Grants.
- Click the Add button.
- Open the settings of the created client, and then copy and save the client ID and client secret.
- Create a new user profile with permissions to create tickets and followups (alternatively, you can use an existing profile with sufficient privileges):
- Go to Administration > Profiles and click the Add button on the top of the page.
- Specify the profile name and set the Profile's Interface option to Standard Interface, and then click the Add button.
- Open the created profile and click the Assistance tab.
- In the Tickets section, set the Update, Create, and See all tickets permissions.
- In the Followups/Tasks section, set the Add (Requester) permission for the Followups row.
- Click the Save button.
- Create a new user:
- Go to Administration > Users and click the Add button on the top of the page.
- Specify the user login and set the Authorization > Profile option to the profile you created in the previous step (or any other existing profile with permissions to create tickets and followups).
- Set the password for the user.
- Click the Add button.
GLPI 11+ continues to support REST API (V1) without requiring OAuth2/V2. Note that V1 is not recommended for new integrations.
REST API (V1) - legacy configuration for GLPI 10:
- Enable access to the GLPI REST API:
- In the GLPI web interface, go to Setup > General > API.
- Set the Enable Rest API and Enable login with external token options to Yes and click the Save button.
- Add a new API client:
- Click the Add API client button.
- Specify the API client name and set the Active option to Yes.
- For security reasons, you may want to restrict the API client to the IP address of Zabbix server and/or create an additional application token (will be generated by default; you can uncheck the Regenerate checkbox if you don't want to use it).
- Click the Add button.
- If you've opted to create an application token, open the settings of the created API client, and then copy and save the generated application token.
- Create a new user profile with permissions to create tickets and followups (alternatively, you can use an existing profile with sufficient privileges):
- Go to Administration > Profiles and click the Add button on the top of the page.
- Specify the profile name and set the Profile's Interface option to Standard Interface, and then click the Add button.
- Open the created profile and click the Assistance tab.
- Set the Update, Create, and See all tickets permissions in the Tickets section.
- Set the Add followup (Requester) permission for the Followups line in the Followups/Tasks section.
- Click the Save button.
- Create a new user:
- Go to Administration > Users and click the Add User button on the top of the page.
- Specify the user login and set the Profiles option to the profile that you created in the previous step (or any other existing profile with permissions to create tickets and followups).
- Click the Add button.
- Open the profile of the created user and check the Regenerate checkbox of the API token option; click Save.
- Copy and save the generated user API token.
Zabbix configuration
- Before you can start using the GLPI webhook, you need to set the global macro
{$ZABBIX.URL}:
- In the Zabbix web interface, go to Administration > Macros in the top-left drop-down menu.
- Set up the global macro
{$ZABBIX.URL}which will contain the URL to the Zabbix frontend. The URL should be either an IP address, a fully qualified domain name, or a localhost. - Specifying a protocol is mandatory, whereas the port is optional. Depending on the web server configuration, you might also need to append
/zabbixto the end of the URL. Good examples:http://zabbix.comhttps://zabbix.lan/zabbixhttp://server.zabbix.lan/http://localhosthttp://127.0.0.1:8080
- Bad examples:
zabbix.comhttp://zabbix/
- Import the media type:
- In the Alerts > Media types section, import the
media_glpi.yamlfile.
- It is also possible to set GLPI ticket urgency by parameters. Predefined parameter values are already in place; note that they use the default GLPI urgency.
Please adjust these values to suit your GLPI environment.
The following parameters apply to Zabbix events that support severities:
severity_not_classified- for Zabbix severity "Not Classified"severity_information- for Zabbix severity "Information"severity_warning- for Zabbix severity "Warning"severity_average- for Zabbix severity "Average"severity_high- for Zabbix severity "High"severity_disaster- for Zabbix severity "Disaster"
And the following for Zabbix events that do not have severities:
glpi_urgency_internal- for Zabbix internal eventsglpi_urgency_discovery- for Zabbix discovery eventsglpi_urgency_autoregistration- for Zabbix autoregistration events
- Open the imported GLPI media type and set the following webhook parameters:
glpi_url- the frontend URL of your GLPI installation, without any path suffix (e.g. http://glpi.example.com:8080).glpi_legacy_api- determine whether you are using RESTful API V2 with OAuth2 authorization (default, parameter valuefalse) or legacy API (parameter valuetrue).
If using RESTful API V2 with OAuth2, set the required parameters:
glpi_client_id- the client ID that was generated during the creation of the OAuth client.glpi_client_secret- the client secret that was generated during the creation of the OAuth client.glpi_username- GLPI username created for the webhook.glpi_password- password for the GLPI webhook user.
If using legacy API, set the parameters:
glpi_app_token- if you've opted to use an application token during the creation of API client, specify it here; otherwise leave it empty.glpi_user_token- the user token that was generated during the creation of the GLPI user.
-
Click the Enabled checkbox to enable the media type and click the Update button to save the webhook settings.
-
Create a Zabbix user and add media:
- To create a new user, go to the Users > Users section and click the Create user button in the top-right corner. In the User tab, fill in all the required fields (marked with red asterisks).
- In the Media tab, click Add and select GLPI from the Type drop-down list. Though the Send to field is not used in the GLPI webhook, it cannot be left empty. To comply with frontend requirements, enter any symbol in the field.
- Make sure this user has access to all the hosts for which you would like problem notifications to be sent to GLPI.
- Done! You can now start using this media type in actions and create ticket items in GLPI.
For more information, please see Zabbix and GLPI documentation.
Feedback
Please report any issues with the media type at https://support.zabbix.com.
You can also provide feedback, discuss the media type, or ask for help at ZABBIX forums.
Source: https://git.zabbix.com/projects/ZBX/repos/zabbix/browse/templates/media/glpi?at=release/6.4
GLPi webhook
About webhook
This webhook creates problems in GLPi Assistance section. Created problems have the next severity mapping:
| Severity In zabbix | Urgency in GLPi |
|---|---|
| 0 - Not classified | Medium (default) |
| 1 - Information | Very low |
| 2 - Warning | Low |
| 3 - Average | Medium |
| 4 - High | High |
| 5 - Disaster | Very High |
On Update action in zabbix, webhook updates created problem's title, severity and creates followup with update comment.
On resolve action, webhook updates created problem title and creates followup with resolve information.
Created problems have "New" status, and resolved - "Solved" status.
Due to the specifics of the webhook, the number of retries is set to 1 by default. We recommend that you do not change this setting, because in case of a transaction error, additional duplicate objects (problems, followups) may be created during the retry.
Installation guide
This guide describes how to integrate your Zabbix installation with GLPi problems using the Zabbix webhook feature. This guide provides instructions on setting up a media type, a user and an action in Zabbix.
In GLPi
1. Create or use existing user in GLPi with permission to create problems and followups.
👁 Image
👁 Image
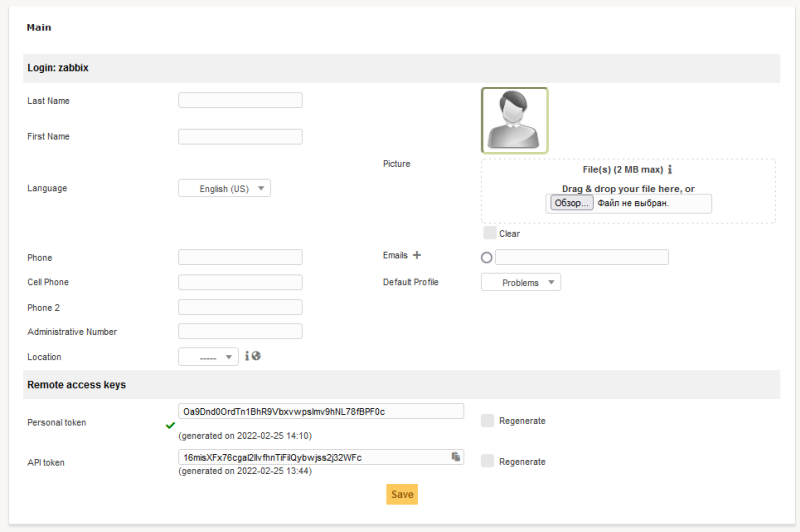
2. Please create an API token. For that you should go into user profile and set tick in "Regenerate" field against "API token" and hit save.
👁 Image
3. Copy the API token of your new integration to use it in Zabbix.
In Zabbix
The configuration consists of a media type in Zabbix, which will invoke the webhook to send alerts to GLPi problems through the GLPi Rest API.
1. Import the GLPi media type from file media_glpi.yaml.
2. Change in the imported media the values of the variable glpi_token and glpi_url.
For more information about the Zabbix Webhook configuration, please see the documentation.
3. Create a Zabbix user and add Media with the GLPi media type. Though a "Send to" field is not used in GLPi webhook, it cannot be empty. To comply with frontend requirements, you can put any symbol there. Make sure this user has access to all hosts for which you would like problem notifications to be converted into GLPi problems.
4. Set up a global macro {$ZABBIX.URL} with URL of current zabbix. Please notice that HTTPS will be used by default if HTTP/HTTPS schema is not present in the URL.
For more information, please see Zabbix and GLPi documentation.
Tested on
GLPI 9.5.7
Supported Versions
Zabbix 6.2
Source: https://git.zabbix.com/projects/ZBX/repos/zabbix/browse/templates/media/glpi?at=release/6.2
GLPi webhook
About webhook
This webhook creates problems in GLPi Assistance section. Created problems have the next severity mapping:
| Severity In zabbix | Urgency in GLPi |
|---|---|
| 0 - Not classified | Medium (default) |
| 1 - Information | Very low |
| 2 - Warning | Low |
| 3 - Average | Medium |
| 4 - High | High |
| 5 - Disaster | Very High |
On Update action in zabbix, webhook updates created problem's title, severity and creates followup with update comment.
On resolve action, webhook updates created problem title and creates followup with resolve information.
Created problems have "New" status, and resolved - "Solved" status.
Due to the specifics of the webhook, the number of retries is set to 1 by default. We recommend that you do not change this setting, because in case of a transaction error, additional duplicate objects (problems, followups) may be created during the retry.
Installation guide
This guide describes how to integrate your Zabbix installation with GLPi problems using the Zabbix webhook feature. This guide provides instructions on setting up a media type, a user and an action in Zabbix.
In GLPi
1. Create or use existing user in GLPi with permission to create problems and followups.
👁 Image
👁 Image
2. Please create an API token. For that you should go into user profile and set tick in "Regenerate" field against "API token" and hit save.
👁 Image
3. Copy the API token of your new integration to use it in Zabbix.
In Zabbix
The configuration consists of a media type in Zabbix, which will invoke the webhook to send alerts to GLPi problems through the GLPi Rest API.
1. Import the GLPi media type from file media_glpi.yaml.
2. Change in the imported media the values of the variable glpi_token and glpi_url.
For more information about the Zabbix Webhook configuration, please see the documentation.
3. Create a Zabbix user and add Media with the GLPi media type. Though a "Send to" field is not used in GLPi webhook, it cannot be empty. To comply with frontend requirements, you can put any symbol there. Make sure this user has access to all hosts for which you would like problem notifications to be converted into GLPi problems.
4. Set up a global macro {$ZABBIX.URL} with URL of current zabbix. Please notice that HTTPS will be used by default if HTTP/HTTPS schema is not present in the URL.
For more information, please see Zabbix and GLPi documentation.
Tested on
GLPI 9.5.7
Supported Versions
Zabbix 6.2
Source: https://git.zabbix.com/projects/ZBX/repos/zabbix/browse/templates/media/glpi?at=release/6.0
GLPi webhook
About webhook
This webhook creates problems in GLPi Assistance section. Created problems have the next severity mapping:
| Severity In zabbix | Urgency in GLPi |
|---|---|
| 0 - Not classified | Medium (default) |
| 1 - Information | Very low |
| 2 - Warning | Low |
| 3 - Average | Medium |
| 4 - High | High |
| 5 - Disaster | Very High |
On Update action in zabbix, webhook updates created problem's title, severity and creates followup with update comment.
On resolve action, webhook updates created problem title and creates followup with resolve information.
Created problems have "New" status, and resolved - "Solved" status.
Due to the specifics of the webhook, the number of retries is set to 1 by default. We recommend that you do not change this setting, because in case of a transaction error, additional duplicate objects (problems, followups) may be created during the retry.
Installation guide
This guide describes how to integrate your Zabbix installation with GLPi problems using the Zabbix webhook feature. This guide provides instructions on setting up a media type, a user and an action in Zabbix.
In GLPi
1. Create or use existing user in GLPi with permission to create problems and followups.
👁 Image
👁 Image
2. Please create an API token. For that you should go into user profile and set tick in "Regenerate" field against "API token" and hit save.
👁 Image
3. Copy the API token of your new integration to use it in Zabbix.
In Zabbix
The configuration consists of a media type in Zabbix, which will invoke the webhook to send alerts to GLPi problems through the GLPi Rest API.
1. Import the GLPi media type from file media_glpi.yaml.
2. Change in the imported media the values of the variable glpi_token and glpi_url.
For more information about the Zabbix Webhook configuration, please see the documentation.
3. Create a Zabbix user and add Media with the GLPi media type. Though a "Send to" field is not used in GLPi webhook, it cannot be empty. To comply with frontend requirements, you can put any symbol there. Make sure this user has access to all hosts for which you would like problem notifications to be converted into GLPi problems.
4. Set up a global macro {$ZABBIX.URL} with URL of current zabbix. Please notice that HTTPS will be used by default if HTTP/HTTPS schema is not present in the URL.
For more information, please see Zabbix and GLPi documentation.
Tested on
GLPI 9.5.7
Supported Versions
Zabbix 6.0