
Source: https://git.zabbix.com/projects/ZBX/repos/zabbix/browse/templates/media/msteams?at=release/7.4
MS Teams webhook
Overview
This guide describes how to integrate your Zabbix installation with MS Teams using the Zabbix webhook feature, providing instructions on setting up a media type, user, and action in Zabbix.
This integration is supported only on Teams as part of Office 365.
Please note that the Teams free plan does not support the incoming webhook feature.
Requirements
Zabbix version: 7.4 and higher.
Parameters
After importing the webhook, you can configure it using webhook parameters.
Configurable parameters
The configurable parameters are intended to be changed according to the webhook setup as well as the user's preferences and environment.
| Name | Value | Description |
|---|---|---|
| zabbix_url | {$ZABBIX.URL} | Current Zabbix URL. |
| teams_endpoint | <PLACE WEBHOOK URL HERE> | Teams webhook URL. |
| use_default_message | false | Notification format toggle. |
Internal parameters
Internal parameters are reserved for predefined macros that are not meant to be changed.
| Name | Value | Description |
|---|---|---|
| event_source | {EVENT.SOURCE} | Numeric value of the event source. Possible values: 0 - Trigger, 1 - Discovery, 2 - Autoregistration, 3 - Internal, 4 - Service. |
| event_value | {EVENT.VALUE} | Numeric value of the event that triggered an action (1 for problem, 0 for recovering). |
| event_severity | {EVENT.SEVERITY} | Name of the event severity. |
| event_nseverity | {EVENT.NSEVERITY} | Numeric value of the event severity. Possible values: 0 - Not classified, 1 - Information, 2 - Warning, 3 - Average, 4 - High, 5 - Disaster. |
| event_update_nseverity | {EVENT.UPDATE.NSEVERITY} | Numeric value of the event update severity. Possible values: 0 - Not classified, 1 - Information, 2 - Warning, 3 - Average, 4 - High, 5 - Disaster. |
| event_update_severity | {EVENT.UPDATE.SEVERITY} | Name of the event update severity. |
| event_update_status | {EVENT.UPDATE.STATUS} | Numeric value of the problem update status. Possible values: 0 - Webhook was called because of problem/recovery event, 1 - Update operation. |
| alert_subject | {ALERT.SUBJECT} | 'Default subject' value from action configuration. |
| alert_message | {ALERT.MESSAGE} | 'Default message' value from action configuration. |
| event_date | {EVENT.DATE} | Date of the event that triggered an action. |
| event_id | {EVENT.ID} | Numeric ID of the event that triggered an action. |
| event_opdata | {EVENT.OPDATA} | Operational data of the underlying trigger of a problem. |
| event_recovery_date | {EVENT.RECOVERY.DATE} | Date of the recovery event. |
| event_recovery_time | {EVENT.RECOVERY.TIME} | Time of the recovery event. |
| event_status | {EVENT.STATUS} | Verbal value of the event that triggered an action. |
| event_tags | {EVENT.TAGS} | A comma-separated list of event tags. Expanded to an empty string if no tags exist. |
| event_time | {EVENT.TIME} | Time of the event that triggered an action. |
| event_update_action | {EVENT.UPDATE.ACTION} | Human-readable name of the action(s) performed during a problem update. |
| event_update_date | {EVENT.UPDATE.DATE} | Date of event update (acknowledgment, etc). |
| event_update_message | {EVENT.UPDATE.MESSAGE} | Problem update message. |
| event_update_time | {EVENT.UPDATE.TIME} | Time of event update (acknowledgment, etc). |
| event_update_user | {USER.FULLNAME} | Name, surname, and username of the user who added an event acknowledgment or started the script. |
| host_ip | {HOST.IP} | Host IP address |
| host_name | {HOST.NAME} | Visible host name. |
| trigger_description | {TRIGGER.DESCRIPTION} | Trigger description. |
| trigger_id | {TRIGGER.ID} | Numeric ID of the trigger of this action. |
Please be aware that each webhook supports an HTTP proxy. To use this feature, add a new media type parameter with the name
http_proxyand set its value to the proxy URL.
Service setup
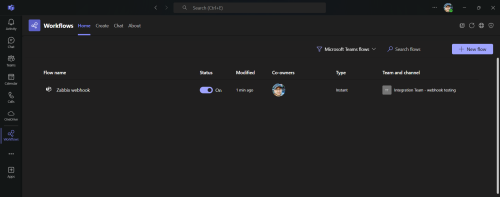
The Microsoft Teams webhook only supports integrating with a single channel.
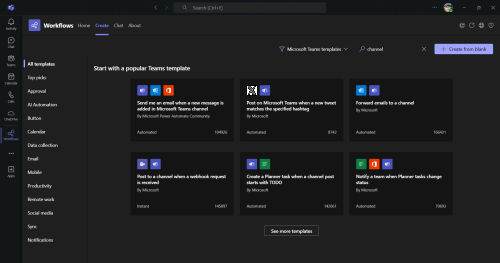
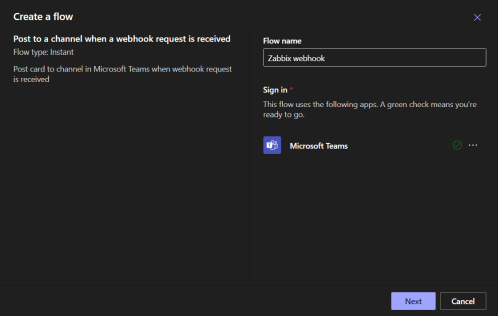
First, you need to get a webhook URL for the channel. There are two ways to do this:
-
Add an official Zabbix webhook connector from MS Teams apps for the channel where you want to receive notifications. (See: how to add a connector to a channel)
-
Create an Incoming webhook for your channel. (See Teams documentation for step-by-step instructions).
Zabbix configuration
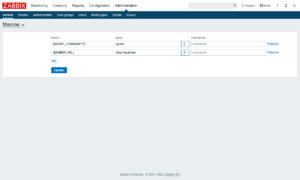
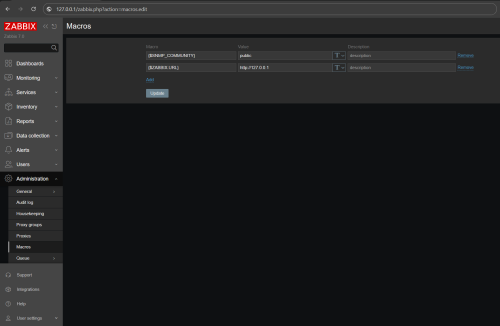
1. In the Zabbix web interface, go to Administration > Macros. Set up the global macro {$ZABBIX.URL} which will contain the URL to the Zabbix frontend.
The URL should be either an IP address, a fully qualified domain name, or a localhost. Specifying a protocol is mandatory, whereas the port is optional.
- Good examples:
http://zabbix.comhttps://zabbix.lan/zabbixhttp://server.zabbix.lan/http://localhosthttp://127.0.0.1:8080
- Bad examples:
zabbix.comhttp://zabbix/
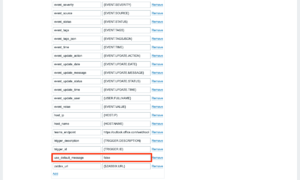
2. In the Zabbix frontend Alerts > Media types section, import the media_msteams.yaml file.
3. Open the newly added MS Teams media type and replace PLACE WEBHOOK URL HERE with the incoming webhook URL created during the webhook setup in Teams.
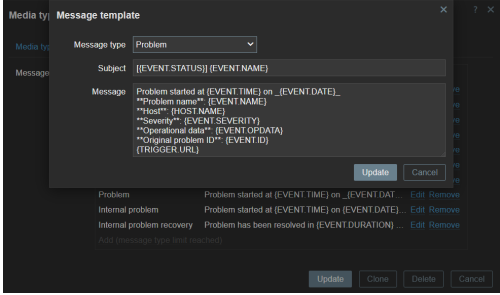
4. You can also choose between two notification formats. Set the use_default_message parameter:
-
false (default)
- Use a preformatted message with a predefined set of fields for trigger-based notifications.
In internal, autoregistration, and discovery notifications,
{ALERT.MESSAGE}will be used as the message body. You can customize the message template for trigger-based notifications by adding additional fields and up to four buttons with URLs.- To add an additional field to message card, enter a parameter with the prefix
fact_in its name. Example:fact_Data center(name) -{EVENT.TAGS.dc}(value). - To create a new button with a link to an external resource, add a parameter with prefix
openUri_in its name. The value should be a valid URL. Example:openUri_Link to Zabbix.com(name) andhttps://www.zabbix.com/(value). Parameters with the prefix openUri_ with invalid URLs will be ignored by Teams. Teams only supports 5 buttons in a message card, one of which is reserved for theEvent infolink; subsequentopenUri_parameters (even if the URLs are valid) will be ignored.
- To add an additional field to message card, enter a parameter with the prefix
- Use a preformatted message with a predefined set of fields for trigger-based notifications.
In internal, autoregistration, and discovery notifications,
-
true
- Use
{ALERT.MESSAGE}as the message body in all notification types.
- Use
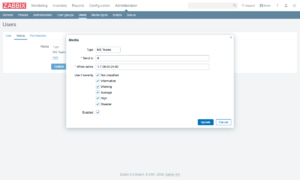
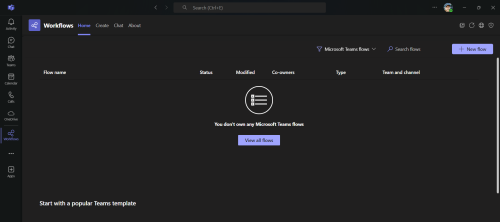
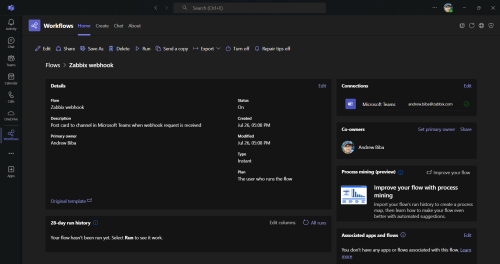
5. To receive Zabbix notifications in Teams, you need to create a Zabbix user and add Media with the MS Teams media type.
In Users > Users, click Create user in the top-right corner. In the User tab, fill in the required fields (marked with red asterisks). In the Media tab, add a new media and select MS Teams type from the drop-down list. Though the Send to field is not used in Teams media, it cannot be empty. To comply with the frontend requirements, enter any symbol in the field.
Make sure this user has access to all the hosts for which you would like problem notifications to be sent to Teams.
6. Done! You can now start receiving Teams alerts.
For more information, please see Zabbix and Microsoft Teams webhook documentation.
Feedback
Please report any issues with the media type at https://support.zabbix.com.
You can also provide feedback, discuss the media type, or ask for help at ZABBIX forums.
Source: https://git.zabbix.com/projects/ZBX/repos/zabbix/browse/templates/media/msteams?at=release/7.2
MS Teams webhook
Overview
This guide describes how to integrate your Zabbix installation with MS Teams using the Zabbix webhook feature, providing instructions on setting up a media type, user, and action in Zabbix.
This integration is supported only on Teams as part of Office 365.
Please note that the Teams free plan does not support the incoming webhook feature.
Requirements
Zabbix version: 7.2 and higher.
Parameters
After importing the webhook, you can configure it using webhook parameters.
Configurable parameters
The configurable parameters are intended to be changed according to the webhook setup as well as the user's preferences and environment.
| Name | Value | Description |
|---|---|---|
| zabbix_url | {$ZABBIX.URL} | Current Zabbix URL. |
| teams_endpoint | <PLACE WEBHOOK URL HERE> | Teams webhook URL. |
| use_default_message | false | Notification format toggle. |
Internal parameters
Internal parameters are reserved for predefined macros that are not meant to be changed.
| Name | Value | Description |
|---|---|---|
| event_source | {EVENT.SOURCE} | Numeric value of the event source. Possible values: 0 - Trigger, 1 - Discovery, 2 - Autoregistration, 3 - Internal, 4 - Service. |
| event_value | {EVENT.VALUE} | Numeric value of the event that triggered an action (1 for problem, 0 for recovering). |
| event_severity | {EVENT.SEVERITY} | Name of the event severity. |
| event_nseverity | {EVENT.NSEVERITY} | Numeric value of the event severity. Possible values: 0 - Not classified, 1 - Information, 2 - Warning, 3 - Average, 4 - High, 5 - Disaster. |
| event_update_nseverity | {EVENT.UPDATE.NSEVERITY} | Numeric value of the event update severity. Possible values: 0 - Not classified, 1 - Information, 2 - Warning, 3 - Average, 4 - High, 5 - Disaster. |
| event_update_severity | {EVENT.UPDATE.SEVERITY} | Name of the event update severity. |
| event_update_status | {EVENT.UPDATE.STATUS} | Numeric value of the problem update status. Possible values: 0 - Webhook was called because of problem/recovery event, 1 - Update operation. |
| alert_subject | {ALERT.SUBJECT} | 'Default subject' value from action configuration. |
| alert_message | {ALERT.MESSAGE} | 'Default message' value from action configuration. |
| event_date | {EVENT.DATE} | Date of the event that triggered an action. |
| event_id | {EVENT.ID} | Numeric ID of the event that triggered an action. |
| event_opdata | {EVENT.OPDATA} | Operational data of the underlying trigger of a problem. |
| event_recovery_date | {EVENT.RECOVERY.DATE} | Date of the recovery event. |
| event_recovery_time | {EVENT.RECOVERY.TIME} | Time of the recovery event. |
| event_status | {EVENT.STATUS} | Verbal value of the event that triggered an action. |
| event_tags | {EVENT.TAGS} | A comma-separated list of event tags. Expanded to an empty string if no tags exist. |
| event_time | {EVENT.TIME} | Time of the event that triggered an action. |
| event_update_action | {EVENT.UPDATE.ACTION} | Human-readable name of the action(s) performed during a problem update. |
| event_update_date | {EVENT.UPDATE.DATE} | Date of event update (acknowledgment, etc). |
| event_update_message | {EVENT.UPDATE.MESSAGE} | Problem update message. |
| event_update_time | {EVENT.UPDATE.TIME} | Time of event update (acknowledgment, etc). |
| event_update_user | {USER.FULLNAME} | Name, surname, and username of the user who added an event acknowledgment or started the script. |
| host_ip | {HOST.IP} | Host IP address |
| host_name | {HOST.NAME} | Visible host name. |
| trigger_description | {TRIGGER.DESCRIPTION} | Trigger description. |
| trigger_id | {TRIGGER.ID} | Numeric ID of the trigger of this action. |
Please be aware that each webhook supports an HTTP proxy. To use this feature, add a new media type parameter with the name
http_proxyand set its value to the proxy URL.
Service setup
The Microsoft Teams webhook only supports integrating with a single channel.
First, you need to get a webhook URL for the channel. There are two ways to do this:
-
Add an official Zabbix webhook connector from MS Teams apps for the channel where you want to receive notifications. (See: how to add a connector to a channel)
-
Create an Incoming webhook for your channel. (See Teams documentation for step-by-step instructions).
Zabbix configuration
1. In the Zabbix web interface, go to Administration > Macros. Set up the global macro {$ZABBIX.URL} which will contain the URL to the Zabbix frontend.
The URL should be either an IP address, a fully qualified domain name, or a localhost. Specifying a protocol is mandatory, whereas the port is optional.
- Good examples:
http://zabbix.comhttps://zabbix.lan/zabbixhttp://server.zabbix.lan/http://localhosthttp://127.0.0.1:8080
- Bad examples:
zabbix.comhttp://zabbix/
2. In the Zabbix frontend Alerts > Media types section, import the media_msteams.yaml file.
3. Open the newly added MS Teams media type and replace PLACE WEBHOOK URL HERE with the incoming webhook URL created during the webhook setup in Teams.
4. You can also choose between two notification formats. Set the use_default_message parameter:
-
false (default)
- Use a preformatted message with a predefined set of fields for trigger-based notifications.
In internal, autoregistration, and discovery notifications,
{ALERT.MESSAGE}will be used as the message body. You can customize the message template for trigger-based notifications by adding additional fields and up to four buttons with URLs.- To add an additional field to message card, enter a parameter with the prefix
fact_in its name. Example:fact_Data center(name) -{EVENT.TAGS.dc}(value). - To create a new button with a link to an external resource, add a parameter with prefix
openUri_in its name. The value should be a valid URL. Example:openUri_Link to Zabbix.com(name) andhttps://www.zabbix.com/(value). Parameters with the prefix openUri_ with invalid URLs will be ignored by Teams. Teams only supports 5 buttons in a message card, one of which is reserved for theEvent infolink; subsequentopenUri_parameters (even if the URLs are valid) will be ignored.
- To add an additional field to message card, enter a parameter with the prefix
- Use a preformatted message with a predefined set of fields for trigger-based notifications.
In internal, autoregistration, and discovery notifications,
-
true
- Use
{ALERT.MESSAGE}as the message body in all notification types.
- Use
5. To receive Zabbix notifications in Teams, you need to create a Zabbix user and add Media with the MS Teams media type.
In Users > Users, click Create user in the top-right corner. In the User tab, fill in the required fields (marked with red asterisks). In the Media tab, add a new media and select MS Teams type from the drop-down list. Though the Send to field is not used in Teams media, it cannot be empty. To comply with the frontend requirements, enter any symbol in the field.
Make sure this user has access to all the hosts for which you would like problem notifications to be sent to Teams.
6. Done! You can now start receiving Teams alerts.
For more information, please see Zabbix and Microsoft Teams webhook documentation.
Feedback
Please report any issues with the media type at https://support.zabbix.com.
You can also provide feedback, discuss the media type, or ask for help at ZABBIX forums.
Source: https://git.zabbix.com/projects/ZBX/repos/zabbix/browse/templates/media/msteams?at=release/7.0
MS Teams webhook
Overview
This guide describes how to integrate your Zabbix installation with MS Teams using the Zabbix webhook feature, providing instructions on setting up a media type, user, and action in Zabbix.
This integration is supported only on Teams as part of Office 365.
Please note that the Teams free plan does not support the incoming webhook feature.
Requirements
Zabbix version: 7.0 and higher.
Parameters
After importing the webhook, you can configure it using webhook parameters.
Configurable parameters
The configurable parameters are intended to be changed according to the webhook setup as well as the user's preferences and environment.
| Name | Value | Description |
|---|---|---|
| zabbix_url | {$ZABBIX.URL} | Current Zabbix URL. |
| teams_endpoint | <PLACE WEBHOOK URL HERE> | Teams webhook URL. |
| use_default_message | false | Notification format toggle. |
Internal parameters
Internal parameters are reserved for predefined macros that are not meant to be changed.
| Name | Value | Description |
|---|---|---|
| event_source | {EVENT.SOURCE} | Numeric value of the event source. Possible values: 0 - Trigger, 1 - Discovery, 2 - Autoregistration, 3 - Internal, 4 - Service. |
| event_value | {EVENT.VALUE} | Numeric value of the event that triggered an action (1 for problem, 0 for recovering). |
| event_severity | {EVENT.SEVERITY} | Name of the event severity. |
| event_nseverity | {EVENT.NSEVERITY} | Numeric value of the event severity. Possible values: 0 - Not classified, 1 - Information, 2 - Warning, 3 - Average, 4 - High, 5 - Disaster. |
| event_update_nseverity | {EVENT.UPDATE.NSEVERITY} | Numeric value of the event update severity. Possible values: 0 - Not classified, 1 - Information, 2 - Warning, 3 - Average, 4 - High, 5 - Disaster. |
| event_update_severity | {EVENT.UPDATE.SEVERITY} | Name of the event update severity. |
| event_update_status | {EVENT.UPDATE.STATUS} | Numeric value of the problem update status. Possible values: 0 - Webhook was called because of problem/recovery event, 1 - Update operation. |
| alert_subject | {ALERT.SUBJECT} | 'Default subject' value from action configuration. |
| alert_message | {ALERT.MESSAGE} | 'Default message' value from action configuration. |
| event_date | {EVENT.DATE} | Date of the event that triggered an action. |
| event_id | {EVENT.ID} | Numeric ID of the event that triggered an action. |
| event_opdata | {EVENT.OPDATA} | Operational data of the underlying trigger of a problem. |
| event_recovery_date | {EVENT.RECOVERY.DATE} | Date of the recovery event. |
| event_recovery_time | {EVENT.RECOVERY.TIME} | Time of the recovery event. |
| event_status | {EVENT.STATUS} | Verbal value of the event that triggered an action. |
| event_tags | {EVENT.TAGS} | A comma-separated list of event tags. Expanded to an empty string if no tags exist. |
| event_time | {EVENT.TIME} | Time of the event that triggered an action. |
| event_update_action | {EVENT.UPDATE.ACTION} | Human-readable name of the action(s) performed during a problem update. |
| event_update_date | {EVENT.UPDATE.DATE} | Date of event update (acknowledgment, etc). |
| event_update_message | {EVENT.UPDATE.MESSAGE} | Problem update message. |
| event_update_time | {EVENT.UPDATE.TIME} | Time of event update (acknowledgment, etc). |
| event_update_user | {USER.FULLNAME} | Name, surname, and username of the user who added an event acknowledgment or started the script. |
| host_ip | {HOST.IP} | Host IP address |
| host_name | {HOST.NAME} | Visible host name. |
| trigger_description | {TRIGGER.DESCRIPTION} | Trigger description. |
| trigger_id | {TRIGGER.ID} | Numeric ID of the trigger of this action. |
Please be aware that each webhook supports an HTTP proxy. To use this feature, add a new media type parameter with the name
http_proxyand set its value to the proxy URL.
Service setup
The Microsoft Teams webhook only supports integrating with a single channel.
First, you need to get a webhook URL for the channel. There are two ways to do this:
-
Add an official Zabbix webhook connector from MS Teams apps for the channel where you want to receive notifications. (See: how to add a connector to a channel)
-
Create an Incoming webhook for your channel. (See Teams documentation for step-by-step instructions).
Zabbix configuration
1. In the Zabbix web interface, go to Administration > Macros. Set up the global macro {$ZABBIX.URL} which will contain the URL to the Zabbix frontend.
The URL should be either an IP address, a fully qualified domain name, or a localhost. Specifying a protocol is mandatory, whereas the port is optional.
- Good examples:
http://zabbix.comhttps://zabbix.lan/zabbixhttp://server.zabbix.lan/http://localhosthttp://127.0.0.1:8080
- Bad examples:
zabbix.comhttp://zabbix/
2. In the Zabbix frontend Alerts > Media types section, import the media_msteams.yaml file.
3. Open the newly added MS Teams media type and replace PLACE WEBHOOK URL HERE with the incoming webhook URL created during the webhook setup in Teams.
4. You can also choose between two notification formats. Set the use_default_message parameter:
-
false (default)
- Use a preformatted message with a predefined set of fields for trigger-based notifications.
In internal, autoregistration, and discovery notifications,
{ALERT.MESSAGE}will be used as the message body. You can customize the message template for trigger-based notifications by adding additional fields and up to four buttons with URLs.- To add an additional field to message card, enter a parameter with the prefix
fact_in its name. Example:fact_Data center(name) -{EVENT.TAGS.dc}(value). - To create a new button with a link to an external resource, add a parameter with prefix
openUri_in its name. The value should be a valid URL. Example:openUri_Link to Zabbix.com(name) andhttps://www.zabbix.com/(value). Parameters with the prefix openUri_ with invalid URLs will be ignored by Teams. Teams only supports 5 buttons in a message card, one of which is reserved for theEvent infolink; subsequentopenUri_parameters (even if the URLs are valid) will be ignored.
- To add an additional field to message card, enter a parameter with the prefix
- Use a preformatted message with a predefined set of fields for trigger-based notifications.
In internal, autoregistration, and discovery notifications,
-
true
- Use
{ALERT.MESSAGE}as the message body in all notification types.
- Use
5. To receive Zabbix notifications in Teams, you need to create a Zabbix user and add Media with the MS Teams media type.
In Users > Users, click Create user in the top-right corner. In the User tab, fill in the required fields (marked with red asterisks). In the Media tab, add a new media and select MS Teams type from the drop-down list. Though the Send to field is not used in Teams media, it cannot be empty. To comply with the frontend requirements, enter any symbol in the field.
Make sure this user has access to all the hosts for which you would like problem notifications to be sent to Teams.
6. Done! You can now start receiving Teams alerts.
For more information, please see Zabbix and Microsoft Teams webhook documentation.
Feedback
Please report any issues with the media type at https://support.zabbix.com.
You can also provide feedback, discuss the media type, or ask for help at ZABBIX forums.
Source: https://git.zabbix.com/projects/ZBX/repos/zabbix/browse/templates/media/msteams?at=release/6.4
Microsoft Teams webhook
This guide describes how to integrate Zabbix 6.2 with MS Teams using the Zabbix webhook feature. This guide will provide instructions on setting up a media type, a user and an action in Zabbix. This integration is supported only for Teams as part of Office 365. Note, that Teams free plan does not support incoming webhook feature.
Setting up webhook in MS Teams
Microsoft Teams webhook only supports integrating with a single channel.
First, you need to get a webhook URL for the channel. There are two ways to do this:
-
Add official Zabbix webhook connector from MS Teams apps for the channel, where you want to receive notifications. (Check how to add a connector to a channel)
-
Create Incoming webhook for your channel. (See Teams documentation for the step-by-step instructions).
Setting up webhook in Zabbix
1. In the Zabbix web interface go to Administration → General section and select Macros from the dropdown menu in top left corner. Setup the global macro "{$ZABBIX.URL}" which will contain the URL to the Zabbix frontend.
The URL should be either an IP address, a fully qualified domain name or localhost. Specifying a protocol is mandatory, whereas port is optional.
Good examples:
http://zabbix.com
https://zabbix.lan/
http://server.zabbix.lan/
http://localhost
http://127.0.0.1:8080
Bad examples:
zabbix.com
http://zabbix/
2. In the Administration > Media types section, import the media_ms_teams.yaml
3. Open the newly added MS Teams media type and replace placeholder <PLACE WEBHOOK URL HERE> with the incoming webhook URL, created during the webhook setup in MS Teams.
4. You can also choose between two notification formats. Set "use_default_message" parameter:
-
false (default)
- Use preformatted message with predefined set of fields for trigger-based notifications.
In internal, autoregistration and discovery notifications {ALERT.MESSAGE} as a body of the message will be used. In this case you can customize the message template for trigger-based notifications by adding additional fields and up to four buttons with URLs.- To add an additional field to message card, put a parameter with prefix fact_ and field name. For example, "fact_Data center" as key and {EVENT.TAGS.dc} as value.
- To create a new button with a link to an external resource, add a parameter with prefix openUri_ and button name. The value should be a valid URL. For example, "openUri_Link to Zabbix.com" as key and https://www.zabbix.com/ as value.
If any of the parameters with prefix openUri_ has invalid URL it will be ignored by Teams.
Also, since Microsoft only supports five buttons in a message card, one of which is reserved for the "Event info" link, the fifth and subsequent parameters with prefix openUri_ and valid URL will be ignored too.
- Use preformatted message with predefined set of fields for trigger-based notifications.
-
true
- Use {ALERT.MESSAGE} as a body of the message in all types of notifications.
5. To receive Zabbix notifications in MS Teams, you need to create a Zabbix user and add Media with the MS Teams media type.
In the Administration → Users section, click Create user button in the top right corner. In the User tab, fill in all required fields (marked with red asterisks). In the Media tab, add a new media and select "MS Teams" type from the drop-down list. Though a "Send to" field is not used in MS Teams media, it cannot be empty. To comply with the frontend requirements, you can put any symbol there.
Make sure this user has access to all hosts for which you would like problem notifications to be sent to MS Teams.
👁 Image
6. Great! You can now start receiving alerts!
For more information see Zabbix and MS Teams webhook documentations.
Supported Versions
Zabbix 6.2
Source: https://git.zabbix.com/projects/ZBX/repos/zabbix/browse/templates/media/msteams?at=release/6.2
Microsoft Teams webhook
This guide describes how to integrate Zabbix 6.2 with MS Teams using the Zabbix webhook feature. This guide will provide instructions on setting up a media type, a user and an action in Zabbix. This integration is supported only for Teams as part of Office 365. Note, that Teams free plan does not support incoming webhook feature.
Setting up webhook in MS Teams
Microsoft Teams webhook only supports integrating with a single channel.
First, you need to get a webhook URL for the channel. There are two ways to do this:
-
Add official Zabbix webhook connector from MS Teams apps for the channel, where you want to receive notifications. (Check how to add a connector to a channel)
-
Create Incoming webhook for your channel. (See Teams documentation for the step-by-step instructions).
Setting up webhook in Zabbix
1. In the Zabbix web interface go to Administration → General section and select Macros from the dropdown menu in top left corner. Setup the global macro "{$ZABBIX.URL}" which will contain the URL to the Zabbix frontend.
The URL should be either an IP address, a fully qualified domain name or localhost. Specifying a protocol is mandatory, whereas port is optional.
Good examples:
http://zabbix.com
https://zabbix.lan/
http://server.zabbix.lan/
http://localhost
http://127.0.0.1:8080
Bad examples:
zabbix.com
http://zabbix/
2. In the Administration > Media types section, import the media_ms_teams.yaml
3. Open the newly added MS Teams media type and replace placeholder <PLACE WEBHOOK URL HERE> with the incoming webhook URL, created during the webhook setup in MS Teams.
4. You can also choose between two notification formats. Set "use_default_message" parameter:
-
false (default)
- Use preformatted message with predefined set of fields for trigger-based notifications.
In internal, autoregistration and discovery notifications {ALERT.MESSAGE} as a body of the message will be used. In this case you can customize the message template for trigger-based notifications by adding additional fields and up to four buttons with URLs.- To add an additional field to message card, put a parameter with prefix fact_ and field name. For example, "fact_Data center" as key and {EVENT.TAGS.dc} as value.
- To create a new button with a link to an external resource, add a parameter with prefix openUri_ and button name. The value should be a valid URL. For example, "openUri_Link to Zabbix.com" as key and https://www.zabbix.com/ as value.
If any of the parameters with prefix openUri_ has invalid URL it will be ignored by Teams.
Also, since Microsoft only supports five buttons in a message card, one of which is reserved for the "Event info" link, the fifth and subsequent parameters with prefix openUri_ and valid URL will be ignored too.
- Use preformatted message with predefined set of fields for trigger-based notifications.
-
true
- Use {ALERT.MESSAGE} as a body of the message in all types of notifications.
5. To receive Zabbix notifications in MS Teams, you need to create a Zabbix user and add Media with the MS Teams media type.
In the Administration → Users section, click Create user button in the top right corner. In the User tab, fill in all required fields (marked with red asterisks). In the Media tab, add a new media and select "MS Teams" type from the drop-down list. Though a "Send to" field is not used in MS Teams media, it cannot be empty. To comply with the frontend requirements, you can put any symbol there.
Make sure this user has access to all hosts for which you would like problem notifications to be sent to MS Teams.
👁 Image
6. Great! You can now start receiving alerts!
For more information see Zabbix and MS Teams webhook documentations.
Supported Versions
Zabbix 6.2
Source: https://git.zabbix.com/projects/ZBX/repos/zabbix/browse/templates/media/msteams?at=release/6.0
Microsoft Teams webhook
This guide describes how to integrate Zabbix 5.0 with MS Teams using the Zabbix webhook feature. This guide will provide instructions on setting up a media type, a user and an action in Zabbix. This integration is supported only for Teams as part of Office 365. Note, that Teams free plan does not support incoming webhook feature.
Setting up webhook in MS Teams
Microsoft Teams webhook only supports integrating with a single channel.
First, you need to get a webhook URL for the channel. There are two ways to do this:
-
Add official Zabbix webhook connector from MS Teams apps for the channel, where you want to receive notifications. (Check how to add a connector to a channel)
-
Create Incoming webhook for your channel. (See Teams documentation for the step-by-step instructions).
Setting up webhook in Zabbix
1. In the Zabbix web interface go to Administration → General section and select Macros from the dropdown menu in top left corner. Setup the global macro "{$ZABBIX.URL}" which will contain the URL to the Zabbix frontend.
The URL should be either an IP address, a fully qualified domain name or localhost. Specifying a protocol is mandatory, whereas port is optional.
Good examples:
http://zabbix.com
https://zabbix.lan/
http://server.zabbix.lan/
http://localhost
http://127.0.0.1:8080
Bad examples:
zabbix.com
http://zabbix/
2. In the Administration > Media types section, import the media_ms_teams.yaml
3. Open the newly added MS Teams media type and replace placeholder <PLACE WEBHOOK URL HERE> with the incoming webhook URL, created during the webhook setup in MS Teams.
4. You can also choose between two notification formats. Set "use_default_message" parameter:
-
false (default)
- Use preformatted message with predefined set of fields for trigger-based notifications.
In internal, autoregistration and discovery notifications {ALERT.MESSAGE} as a body of the message will be used. In this case you can customize the message template for trigger-based notifications by adding additional fields and up to four buttons with URLs.- To add an additional field to message card, put a parameter with prefix fact_ and field name. For example, "fact_Data center" as key and {EVENT.TAGS.dc} as value.
- To create a new button with a link to an external resource, add a parameter with prefix openUri_ and button name. The value should be a valid URL. For example, "openUri_Link to Zabbix.com" as key and https://www.zabbix.com/ as value.
If any of the parameters with prefix openUri_ has invalid URL it will be ignored by Teams.
Also, since Microsoft only supports five buttons in a message card, one of which is reserved for the "Event info" link, the fifth and subsequent parameters with prefix openUri_ and valid URL will be ignored too.
- Use preformatted message with predefined set of fields for trigger-based notifications.
-
true
- Use {ALERT.MESSAGE} as a body of the message in all types of notifications.
5. To receive Zabbix notifications in MS Teams, you need to create a Zabbix user and add Media with the MS Teams media type.
In the Administration → Users section, click Create user button in the top right corner. In the User tab, fill in all required fields (marked with red asterisks). In the Media tab, add a new media and select "MS Teams" type from the drop-down list. Though a "Send to" field is not used in MS Teams media, it cannot be empty. To comply with the frontend requirements, you can put any symbol there.
Make sure this user has access to all hosts for which you would like problem notifications to be sent to MS Teams.
👁 Image
6. Great! You can now start receiving alerts!
For more information see Zabbix and MS Teams webhook documentations.
Supported Versions
Zabbix 5.0
Source: https://git.zabbix.com/projects/ZBX/repos/zabbix/browse/templates/media/msteams?at=release/5.4
Microsoft Teams webhook
This guide describes how to integrate Zabbix 5.0 with MS Teams using the Zabbix webhook feature. This guide will provide instructions on setting up a media type, a user and an action in Zabbix. This integration is supported only for Teams as part of Office 365. Note, that Teams free plan does not support incoming webhook feature.
Setting up webhook in MS Teams
Microsoft Teams webhook only supports integrating with a single channel.
First, you need to get a webhook URL for the channel. There are two ways to do this:
-
Add official Zabbix webhook connector from MS Teams apps for the channel, where you want to receive notifications. (Check how to add a connector to a channel)
-
Create Incoming webhook for your channel. (See Teams documentation for the step-by-step instructions).
Setting up webhook in Zabbix
1. In the Zabbix web interface go to Administration → General section and select Macros from the dropdown menu in top left corner. Setup the global macro "{$ZABBIX.URL}" which will contain the URL to the Zabbix frontend.
The URL should be either an IP address, a fully qualified domain name or localhost. Specifying a protocol is mandatory, whereas port is optional.
Good examples:
http://zabbix.com
https://zabbix.lan/
http://server.zabbix.lan/
http://localhost
http://127.0.0.1:8080
Bad examples:
zabbix.com
http://zabbix/
2. In the Administration > Media types section, import the media_ms_teams.yaml
3. Open the newly added MS Teams media type and replace placeholder <PLACE WEBHOOK URL HERE> with the incoming webhook URL, created during the webhook setup in MS Teams.
4. You can also choose between two notification formats. Set "use_default_message" parameter:
-
false (default)
- Use preformatted message with predefined set of fields for trigger-based notifications.
In internal, autoregistration and discovery notifications {ALERT.MESSAGE} as a body of the message will be used. In this case you can customize the message template for trigger-based notifications by adding additional fields and up to four buttons with URLs.- To add an additional field to message card, put a parameter with prefix fact_ and field name. For example, "fact_Data center" as key and {EVENT.TAGS.dc} as value.
- To create a new button with a link to an external resource, add a parameter with prefix openUri_ and button name. The value should be a valid URL. For example, "openUri_Link to Zabbix.com" as key and https://www.zabbix.com/ as value.
If any of the parameters with prefix openUri_ has invalid URL it will be ignored by Teams.
Also, since Microsoft only supports five buttons in a message card, one of which is reserved for the "Event info" link, the fifth and subsequent parameters with prefix openUri_ and valid URL will be ignored too.
- Use preformatted message with predefined set of fields for trigger-based notifications.
-
true
- Use {ALERT.MESSAGE} as a body of the message in all types of notifications.
5. To receive Zabbix notifications in MS Teams, you need to create a Zabbix user and add Media with the MS Teams media type.
In the Administration → Users section, click Create user button in the top right corner. In the User tab, fill in all required fields (marked with red asterisks). In the Media tab, add a new media and select "MS Teams" type from the drop-down list. Though a "Send to" field is not used in MS Teams media, it cannot be empty. To comply with the frontend requirements, you can put any symbol there.
Make sure this user has access to all hosts for which you would like problem notifications to be sent to MS Teams.
👁 Image
6. Great! You can now start receiving alerts!
For more information see Zabbix and MS Teams webhook documentations.
Supported Versions
Zabbix 5.0
Source: https://git.zabbix.com/projects/ZBX/repos/zabbix/browse/templates/media/msteams?at=release/5.0
Microsoft Teams webhook
This guide describes how to integrate Zabbix 5.0 with MS Teams using the Zabbix webhook feature. This guide will provide instructions on setting up a media type, a user and an action in Zabbix. This integration is supported only for Teams as part of Office 365. Note, that Teams free plan does not support incoming webhook feature.
Setting up webhook in MS Teams
Microsoft Teams webhook only supports integrating with a single channel.
First, you need to get a webhook URL for the channel. There are two ways to do this:
-
Add official Zabbix webhook connector from MS Teams apps for the channel, where you want to receive notifications. (Check how to add a connector to a channel)
-
Create Incoming webhook for your channel. (See Teams documentation for the step-by-step instructions).
Setting up webhook in Zabbix
1. In the Zabbix web interface go to Administration → General section and select Macros from the dropdown menu in top left corner. Setup the global macro "{$ZABBIX.URL}" which will contain the URL to the Zabbix frontend.
The URL should be either an IP address, a fully qualified domain name or localhost. Specifying a protocol is mandatory, whereas port is optional.
Good examples:
http://zabbix.com
https://zabbix.lan/
http://server.zabbix.lan/
http://localhost
http://127.0.0.1:8080
Bad examples:
zabbix.com
http://zabbix/
2. In the Administration > Media types section, import the media_ms_teams.xml
3. Open the newly added MS Teams media type and replace placeholder <PLACE WEBHOOK URL HERE> with the incoming webhook URL, created during the webhook setup in MS Teams.
4. You can also choose between two notification formats. Set "use_default_message" parameter:
-
false (default)
- Use preformatted message with predefined set of fields for trigger-based notifications.
In internal, autoregistration and discovery notifications {ALERT.MESSAGE} as a body of the message will be used. In this case you can customize the message template for trigger-based notifications by adding additional fields and up to four buttons with URLs.- To add an additional field to message card, put a parameter with prefix fact_ and field name. For example, "fact_Data center" as key and {EVENT.TAGS.dc} as value.
- To create a new button with a link to an external resource, add a parameter with prefix openUri_ and button name. The value should be a valid URL. For example, "openUri_Link to Zabbix.com" as key and https://www.zabbix.com/ as value.
If any of the parameters with prefix openUri_ has invalid URL it will be ignored by Teams.
Also, since Microsoft only supports five buttons in a message card, one of which is reserved for the "Event info" link, the fifth and subsequent parameters with prefix openUri_ and valid URL will be ignored too.
- Use preformatted message with predefined set of fields for trigger-based notifications.
-
true
- Use {ALERT.MESSAGE} as a body of the message in all types of notifications.
5. To receive Zabbix notifications in MS Teams, you need to create a Zabbix user and add Media with the MS Teams media type.
In the Administration → Users section, click Create user button in the top right corner. In the User tab, fill in all required fields (marked with red asterisks). In the Media tab, add a new media and select "MS Teams" type from the drop-down list. Though a "Send to" field is not used in MS Teams media, it cannot be empty. To comply with the frontend requirements, you can put any symbol there.
Make sure this user has access to all hosts for which you would like problem notifications to be sent to MS Teams.
👁 Image
6. Great! You can now start receiving alerts!
For more information see Zabbix and MS Teams webhook documentations.
Supported Versions
Zabbix 5.0