 |
VOOZH | about |
|
VOOZH | about |
In this post, we will look at how to use render functions to unleash the power of JavaScript by using templates in Vue.
👁 ImageThe Replay is a weekly newsletter for dev and engineering leaders.
Delivered once a week, it's your curated guide to the most important conversations around frontend dev, emerging AI tools, and the state of modern software.
This post is suited for developers of all stages including beginners. Here are a few things you should already have before going through this article.
You will need the following on your pc:
node -v
npm uninstall -g vue-cli
then install the new one:
npm install -g @vue/cli
npm install
Vue JS has a focus on the view layer of your JavaScript projects and that is why the templates are provided to show your presentation (markup language). The node is the smallest unit of constructs in the DOM, so when template code like this is sent to the DOM, the browser breaks it all down to nodes:
<div>
 <h1>My first heading is this </h1>
 <p>The paragraph text stays here </p>
</div>
So the heading is a node and the header text is a child node inside the header node, just as the paragraph is a node and the text in it is a child node. To update these nodes, Vue, provides a template to write the presentation code while it assembles the nodes.
So for a paragraph like the one above, you simply write this in the template section:
<p>The paragraph text stays here </p>
Or use a render function to create it, like this:
render: function (createElement) {
 return createElement('p', 'The paragraph text stays here')
}
You can quickly notice the level of abstraction you get with Vue as you compare both methods. The render function, however, closer to the compiler as the template code will still need transcribing to JavaScript.
To monitor and properly manage these nodes, Vue JS builds a virtual DOM where it does the dirty work of keeping up with nodes and how they change from the point of mounting onInit to when they are un-mounted (at onDestroy) as virtual nodes. A virtual DOM is simply a component tree of all the virtual nodes.
This is the function in JavaScript used inside a Vue component to perform tasks like creating an element. Here we see the function that is shown above:
render: function (createElement) {
 return createElement('p', 'The paragraph text stays here')
 }
You see that the argument createElement is used to create a new element in the DOM, behind the scenes it returns a virtual node. Virtual nodes are called VNodes in Vue JS.
The render function’s createElement accepts up to three parameters:
To illustrate the render function, let us see a sample example, if you read this post from the start you will have downloaded the starter project, unzipped and opened it up in your VS Code application. Open your App.vue file and make sure it looks like this:
<template>
 <div id="app">
 <p>{{greetings}} </p>
 </div>
</template>
<script>
import Test from './components/Test.vue'
export default {
 name: 'app',
 components: {
 Test
 },
 data(){
 return {
 greetings: 'The paragraph text stays here'
 }
 }
}
</script>
<style>
#app {
 font-family: 'Avenir', Helvetica, Arial, sans-serif;
 -webkit-font-smoothing: antialiased;
 -moz-osx-font-smoothing: grayscale;
 text-align: center;
 color: #2c3e50;
 margin-top: 60px;
}
</style>
This is exactly what we had as our first code sample at the start of this post. To use the render function approach, remember it is a pure JavaScript concept in Vue so open up the main.js file, it should look like this:
import Vue from 'vue'
import App from './App.vue'
Vue.config.productionTip = false
new Vue({
 render: h => h(App),
}).$mount('#app')
This is where the default mounting statement is kept by Vue and how the app.vue file is the root component. Add this code block before the new Vue code block, just immediately after the third line:
import Vue from 'vue'
import App from './App.vue'
Vue.config.productionTip = false
Vue.component('Hello', {
 render(createElement){
 return createElement('p', 'The rendered paragraph text stays here');
 }
})
new Vue({
 render: h => h(App),
}).$mount('#app')
This creates a new Vue component called Hello and then creates a paragraph element inside it. The paragraph will look exactly as if you opened a new .vue file like the Test component in the project directory. To test it out, go back to the app.vue file and add the Hello component in the template and watch it appear in your browser.
<template>
 <div id="app">
 <p>{{greetings}} </p>
 <Hello />
 </div>
</template>
Here is what it will look like in the browser:
You can leverage your knowledge of JavaScript to really control the virtual DOM as you already know that using the render function gives you direct control to the Vue virtual DOM. You can add a data object with values and then use this to refer to it like this:
Vue.component('Hello', {
 render(createElement){
 return createElement('p', this.greetings);
 },
 data(){
 return {
 greetings: 'The paragraph text stays here'
 }
 }
})
This displays the created paragraph with the text specified in the data object.
You can also make use of your favorite Vue JS constructs like props, for instance. If your app.vue template section has a car property like this:
<template>
 <div id="app">
 <p>{{greetings}} </p>
 <Hello car=" driving a Ferari"/>
 </div>
</template>
You can make reference to it using the props in the main.js file like this:
Vue.component('Hello', {
 render(createElement){
 return createElement('p', this.greetings + this.car);
 },
 data(){
 return {
 greetings: 'The paragraph text stays here'
 }
 },
 props: ['car']
})
Here is what it will look like in the browser:
👁 render createElement
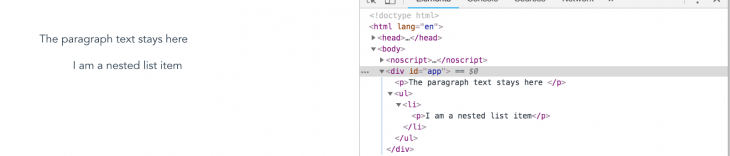
You can also nest elements with the render function like this:
Vue.component('Hello', {
 render(createElement){
 return createElement('ul',
 [createElement('li',[createElement('p', 'I am a nested list item')])]);
 },
 data(){
 return {
 greetings: 'The paragraph text stays here'
 }
 },
 props: ['car']
 })
Here is what it will look like in the browser:
You can see the Vue instance API and the render function documentation here.
This has been a good introduction into accessing the Vue virtual DOM with render functions. It is a very direct way to communicate with the DOM and with knowledge of both Vue and JavaScript itself, you can comfortably have total control over the DOM. Happy hacking!
Debugging Vue.js applications can be difficult, especially when users experience issues that are difficult to reproduce. If you’re interested in monitoring and tracking Vue mutations and actions for all of your users in production, try LogRocket.
👁 LogRocket Dashboard Free Trial BannerLogRocket lets you replay user sessions, eliminating guesswork by showing exactly what users experienced. It captures console logs, errors, network requests, and pixel-perfect DOM recordings — compatible with all frameworks.
With Galileo AI, you can instantly identify and explain user struggles with automated monitoring of your entire product experience.
Modernize how you debug your Vue apps — start monitoring for free.
Learn how next-browser gives AI agents runtime context for debugging Next.js apps, including React props, hydration, PPR, forms, and performance.
Build dynamic LLM routing in Next.js with OpenRouter, TanStack AI, task classification, model fallbacks, and cost-aware routing.
TSRX adds first-class control flow, conditional hooks, and scoped styles to React via a TypeScript compiler extension — no new framework required.
Learn how to build a full React Native auth system using Better Auth and Expo — with email/password login, Google OAuth, session persistence, and protected routes.
Hey there, want to help make our blog better?
Join LogRocket’s Content Advisory Board. You’ll help inform the type of content we create and get access to exclusive meetups, social accreditation, and swag.
Sign up now