 |
VOOZH | about |
|
VOOZH | about |
Editor’s note: This article was last updated 15 November 2022 to include the addition of Vuetify as a UI framework.
👁 Nuxtjs Component TestingVue’s increase in popularity over the past few years has fueled an interest in Nuxt.js, a framework used to build robust and universal applications with Vue. When building applications, it’s important to provide a clear path towards testing, which will reduce the time spent debugging and refactoring code.
In this article, we’ll learn how to set up a game store application with Nuxt.js and test its components. To follow along with this article, you should have basic knowledge of Vue and Nuxt.js. You can also check out the full repository on GitHub. Let’s get started!
The Replay is a weekly newsletter for dev and engineering leaders.
Delivered once a week, it's your curated guide to the most important conversations around frontend dev, emerging AI tools, and the state of modern software.
To create a new application with Nuxt.js, we first have to install it. In the terminal, navigate to your project folder and input the following command:
npm install nuxt
Still using the terminal, in our project folder, we’ll create our application via npx, which is shipped by default since npm ≥v5.2.0:
npx create-nuxt-app game-store
Running this will take us through a list of options, and your options may differ during this process. Select Vuetify as the UI framework and Jest as the testing framework option. The guide below details what we selected in creating the application we’ll be working with:
? Project name: game-store
? Programming language: JavaScript
? Package manager: NPM
? UI Framework: Vuetify
? Nuxt.js modules: None
? Linting tools: None
? Testing framework: Jest
? Rendering mode: Single Page App
? Deployment target: Static
? Development tools: jsconfig.json
? Version Control System: Git
Once we’re done creating the application, we can navigate to it via our terminal and launch it in the browser:
cd game-stores
npm run dev
The following window should appear:
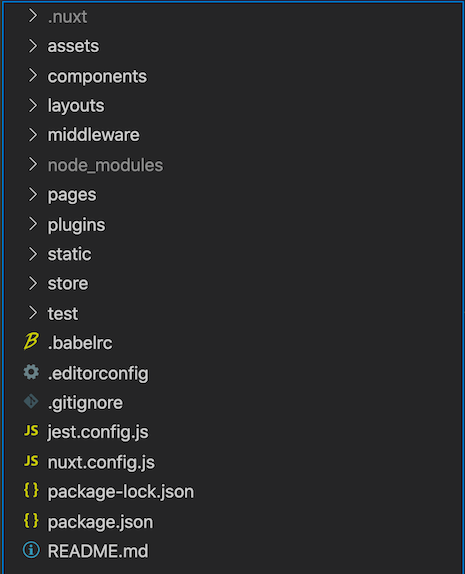
We should also have a project folder structure similar to the one below:
👁 Nuxtjs Project Folder Structure
To efficiently manage states, Nuxt.js leverages the abilities of Vuex. Therefore, every file created in the /store directory can be treated as a Vuex module, meaning it contains its state, mutation, action, and getters.
We’ll use our store directory as a starting point for our application. Let’s begin by including the data we need. Create a new games/games.js file in the existing /store directory and paste the following code into it:
// store/games/games.js

const games = [
 {
 title: "Star Wars Battlefront 2",
 console: "PlayStation 4",
 rating: 7,
 price: 15.3,
 photo:
 "https://res.cloudinary.com/fullstackmafia/image/upload/v1604990005/SWBF2_box_or6x8s.jpg",
 },
 {
 title: "BioShock: The Collection",
 console: "PlayStation 4",
 rating: 9,
 price: 16.0,
 photo:
 "https://res.cloudinary.com/fullstackmafia/image/upload/v1604990078/220px-BioShock-_The_Collection_tix1ol.jpg",
 },
 {
 title: "Call of Duty: Black Ops 4",
 console: "PlayStation 4",
 rating: 9,
 price: 11.7,
 photo:
 "https://res.cloudinary.com/fullstackmafia/image/upload/v1604990123/220px-Call_of_Duty_Black_Ops_4_official_box_art_vvhd7w.jpg",
 },
 {
 title: "Tom Clancy's Rainbow Six: Siege",
 console: "PlayStation 5",
 rating: 9,
 price: 13.9,
 photo:
 "https://res.cloudinary.com/fullstackmafia/image/upload/v1604990231/56c494ad88a7e300458b4d5a_qeyro6.jpg",
 },
];
Next, we’ll configure our games store’s state, mutation, action, and getters. To perform this operation, in the games.js file we created earlier, paste the following code immediately after the former code snippet:
// store/games/games.js

const state = () => {
 return games;
};

const mutations = {};
const actions = {};
const getters = {
 bestGames(state) {
 return state.filter(({ rating }) => {
 return rating === 9;
 });
 },
 playstationfour(state) {
 return state.filter(({ console }) => {
 return console === "PlayStation 4";
 });
 },
 consoleType(state) {
 return (consoleName) => {
 return state.filter(({ console }) => {
 return console === consoleName;
 });
 };
 },
 cheapGames(state) {
 return state.filter(({ price }) => {
 return price === 15.3;
 });
 },
};

export default { state, mutations, actions, getters };
Let’s display our games store data on the main page by iterating through each item using the v-for directive. Replace the code in pages/index.vue with the following:
<!-- pages/index.vue -->
<template>
 <div>
 <v-container>
 <v-row>
 <v-col xs4 v-for="game in psfourGames" :key="game.title">
 <v-card>
 <v-img :src="game.photo" aspect-ratio="1"></v-img>
 <v-card-title primary-title>
 <div>
 <h3>{{ game.title }}</h3>
 <h4>Rating: {{ game.rating }}</h4>
 <h4>Price: ${{ game.price }}</h4>
 </div>
 </v-card-title>
 </v-card>
 </v-col>
 </v-row>
 </v-container>
 </div>
</template>
Then, we’ll use Vuex’s MapGetter helper to map the previously defined getter in games.js to a computed property in our index.vue file:
<!-- pages/index.vue -->
<script>
import { mapGetters } from "vuex";
export default {
 computed: {
 ...mapGetters({
 consoleType: "games/games/consoleType",
 }),
 psfourGames() {
 return this.consoleType("PlayStation 4");
 },
 },
};
</script>
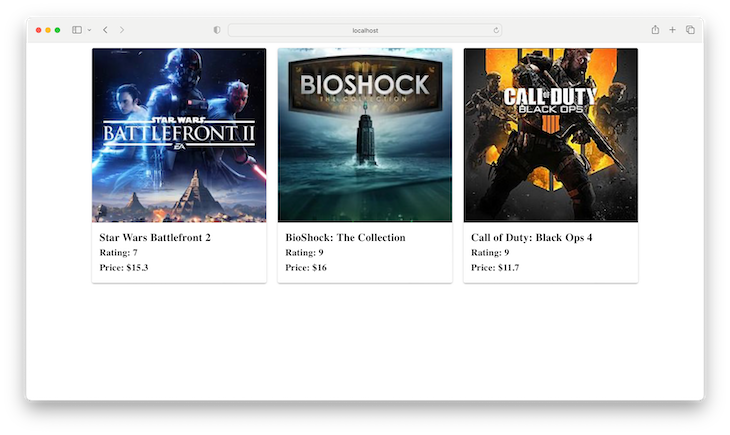
Let’s see how this appears in the browser so far. Navigate to your terminal and run npm run dev. Your browser view should be similar to the image below:
For our application’s testing framework, we’re using Jest, which we selected earlier during setup. As we’ve previously mentioned, Nuxt.js builds all the content of our store into Vuex modules. Our goal is to have various stores that are responsible for different functions and to test these stores in the same way that they are used in our components, meaning we choose which particular store we want to test.
To achieve this, we’ll configure Jest to use its globalSetup module, which exports an async function that is triggered once before all the tests are run. Therefore, we can choose the particular store that we want to test. To perform this operation, replace the code in the jest.config.js file with the following:
// jest.config.js

module.exports = {
 globalSetup: "<rootDir>/jest.setup.js",
 moduleNameMapper: {
 "^@/(.*)$": "<rootDir>/$1",
 "^~/(.*)$": "<rootDir>/$1",
 "^vue$": "vue/dist/vue.common.js",
 },
 moduleFileExtensions: ["js", "vue", "json"],
 transform: {
 "^.+\\.js$": "babel-jest",
 ".*\\.(vue)$": "vue-jest",
 },
 collectCoverage: true,
 collectCoverageFrom: [
 "<rootDir>/components/**/*.vue",
 "<rootDir>/pages/**/*.vue",
 ],
};
In the Jest config file above, we’ve configured the globalSetup module to run our Jest setup file first before running any tests.
Next, we’ll create the jest.setup.js file, where we’ll expose the directory of our store through a process variable:
import { Nuxt, Builder } from "nuxt";
import nuxtConfig from "./nuxt.config";

const resetConfig = {
 loading: false,
 loadingIndicator: false,
 fetch: {
 client: false,
 server: false,
 },
 features: {
 store: true,
 layouts: false,
 meta: false,
 middleware: false,
 transitions: false,
 deprecations: false,
 validate: false,
 asyncData: false,
 fetch: false,
 clientOnline: false,
 clientPrefetch: false,
 clientUseUrl: false,
 componentAliases: false,
 componentClientOnly: false,
 },
 build: {
 indicator: false,
 terser: false,
 },
};
const config = Object.assign({}, nuxtConfig, resetConfig, {
 srcDir: nuxtConfig.srcDir,
 ignore: ["**/components/**/*", "**/layouts/**/*", "**/pages/**/*"],
});
const buildNuxt = async () => {
 const nuxt = new Nuxt(config);
 await new Builder(nuxt).build();
 return nuxt;
};
module.exports = async () => {
 const nuxt = await buildNuxt();
 process.env.buildDir = nuxt.options.buildDir;
};
In the setup file above, resetConfig ensures that only the store is built when we run our build process. Then, we use process.env.buildDir to expose the path for our store.
With that completed, let’s write the test for our store. Create a new games.test.js file inside the existing /test directory and add the following code to it:
// test/games.test.js

import _ from "lodash";
import Vuex from "vuex";
import { createLocalVue } from "@vue/test-utils";

describe("store/games/games", () => {
 const localVue = createLocalVue();
 localVue.use(Vuex);
 let NuxtStore;
 let store;
 beforeAll(async () => {
 const storePath = `${process.env.buildDir}/store.js`;
 NuxtStore = await import(storePath);
 });
 beforeEach(async () => {
 store = await NuxtStore.createStore();
 });
// ...
});
In the tests above, we used Jest’s beforeAll block to import the built store. The beforeEach block ensures that a new store is created each time a separate test is run.
Next, we’ll write out the specific tests we want for our application. Let’s say we want the following specific set of criteria:
9Our test code will be like the following:
describe("consoleType", () => {
 let playstationfour;
 beforeEach(() => {
 playstationfour = store.getters["games/games/playstationfour"];
 });
 test("Call of Duty: Black Ops 4 should be on only playStation 4", () => {
 expect(playstationfour).toEqual(
 expect.arrayContaining([
 expect.objectContaining({
 console: "PlayStation 4",
 title: "Call of Duty: Black Ops 4",
 }),
 ])
 );
 });
});

describe("cheapGames", () => {
 let cheapGames;
 beforeEach(() => {
 cheapGames = store.getters["games/games/cheapGames"];
 });
 test(`StarWars BattleFront must cost exactly ${15.3}`, () => {
 expect(cheapGames).toEqual(
 expect.arrayContaining([
 expect.objectContaining({
 price: 15.3,
 }),
 ])
 );
 });
});

describe("bestGames", () => {
 let bestGames;
 beforeEach(() => {
 bestGames = store.getters["games/games/bestGames"];
 });
 test("Display only the best titles we have", () => {
 expect(bestGames).toEqual(
 expect.arrayContaining([
 expect.objectContaining({
 rating: 9,
 }),
 ])
 );
 });
});
However, you must ensure that the test code is written immediately after the beforeEach block so that we can continue to access our store instance. With these new changes, the complete code for our games.test.js file will look like the following:
// test/games.test.js

import _ from "lodash";
import Vuex from "vuex";
import { createLocalVue } from "@vue/test-utils";

describe("store/games/games", () => {
 const localVue = createLocalVue();
 localVue.use(Vuex);
 let NuxtStore;
 let store;
 beforeAll(async () => {
 const storePath = `${process.env.buildDir}/store.js`;
 NuxtStore = await import(storePath);
 });
 beforeEach(async () => {
 store = await NuxtStore.createStore();
 });

 describe("consoleType", () => {
 let playstationfour;
 beforeEach(() => {
 playstationfour = store.getters["games/games/playstationfour"];
 });
 test("Call of Duty: Black Ops 4 should be on only playStation 4", () => {
 expect(playstationfour).toEqual(
 expect.arrayContaining([
 expect.objectContaining({
 console: "PlayStation 4",
 title: "Call of Duty: Black Ops 4",
 }),
 ])
 );
 });
 });

 describe("cheapGames", () => {
 let cheapGames;
 beforeEach(() => {
 cheapGames = store.getters["games/games/cheapGames"];
 });
 test(`StarWars BattleFront must cost exactly ${15.3}`, () => {
 expect(cheapGames).toEqual(
 expect.arrayContaining([
 expect.objectContaining({
 price: 15.3,
 }),
 ])
 );
 });
 });

 describe("bestGames", () => {
 let bestGames;
 beforeEach(() => {
 bestGames = store.getters["games/games/bestGames"];
 });
 test("Display only the best titles we have", () => {
 expect(bestGames).toEqual(
 expect.arrayContaining([
 expect.objectContaining({
 rating: 9,
 }),
 ])
 );
 });
 });
});
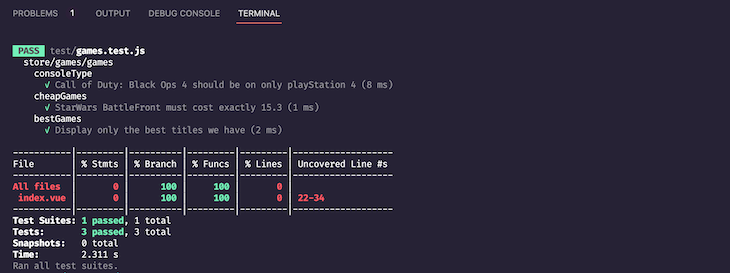
Let’s give our tests a go. Navigate to your terminal and run npm test; this should run all the specified tests and deliver the expected results, reading All default components and routes have been deleted before running this test:
Writing tests for universal applications can seem cumbersome. A general rule of thumb is to always keep tests simple and concise. In this article, we explored testing our Nuxt.js components with Jest. We also explored Vuetify and Vuex. I hope you enjoyed this article, and be sure to leave a comment if you have questions. Happy coding!
Debugging Vue.js applications can be difficult, especially when users experience issues that are difficult to reproduce. If you’re interested in monitoring and tracking Vue mutations and actions for all of your users in production, try LogRocket.
👁 LogRocket Dashboard Free Trial BannerLogRocket lets you replay user sessions, eliminating guesswork by showing exactly what users experienced. It captures console logs, errors, network requests, and pixel-perfect DOM recordings — compatible with all frameworks.
With Galileo AI, you can instantly identify and explain user struggles with automated monitoring of your entire product experience.
Modernize how you debug your Vue apps — start monitoring for free.
Install LogRocket via npm or script tag. LogRocket.init() must be called client-side, not
server-side
$ npm i --save logrocket

// Code:

import LogRocket from 'logrocket';
LogRocket.init('app/id');
// Add to your HTML:

<script src="https://cdn.lr-ingest.com/LogRocket.min.js"></script>
<script>window.LogRocket && window.LogRocket.init('app/id');</script>
Learn how next-browser gives AI agents runtime context for debugging Next.js apps, including React props, hydration, PPR, forms, and performance.
Build dynamic LLM routing in Next.js with OpenRouter, TanStack AI, task classification, model fallbacks, and cost-aware routing.
TSRX adds first-class control flow, conditional hooks, and scoped styles to React via a TypeScript compiler extension — no new framework required.
Learn how to build a full React Native auth system using Better Auth and Expo — with email/password login, Google OAuth, session persistence, and protected routes.
Would you be interested in joining LogRocket's developer community?
Join LogRocket’s Content Advisory Board. You’ll help inform the type of content we create and get access to exclusive meetups, social accreditation, and swag.
Sign up now