 |
VOOZH | about |
|
VOOZH | about |
Editor’s note: This article was updated 10 May 2022 to more accurately reflect the capabilities of Vuex and fix a misleading title.
👁 ImageThe Replay is a weekly newsletter for dev and engineering leaders.
Delivered once a week, it's your curated guide to the most important conversations around frontend dev, emerging AI tools, and the state of modern software.
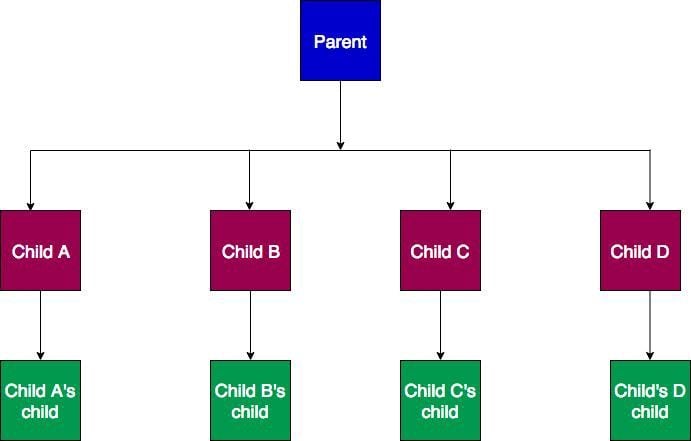
When building complex web applications in Vue, you may encounter situations in which you need to share data amongst a deep nested hierarchy of components and you would like to use Vuex to manage state. In this case, it makes sense to use the “separation of concerns” concept by breaking your Vuex store into modules so the complexity of having all your logic in one single store is abstracted.
Vuex modules are essentially small, independent Vuex stores that are combined into a larger, central Vuex store. This makes managing them much easier, and it is a skill that Vuex devs should have in their toolbelt.
In this article, we will learn how to manage multiple store modules with Vuex.
In a simple Vue application with just a few components, sharing data can be achieved using props and component events. However, when your components start growing progressively, it’s advisable to introduce a state management package to serve as a standalone service for managing data across components in your application so as to avoid “prop drilling.”
Prop drilling happens when data is passed through every component on every level of the hierarchy until it gets to its destination. This is an issue in itself, as you would end up writing more repetitive and hard-to-read code.
So, what’s the best way to share data among nested components?
👁 A system with nested components
This is where Vuex comes in. Vuex acts as a central store for all components in the application. The store can be accessed by any of the components regardless of the number of nested components in an application.
The problem is that a Vuex store by default is comprised of one large object which contains all our application’s state, mutations, actions, and getters. This can cause our app to become bloated as it increases in size and complexity.
To make a Vuex store easier to scale, it can be separated into modules. Each module can have its own state, mutations ,getters, and actions. We can even nest modules.
Vuex can easily be added to a project using any of the following options:
First, via a CDN (content delivery network)
For this method, you can simply insert the script in-between the head tags of your .html file:
<script src="https://unpkg.com/[email protected]/dist/vuex.global.js"></script>
Remember to add the Vuex script right after the Vue script like this:
<script src="/path/to/vue.js"></script>
<script src="/path/to/vuex.js"></script>
Second is npm or yarn. If you’re building a complex application, this method is highly recommended:
npm install vuex@next --save
#OR Yarn
yarn add vuex@next --save
To setup Vuex using npm or yarn, create a store folder in the root of your src folder and create a file in it named index.js.
Before we can access the properties of Vuex, Vue needs to be aware of the external resource before we can use it. In your main.js file located inside the src folder add the following code:
import { createApp } from 'vue'
import App from './App.vue'
import store from "./store";

createApp(App)
.use(store)
.mount('#app')
Next, create a modules folder inside of the store folder and add the files jokes.js and crypto.js. For this tutorial, our store will consist of these two modules.
The jokes.js module will fetch jokes from the Chuck Norris Jokes API and the crypto.js module will fetch cryptocurrency data from the Coincap API.
For our modules to work we’ll need to configure them in the central store, which is our index.js file. Import the modules like so:
//store/index.js

import { createStore } from 'vuex'
import jokes from './modules/jokes'
import crypto from './modules/crypto'

export default createStore({
 modules: {
 jokes,
 crypto
 },
})
In this section, we’ll update our empty module files to contain the code to fetch data from the various APIs.
Creating a module isn’t that different from a regular central Vuex store. The syntax is pretty much the same except that we don’t create a new store instance in the module. Instead, we export an object containing all of its properties into the central store instance:
// modules/crypto.js

export default {
 namespaced: true,
 state: {
 data: {},
 },
 getters: {
 data: state => state.data,
 },
 actions: {
 async getData({commit }) {
 const data = await fetch('https://api.coincap.io/v2/assets');
 commit('SET_DATA', await data.json());
 },
 },
 mutations: {
 SET_DATA(state, data) {
 state.data = data;
 },
 }
}


// modules/jokes.js

export default {
 namespaced: true,
 state: {
 data: {},
 },
 getters: {
 data: state => state.data,
 },
 actions: {
 async getData({commit }) {
 const data = await fetch('http://api.icndb.com/jokes/random/15');
 commit('SET_DATA', await data.json());
 },
 },
 mutations: {
 SET_DATA(state, data) {
 state.data = data;
 },
 }
}
Above, we added the attribute namespaced:true to the module object so our modules can be self-contained and reusable. Namespacing the modules also helps to prevent naming issues, as you can reuse the same name for your state, mutation, and actions without causing any errors.
In this section, we’ll go over how we can access a store module in our template files.
We’ll be using the App.vue file to fetch and display the data gotten from each of our store modules as such:
// App.vue

<template>
 <div id="app">
 <img alt="Vue logo" src="./assets/logo.png" />
 <div>
 <button @click="jokeData">Get Jokes</button>
 <button @click="cryptoData">Get Crypto Data</button>
 </div>
 <div class="display">
 <pre>{{ jokes.data }}</pre>
 <pre>{{ crypto.data }}</pre>
 </div>
 </div>
</template>
<script>
import { mapState } from "vuex";
export default {
 name: "App",
 computed: {
 ...mapState(["jokes", "crypto"]),
 },
 methods: {
 jokeData() {
 this.$store.dispatch("jokes/getData");
 },
 cryptoData() {
 this.$store.dispatch("crypto/getData");
 },
 },
};
</script>
In the code above, there are two methods that are used to fetch data from each of our store modules. Since we had set the namespaced attribute to true, in order to access data from the store, we have to prefix the name of the module alongside a forward slash to the name of the action to successfully dispatch it.
Then, in order to fetch the state from the store modules, we use the Vuex mapstate helper and then display the data stored in the state for each of the modules on the template.
Vuex gives you the flexibility to manage multiple store modules based on how you’d like to structure your project. We can also choose to use the same name for actions, mutations, and getters as long as you set the namespaced attribute to true.
You can learn more about Vuex modules here.
Debugging Vue.js applications can be difficult, especially when users experience issues that are difficult to reproduce. If you’re interested in monitoring and tracking Vue mutations and actions for all of your users in production, try LogRocket.
👁 LogRocket Dashboard Free Trial BannerLogRocket lets you replay user sessions, eliminating guesswork by showing exactly what users experienced. It captures console logs, errors, network requests, and pixel-perfect DOM recordings — compatible with all frameworks.
With Galileo AI, you can instantly identify and explain user struggles with automated monitoring of your entire product experience.
Modernize how you debug your Vue apps — start monitoring for free.
Learn how next-browser gives AI agents runtime context for debugging Next.js apps, including React props, hydration, PPR, forms, and performance.
Build dynamic LLM routing in Next.js with OpenRouter, TanStack AI, task classification, model fallbacks, and cost-aware routing.
TSRX adds first-class control flow, conditional hooks, and scoped styles to React via a TypeScript compiler extension — no new framework required.
Learn how to build a full React Native auth system using Better Auth and Expo — with email/password login, Google OAuth, session persistence, and protected routes.
Would you be interested in joining LogRocket's developer community?
Join LogRocket’s Content Advisory Board. You’ll help inform the type of content we create and get access to exclusive meetups, social accreditation, and swag.
Sign up now