 |
VOOZH | about |
|
VOOZH | about |
Editor’s note: This post was last updated on 2 November 2022 to add information about consuming APIs with Vuex and Axios, and to answer popular search queries about using Pinia and Vuex according to the latest version of Vuex (v5, at the time of writing).
👁 How To Consume APIs With Vuex, Pinia, And AxiosAn application programming interface (API) is a set of programming standards for accessing an application. This means that with an API, your backend and frontend applications can communicate with each other without the knowledge of the user.
“Consuming” an API means to receive requests and send responses via an API. In this article, you’ll learn how to consume APIs from a server using Vuex, Pinia, and Axios. We’ll cover the following sections:
The Replay is a weekly newsletter for dev and engineering leaders.
Delivered once a week, it's your curated guide to the most important conversations around frontend dev, emerging AI tools, and the state of modern software.
Some frameworks, such as Angular, JQuery, and version 1.0 of Vue.js, come with built-in HTTP APIs. Since Vue 2.0, developers have decided that the built-in HTTP client module, Vue-resource, is no longer essential and can be replaced by third-party libraries. Now, the most recommended library is Axios.
Axios is a flexible HTTP client library that uses promises by default and runs on both the client and the server, which makes it appropriate for fetching data during server-side rendering. It’s easy to use with Vue.js.
State management is the implementation of a design pattern to manage data that will be shared among various components in a given application, which helps to ensure consistency across data that is being presented to the user.
In a Vue.js single-page application (SPA), multiple components may, at any given time, interact with and change the data before sending it back to the server. Therefore, developers need a way to manage these changes — “the state” — which can be done with a state management library such as Vuex or Pinia.
A state management library lets you extract shared state from components, manage it in a global singleton, and either provide components access to the state, or trigger actions, no matter where they are in the tree.
If you have never built a large-scale SPA, using a library for state management may feel too complicated and unnecessary. But if you are building a medium- to large-scale SPA, chances are you have run into situations that have made you think twice about how to better handle and share state between components. If so, Vuex or Pinia is the right tool for you!
Why you should use a state management library
Typically, you’ll want to use a library to manage state if:
Passing props can be difficult or almost impossible for deeply-nested components. It can be tempting to use direct references to parent/child instances, or try to mutate and synchronize multiple copies of the state via events. But neither of these options are recommended because they may produce unmaintainable code and bugs.
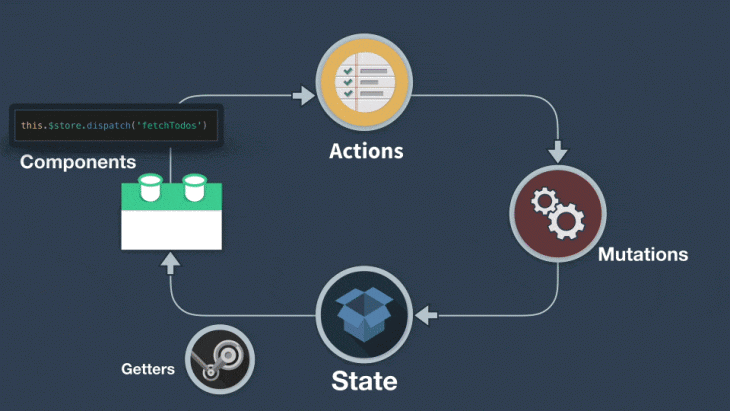
Vuex is a state management pattern and library for Vue.js applications. It serves as a centralized store for all the components in an application:
👁 The Vuex State Management Cycle
Similar to Vuex, Pinia is another state management library designed to work with the Vue framework. Some of Pinia’s underlying concepts and principles are quite similar to Vuex’s and only a few concepts differentiate these libraries, such as out-of-the-box modularity and a slight difference in syntax. With sufficient knowledge of Vuex, learning to use Pinia should be an easy switch if you’re just getting started.
In fact, Pinia is now considered Vuex 5 and is the recommended default state management library for Vue applications. This does not, however, imply that Vuex is no longer supported. Furthermore, despite being designed with the Composition API and Vue 3 in mind, Pinia is compatible with both Vue 2 and 3, regardless of whether you intend to use the Composition API or the Options API.
One of Vuex’s major drawbacks is the complexity and repetitiveness of creating actions and mutations; for example, when working on large-scale applications, you’d need to create actions that trigger mutations, which becomes a laborious and repetitive process. Pinia was inspired by this Vuex limitation, which typically eliminates mutations while also providing a more modular way for global state management.
For this tutorial, we’ll be working with the latest default Vue version, 3.0, and the Composition API. If you don’t have the Vue CLI installed already, run the following in your terminal:
npm install -g @vue/cli
To see if the Vue CLI is already installed on your system, execute the code below. A Vue CLI version should appear if Vue is already installed:
vue --version
// 5.0.1
Now, create a Vue project by running the following code in your terminal:
vue create my-app
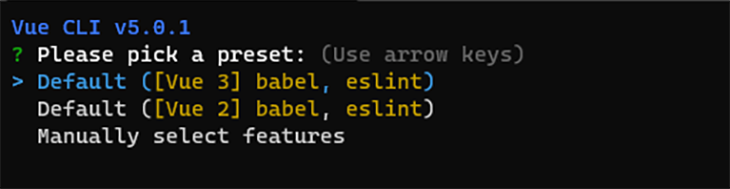
Next, you’ll receive a prompt to select a Vue version. Select Vue 3:
👁 Selecting The Appropriate Vue Version
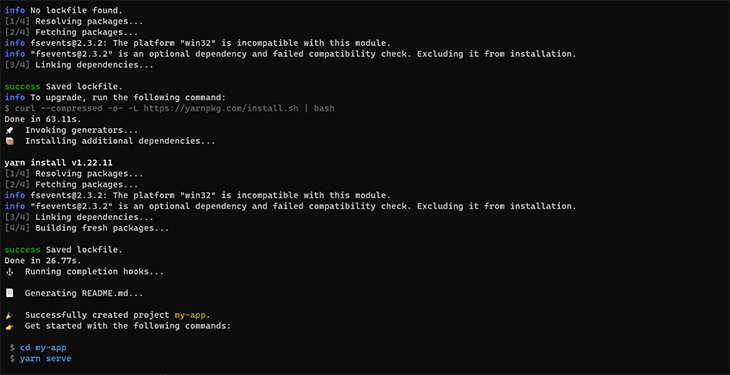
Once our app is ready, follow the commands to move into the app directory and start the server:
👁 Starting The Server In The App Directory
Then, you can install and set up Axios, which we’ll be using to fetch data from the API with the following code:
yarn add axios
# OR
npm install axios
Install and set up Vuex with the following code:
yarn add vuex
# OR
npm install vuex
Next, create a folder in your src folder and name it store. In your store folder, create a new index.js so that your project folder will have a structure similar to the one below:
├── index.html
└── src
 ├── components
 ├── App.vue
 └──store
 └── index.js # where we assemble modules and export the store
Next, in your store/index.js file, input the following code:
//import the createStore object from Vuex
import { createStore } from 'vuex'
// Import axios to make HTTP requests
import axios from "axios"
export default createStore({
 state: {},
 getters: {},
 actions: {},
 mutations: {}
})
/** we have just created a boiler plate for our vuex store module**/
Register your store by updating your main.js file to match the following:
import { createApp } from "vue";
import App from "./App.vue";
import store from "./store";

createApp(App).use(store).mount("#app");
Before we proceed, if you’d like to learn more about actions, mutations, and getters in Vuex, I recommend checking out LogRocket’s really concise article on the subject.
To properly understand how to create a Vuex store and consume APIs with Axios using Vuex actions, state, mutations, and getters, we’ll create a simple Vuex application that fetches user information from our fake JSON backend and populates our template. To proceed, update the store/index.js file with the following code:
// store/index.js

import { createStore } from "vuex";
import axios from "axios";
export default createStore({
 state: {
 users: [],
 },
 getters: {
 getUsers: (state) => state.users,
 },
 actions: {
 async fetchUsers({ commit }) {
 try {
 const data = await axios.get(
 "https://jsonplaceholder.typicode.com/users"
 );
 commit("SET_USERS", data.data);
 } catch (error) {
 alert(error);
 console.log(error);
 }
 },
 },
 mutations: {
 SET_USERS(state, users) {
 state.users = users;
 },
 },
});
We’re using the async/await format to fetch data from the endpoint, and using Axios to make the HTTP request.
We’ll make a request to the API form inside of the actions object. In the try block, we then assign a data variable to our HTTP request. When a response is returned, a mutation is committed, which updates the application’s state.
We can also alert on errors or log them in the console in the catch block.
In your HelloWorld.vue file, paste the following code:
<template>
 <div class="hello">
 <h1>{{ msg }}</h1>
 <h1>Made By Getters</h1>
 <div v-for="user in getUsers" :key="user.id">
 {{ user.id }} {{ user.name }} {{ user.address }}
 </div>
 <h1>Made By Actions</h1>
 <div v-for="user in users" :key="user.id">
 {{ user.id }} {{ user.name }} {{ user.address }}
 </div>
 </div>
</template>

<script setup>
import { ref, onMounted, computed } from "vue";
import { useStore } from "vuex";
const store = useStore();
const msg = ref("Welcome to my Vuex Store");
const getUsers = computed(() => {
 return store.getters.getUsers;
});
const users = computed(() => {
 return store.state.users;
});
onMounted(() => {
 store.dispatch("fetchUsers");
});
</script>
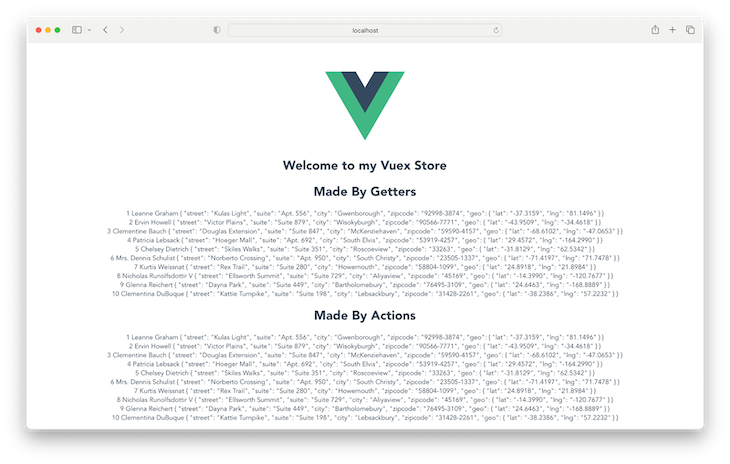
Navigate back to localhost:8080 on your browser to see the changes we’ve made:
To install and setup Pinia, follow the steps below:
yarn add pinia
# OR
npm install pinia
Next, import Pinia in the root file of your app, the main.js file, and instantiate it as such:
import { createApp } from 'vue'
import App from './App.vue'

//Import Pinia into your config file
import { createPinia } from 'pinia'

createApp(App)
//Add the line below to the file to instantiate it
.use(createPinia())
.mount('#app')
Next, create a stores folder in the root of the src folder and add a file named users.js.
// stores/users.js
import { defineStore } from 'pinia'
// Import axios to make HTTP requests
import axios from "axios"

export const useUserStore = defineStore("user",{
 state: () => ({}),
 getters: {},
 actions: {},
})
We’ve successfully set up both our Vuex and Pinia stores! Now, let’s use our stores to fetch data from an API to populate our template.
We’re going to replicate the output in the Vuex example using Pinia and Axios. Update the users.js file we created earlier with the following code:
//stores/users.js

import { defineStore } from 'pinia'
// Import axios to make HTTP requests
import axios from "axios"
export const useUserStore = defineStore("user", {
 state: () => ({
 users: [],
 }),
 getters: {
 getUsers(state){
 return state.users
 }
 },
 actions: {
 async fetchUsers() {
 try {
 const data = await axios.get('https://jsonplaceholder.typicode.com/users')
 this.users = data.data
 }
 catch (error) {
 alert(error)
 console.log(error)
 }
 }
 },
})
Replace the code in the HelloWorld.vue file with:
<template>
 <div class="hello">
 <h1>{{ msg }}</h1>
 <h1>Made By Getters</h1>
 <div v-for="user in getUsers" :key="user.id">
 {{ user.id }} {{ user.name }} {{ user.address }}
 </div>
 <h1>Made By Actions</h1>
 <div v-for="user in users" :key="user.id">
 {{ user.id }} {{ user.name }} {{ user.address }}
 </div>
 </div>
</template>

<script setup>
import { ref, onMounted, computed } from "vue";
import { useUserStore } from "../store/users";
const store = useUserStore();
const msg = ref("Welcome to my Vuex Store");
const getUsers = computed(() => {
 return store.getUsers;
});
const users = computed(() => {
 return store.users;
});
onMounted(() => {
 store.fetchUsers();
});
</script>
In Pinia, stores are modular by default. For each created store, we need to import the store in the component it is to be used. As a result, we imported our useUserStore and assigned it to the store variable so that it can be easily accessed throughout our component.
Instead of the store.dispatch("fetchUsers") method in Vuex, in Pinia, an action is seen as a function and can be accessed from the declared store variable using the store.fetchUsers() method.
Below is the simplest Vuex store structure, where actions, getters, state, and mutations are called and exported in the index.js file.
NB: Pinia is modular out of the box, so these Vuex examples might not apply:
├── index.html
└── src
 ├── components
 ├── App.vue
 └──store
 └── index.js # where we assemble modules and export the store
As your application becomes larger, you may need to separate your actions, mutations, getters, and state modules into their own, different files:
├── index.html
└── src
 ├── components
 ├── App.vue
 └──store
 ├── index.js # where we assemble modules and export the
 ├── actions.js # root actions
 ├── mutations.js # root mutation
 ├── getters.js # root getters
 └── state
All states in our application are contained inside one large object because we’re using a single state tree. This isn’t ideal because our application grows as our actions, mutations, and state become larger, making it possible for the store to become even larger, so much so that we may not be able to keep up with it.
A great solution is to group our store into modules. Each module can contain its own state, mutations, actions, and getters — and they can even contain nested modules, providing greater options for scalability:
├── index.html
├── main.js
├── api
│ └── ... # abstractions for making API requests
├── components
│ ├── App.vue
│ └── ...
└── store
 ├── index.js # where we assemble modules and export the store
 ├── actions.js # root actions
 ├── mutations.js # root mutations
 └── modules
 ├── cart.js # cart module
 └── products.js
Pinia is considered a Vuex5 replacement and is now the recommended state management library for Vue applications. However, this does not imply that older versions of Vuex do not function properly.
You can use Vuex and Pinia in the same application; however, this is not recommended because it is best to stick to a single state management library. Using more than one may result in performance issues.
With our previous configuration, here’s how you can initialize Pinia and a Vuex store in the entry main.js file:
import { createApp } from "vue";
import App from "./App.vue";

import store from "./store";
import { createPinia } from "pinia";

createApp(App).use(createPinia()).use(store).mount("#app");
You can then proceed to utilizing the store in your components like we did before.
In this tutorial, we’ve looked at what state management is and why you need a library such as Vuex/Pinia to handle state for your Vue applications.
In addition, we created a simple Vue application to demonstrate Vuex/Pinia, as well as learned different store structures so you can decide which one is best for your application.
Debugging Vue.js applications can be difficult, especially when users experience issues that are difficult to reproduce. If you’re interested in monitoring and tracking Vue mutations and actions for all of your users in production, try LogRocket.
👁 LogRocket Dashboard Free Trial BannerLogRocket lets you replay user sessions, eliminating guesswork by showing exactly what users experienced. It captures console logs, errors, network requests, and pixel-perfect DOM recordings — compatible with all frameworks.
With Galileo AI, you can instantly identify and explain user struggles with automated monitoring of your entire product experience.
Modernize how you debug your Vue apps — start monitoring for free.
Learn how next-browser gives AI agents runtime context for debugging Next.js apps, including React props, hydration, PPR, forms, and performance.
Build dynamic LLM routing in Next.js with OpenRouter, TanStack AI, task classification, model fallbacks, and cost-aware routing.
TSRX adds first-class control flow, conditional hooks, and scoped styles to React via a TypeScript compiler extension — no new framework required.
Learn how to build a full React Native auth system using Better Auth and Expo — with email/password login, Google OAuth, session persistence, and protected routes.
Hey there, want to help make our blog better?
Join LogRocket’s Content Advisory Board. You’ll help inform the type of content we create and get access to exclusive meetups, social accreditation, and swag.
Sign up now