 |
VOOZH | about |
|
VOOZH | about |
Editor’s note: This article was updated on 24 February 2024 by Abiola Farounbi to include the newest Vue and Pinia capabilities and features, discuss notable differences in state management with the Options API vs. the Composition API, dive deeper into how Pinia leverages Vue’s reactivity system, cover state hydration, and more.
👁 Leveraging Pinia To Simplify Complex Vue State ManagementState management is one of the cornerstones of web application development. Most apps designed for real-world usage need some kind of state management solution.
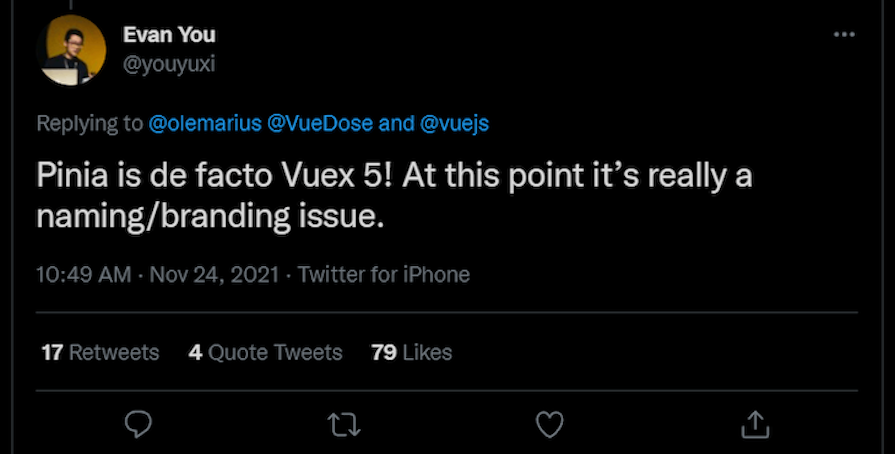
For years, Vuex was the primary state management tool for Vue apps. However, in November 2019, the Vue team released another tool called Pinia that Evan You described in a tweet as “de facto Vuex 5”:
👁 Evan You Tweet Explaining Pinia Is De Factor Vuex 5
In February 2022, Pinia officially became part of Vue’s ecosystem and the new default state management tool for Vue projects. It reached its stable v2.1.7 release in October 2023. Meanwhile, Vuex — although still usable — is now in maintenance mode, and we’re unlikely to see any new updates or features added.
In this tutorial, we’ll examine the most important features of Pinia by learning how to create, use, and inspect data stores. The project we’ll build along the way will demonstrate the basics of building apps with complex state. But first, let’s see how Pinia differs from Vuex.
The Replay is a weekly newsletter for dev and engineering leaders.
Delivered once a week, it's your curated guide to the most important conversations around frontend dev, emerging AI tools, and the state of modern software.
Although Pinia can be considered Vuex 5, there are some important differences between the two you should bear in mind:
These differences make Pinia a more complete, up-to-date, and usable tool than Vuex.
The Pinia API is maximally simplified. A store is defined using defineStore(). It requires two arguments:
id)Pinia offers the flexibility of using any method that seems convenient for you. Here’s an example using the options object:
import { defineStore } from 'pinia'

export const useCounterStore = defineStore({
 id: 'counter',
 state: () => ({
 counter: 0
 }),
 getters: {
 doubleCount: (state) => state.counter * 2
 },
 actions: {
 increment() {
 this.counter++
 }
 }
})
To define a store, we use the defineStore function. Here, the word define is used instead of create because a store is not created until it’s actually used in a component or page.
Starting the store name with use is a convention across Vue composables. Each store must provide a unique id to mount the store to Vue DevTools.
Pinia also uses the state, getters, and actions concepts, which are equivalent to data, computed, and methods in components:
state is defined as a function returning the initial stategetters are functions that receive the state as a first argumentactions are functions that can be asynchronousNow that we’ve seen what using the options object looks like, let’s see an example using the setup function:
import { defineStore } from 'pinia'

export const useCounterStore = defineStore('counter', () => {

const count = ref(0)
const doubleCount = computed(() => count.value * 2)
function increment() {
 count.value++
}
 return { count, doubleCount, increment }
})
In Pinia’s setup stores, ref() functions become state properties, while computed() functions transform into getters and regular functions are designated as actions. Returning all state properties in the setup function is essential to ensure proper SSR, DevTools, and plugin compatibility.
For this article, we will use the options object to provide a fundamental understanding of this concept.
That’s pretty much everything you need to know to define a Pinia store. We’ll see how stores are actually used in components and pages throughout the rest of the tutorial.
After seeing how simple the Pinia API is, let’s start building our project.
To demonstrate Pinia’s features, we’ll build a basic blog engine with the following features:
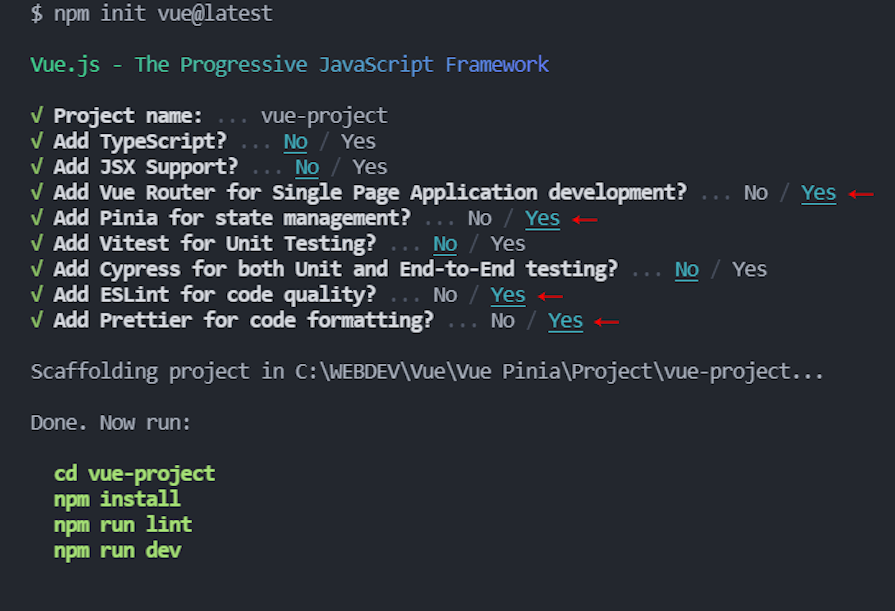
First, let’s create a new Vue project by running the following command:
npm init vue@latest
This will install and execute create-vue, the official Vue project scaffolding tool, to set up a new project with Vue and Vite. In the process, you must choose the tools necessary for the project:
👁 Screenshot Of Developer Terminal Showing Setup Process For New Project With Vue And Vite
Select all the tools marked with a red arrow in the image above: Router, Pinia, ESLint, and Prettier. When the setup completes, navigate to the project and install the dependencies:
cd vue-project
npm install
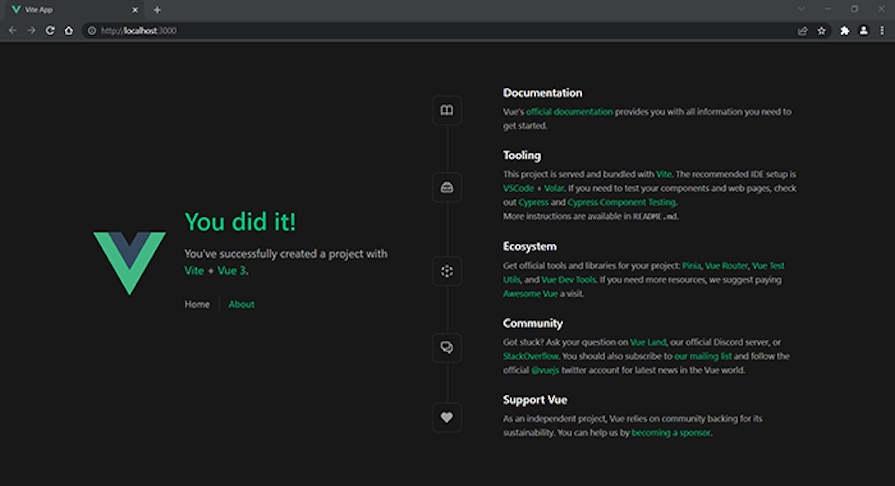
Now you can open the project in the browser by running the following:
npm run dev
Your new Vue app will be served at http://localhost:3000. Here is what you should see:
👁 New Vue App Displayed At Localhost 3000
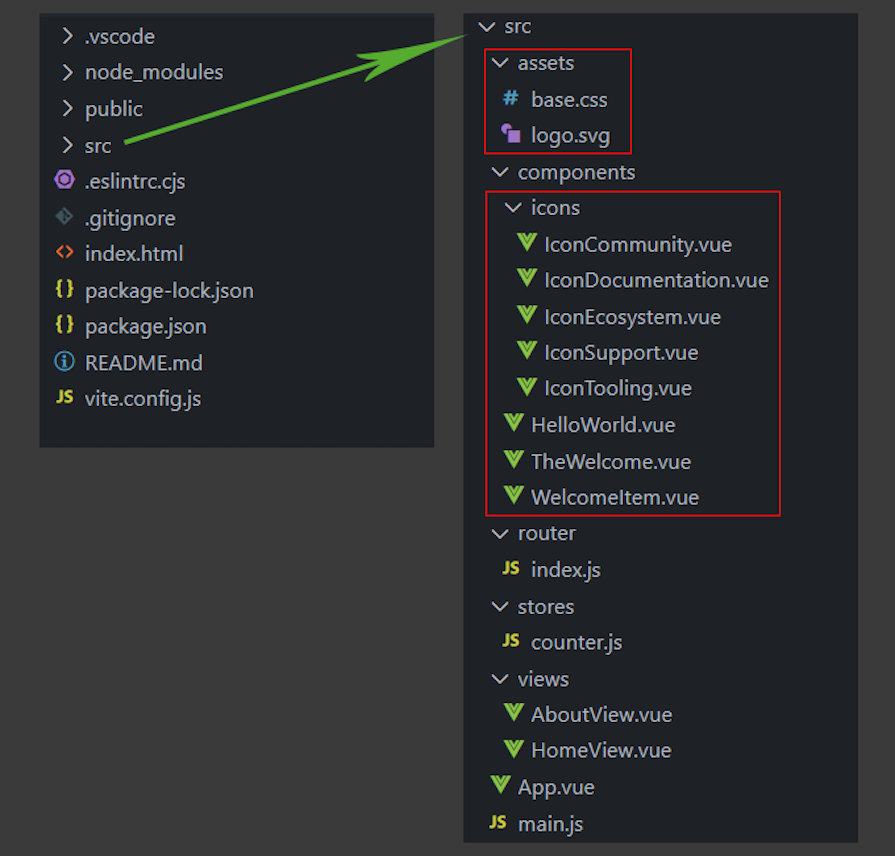
Now, to adapt it to our needs, we’ll clean up the default project structure. Here is how it looks now, with red boxes outlining the files and folders we’re going to delete:
👁 Default Vue Project Structure With Red Boxes Outlining Files And Folders To Remove For Cleanup
Close your terminal and delete all files and folders within the assets and icons folders, as outlined in the image above.
Now, we’re ready to start writing the project’s code. Let’s first open the main.js file to see how the Pinia root store is created and included in the project:
import { createApp } from 'vue'
import { createPinia } from 'pinia' // Import

import App from './App.vue'
import router from './router'

const app = createApp(App)

app.use(createPinia()) // Create the root store
app.use(router)

app.mount('#app')
As you can see, we imported the createPinia function, used it to create the Pinia store, and passed it to the app.
Now, open the App.vue file and replace its content with the following:
<script setup>
import { RouterLink, RouterView } from 'vue-router'
</script>

<template>
 <header class="navbar">
 <div>
 <nav>
 <RouterLink to="/">Posts</RouterLink> -
 <RouterLink to="/authors">Authors</RouterLink>
 </nav>
 </div>
 </header>

 <RouterView />
</template>

<style>
 .navbar {
 background-color: lightgreen;
 padding: 1.2rem;
 }
</style>
Here, we changed the link labels by replacing Home with Posts and About with Authors. We also changed the Authors link from /about to /authors.
Then, we removed all default styles and added our own for the navbar class, which we add to distinguish the navigation from the posts.
Ok, now we’re ready to dive deeper into Pinia and define the necessary app stores.
For our small app, we’ll use the JSONPlaceholder service as a data source and these three resources: users, posts, and comments.
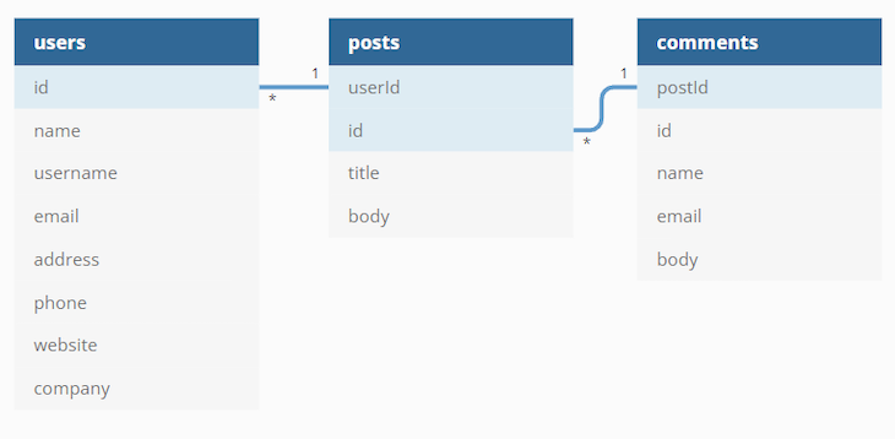
To understand how we’ll create the app stores better, let’s see how these resources relate to each other. Take a look at the following diagram:
👁 Graphic Defining And Explaining App Stores In Pinia
As you can see, the users resource is connected to posts by its id, and posts is connected to comments in the same way. So, to get a post’s author, we can use userId, and to get the comments for a post, we can use postId.
With this knowledge, we can start mapping the data to our stores.
The first store we’ll define is for blog posts. In the stores directory, rename counter.js to post.js and replace its content with the following:
import { defineStore } from 'pinia'

export const usePostStore = defineStore({
 id: 'post',
 state: () => ({
 posts: [],
 post: null,
 loading: false,
 error: null
 }),
 getters: {
 getPostsPerAuthor: (state) => {
 return (authorId) => state.posts.filter((post) => post.userId === authorId)
 }
 },
 actions: {
 async fetchPosts() {
 this.posts = []
 this.loading = true
 try {
 this.posts = await fetch('https://jsonplaceholder.typicode.com/posts')
 .then((response) => response.json())
 } catch (error) {
 this.error = error
 } finally {
 this.loading = false
 }
 },
 async fetchPost(id) {
 this.post = null
 this.loading = true
 try {
 this.post = await fetch(`https://jsonplaceholder.typicode.com/posts/${id}`)
 .then((response) => response.json())
 } catch (error) {
 this.error = error
 } finally {
 this.loading = false
 }
 }
 }
})
Let’s break this into small chunks and explain what’s going on. First, we define a usePostStore with an id of post. Second, we define our state with four properties:
posts for holding the fetched postspost for holding the current postloading for holding the loading stateerror for holding the error, if such existsThird, we create a getter to get how many posts an author has written. By default, a getter takes the state as an argument and uses it to get access to posts array. Getters can’t take custom arguments, but we can return a function that can receive such.
So, in our getter function, we filter posts to find all posts with a particular user ID. We’ll provide that ID when we use it in a component later. However, note that when we return a function with an argument from a getter, the getter is not cached anymore.
Finally, let’s create two asynchronous actions to fetch all posts and a single post.
In fetchPosts() action, we first reset the posts and set loading to true. Then, we fetch the posts by using FetchAPI and the posts’ resource from JSONPlaceholder. If there is an error, we assign the error to the error property. Finally, we set loading back to false.
The fetchPost(id) action is almost identical, but this time we use the post property and provide an id to get a single post. Make sure you use backticks instead of single quotes when fetching the post.
Here, we also reset the post property because if we don’t do it, the current post will display with the data from the previous post and the newly fetched post will be assigned to the post.
We have the posts, now it’s time to get some comments.
In the stores directory, create a comment.js file with the following content:
import { defineStore } from 'pinia'
import { usePostStore } from './post'

export const useCommentStore = defineStore({
 id: 'comment',
 state: () => ({
 comments: []
 }),
 getters: {
 getPostComments: (state) => {
 const postSore = usePostStore()
 return state.comments.filter((post) => post.postId === postSore.post.id)
 }
 },
 actions: {
 async fetchComments() {
 this.comments = await fetch('https://jsonplaceholder.typicode.com/comments')
 .then((response) => response.json())
 }
 }
})
Here, we create a comments array property in the state to hold the fetched comments. We fetch them with the help of fetchComments() action.
The interesting part here is the getPostComments getter. To get the post’s comments, we need a current post’s ID. Since we have it already in the post store, can we get it from there?
Yes, fortunately, Pinia allows us to use one store in another and vice versa. So, to get the post’s ID, we import the usePostStore and use it inside the getPostComments getter.
Ok, now we have the comments; the last thing is to get the authors.
In the stores directory, create an author.js file with the following content:
import { defineStore } from 'pinia'
import { usePostStore } from './post'

export const useAuthorStore = defineStore({
 id: 'author',
 state: () => ({
 authors: []
 }),
 getters: {
 getPostAuthor: (state) => {
 const postStore = usePostStore()
 return state.authors.find((author) => author.id === postStore.post.userId)
 }
 },
 actions: {
 async fetchAuthors() {
 this.authors = await fetch('https://jsonplaceholder.typicode.com/users')
 .then((response) => response.json())
 }
 }
})
This is pretty identical to commentStore. We again import usePostStore and use it to provide the needed author’s ID in the getPostAuthor getter.
And that’s it. You see how easy it is to create stores with Pinia, a simple and elegant solution.
Now, let’s see how to use the stores in practice.
In this section, we’ll create the necessary views and components to apply the Pinia stores we just created. Let’s start with the list of all posts.
You can either use Pinia with the Composition API and <script setup> syntax or the Options API. The Options API and Composition API work in different ways:
mapStores , mapState, mapWritableState, and mapActions — while the Composition API directly accesses store properties and methods.@vue/composition-api plugin required for Vue versions prior to v2.7In this tutorial, we’ll be using the Vue Composition API with Pinia.
In the views directory, rename HomeView.vue to PostsView.vue and replace its content with the following:
<script setup>
 import { RouterLink } from 'vue-router'
 import { storeToRefs } from 'pinia'
 import { usePostStore } from '../stores/post'

 const { posts, loading, error } = storeToRefs(usePostStore())
 const { fetchPosts } = usePostStore()

 fetchPosts()
</script>

<template>
 <main>
 <p v-if="loading">Loading posts...</p>
 <p v-if="error">{{ error.message }}</p>
 <p v-if="posts" v-for="post in posts" :key="post.id">
 <RouterLink :to="`/post/${post.id}`">{{ post.title }}</RouterLink>
 <p>{{ post.body }}</p>
 </p>
 </main>
</template>
Note that you may get a notification that you’ve renamed the file. You can just ignore it.
Here, we import and extract all necessary data from post store. To maintain reactivity when destructuring reactive properties like state properties and getters within a Pinia store, we used the storeToRefs() function:
const { posts, loading, error } = storeToRefs(usePostStore())
This function facilitates the creation of refs for the reactive properties, ensuring that changes to these properties trigger reactivity in the Vue components where they are used. Meanwhile, for actions, destructuring can be employed without any additional considerations:
const { fetchPosts } = usePostStore()
This approach enhances code readability and maintainability by providing a clear and consistent way to handle reactive and non-reactive data within Pinia stores.
We call fetchPosts() to fetch the posts. When using Composition API and call a function inside the setup() function, it’s equivalent to using the created() Hook. So, we’ll have the posts before the component mounts.
We also have a series of v-if directives in the template. First, we show the loading message if loading is true. Then, we show the error message if an error occurred.
Finally, we iterate through posts and display a title and a body for each one. We use the RouterLink component to add a link to the title so when users click it, they will navigate to the single post view, which we’ll create a bit later.
Now, let’s modify the router.js file. Open it and replace its content with the following:
import { createRouter, createWebHistory } from 'vue-router'
import PostsView from '../views/PostsView.vue'

const router = createRouter({
 history: createWebHistory(),
 routes: [
 {
 path: '/',
 name: 'posts',
 component: PostsView
 },
 {
 path: '/about',
 name: 'about',
 // route level code-splitting
 // this generates a separate chunk (About.[hash].js) for this route
 // which is lazy-loaded when the route is visited.
 component: () => import('../views/AboutView.vue')
 }
 ]
})

export default router
Here, we import the PostsView.vue and use it as a component in the first route. We also change the name from home to posts.
Ok, it’s time to test what we achieved so far. Run the app with the npm run dev command and see the result in your browser:
👁 Posts Listing View In Vue App
You will probably get some Vue warnings in the console starting with No match found.... This is because we haven’t created the necessary components yet, so you can safely ignore these warnings. You may also need to reload the page if posts do not display.
Let’s continue by creating the single post view. Close the terminal to avoid any unnecessary error messages.
In the views directory, create a PostView.vue file with the following content:
<script setup>
 import { useRoute } from 'vue-router'
 import { storeToRefs } from 'pinia'
 import { useAuthorStore } from '../stores/author'
 import { usePostStore } from '../stores/post'
 import Post from '../components/Post.vue'

 const route = useRoute()
 const { getPostAuthor } = storeToRefs(useAuthorStore())
 const { fetchAuthors} = useAuthorStore()
 const { post, loading, error } = storeToRefs(usePostStore())
 const { fetchPost } = usePostStore()

 fetchAuthors()
 fetchPost(route.params.id)
</script>

<template>
 <div>
 <p v-if="loading">Loading post...</p>
 <p v-if="error">{{ error.message }}</p>
 <p v-if="post">
 <post :post="post" :author="getPostAuthor"></post>
 </p>
 </div>
</template>
In the setup, we extract getPostAuthor and fetchAuthors from the author store and the necessary data from post store. We also call fetchAuthors() to get the existing authors.
Next, we call the fetchPost(route.params.id) action with the ID provided with the help of the route object. This updates the getPostAuthor and we can use it effectively in the template.
To provide the actual post, we use a post component which takes two props: post and author. Let’s create the component now.
post componentIn components directory, create a Post.vue file with the following content:
<script setup>
 import { RouterLink } from 'vue-router'
 import { storeToRefs } from 'pinia'
 import { useCommentStore } from '../stores/comment'
 import Comment from '../components/Comment.vue'

 defineProps(['post', 'author'])

 const { getPostComments } = storeToRefs(useCommentStore())
 const { fetchComments } = useCommentStore()

 fetchComments()
</script>

<template>
 <div>
 <div>
 <h2>{{ post.title }}</h2>
 <p v-if="author">Written by: <RouterLink :to="`/author/${author.username}`">{{ author.name }}</RouterLink>
 | <span>Comments: {{ getPostComments.length }}</span>
 </p>
 <p>{{ post.body }}</p>
 </div>
 <hr>
 <h3>Comments:</h3>
 <comment :comments="getPostComments"></comment>
 </div>
</template>
Here, we define the needed props by using the defineProps function and extract the necessary data from the comment store. Then, we fetch the comments so the getPostComments can be updated properly.
In the template, we first display the post title. Then, in a byline, we add an author name with a link to the author’s page and the number of comments in the post. We then add the post body and the comments section below.
To display comments, we’ll use separate component and pass the post comments to the comments prop.
comment componentIn the components directory, create a Comment.vue file with the following content:
<script setup>
 defineProps(['comments'])
</script>

<template>
 <div>
 <div v-for="comment in comments" :key="comment.id">
 <h3>{{ comment.name }}</h3>
 <p>{{ comment.body }}</p>
 </div>
 </div>
</template>
This is pretty simple. We define the comments prop and use it to iterate through the post’s comments.
Before we test the app again, add the following to the router.js:
import PostView from '../views/PostView.vue'
// ...
routes: [
// ...
{ path: '/post/:id', name: 'post', component: PostView },
]
Run the app again. You should see a similar view when you navigate to a single post:
👁 Comment Component In Vue App Showing Sample Post With List Of Comments
Now it’s time to display the authors. Close the terminal again.
In the views directory, rename the AboutView.vue file to AuthorsView.vue and replace its content with the following:
<script setup>
 import { RouterLink } from 'vue-router'
 import { storeToRefs } from 'pinia'
 import { useAuthorStore } from '../stores/author'

 const { authors } = storeToRefs(useAuthorStore())
 const { fetchAuthors } = useAuthorStore()

 fetchAuthors()
</script>

<template>
 <div>
 <p v-if="authors" v-for="author in authors" :key="author.id">
 <RouterLink :to="`/author/${author.username}`">{{ author.name }}</RouterLink>
 </p>
 </div>
</template>
Here, we use the author store to fetch and get the authors to iterate through them in the template. For each author, we provide a link to their page.
Open router.js file again and change the route for the About page to the following:
 {
 path: '/authors',
 name: 'authors',
 // route level code-splitting
 // this generates a separate chunk (About.[hash].js) for this route
 // which is lazy-loaded when the route is visited.
 component: () => import('../views/AuthorsView.vue')
 },
Here, we change the path and name to /authors and authors, respectively, and import the AuthorsView.vue with lazy loading.
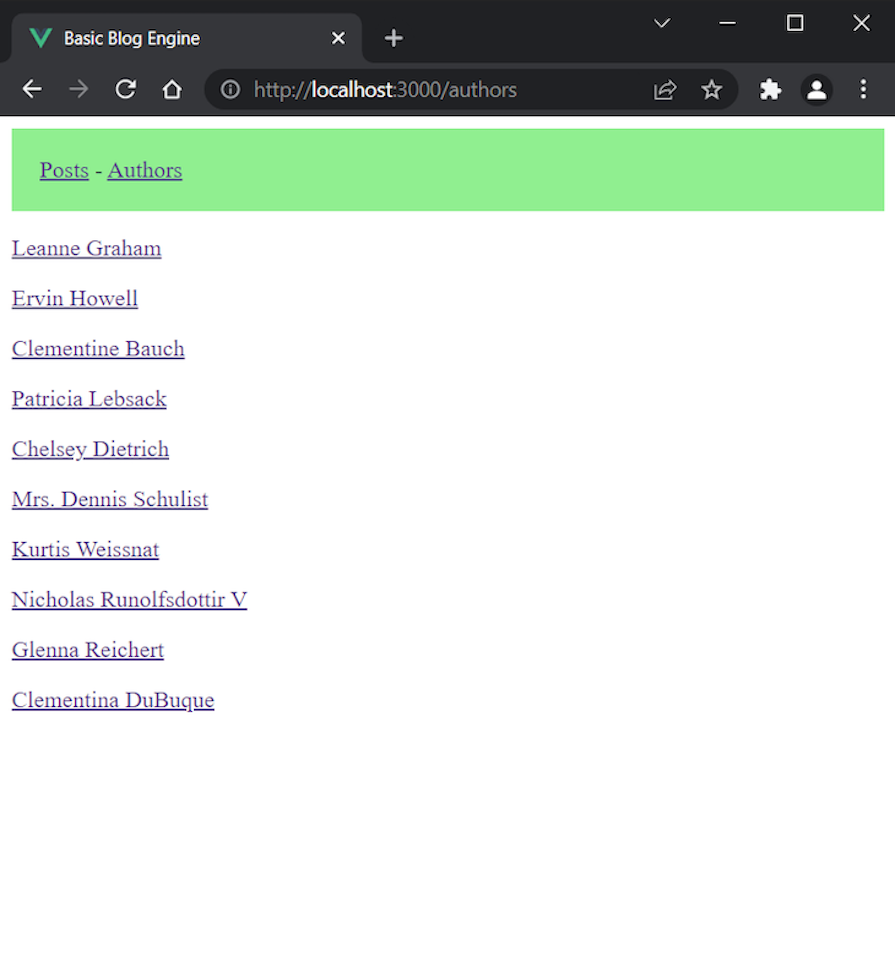
Run the app again. You should see the following when you visit the authors view:
👁 Authors View In Vue App Showing List Of Authors
Now let’s create the single author view. Close the terminal again.
In the views directory, create an AuthorView.vue file with the following content:
<script setup>
 import { computed } from 'vue'
 import { useRoute } from 'vue-router'
 import { storeToRefs } from 'pinia'
 import { useAuthorStore } from '../stores/author'
 import { usePostStore } from '../stores/post'
 import Author from '../components/Author.vue'

 const route = useRoute()
 const { authors } = storeToRefs(useAuthorStore())
 const { getPostsPerAuthor } = storeToRefs(usePostStore())
 const { fetchPosts } = usePostStore()

 const getAuthorByUserName = computed(() => {
 return authors.value.find((author) => author.username === route.params.username)
 })

 fetchPosts()
</script>

<template>
 <div>
 <author
 :author="getAuthorByUserName"
 :posts="getPostsPerAuthor(getAuthorByUserName.id)">
 </author>
 </div>
</template>
Here, to find who the current author is, we use their username to get it from the route. So, we create a getAuthorByUserName function for this purpose. Then, we pass author and posts props to an author component, which we’ll create right now.
author componentIn the components directory, create Author.vue file with the following content:
<script setup>
 import { RouterLink } from 'vue-router'

 defineProps(['author', 'posts'])
</script>

<template>
 <div>
 <h1>{{author.name}}</h1>
 <p>{{posts.length}} posts written.</p>
 <p v-for="post in posts" :key="post.id">
 <RouterLink :to="`/post/${post.id}`">{{ post.title }}</RouterLink>
 </p>
 </div>
</template>
This component displays the author name, how many posts were written by the author, and the posts themselves.
Next, add the following to the router.js file:
import AuthorView from '../views/AuthorView.vue'
// ...
routes: [
// ...
{ path: '/author/:username', name: 'author', component: AuthorView }
]
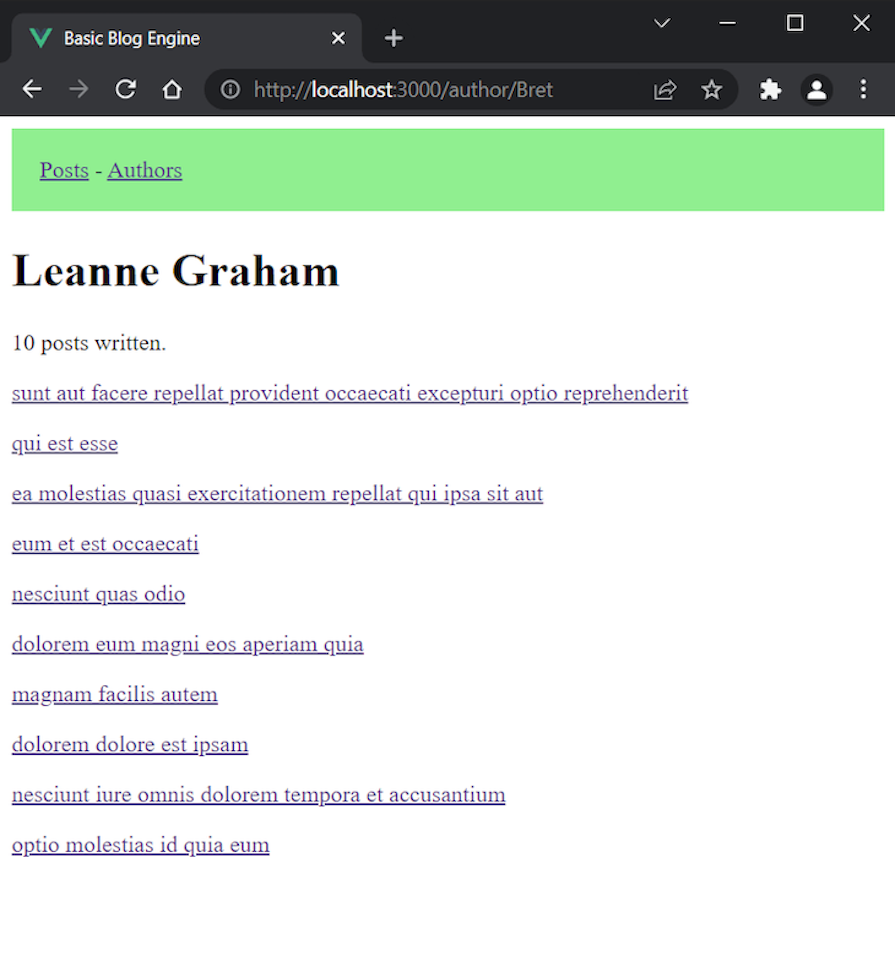
Run the app again. You should see the following when you go to the author view:
👁 Single Author Details View In Vue App
Here is how the final router.js file should look like:
import { createRouter, createWebHistory } from 'vue-router'
import PostsView from '../views/PostsView.vue'
import PostView from '../views/PostView.vue'
import AuthorView from '../views/AuthorView.vue'

const router = createRouter({
 history: createWebHistory(),
 routes: [
 {
 path: '/',
 name: 'posts',
 component: PostsView
 },
 {
 path: '/authors',
 name: 'authors',
 // route level code-splitting
 // this generates a separate chunk (About.[hash].js) for this route
 // which is lazy-loaded when the route is visited.
 component: () => import('../views/AuthorsView.vue')
 },
 { path: '/post/:id', name: 'post', component: PostView },
 { path: '/author/:username', name: 'author', component: AuthorView },
 ]
})

export default router
Now, all the Vue warnings for missing resources and components should be gone. And that’s it — we successfully created and used Pinia stores in a fairly complex app.
Lastly, let’s see how we can inspect the app in Vue DevTools.
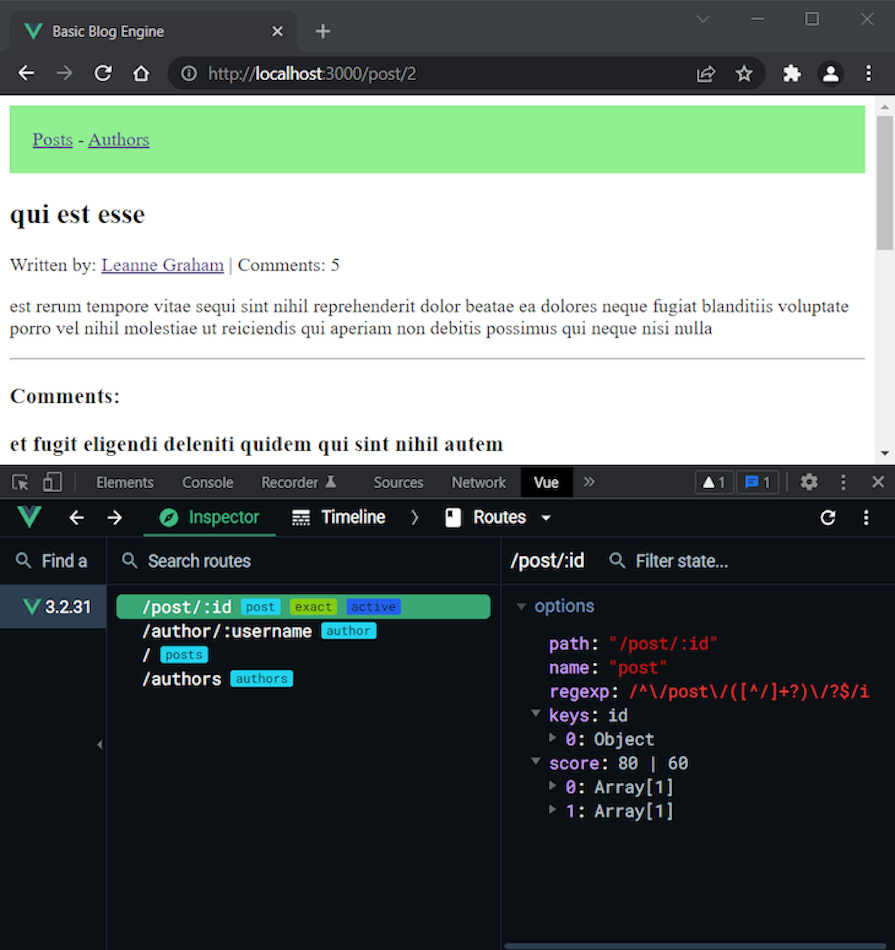
In the next screenshots, we have a post with an ID of 2 open. Here is how the routes of the app are listed in the Routes tab:
👁 Inspecting Pinia Stores Via Vue Devtools
We can see that all routes we created are here. The one for the single post is active because it’s currently being used.
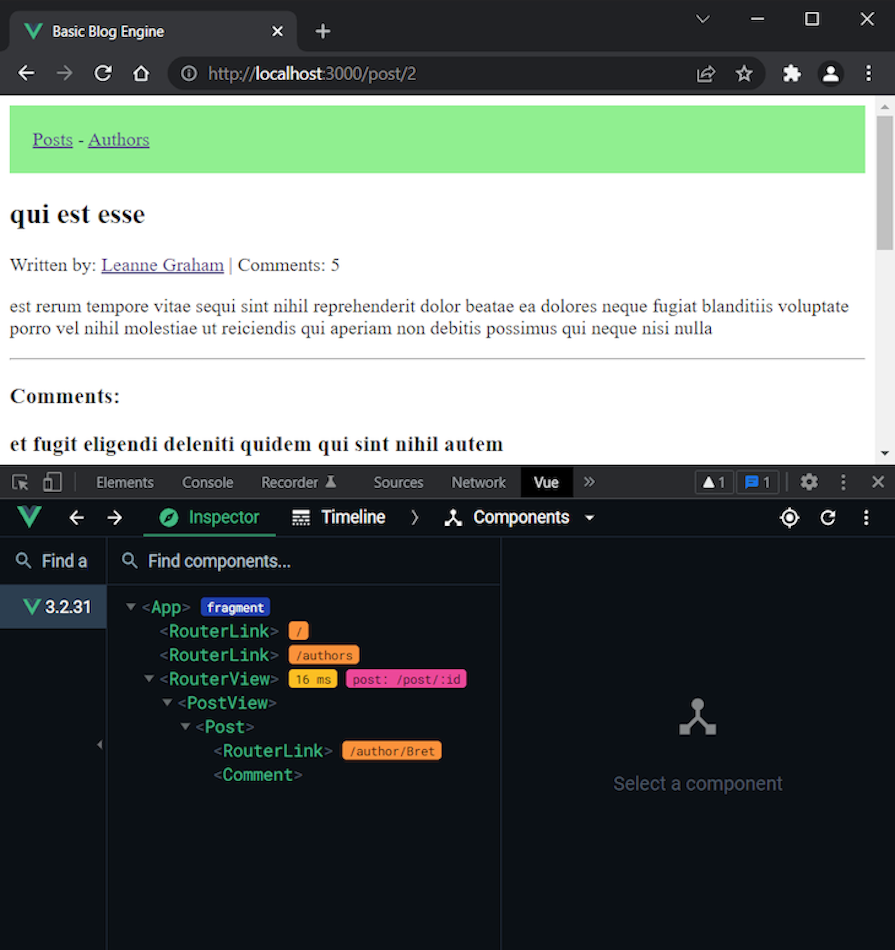
Now, let’s switch to the Components tab so we can explore the app components tree for the post view:
👁 Inspecting App Components Tree Via Vue Devtools In Components Tab
As we can see, the app starts with the two RouterLink components and the RouterView component defined in App.vue. Then, we have the single post view followed by the post component. At the end, there is another RouterLink and the comment component.
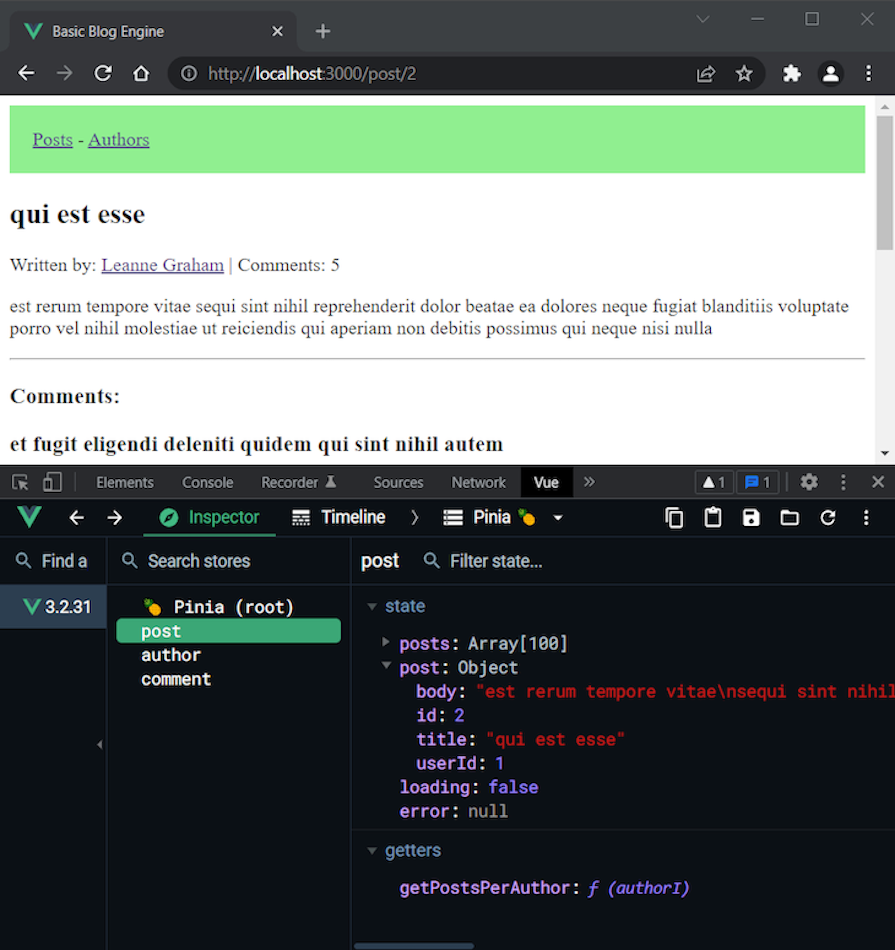
Let’s now see the stores, which is the interesting part. Pinia shows all stores used in the active component. In our case, we have all three because we use them all when we open a single post.
Here is the post store:
👁 Pinia Post Store In Vue Devtools
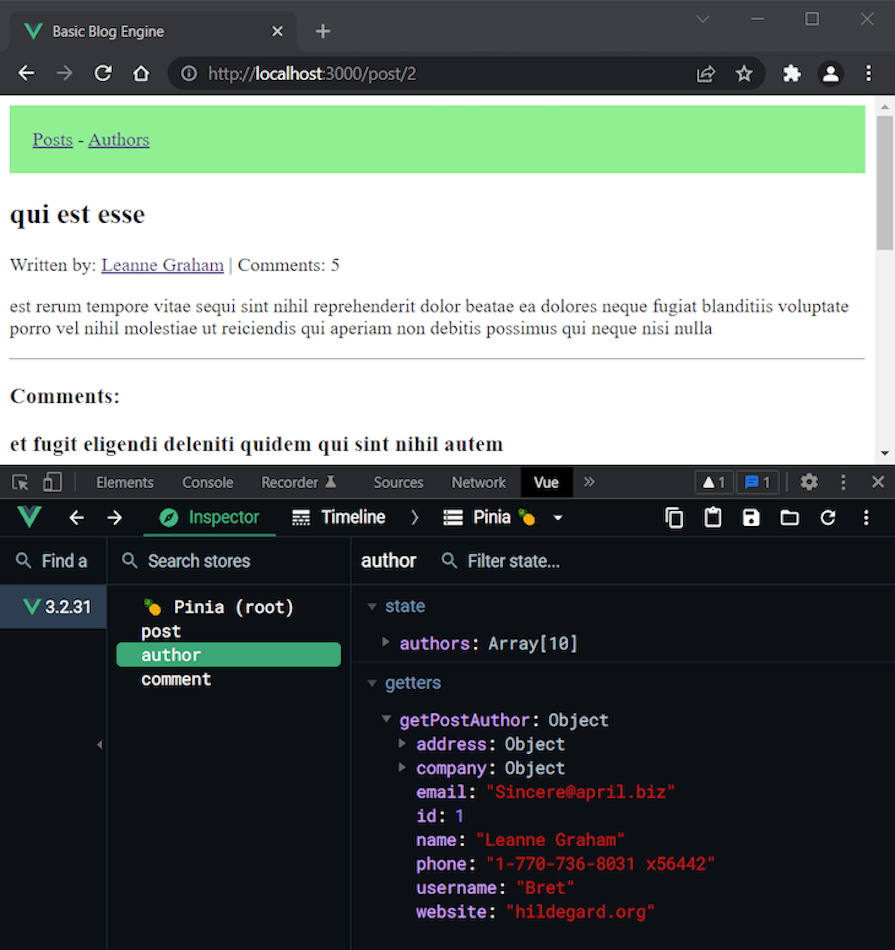
We can see that Pinia shows the correct opened post. The same is true for the author store:
👁 Pinia Author Store In Vue Devtools
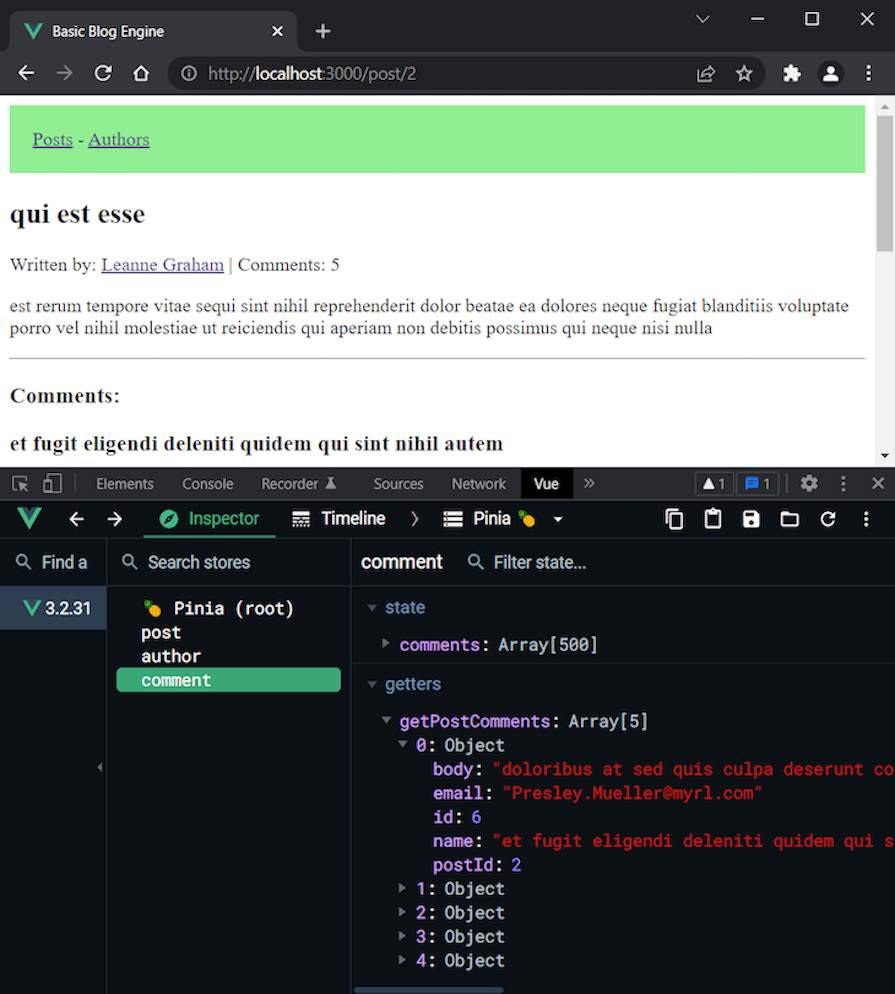
And finally, the comment store shows the comments:
👁 Pinia Comments Store In Vue Devtools
Again, we can see that the name of the first comment matches the one displayed in the browser. So, everything worked as expected.
Now you know how to create, use, and inspect Pinia stores.
State hydration in SSR refers to ensuring that the client-side state matches the server-side state during the initial page load. This involves serializing the initial state on the server and sending it to the client, where it is used to hydrate the client-side store.
On the client side, Pinia allows for optimized data fetching, enabling only necessary data to be loaded during the initial render. This reduces the payload size and speeds up the page load process.
Overall, Pinia facilitates seamless state hydration in Vue SSR, contributing to faster and more efficient page loads.
I’m pretty happy with the new official Vue state management tool. As we saw, it’s modular by design, easy to use, has a tiny footprint, and last but not least, it’s simple, flexible, and powerful. It’s really enjoyable to create stores with Pinia.
In this tutorial, we built a basic blog engine incorporating the main features Pinia provides (state, getters, and actions). Of course, the project can be extended further by adding CRUD functionality for the authors, posts, and comments, but this is out of the scope of this tutorial.
If you wish, you can try to implement such functionality by yourself to practice what you’ve learned. The JSONPlaceholder guide can help you with this job. You can find all the code written in this GitHub repository.
To further enhance your knowledge, exploring additional concepts is advisable, particularly for larger projects. For example:
For a more complex and real-world examples of Pinia usage, you can explore the Directus project’s code. Finally, make sure to check the Pinia docs to learn even more advanced ways to use it.
Debugging Vue.js applications can be difficult, especially when users experience issues that are difficult to reproduce. If you’re interested in monitoring and tracking Vue mutations and actions for all of your users in production, try LogRocket.
👁 LogRocket Dashboard Free Trial BannerLogRocket lets you replay user sessions, eliminating guesswork by showing exactly what users experienced. It captures console logs, errors, network requests, and pixel-perfect DOM recordings — compatible with all frameworks.
With Galileo AI, you can instantly identify and explain user struggles with automated monitoring of your entire product experience.
Modernize how you debug your Vue apps — start monitoring for free.
TSRX adds first-class control flow, conditional hooks, and scoped styles to React via a TypeScript compiler extension — no new framework required.
Learn how to build a full React Native auth system using Better Auth and Expo — with email/password login, Google OAuth, session persistence, and protected routes.
Compare the top AI development tools and models of June 2026. View updated rankings, feature breakdowns, and find the best fit for you.
Learn how Bloom filters reduce database lookups for username availability checks while preserving correctness at scale.
Would you be interested in joining LogRocket's developer community?
Join LogRocket’s Content Advisory Board. You’ll help inform the type of content we create and get access to exclusive meetups, social accreditation, and swag.
Sign up now