 |
VOOZH | about |
|
VOOZH | about |
If you’re building a medium to large-scale SPA, chances are you’ll run into situations where you want to better handle the state of your Vue components.
👁 Unit Testing Vuex Modules Web NocdnIn any application, multiple components depend on the same piece of state. Let’s imagine that multiple actions from different components would like to mutate the same state. To overcome these challenges, Vuex helps us to maintain state across the application.
In this article, I’ll guide you through implementing a Vuex module in TypeScript, then unit testing it using Jest. The complete code for this tutorial is available at the vuex-test GitHub repository; feel free to fork it. Let’s get started!
The Replay is a weekly newsletter for dev and engineering leaders.
Delivered once a week, it's your curated guide to the most important conversations around frontend dev, emerging AI tools, and the state of modern software.
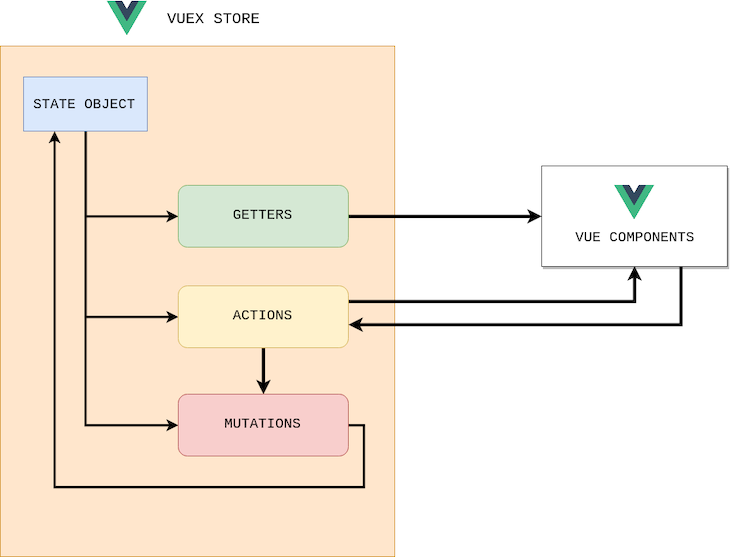
Vuex is a state management pattern and library for Vue applications that allows you to use centralized state management in your applications, helping you to take advantage of Flux-like architecture. The Vuex store contains four core concepts:
The state object contains the data you want to have in the store, including all your application-level state, serving as the single source of truth. The properties defined in the state can be any data type, including a string, number, object, or array.
If you’d like to have a derived state based on the store state, for example, counting the list of items, filtering the collection, or using the same set of derived state in other modules or components, you can define getters.
On the other hand, mutations are the only way we can change the state. Mutations are always synchronous, and the payload is optional. You can call a mutation via the commit, i.e., MUTATION_NAME or payload. It’s always recommended to call mutations from actions.
Actions can perform asynchronous operations and commit the mutations. Action handlers receive a context object that exposes the same set of methods or properties on the store instance.
You can use context.getters and context.state to get the state and context.commit to call mutations. You can call action handlers using action-name and payload, and they are called from other actions within the store.
As your application size increases, your store can become bloated. To prevent this, Vuex allows you to split the store into modules. Each module can contain its own state, getters, mutations, and actions.
As an example, let’s create an application for managing a to-do list. First, create a new module for to-do operations, which is responsible for getting all the to-do items and updating the state as needed.
Our goal is to build the module for medium to large-scale applications, therefore, it is better to split the mutation types, actions called functions, and the module implementation into separate files:
mutation-types.ts: Contains all the function namesactions.ts: Responsible for all asynchronous operationsindex.ts: The module implementationimport { IToDo } from '@/types/todo';
import {Module, VuexModule, Mutation, Action} from 'vuex-module-decorators';
import TodoActions from './actions';
import * as mutationTypes from './mutation-types';
@Module({namespaced: true, name: "Todos"})
export class ToDoModule extends VuexModule {
todos:Array<IToDo> = [];
loading = false;
get completedTodos(){
return this.todos.filter((todo:IToDo)=> todo.completed);
}
@Mutation
[mutationTypes.ON_FETCH_TODOS_STARTED]() {
this.loading = true;
}
@Mutation
\[mutationTypes.ON_FETCH_TODOS_SUCCESS\](data: Array<IToDo>) {
this.loading = false;
this.todos = data;
}
@Mutation
[mutationTypes.ON_FETCH_TODOS_FAILED]() {
this.loading = false;
this.todos = [];
}
@Action({rawError: true})
public async fetchTodos():Promise<void> {
try {
this.context.commit(mutationTypes.ON_FETCH_TODOS_STARTED);
const response: Array<IToDo> = await TodoActions.fetchTodos();
this.context.commit(mutationTypes.ON_FETCH_TODOS_SUCCESS, response);
} catch (error) {
this.context.commit(mutationTypes.ON_FETCH_TODOS_FAILED);
}
}
}
The code snippet above contains the following implementation:
fetchTodos Action: Fetches the to-do items from the REST API and commits the mutationsON_FETCH_TODOS_STARTED mutation: Updates the loading state attributeON_FETCH_TODOS_SUCCESS mutation: Updates the todos state arrayON_FETCH_TODOS_FAILED mutation: Resets the todos and updates loading as falsecompletedTodos getter: Gets only the to-do items that are completedWe’ll use the Jest framework for unit testing; Jest is simply a JavaScript testing framework that can be easily installed with any node-based package manager, like npm or Yarn. There are few advantages of using Jest, for example, Jest tests run in parallel, include built-in code coverage, and support isolated tests, mocking, and snapshot testing.
You can initialize the test by creating a store, attaching Vuex to Vue, and registering the store. localVue is the scoped Vue constructor that we can change without affecting the global Vue constructor. The code snippet below will initialize the store:
describe('Todos Module', function() {
 let store: any;
 let todosInstance: ToDoModule;

 beforeEach(function() {
 localVue.use(Vuex);
 store = new Vuex.Store({});
 registerStoreModules(store);
 todosInstance = getModule(ToDoModule, store);
 });

 it('should exists', function() {
 expect(todosInstance).toBeDefined();
 });
});
In the todos module, we created the fetchTodos action, which fetches data from a REST API and fills the state using mutations. Since the REST API is an external call, we can mock it using a Jest function, then validate whether it is being called and the state is being updated:
it('fetchTodos action should fill todos state', async function() {
 // arrange
 const todosMocked = todos as Array<IToDo>;
 // act
 jest.spyOn(TodoActions, 'fetchTodos').mockImplementation(
 (): Promise<Array<IToDo>> => {
 return Promise.resolve(todosMocked);
 }
 );
 await todosInstance.fetchTodos();
 // assert
 expect(todosInstance.todos.length >0).toEqual(true);
 expect(TodoActions.fetchTodos).toHaveBeenCalled();
});
Getter functions simply return the state object. In our example, we have one getter function, completedTodos, which should return the to-do items that are completed:
 it('completedTodos getter should return only completed todos', async function() {
 // arrange
 const completedTodos = todosInstance.completedTodos;
 // assert
 expect(completedTodos.every((todo:IToDo)=> todo.completed)).toEqual(true);
 });
As we already know, mutations are the only way to change the state. We can test the ON_FETCH_TODOS_SUCCESS mutation by sending mock to-do tasks and validating whether the state is modified.
The code snippet below is for the success mutation. The same applies for the started and error mutations too:
it('ON_FETCH_TODOS_SUCCESS mutation should update given todos', function() {
 // arrange
 const todosTest = [
 {
 userId: 13,
 id: 12,
 title: "Move to new city",
 completed: false
 },
 {
 userId: 15,
 id: 21,
 title: "Finish a novel",
 completed: true
 },
 ];
 // act
 todosInstance.ON_FETCH_TODOS_SUCCESS(todosTest);
 // assert
 expect(todosInstance.todos.length).toEqual(2);
 expect(todosInstance.todos).toEqual(todosTest);
 });
In this tutorial, we learned about Vuex by creating and unit testing a Vuex module with TypeScript and Jest. We covered the four core concepts of a Vuex store, including state, getters, mutations, and actions. With Vuex’s centralized state management, you can simplify your application and take advantage of Flux-like architecture.
I hope you learned something new, and be sure to leave a comment if you have any questions. Happy coding!
Debugging Vue.js applications can be difficult, especially when users experience issues that are difficult to reproduce. If you’re interested in monitoring and tracking Vue mutations and actions for all of your users in production, try LogRocket.
👁 LogRocket Dashboard Free Trial BannerLogRocket lets you replay user sessions, eliminating guesswork by showing exactly what users experienced. It captures console logs, errors, network requests, and pixel-perfect DOM recordings — compatible with all frameworks.
With Galileo AI, you can instantly identify and explain user struggles with automated monitoring of your entire product experience.
Modernize how you debug your Vue apps — start monitoring for free.
Learn how next-browser gives AI agents runtime context for debugging Next.js apps, including React props, hydration, PPR, forms, and performance.
Build dynamic LLM routing in Next.js with OpenRouter, TanStack AI, task classification, model fallbacks, and cost-aware routing.
TSRX adds first-class control flow, conditional hooks, and scoped styles to React via a TypeScript compiler extension — no new framework required.
Learn how to build a full React Native auth system using Better Auth and Expo — with email/password login, Google OAuth, session persistence, and protected routes.
Would you be interested in joining LogRocket's developer community?
Join LogRocket’s Content Advisory Board. You’ll help inform the type of content we create and get access to exclusive meetups, social accreditation, and swag.
Sign up now