 |
VOOZH | about |
|
VOOZH | about |
Data is constantly moving from one network to another. At some point, data needs to be stored, retrieved, shared, or deleted.
👁 Decentralized data storage using IPFS: A tutorial with examplesIn this tutorial, we’ll introduce you to the InterPlanetary File System (IPFS) and demonstrate how to upload and store data through a distributed file system.
To show IPFS in action with a practical example, we’ll build a DApp with a React frontend and connect it to IPFS to upload files and store the CID returned from IPFS to our application’s state.
Here’s what we’ll cover:
The Replay is a weekly newsletter for dev and engineering leaders.
Delivered once a week, it's your curated guide to the most important conversations around frontend dev, emerging AI tools, and the state of modern software.
IPFS, which stands for InterPlanetary File System, is a communication protocol that uses peer-to-peer networking to store, retrieve, and share data through a distributed file system mechanism.
IPFS is a decentralized, peer-to-peer file sharing protocol. The IPFS network runs on the web and uses content-addressed storage (CAS) to store data and retrieve it based on its content, not its location. IPFS uses this method to uniquely identify and fetch the data in question.
Using IPFS to store archival data enables deduplication, clustered persistence, and high performance on the posterity of the data.
When you upload data to a an existing node on the protocol, the data is chopped into smaller chunks of itself, then hashed and given a unique content identifier (CID), which serves as fingerprint. This makes it faster and easier to store the small pieces of your data on the network quickly.
Once the data is uploaded to the network, other nodes within the network update their nodes to contain a cached copy of the data. This way, they can also provide the data just like the initial node. It’s up to a node to keep and still provide this data or discard it, for example, as a way to save memory.
For every new upload of new data or previous uploaded data, a new cryptographic hash (CID) is generated, making every upload to the network unique and resistant to security breaches or tampering.
IPFS uses a decentralized naming system to find the name of the file — that’s the long CID string — then maps the CID to a more human-readable DNS name using DNSLink.
IPFS is available for anyone, not just blockchain developers, to use. That includes Web 2.0 developers, content creators, service providers, researchers, archivists, and so on. The major benefit to using IPFS, regardless of the use case, is that it provides a decentralized platform to store and work with your data.
Now that we understand what IPFS is and how the distributed file system works, let’s build an example frontend in React to connect to IPFS, where we will upload files and store the CID returned from IPFS to our application’s state.
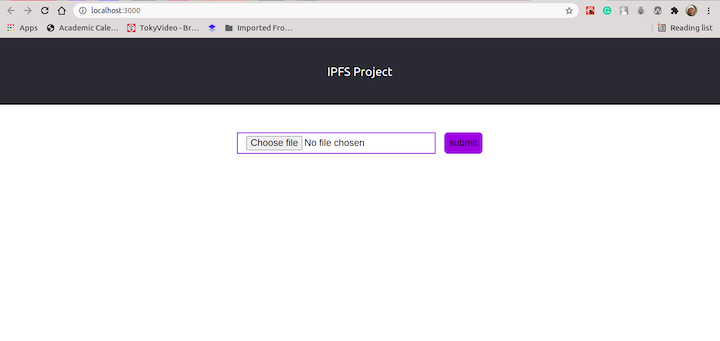
First, create a new React project using the npx create-react-app command. For this tutorial, we’ll name our project IPFS project.
npx create-react-app IPFS\ project
Change the directory to the newly created folder and delete any superfluous source files from the codebase. Then, update the /src/App.jsx file with the following JSX code snippet:
...
const App = () => {
 return (
 <div className="App">
 <form className="form" onSubmit={handleSubmit}>
 <input type="file" name="data" onChange={retrieveFile} />
 <button type="submit" className="btn">Upload file</button>
 </form>
 </div>
 )
}
...
The above code provides a form element. Inside the form element, we defined two additional elements: input and button. On the form element, we defined a function for the onSubmit event, handleSubmit.
We also defined within the handleSubmit function the sample code to upload the file we uploaded from our local machine to IPFS.
Lastly, we defined another function, retrieveFile, for the onChange event in the input element. This function will help us access the files when uploaded from the local machine.
👁 Uploading Files to an Example React App Using IPFS
Next, let’s define the above functions, starting with the retrieveFile function. Within the App component, define a retrieveFile function, as shown below:
...
const App = () => {
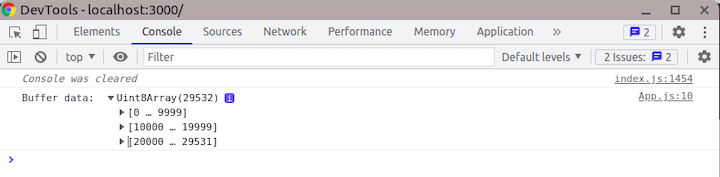
const retrieveFile = (e) => {
const data = e.target.files[0];
const reader = new window.FileReader();
reader.readAsArrayBuffer(data);
reader.onloadend = () => {
console.log("Buffer data: ", Buffer(reader.result));
}
e.preventDefault();
}
return (
<div className="App">
...
</div>
)
}
...
Once the file is uploaded, we’ll retrieve the data from the e.target.files array and then pass it into a FileReader object.
With the FileReader object, we can asynchronously read the content of the data we uploaded from the local machine. With Buffer(reader.result), we can convert the result into an array of Uint8Array data:
Now let’s update the App component to store this data in the application state using the React Hook useState.
...
import { useState } from "react";

const App = () => {
 const [file, setFile] = useState(null);
 const retrieveFile = (e) => {
 ...
 reader.onloadend = () => {
 setFile(Buffer(reader.result));
 }

 e.preventDefault();
 }
 return (
 <div className="App">
 ...
 </div>
 )
}
...
Now let’s create the second function, handleSubmit. This function will handle the task of uploading to IPFS the data we uploaded and processed from the local machine.
Before creating the function, let’s cover the available types of IPFS gateways to access the IPFS networks. The gateways available for use are Infura, Pinata and Fleek. Some of these gateways are free while some are not. Also, some offer read-only access while others offer both read and write access.
For this tutorial, we need a read and write access gateway because we’ll be uploading and also fetching data from IPFS. We’ll use Infura for the purpose of this demonstration.
Next, install the ipfs-http-client library, which enables us to connect to Infura.
yarn add ipfs-http-client
Update the App component with the following code snippet:
...
import { create } from "ipfs-http-client";

const client = create('https://ipfs.infura.io:5001/api/v0');

const App = () => {
 ...
 const [urlArr, setUrlArr] = useState([]);
 ...
 const handleSubmit = async (e) => {
 e.preventDefault();
 try {
 const created = await client.add(file);
 const url = `https://ipfs.infura.io/ipfs/${created.path}`;
 setUrlArr(prev => [...prev, url]);
 } catch (error) {
 console.log(error.message);
 }
 };

 return (
 <div className="App">
 ...
 </div>
 )
}
...
In the above code, we created a client instance using the imported create function provided by the ipfs-http-client library. Then, using the client.add function, we uploaded our data to IPFS.
The response from this action returns an object that contains the CID of the uploaded data. Using the https://ipfs.infura.io/ipfs/ URL plus the path key/pair value stored on the created object, we can retrieve the uploaded data from IPFS and store it in the urlArr state.
Update the UI JSX code to display the returned URLs that was stored in the urlArr state after we uploaded them from the local machine to IPFS.
...
const App = () => {
...
return (
<div className="App">
...
<div className="main">
...
</div>
<div className="display">
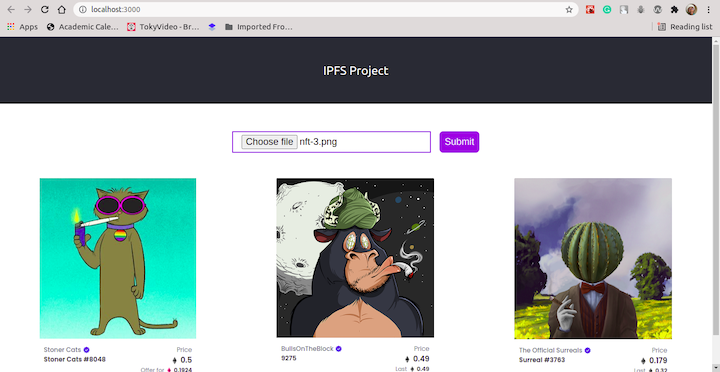
{urlArr.length !== 0
? urlArr.map((el) => <img src={el} alt="nfts" />)
: <h3>Upload data</h3>}
</div>
</div>
)
}
Next, upload some data (we’ll use pictures for this demonstration) from your local machine to IPFS, thereby adding it to the UI when fetched back from IPFS:
👁 Uploading Files to an Example React App Using IPFS
In this tutorial, we covered what IPFS is, how it works, and how to connect to the P2P network using the available gateways. We built a sample project that uploads a file from the local machine to IPFS, then retrieves and stores the returned path to the file in our application.
You can use IPFS to build all kinds of things — as a next step, you might consider building a blogging platform, a shopping cart, or a remote repository to store codebases. The possibilities presented by IPFS go far beyond storing just data.
The code used in this tutorial is available on GitHub.
Install LogRocket via npm or script tag. LogRocket.init() must be called client-side, not
server-side
$ npm i --save logrocket

// Code:

import LogRocket from 'logrocket';
LogRocket.init('app/id');
// Add to your HTML:

<script src="https://cdn.lr-ingest.com/LogRocket.min.js"></script>
<script>window.LogRocket && window.LogRocket.init('app/id');</script>
AI tools generate working React code fast, but miss race conditions, empty states, debouncing, and accessibility. Here’s how to catch bugs before production.
Learn how to use Gemini CLI subagents to delegate frontend, backend, testing, and docs tasks to specialized agents with guardrails and clear ownership.
Learn how next-browser gives AI agents runtime context for debugging Next.js apps, including React props, hydration, PPR, forms, and performance.
Build dynamic LLM routing in Next.js with OpenRouter, TanStack AI, task classification, model fallbacks, and cost-aware routing.
Would you be interested in joining LogRocket's developer community?
Join LogRocket’s Content Advisory Board. You’ll help inform the type of content we create and get access to exclusive meetups, social accreditation, and swag.
Sign up now