 |
VOOZH | about |
|
VOOZH | about |
Editor’s note: This article was last updated on 1 September 2023 to include tips for optimizing your IDEA for React Native and to update information on the Visual Studio Code editor.
👁 How To Choose The Best IDE For React NativeSince its initial release in 2015, React Native has gained significant popularity as a framework for developing apps that work on multiple platforms. This framework is known for its thriving community, a wide range of libraries and frameworks, and the availability of component libraries that support native features.
All these features make it easier for developers to work with React Native and improve their overall development experience. Additionally, the dev community is continuously creating Integrated Development Environments (IDEs) and IDE extensions to enhance the development process of React Native applications. IDEs are software applications that provide a complete set of tools and functionalities to make the development of computer programs, software applications, and websites easier.
With so many IDEs to choose from, it can be challenging to decide which option will best support your workflow. Let’s look at how to choose the best IDE for developing native apps with React Native and compare some popular options.
Jump ahead:
We will also use a sample React Native project to help us better understand how these IDEs can help us speed up our development in React Native.
The Replay is a weekly newsletter for dev and engineering leaders.
Delivered once a week, it's your curated guide to the most important conversations around frontend dev, emerging AI tools, and the state of modern software.
When developing with React Native, an IDE that robustly supports JavaScript and JSX is crucial. To help you select the right React Native IDE, here are some important factors to consider:
In the following sections, we will explore popular IDEs like VS Code, WebStorm, and IntelliJ IDEA to see how they meet this criteria, offering other useful features that contribute to a productive React Native development environment.
Visual Studio Code, also known as VS Code, is a lightweight and open source code editor developed by Microsoft. Its features include debugging support, syntax highlighting, intelligent code completion, snippets, code refactoring, and embedded Git. This editor is available for Windows, Linux, and macOS operating systems.
Here are some of the key features of Visual Studio Code include:
Technically, VS Code is a code editor rather than an Integrated Development Environment (IDE). While IDEs combine different development tools (such as code editors, compilers, and debugging tools) into a single integrated environment, code editors are primarily focused on code editing tasks. They are highly customizable, versatile, and accessible, making them suitable for a variety of workflows. However, installing extensions in VS Code can typically provide additional functionality, effectively making it an IDE.
According to the 2023 Stack Overflow Developer Survey, developers have chosen VS Code as their preferred IDE. This powerful tool offers a user-friendly interface that is easily customizable for individual preferences. With support for multiple themes, users can personalize their experience. Plus, new features are released on a monthly basis, ensuring the best possible development experience.
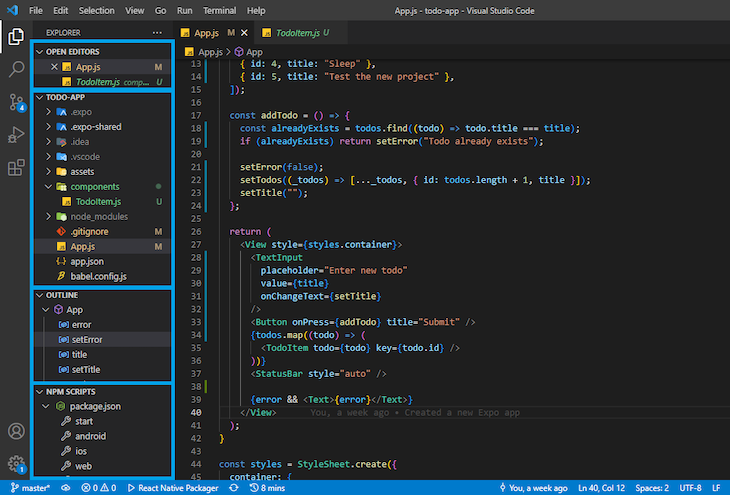
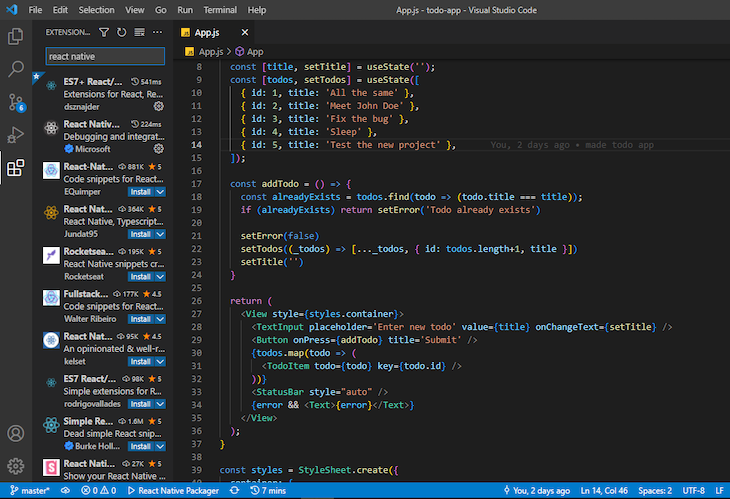
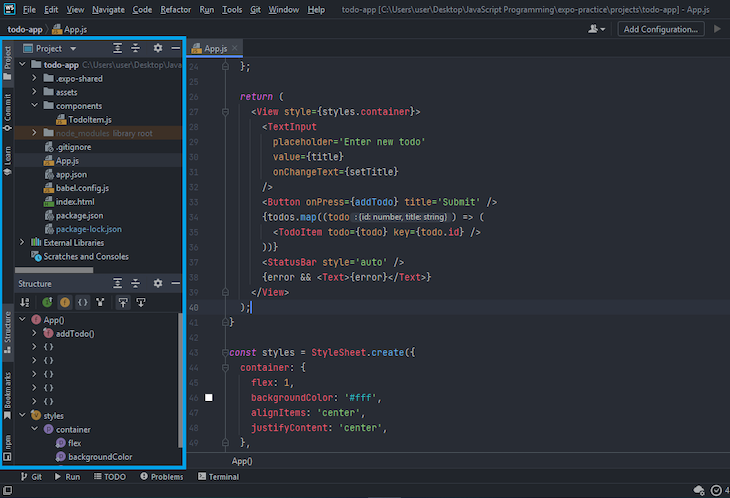
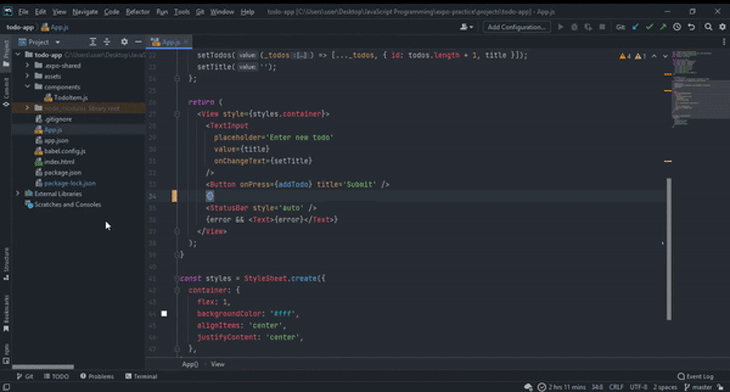
In the VS Code sidebar is an explorer that contains all the files and directories in your current project. The explorer also contains a list of open files, an outline of the code structure in the current file for easy navigation, and other relevant project information.
Take a look at how the sample React Native project looks in the VS Code Explorer below. I have used blue boxes to highlight various sections in the sidebar:
👁 VS Code With Blue Boxes At Left Sidebar Showing Various Sections In Explorer
The content that appears in the NPM Scripts section depends on the scripts in your package.json file. You can use this section to run your React Native project with a click of a button. The sidebar can be moved left or right and made hidden or visible.
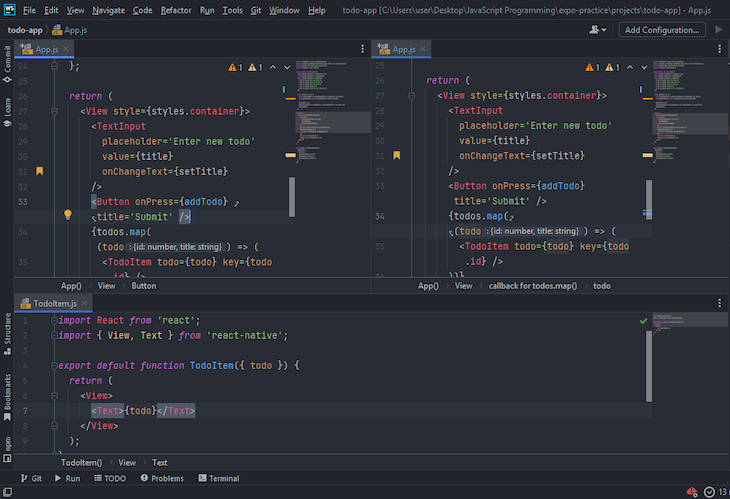
Another thing to look out for in VS Code is the text editor. Apart from having a simple file opened, you can split files into groups, as well as split the editor panel into different sections at the top, bottom, left, and right of your screen.
For example, a single file can be split into separate sections where each section scrolls independently, but any changes made in one section will reflect in the other. I find this feature useful for styling: I can display the styles I have created in one section, while the other section displays the components. That way, I pass the styles appropriate to each component without constantly scrolling up and down.
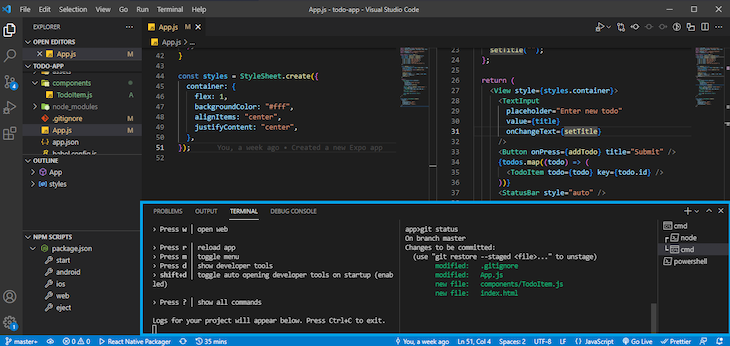
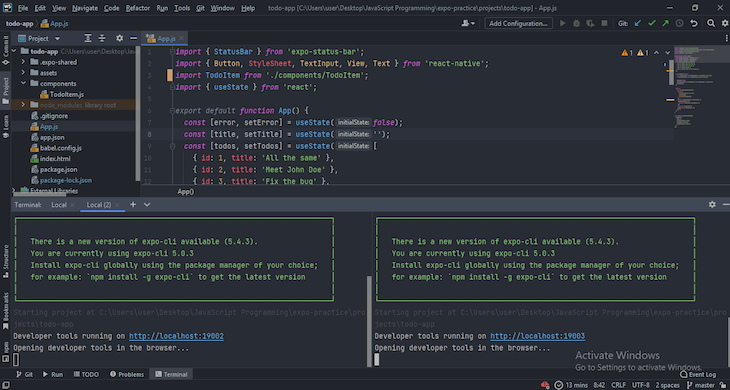
VS Code also contains an integrated terminal, which you can use to create multiple terminals or split the terminal view into two sections.
👁 VS Code Integrated Terminal, Shown In A Blue Box At Bottom Of VS Code App.js File
Other notable VS Code features include:
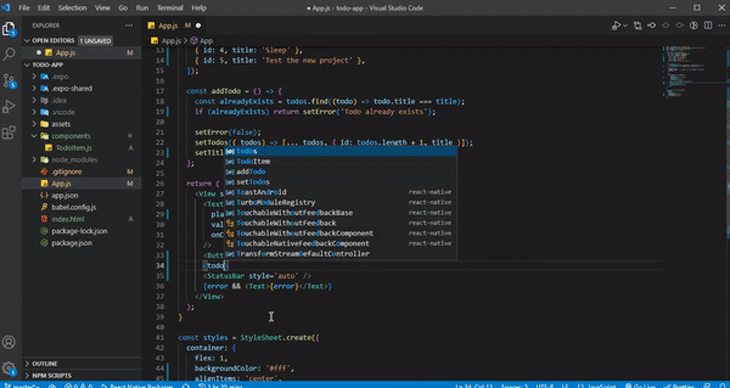
VS Code has tons of built-in features that help make it a very powerful IDE. One major feature that supports VS Code’s performance and ease of use is IntelliSense.
IntelliSense is a feature commonly found in integrated development environments (IDEs) and code editors that provides context-aware code autocompletion and code suggestions as you write or edit code. It has built-in support for React Native languages (JavaScript, TypeScript, JSON):
👁 User Shown Typing In VS Code With IntelliSense Providing Info And Suggestions In Popup Box
As you work on your code, IntelliSense offers helpful suggestions for code completion and parameter information. It can even deduce the type of a parameter.
IntelliSense also provides intelligent suggestions and snippets as you type. Snippets are pre-built templates that can accelerate your development, and you can customize your own for frequently used React Native code. Furthermore, there are extensions available that provide a plethora of React Native snippets for repetitive code occurrences, such as generating a new component or stylesheet template.
Another valuable feature of IntelliSense is its hover function. By hovering over a piece of code, you can view a brief description that includes inferred types and links to pertinent documentation or where that code is declared.
Code actions are another performance feature for improving your code quality. After selecting a piece or block of code, you can see source code refactorings and quick fixes for detected issues, such as renaming variables, converting functions, and more.
Oftentimes, you’ll find that you need to change a filename or variable name that is used across multiple files. VS Code’s “find and replace” function is a great way to do so. The function searches for all occurrences of a keyword and replaces it with a new word. Normally, changing the name of a file, variable, function, or component will prompt VS Code to change the name wherever it’s used in the project.
React Native provides a means of debugging your code in the browser, but it is often more convenient if you can debug your code right in your editor.
VS Code comes with an built-in, advanced debugger, and setting up this debugger for your React Native project is quite easy. Once set up, you can easily run and debug your project together with a single click and step over, step into, step out, pause, restart, and stop the debugger.
You can also easily toggle breakpoints for any line of code in your file, just like you would in Google’s Chromium browser. And finally, there’s a debug console where you can view logged messages. Logged messages are powered by Logpoints. Unlike breakpoints, they log custom messages in the debug console rather than break into the debugger.
A Version Control System, or VCS for short, is a software tool that helps developers manage changes to their codebase over time. It tracks and manages different versions of a project’s code and allows for collaboration among team members. It’s essential for maintaining codebase integrity and consistency over time.
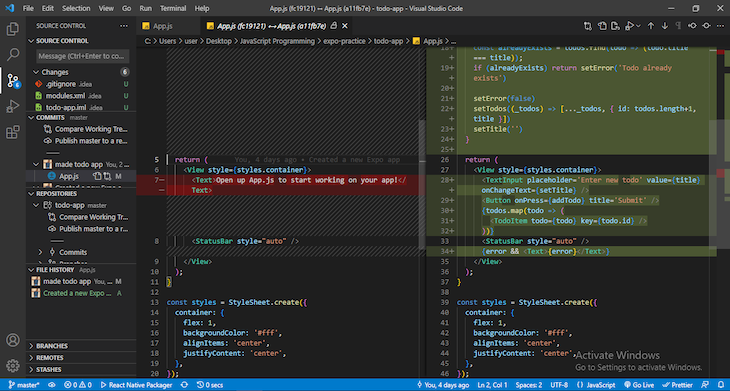
Visual Studio Code includes integrated Git support, eliminating the need to download a separate Git client and making it simple to manage your source code using Git. Furthermore, VS Code has extensions that support multiple VCSs, including Subversion, Mercurial, and Perforce:
👁 VS Code Version Control System In Action
This feature enables you to easily perform tasks such as initializing and cloning Git repositories, making unstaged changes, staging and committing files, comparing commits and staged files, creating branches, and much more.
Several extensions improve VS Code’s code management capabilities through Git. Some extensions provide commit/stage information for each line of code in your file, while others allow you to connect your GitHub with VS Code and assist you in tracking your project’s issues from GitHub, among other features.
With all the built-in features VS Code offers, we could easily call it a day and have a good enough dev experience. However, VS Code is mostly popular because of its extensibility through extensions made by individual developers and teams:
👁 Search Results Within VS Code Showing React Native Extensions
There are hundreds of React Native extensions in VS Code that contribute to simplifying React Native app development with VS Code. The image above shows a small sample of the search results for React Native extensions in VS Code.
Here are a few types of extensions you might find useful in your React Native project:
Extensions in VS Code are not reviewed before being published, so you should keep this in mind when installing extensions. A badly written extension can slow down your VS Code’s performance, causing a bad dev experience.
WebStorm, developed by JetBrains, is a widely used IDE that offers robust support for JavaScript, TypeScript, and React Native. This IDE is adaptable to a variety of JavaScript development tasks, providing features such as syntax highlighting, linting, and code completion.
WebStorm seamlessly integrates with popular tools and technologies like Git, Node.js, and npm, and its vast community of users and developers provides support when needed. Although WebStorm costs $59 for individuals in the first year, it is well worth the investment.
While VS Code is popular among developers, it is primarily a code editor, making it less suitable for larger projects. On the other hand, WebStorm offers many built-in features that are valuable for projects of any size. Some users, including students and open source developers, can obtain a free license for WebStorm and other JetBrains IDEs, making it a compelling option to consider.
Before dismissing it due to cost, it’s worth exploring how WebStorm can significantly enhance your development experience.
Like every JetBrains IDE, WebStorm’s UI is customizable and simple to use. You could easily move any panels or bars around as you please. WebStorm also provides support for any other theme to be used, including customized themes.
Just like VS Code, the WebStorm sidebar contains a list of files and directories of your current project. This sidebar also contains a section that outlines the structure of the code blocks in your file. You can use this section to easily navigate across your files.
Another way to navigate within WebStorm is with the section listing out the bookmarks and breakpoints in your code. You can bookmark a line of code and navigate to it when needed:
👁 WebStorm UI With Navigation Panel On Left
Like in VS Code, there is an npm scripts section in the sidebar that lets you run npm script commands available in your package.json. Each section of this sidebar can be dragged and dropped to the top, bottom, left, or right of the editor, and be made visible or hidden.
The editor in WebStorm can be split into top, bottom, left, and right sections. A single file can also be split into different sections, so you can easily work on different sections of your file without having to scroll up and down:
👁 WebStorm Text Editor Shown Split Into Three Panels
WebStorm also has an integrated terminal with which you can open multiple terminals or split an open terminal into multiple sections:
👁 WebStorm Integrated Terminal Shown Split Into Left And Right Panels
If these features sound familiar, it’s because you can find them built-in or as extensions in VS Code. However, while you may need extensions to use VS Code as an IDE, most or all of the features you need are built into WebStorm.
We could spend a whole day talking about the built-in features of WebStorm and still wouldn’t cover it all. Breadcrumbs, line wrapping, attaching multiple projects, saving files, TODO comments, multiple cursors, and more all exist in WebStorm. These built-in features give WebStorm an edge over free options such as VS Code, especially when it comes to large projects.
WebStorm makes it easy to generate a new React Native project with all the required files and dependencies with just a few clicks instead of searching for the command to get a new project up and running.
As you code, code completion features for JavaScript contribute to a great dev experience in WebStorm. These features include:
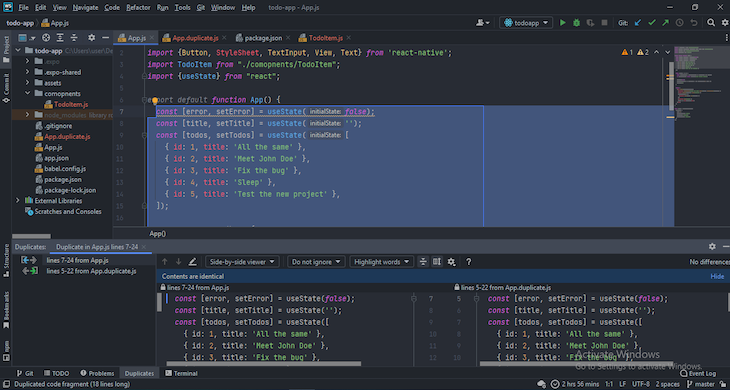
WebStorm can detect issues as you code, such as redundancies, and provide fixes. It can also detect duplicates and provide safe refactorings for your selection of code, if available:
👁 User Typing In WebStorm While A Popup Displays Information
You can view parameter info in a popup in WebStorm. This popup contains information about the available parameters, including their inferred data types.
WebStorm can infer a type for a parameter and will throw a warning indicator when a wrong data type is used. When you hover over the warning indicator, it provides more information about why the argument’s type isn’t suitable for the given parameter.
Similarly, hovering over all other warning and error indicators will provide more information and quick fixes, if available. Examples of warnings with quick fixes in WebStorm include unused variables, unused imports, redundancies, data type conflicts, and more.
Finding issues and providing quick fixes in WebStorm is very common. This is made possible with an already-installed lint plugin.
As with parameter info, WebStorm also provides props info for various components and will throw a warning indicator if required props of custom components are missing. WebStorm also infers data types for component props.
When you hover over a keyword, variable, method, or component, WebStorm provides a brief description of what that code stands for. It also provides a link to the documentation if available. There is also a jump-to-source function that lets you jump to the source code you hovered over. Jumping to the source is not limited to the code you write; for example, you can jump to where the Text component from React Native is declared.
In WebStorm, auto-imports and autocompletion function similarly to VS Code, but they’re quicker and more advanced. Another built-in feature is auto-tag completion, which allows you to rename opening and closing tags concurrently.
WebStorm also offers duplicated code fragment inspection to help you avoid code repetiion, impvoring code management. When duplicates are detected, a warning indicator is displayed. Just hover over the warning indicator to view where else that block of code has been used so you can make necessary adjustments. Additionally, WebStorm’s duplicate panel is customizable, allowing for detection based on specific conditions:
Some safe refactorings supported in WebStorm are file renaming, variable renaming, converting arrow functions to named functions, and joining variable declarations.
Renaming a variable or file automatically renames any occurrences of that variable name or filename. Multiple occurrences or conflicts with renaming will often trigger a confirmation that tells you where the occurrences are.
There are many other cool performance features in WebStorm, including:
WebStorm offers a lot of flexibility for debugging React Native applications, with plenty of built-in functions available. When set up, you can easily run or debug your application in a simulator or physical device with the click of a button.
By default, WebStorm relies on Chrome and other Chromium-based browsers for debugging JavaScript code; as you run the debugger, a Chrome window will open and attach to WebStorm. If you don’t want the Chrome window, you will have to set up Chrome headless.
Just like in VS Code and Chromium browsers, you can easily toggle breakpoints for any line of code. You can step over, step into, step out, pause, restart, and stop the debugger session.
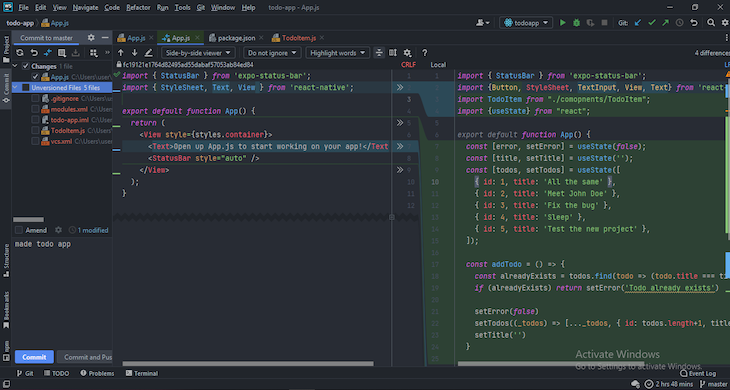
In WebStorm, you can easily attach a VCS to your React Native project. Once enabled, you can perform multiple operations like commit, compare changes, show history, create and read or delete branches, push or pull, stash or unstash changes, and more.
By default, VCS integration is enabled in WebStorm at the IDE level through a set of bundled plugins. WebStorm also provides helpful documentation about version control:
👁 WebStorm VCS Shown Enabled And Active
When you install WebStorm, there are some plugins that are already installed and enabled, including some of the features listed above. However, there are other plugins available that make WebStorm extensible.
Plugins are not required in WebStorm, but there are some that are recommended for development in JavaScript, including:
You can easily disable the ones you don’t want, but chances are good that you’d need most of them.
You can also install plugins from the marketplace that were built by individuals or teams. These plugins are validated by JetBrains before being published, so you don’t need to worry too much about badly written plugins.
There are many other IDEs for React Native. These options can be useful and may have additional features beyond those a React Native developer might need. However, most tend to be similar to VS Code and WebStorm.
Let’s briefly another popular React Native IDEs: IntelliJ IDEA. Because we have already reviewed performance and ease of use, debugging, VCS, and extensibility in VS Code and WebStorm, we will focus on some distinguishing features of IntelliJ IDEA.
IntelliJ IDEA is an IDE for Java development and other JVM languages like Kotlin. It is an intelligent IDE from JetBrains and has the same easy-to-use UI as WebStorm.
The IntelliJ IDEA Community Edition is free and open source, while IntelliJ IDEA Ultimate requires you to purchase a license after a free 30-day trial. If you’ve already purchased a license for WebStorm, you don’t need to purchase a new one for IntelliJ IDEA Ultimate.
IntelliJ IDEA Ultimate comes with all the features of WebStorm, such as built-in support for JavaScript and other related technologies. It also comes with app development features you may not need as a React Native developer.
To optimize your productivity and development experience when working with React Native, it’s important to optimize your IDE. Here are some tips and recommendations to help you streamline your React Native development environment:
Optimizing your IDE for React Native development is an ongoing process. It is advised to customize your environment based on your workflow.
Choosing an Integrated Development Environment IDE can be a daunting task, given the number of options available. However, selecting the right IDE is crucial to maximize your productivity.
If you’re looking for a free option with a large community, then I’d recommend VS Code. It’s a great choice for most projects. On the other hand, if you’re working on a large, complex project and don’t mind paying for advanced features, then WebStorm or IntelliJ IDEA are excellent options.
It’s important to note that the decision ultimately comes down to your personal preference and requirements. There’s no right or wrong choice when it comes to IDEs. What matters is choosing the one that suits your needs and helps you be more productive.
Thank you for reading, and happy coding!
LogRocket's Galileo AI watches sessions for you and and surfaces the technical and usability issues holding back your React Native apps.
LogRocket also helps you increase conversion rates and product usage by showing you exactly how users are interacting with your app. LogRocket's product analytics features surface the reasons why users don't complete a particular flow or don't adopt a new feature.
Start proactively monitoring your React Native apps — try LogRocket for free.
Learn how next-browser gives AI agents runtime context for debugging Next.js apps, including React props, hydration, PPR, forms, and performance.
Build dynamic LLM routing in Next.js with OpenRouter, TanStack AI, task classification, model fallbacks, and cost-aware routing.
TSRX adds first-class control flow, conditional hooks, and scoped styles to React via a TypeScript compiler extension — no new framework required.
Learn how to build a full React Native auth system using Better Auth and Expo — with email/password login, Google OAuth, session persistence, and protected routes.
Would you be interested in joining LogRocket's developer community?
Join LogRocket’s Content Advisory Board. You’ll help inform the type of content we create and get access to exclusive meetups, social accreditation, and swag.
Sign up now